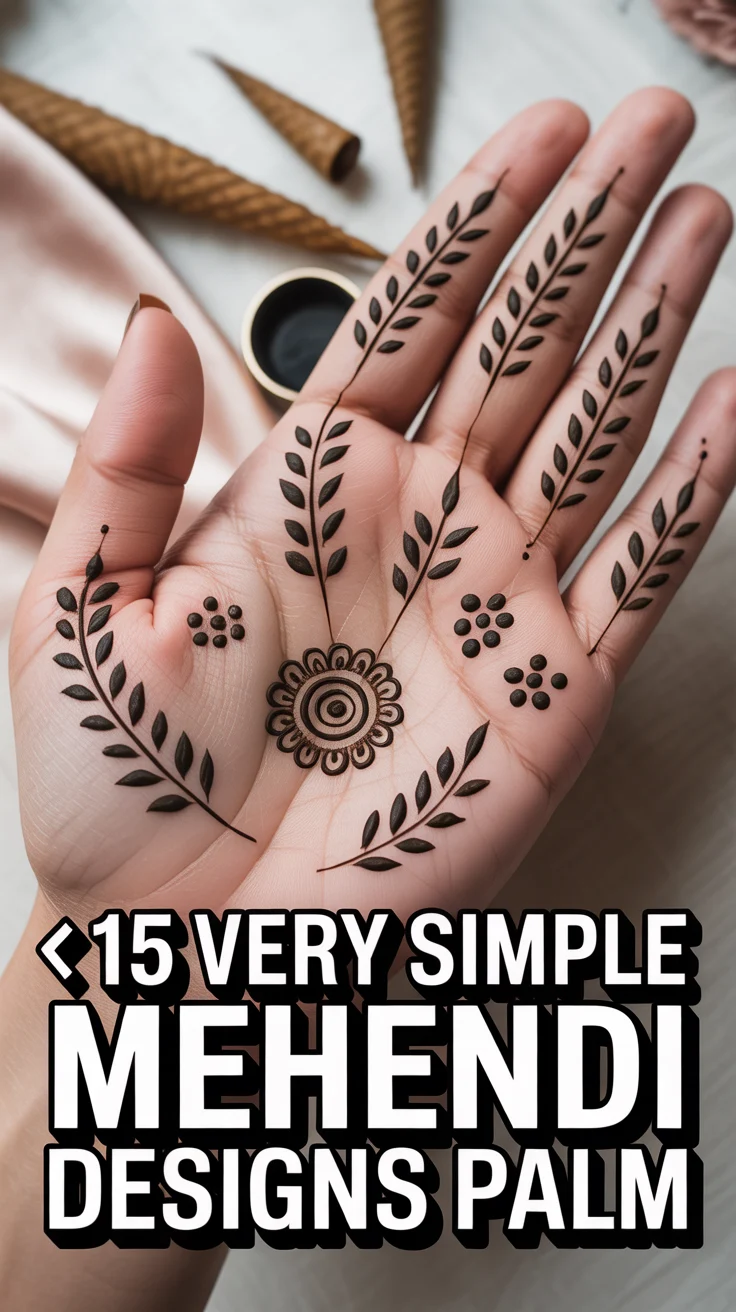
🟠 15 Very Simple Mehendi Designs Palm
🛠️ The Ultimate Maker's Toolkit
I've tested thousands of craft tools over the years. Whether you are quilting, crafting, or building mixed-media art, these are the top 5 absolute non-negotiable tools I personally recommend to guarantee professional results.
🪡 SINGER Heavy Duty 4452 Sewing Machine
The sewing community highly recommends this as the ultimate "bulletproof" entry-level machine. Its heavy metal frame powerfully pushes through thick denim and heavy quilt layers that would instantly jam a standard plastic machine.
✂️ Fiskars 8" Orange-Handled Scissors
Never settle for dull dollar-store blades. Wirecutter repeatedly names Fiskars the absolute best all-purpose craft scissor due to its legendary precision-ground blades and an ergonomic grip that prevents hand-cramping.
🔥 Gorilla Dual Temp Hot Glue Gun
Named Wirecutter's top choice because it literally does the work of two tools. It features dual-temperature settings offering low heat for delicate florals and blistering high heat for heavy wood adhesion repairs.
🖌️ Mod Podge Waterbase Gloss Sealer
The absolute undisputed champion of decoupage and paper crafts. Experts rely exclusively on this exact water-based formula because it glues, seals, and finishes beautifully without yellowing or flaking over time.
🎨 Apple Barrel Acrylic Paint (2 oz)
The quintessential, incredibly inexpensive craft paint. Woodworkers and hobby painters swear by its smooth flow and matte finish, providing massive value and remarkably thick color coverage on rough surfaces.
Need mehendi that looks cute without taking forever No drama, just pretty palms. These ideas are beginner-friendly, super quick, and still get compliments from aunties and Insta alike. Grab your cone, take a deep breath, and let’s make your hands look like art with minimal effort.
1. Dotted Mandala Pop
Start with a small circle and surround it with tidy dots. It’s simple geometry but looks elegant. Keep the dots evenly spaced for a neat finish.
Key points:
- Center circle with layered dot rings.
- Works on any palm size.
- Zero fuss symmetry.
Pro tip: Use the cone tip lightly for tiny, crisp dots. Practice on paper first.
Why it works It frames the palm beautifully without crowding.
2. Half-Moon Wrist-to-Palm Sweep
A curve from wrist to mid-palm with tiny leaves. It’s airy and chic. Think minimalist vine meets crescent moon.
Key points:
- One sweeping curve as the base.
- Leaf flicks on one side only.
- Negative space adds elegance.
Pro tip: Keep leaf tips sharp by lifting the cone quickly at the end.
Why it works The asymmetry looks modern and clean.
3. Mini Checkerboard Grid
Draw a small grid square and fill alternating boxes with dots. Cute and graphic. Great for beginners who like neat lines.
Key points:
- 3×3 or 4×4 grid for control.
- Alternate fills dots or mini diagonal lines.
- Place it near the base of the palm.
Pro tip: Use light pressure for thin grid lines, heavier for fills.
Why it works It’s balanced, structured, and looks fancy with minimal time.
4. Tiny Paisley Cluster
Three small paisleys grouped like a floral. Add micro dots around. So easy, so pretty.
Key points:
- Three paisleys of varying sizes.
- Dot halo to finish.
- Place at palm center or side.
Pro tip: Outline first, then fill one with lines for texture.
Why it works The cluster gives depth without complexity.
5. Finger Tip Bands
Skip the palm, glam the fingertips. Simple rings and tiny motifs. Minimal effort, big payoff.
Key points:
- Two bands per fingertip.
- Mini diamonds or dots between bands.
- Uniform spacing for a polished look.
Pro tip: Rest your hand on a table to keep lines straight.
Why it works Your hands look ornate while staying ultra-light.
6. Sunburst Palm Center
Circle in the center with radiating lines and dots. Think sunshine vibes. Clean, bold, and quick.
Key points:
- Small circle core.
- Even rays with dot tips.
- Keep rays thin for elegance.
Pro tip: Mark four main rays first, then fill in the rest between.
Why it works Perfect symmetry draws the eye instantly.
7. Mini Flower With Leaf Trail
One small flower anchored by a leaf chain. Sweet and delicate. Great for casual events or daily wear.
Key points:
- Five-petal flower with dot center.
- Leaves along a curved stem.
- Place diagonally for flow.
Pro tip: Thicken just one side of the stem for depth.
Why it works It feels natural and graceful without being busy.
8. Bracelet and Charm Drop
Draw a wrist bracelet and a tiny charm hanging into the palm. Cute jewelry effect. Looks intentional and stylish.
Key points:
- Simple chain bracelet line.
- Single charm heart, star, or paisley.
- Keep proportions small.
Pro tip: Use tiny dots to mimic a chain instead of a solid line.
Why it works It frames the hand and feels modern.
9. Leafy S-Scroll
One S-shaped vine with tiny leaves. Elegant with a single stroke vibe. Great for absolute beginners.
Key points:
- Single S curve through the palm.
- Leaves alternate left and right.
- Optional dot accents.
Pro tip: Keep leaf bases thin and tips sharp for finesse.
Why it works The flow flatters every hand shape.
10. Minimal Net With Rosebud
Small net patch topped with a baby rose. Soft and feminine. A tiny detail that looks intentional.
Key points:
- Diagonal net 4–5 lines each way.
- Rosebud made with two curved petals.
- Place near thumb pad for balance.
Pro tip: Keep net intersections clean by pausing at each cross.
Why it works Texture plus a focal point equals instant elegance.
11. Heart Chain Trail
Tiny hearts linked by dots across the palm. Cute without being childish. Minimal lines, maximum charm.
Key points:
- Three to five hearts in a curve.
- Dot connectors for softness.
- Leave space around the trail.
Pro tip: Draw hearts as two teardrops meeting at a point for symmetry.
Why it works It’s playful and reads clearly from a distance.
12. Thumb Arch Vine
A vine hugging the thumb curve. Subtle and graceful. Perfect if you want a side-peek design.
Key points:
- Arch along the thumb pad.
- Micro leaves or buds.
- Light dot sprinkling.
Pro tip: Angle the leaves toward the nail for a lifted look.
Why it works It adds detail without cluttering the palm.
13. Teardrop Cascade
Layered teardrops flowing downward. Simple strokes, mesmerizing vibe. Great for quick fixes.
Key points:
- Three layers max.
- Smallest teardrops at the edges.
- Dot borders to finish.
Pro tip: Start big, then reduce size for a cascading effect.
Why it works The gradient gives movement and depth fast.
14. Tiny Starburst Cluster
Three mini starbursts sprinkled near the center. Minimal lines, lots of sparkle. Think celestial chic.
Key points:
- Short cross lines with dot ends.
- Cluster tightly for impact.
- Leave negative space around.
Pro tip: Keep each burst under a thumbnail size for neatness.
Why it works The small scale looks delicate and refined.
15. Classic Dot-Lined Border
Outline the palm edge with dots and small lines. A frame that makes everything feel polished. Super beginner-friendly.
Key points:
- Alternate dots and dashes along the palm curve.
- Keep spacing consistent.
- Pairs well with any central motif.
Pro tip: Start at the wrist and move upward to maintain rhythm.
Why it works It ties the whole hand together with minimal effort.
✨ New Member Etsy Shops (100% Unsponsored!)
We are incredibly proud of the talent in this community! 💖 We've rounded up some gorgeous new Etsy shops launched by our very own members.
There are ZERO affiliate links in this post—just 100% pure support for our makers. Click below to shop small, show them some love, and find your new favorite items! 👇🛍️


Conclusion
Simple doesn’t mean boring. These easy palm designs keep things chic, fast, and totally doable even with shaky coffee hands. Pick one, practice twice, and enjoy that satisfying stain and the compliments that follow.