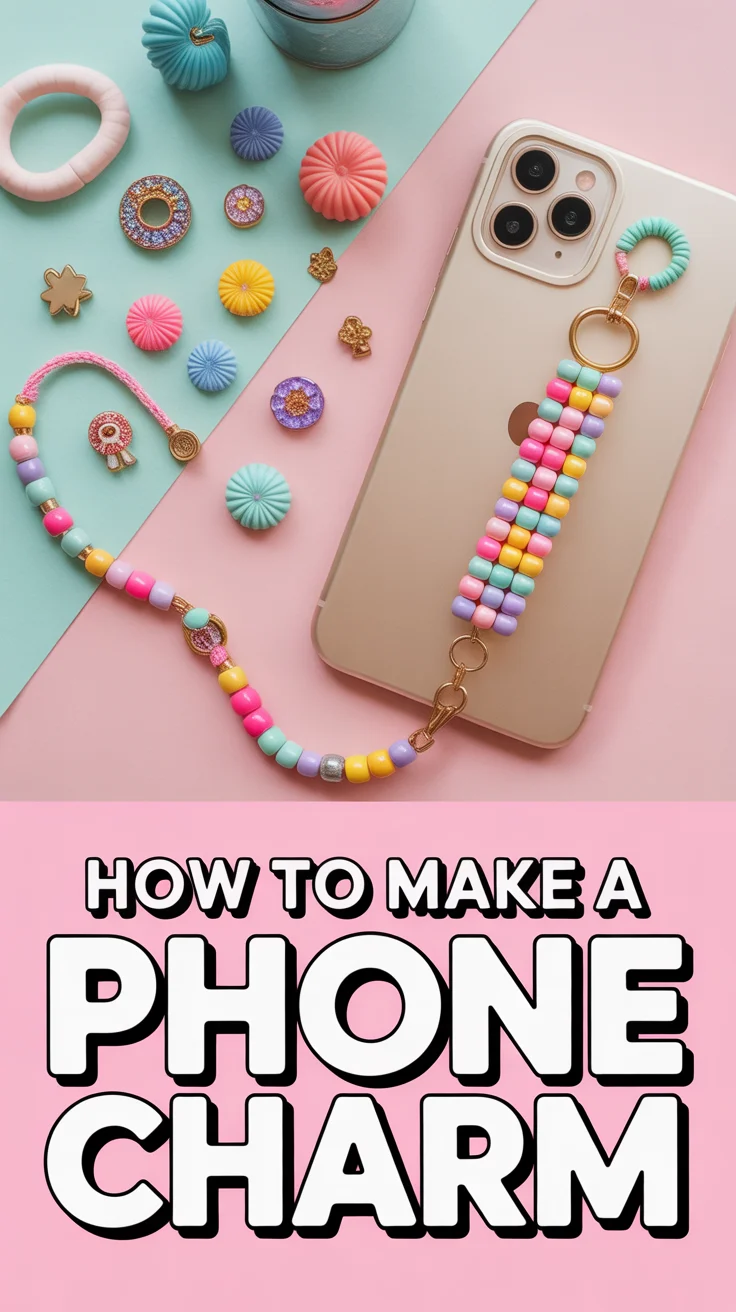
✨ 11 Seed Bead Bracelet Patterns
🛠️ The Ultimate Maker's Toolkit
I've tested thousands of craft tools over the years. Whether you are quilting, crafting, or building mixed-media art, these are the top 5 absolute non-negotiable tools I personally recommend to guarantee professional results.
🪡 SINGER Heavy Duty 4452 Sewing Machine
The sewing community highly recommends this as the ultimate "bulletproof" entry-level machine. Its heavy metal frame powerfully pushes through thick denim and heavy quilt layers that would instantly jam a standard plastic machine.
✂️ Fiskars 8" Orange-Handled Scissors
Never settle for dull dollar-store blades. Wirecutter repeatedly names Fiskars the absolute best all-purpose craft scissor due to its legendary precision-ground blades and an ergonomic grip that prevents hand-cramping.
🔥 Gorilla Dual Temp Hot Glue Gun
Named Wirecutter's top choice because it literally does the work of two tools. It features dual-temperature settings offering low heat for delicate florals and blistering high heat for heavy wood adhesion repairs.
🖌️ Mod Podge Waterbase Gloss Sealer
The absolute undisputed champion of decoupage and paper crafts. Experts rely exclusively on this exact water-based formula because it glues, seals, and finishes beautifully without yellowing or flaking over time.
🎨 Apple Barrel Acrylic Paint (2 oz)
The quintessential, incredibly inexpensive craft paint. Woodworkers and hobby painters swear by its smooth flow and matte finish, providing massive value and remarkably thick color coverage on rough surfaces.
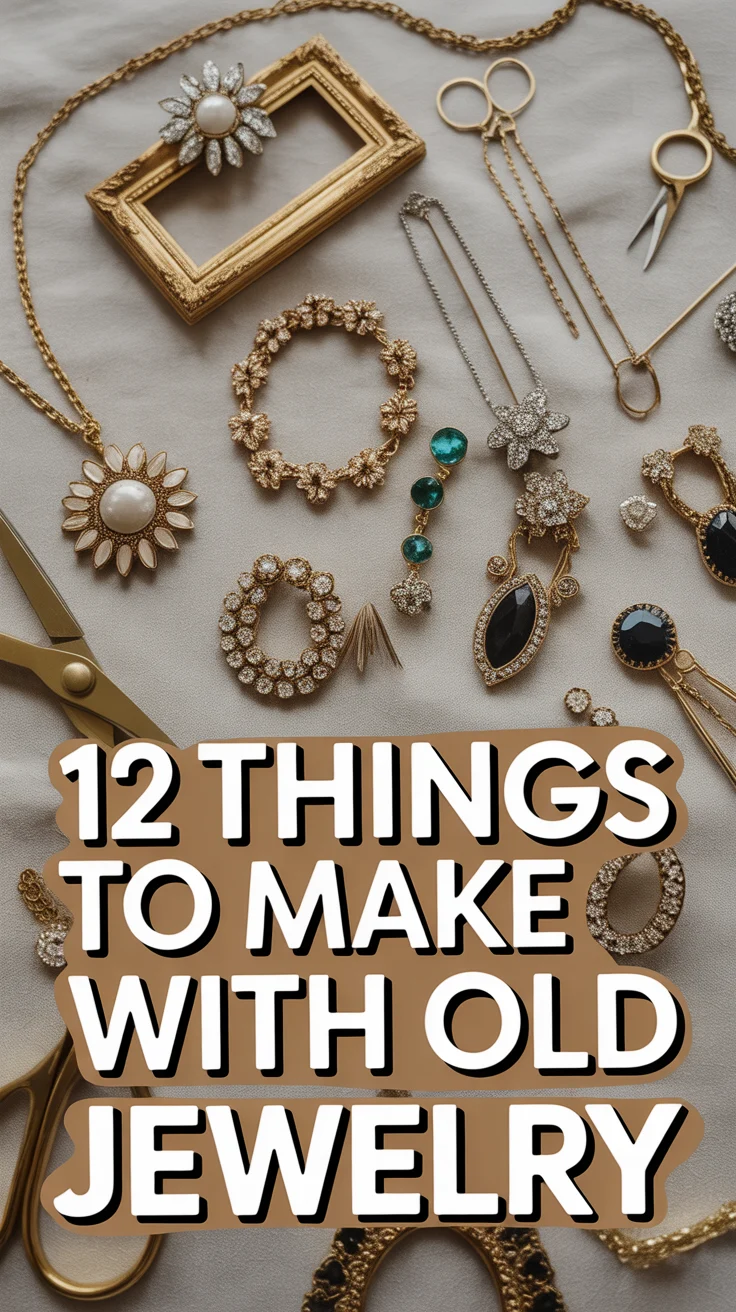
You probably have a mountain of tiny glass beads sitting in a plastic bin gathering dust. It is time to stop hoarding supplies and start actually making something you can wear. We are moving past the basic string-and-knot phase into patterns that actually look like you bought them at a high-end boutique. Grab your needle and some caffeine because your wrist deserves an upgrade.
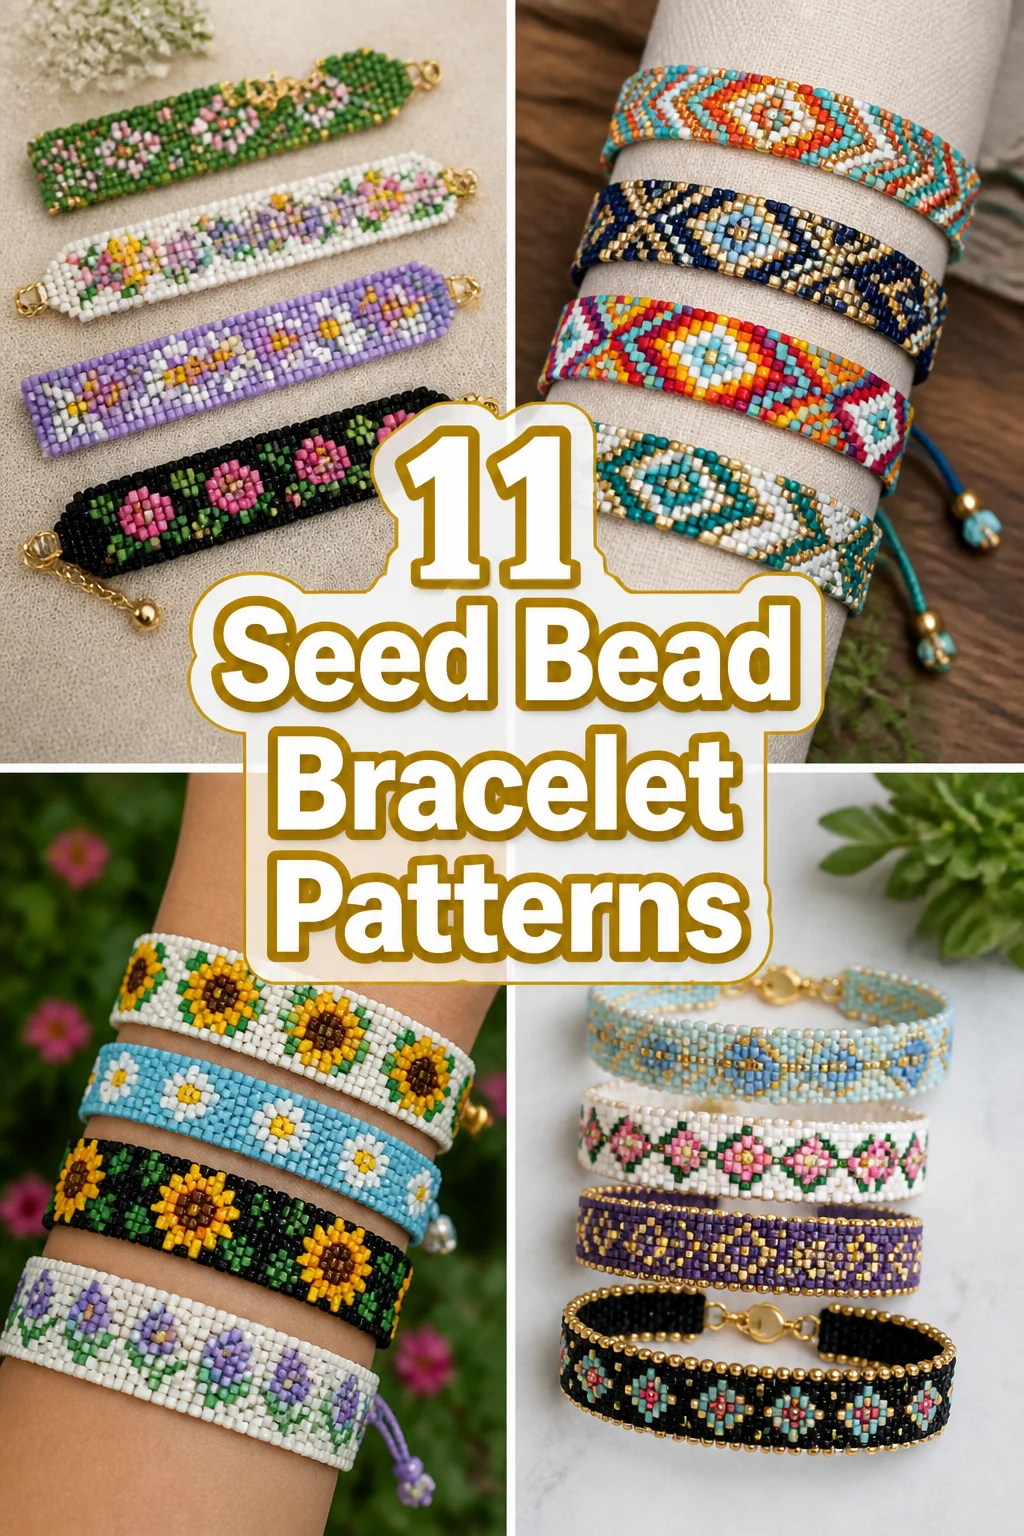
1. The Classic Daisy Chain
This pattern brings back all the nostalgic vibes without looking like a summer camp accident. You create tiny flowers by looping your thread through a central bead and surrounding it with “petals” in a contrasting color. It looks best when you use opaque white beads and a bright yellow center for that timeless garden look.
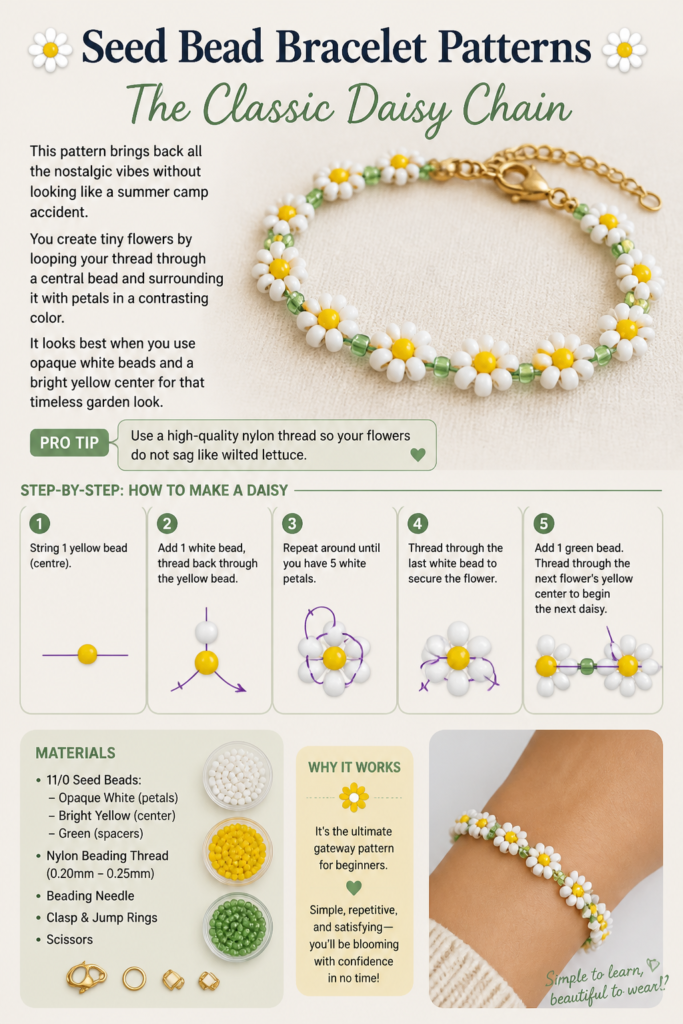
Pro tip involves using a high-quality nylon thread so your flowers do not sag like wilted lettuce. It works because it is the ultimate gateway pattern for beginners.
2. Geometric Herringbone
This one looks way more expensive than it actually is. You stack the beads at a slight angle to create a v-shaped texture that mimics a woven fabric. Use matte black and metallic gold beads to give it a sophisticated, modern edge.

My pro tip is to keep your tension tight so the rows stay perfectly aligned and crisp. It works because it adds instant structure and weight to your jewelry stack.
3. Minimalist Single Strand
Sometimes doing the absolute least is the biggest power move. You simply string uniform glass beads onto a silk cord and finish it with a delicate clasp. This pattern shines when you stack five or six of them in different monochromatic shades.
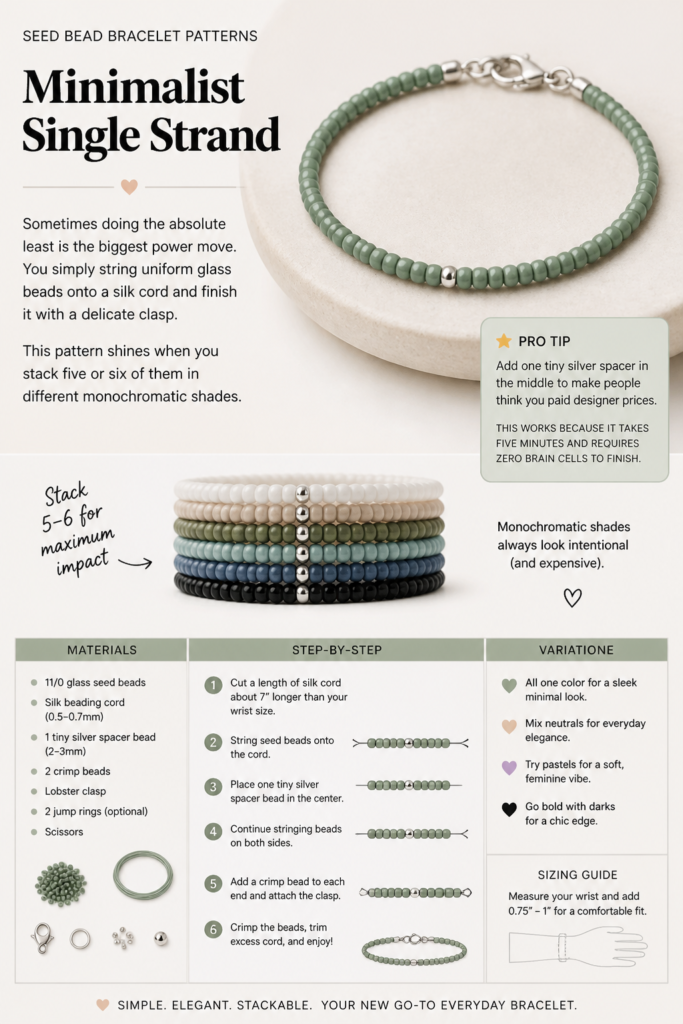
Pro tip suggests adding one tiny silver spacer in the middle to make people think you paid designer prices. This works because it takes five minutes and requires zero brain cells to finish.
4. Chunky Brick Stitch
This pattern creates a sturdy, flat band that feels like a piece of armor. You build it bead by bead like you are literally constructing a wall with tiny glass bricks. Use bold primary colors to create a pop-art inspired statement piece.
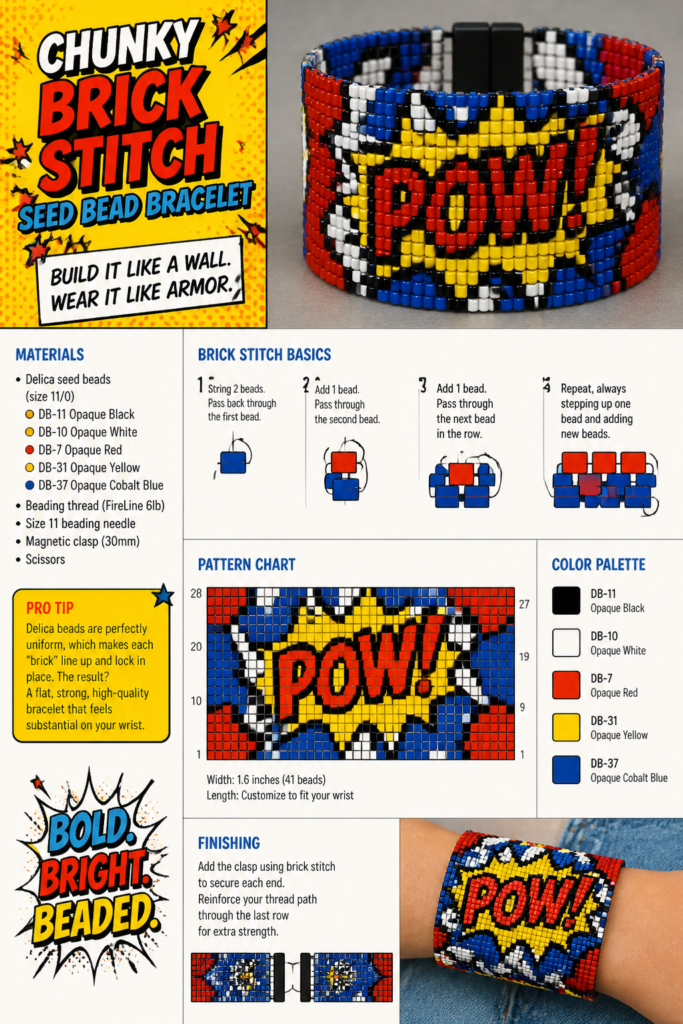
A pro tip for this one is to use delica beads because their uniform cylinder shape makes the rows line up perfectly. It works because the finished product feels substantial and high-quality on your skin.
5. Ombre Fade
Use those five random shades of blue you bought by mistake last month. You transition from dark navy to a clear glass bead to create a smooth gradient effect across the wrist. This pattern makes you look like you actually understand color theory and sophisticated design.
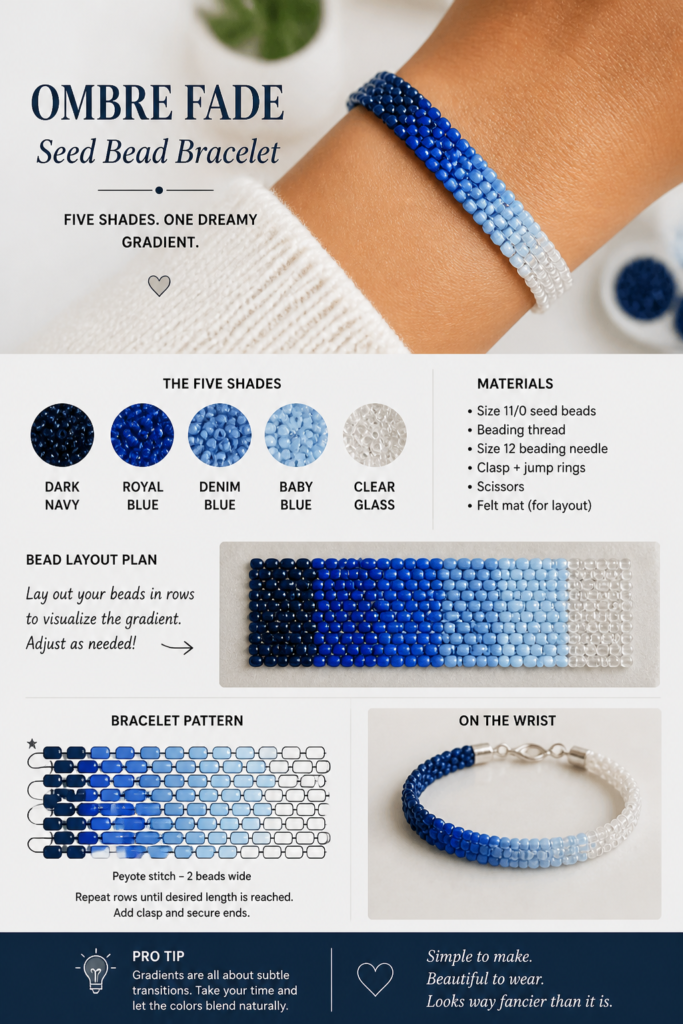
Pro tip involves laying out your beads on a felt mat first to ensure the color transition looks natural. It works because gradients are visually satisfying and easy on the eyes.
6. Metallic Peyote Wrap
This is the “cool girl” of the beadwork world. You use a peyote stitch to create a wide, flexible band that wraps around your wrist multiple times. Go heavy on bronze and copper tones for a bohemian look that pairs well with denim.
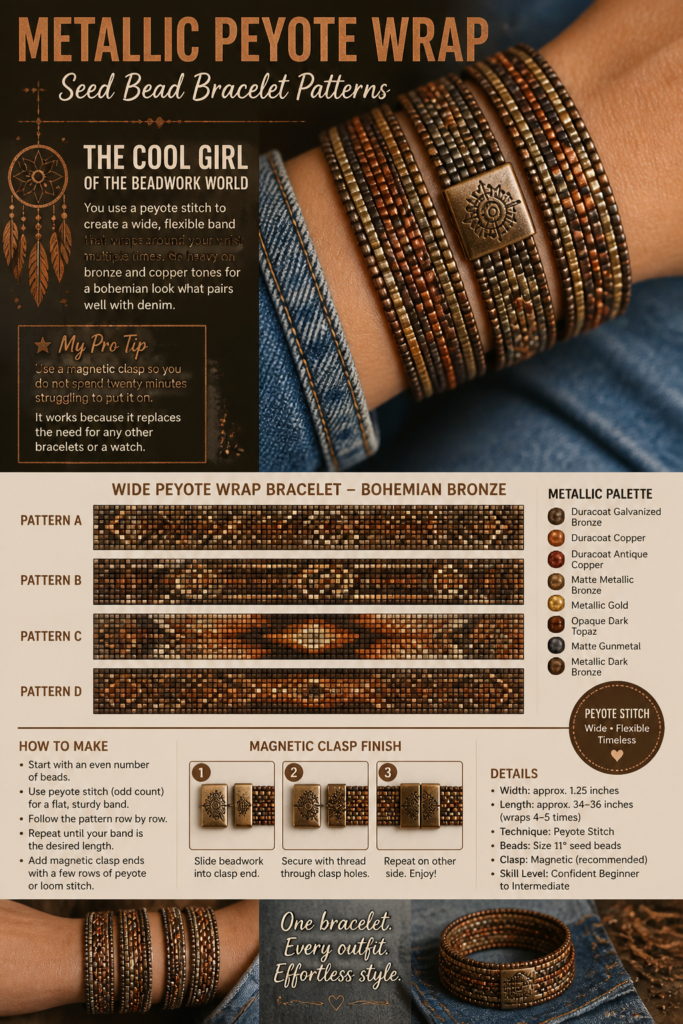
My pro tip is to use a magnetic clasp so you do not spend twenty minutes struggling to put it on. It works because it replaces the need for any other bracelets or a watch.
7. Tassel End Fringe
Why stop the design at the clasp? This pattern features dangling strands of beads that move and sway every time you talk with your hands. Use iridescent beads to catch the light and add some drama to your daily movements.
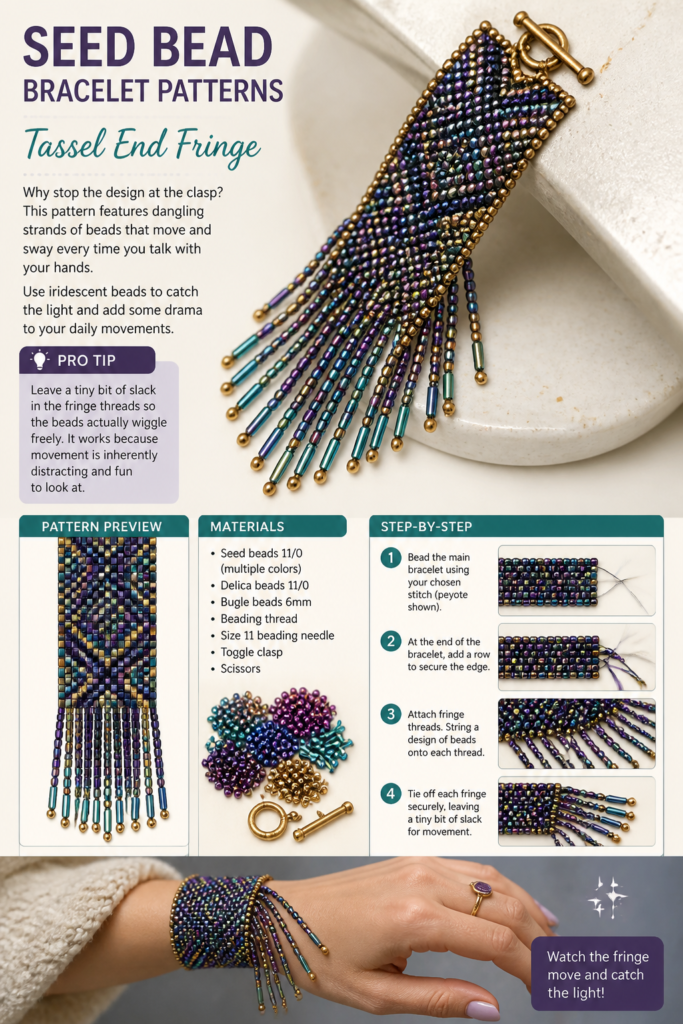
Pro tip says to leave a tiny bit of slack in the fringe threads so the beads actually wiggle freely. It works because movement is inherently distracting and fun to look at.
8. Mixed Texture Loom
Dust off that bead loom you bought during your last hobby hyper-fixation. You mix matte, shiny, and frosted beads in random rows to create a tactile masterpiece that people will want to touch. This is the perfect place to let your inner chaotic artist run wild with different finishes.
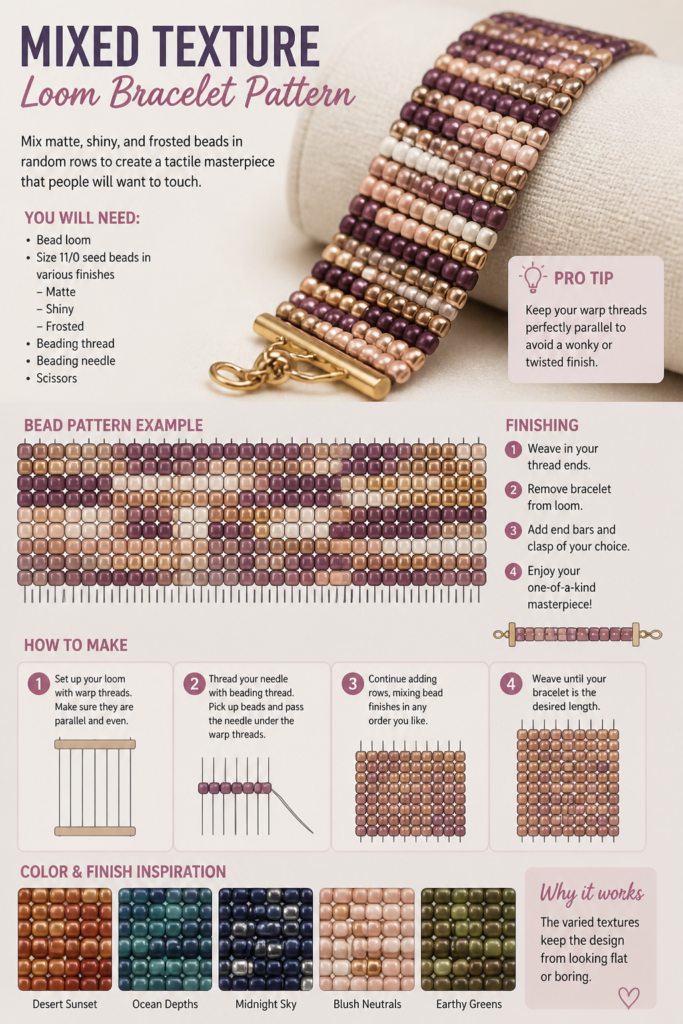
Pro tip is to keep your warp threads perfectly parallel to avoid a wonky or twisted finish. It works because the varied textures keep the design from looking flat or boring.
9. Floating Illusion
This pattern uses clear fishing line to make the beads look like they are hovering on your skin. It is the ultimate choice for people who want a delicate, “barely there” aesthetic. Use tiny silver seeds or pearls for a touch of ethereal sparkle.
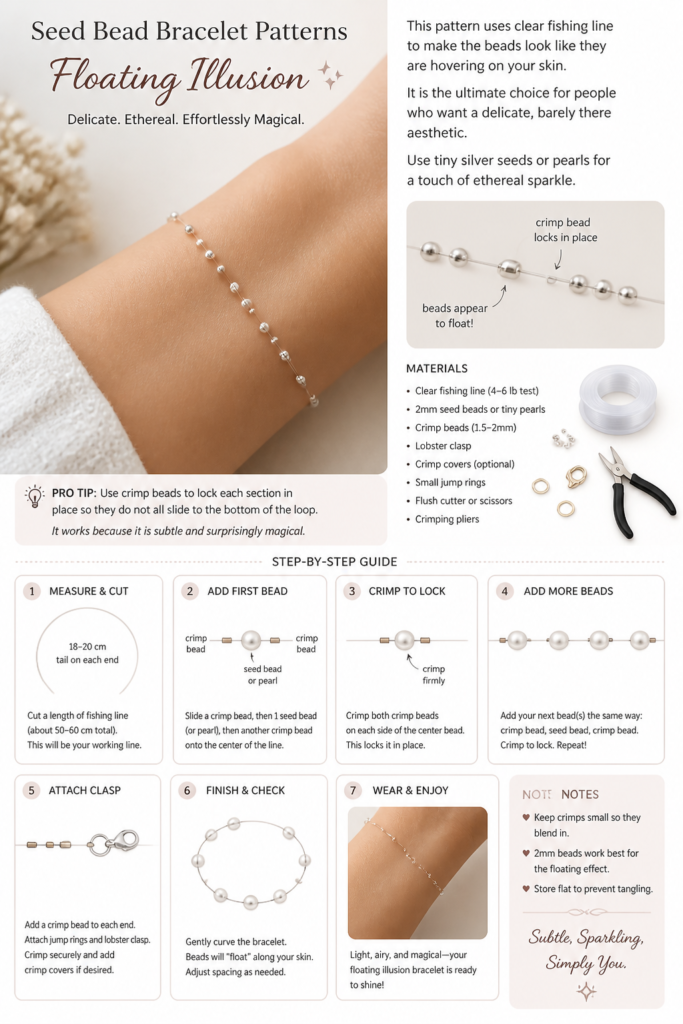
A pro tip is to use crimp beads to lock each section in place so they do not all slide to the bottom of the loop. It works because it is subtle and surprisingly magical.
10. Spiral Rope
This one adds some serious 3D drama to your jewelry collection. You wrap a secondary color around a core of beads to create a thick, twisting rope effect. It looks incredibly complex but is actually just a repetitive loop that you can finish while watching a movie.
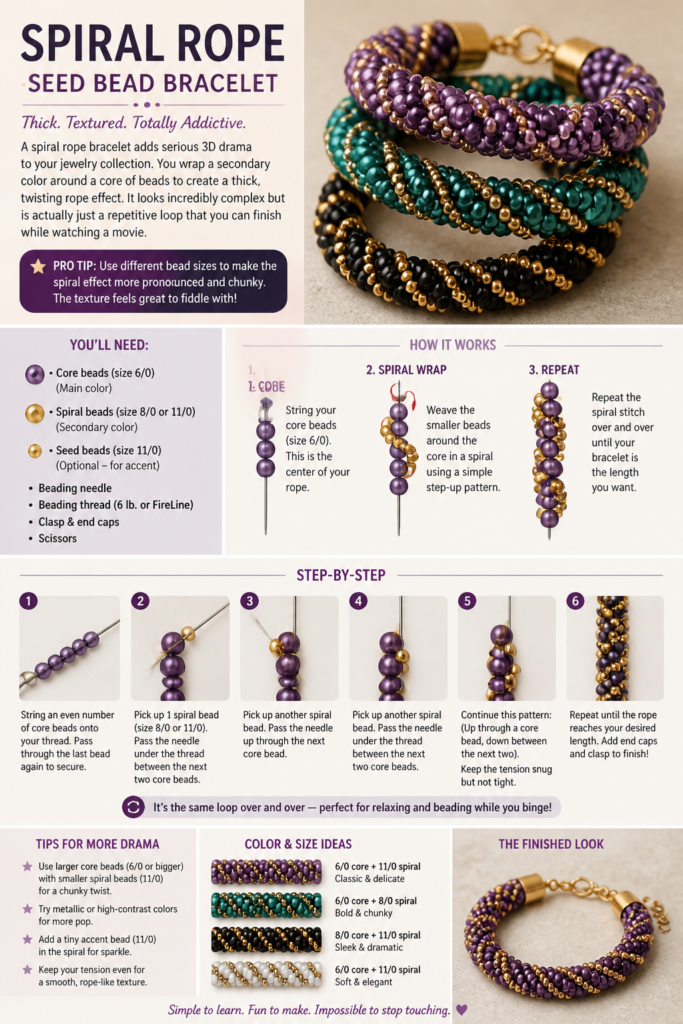
Pro tip involves using different bead sizes to make the spiral effect more pronounced and chunky. It works because the texture feels great to fiddle with when you are bored.
11. Evil Eye Charm
Protect your energy and your outfit at the same time. You integrate a blue and white eye pattern directly into a flat-stitch band for a bit of wearable symbolism. It acts as both a fashion statement and a spiritual bodyguard for your wrist.
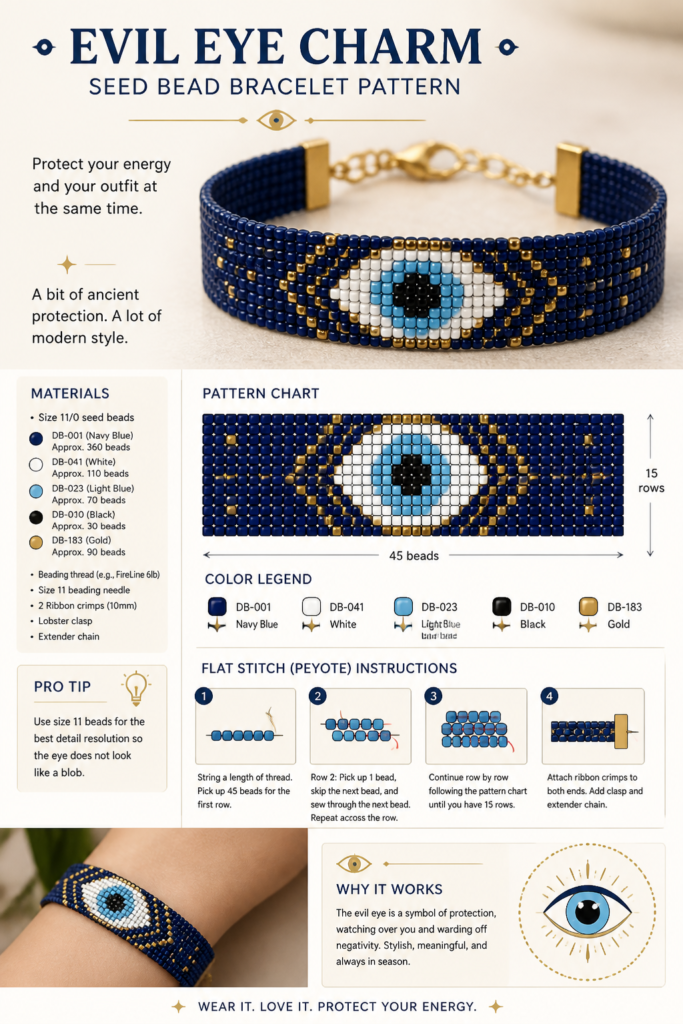
Pro tip is to use size 11 beads for the best detail resolution so the eye does not look like a blob. It works because everyone loves a bit of ancient protection mixed with modern style.
✨ New Member Etsy Shops (100% Unsponsored!)
We are incredibly proud of the talent in this community! 💖 We've rounded up some gorgeous new Etsy shops launched by our very own members.
There are ZERO affiliate links in this post—just 100% pure support for our makers. Click below to shop small, show them some love, and find your new favorite items! 👇🛍️


Conclusion
Now go forth and create something better than a plastic friendship bracelet. You have the patterns and the knowledge to dominate the bead game without breaking a sweat.
Your jewelry box is officially ready for an upgrade that actually looks professional.