✉️ How To Make Envelope
🛠️ The Ultimate Maker's Toolkit
I've tested thousands of craft tools over the years. Whether you are quilting, crafting, or building mixed-media art, these are the top 5 absolute non-negotiable tools I personally recommend to guarantee professional results.
🪡 SINGER Heavy Duty 4452 Sewing Machine
The sewing community highly recommends this as the ultimate "bulletproof" entry-level machine. Its heavy metal frame powerfully pushes through thick denim and heavy quilt layers that would instantly jam a standard plastic machine.
✂️ Fiskars 8" Orange-Handled Scissors
Never settle for dull dollar-store blades. Wirecutter repeatedly names Fiskars the absolute best all-purpose craft scissor due to its legendary precision-ground blades and an ergonomic grip that prevents hand-cramping.
🔥 Gorilla Dual Temp Hot Glue Gun
Named Wirecutter's top choice because it literally does the work of two tools. It features dual-temperature settings offering low heat for delicate florals and blistering high heat for heavy wood adhesion repairs.
🖌️ Mod Podge Waterbase Gloss Sealer
The absolute undisputed champion of decoupage and paper crafts. Experts rely exclusively on this exact water-based formula because it glues, seals, and finishes beautifully without yellowing or flaking over time.
🎨 Apple Barrel Acrylic Paint (2 oz)
The quintessential, incredibly inexpensive craft paint. Woodworkers and hobby painters swear by its smooth flow and matte finish, providing massive value and remarkably thick color coverage on rough surfaces.
In a world brimming with digital messages and instant notifications, there’s a unique magic in receiving something tangible, something crafted with care. Imagine the delight of sending a handwritten note, a thoughtful card, or even a small, flat gift, encased in an envelope you made yourself. It’s not just about the contents; it’s about the entire experience—from the touch of the paper to the personal touch of your creation. Making your own envelopes is a wonderfully rewarding craft that allows for endless customization, reduces waste, and adds an undeniable charm to any message. Get ready to transform a simple sheet of paper into a vessel of your heartfelt sentiments!
Quick Overview
In this guide, you’ll learn to craft beautiful, custom envelopes from scratch, perfect for any occasion or item. No more struggling to find the right size or settling for plain store-bought options!
- Time needed: 15-30 minutes per envelope (once you get the hang of it, it’s much faster!)
- Difficulty: Beginner
- What you’ll need: Paper, ruler, pencil, scissors, glue stick (or other adhesive)
Step-by-Step Instructions
Step 1: Gather Your Tools & Materials
Every great project begins with the right setup. Lay out your workspace and ensure you have everything within reach. A clear, flat surface is ideal for precise measuring and cutting.
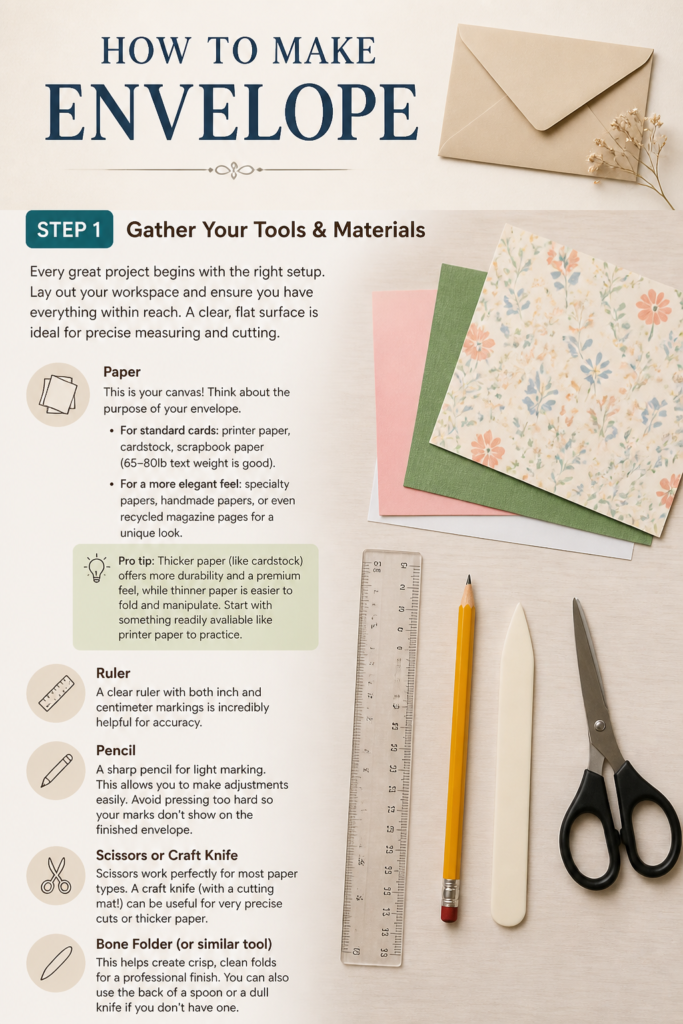
- Paper: This is your canvas! Think about the purpose of your envelope.
- For standard cards: printer paper, cardstock, scrapbook paper (65-80lb text weight is good).
- For a more elegant feel: specialty papers, handmade papers, or even recycled magazine pages for a unique look.
- Pro tip: Thicker paper (like cardstock) offers more durability and a premium feel, while thinner paper is easier to fold and manipulate. Start with something readily available like printer paper to practice.
- Ruler: A clear ruler with both inch and centimeter markings is incredibly helpful for accuracy.
- Pencil: A sharp pencil for light markings that can be erased.
- Scissors: Sharp, comfortable scissors for clean cuts. A craft knife and cutting mat are excellent for more precision if you have them.
- Adhesive:
- Glue stick: Easy to use, minimal mess, but can sometimes warp thinner papers.
- Liquid craft glue (e.g., PVA glue): Stronger hold, but apply sparingly to avoid wrinkles.
- Double-sided tape: Clean, strong, and immediate bond, great for thicker papers.
- Pro tip: For the flap you’ll seal later, consider a re-moistenable envelope glue or a temporary adhesive dot.
- Bone folder (optional but recommended): This tool helps create crisp, professional folds. If you don’t have one, the back of a spoon or your fingernail can work in a pinch.
- Eraser: For removing any visible pencil lines.
Step 2: Choose Your Paper & Determine Size
The beauty of making your own envelopes lies in customization. What are you putting inside? A standard A2 card? A custom-sized invitation? A small photo? This will dictate your envelope’s dimensions.
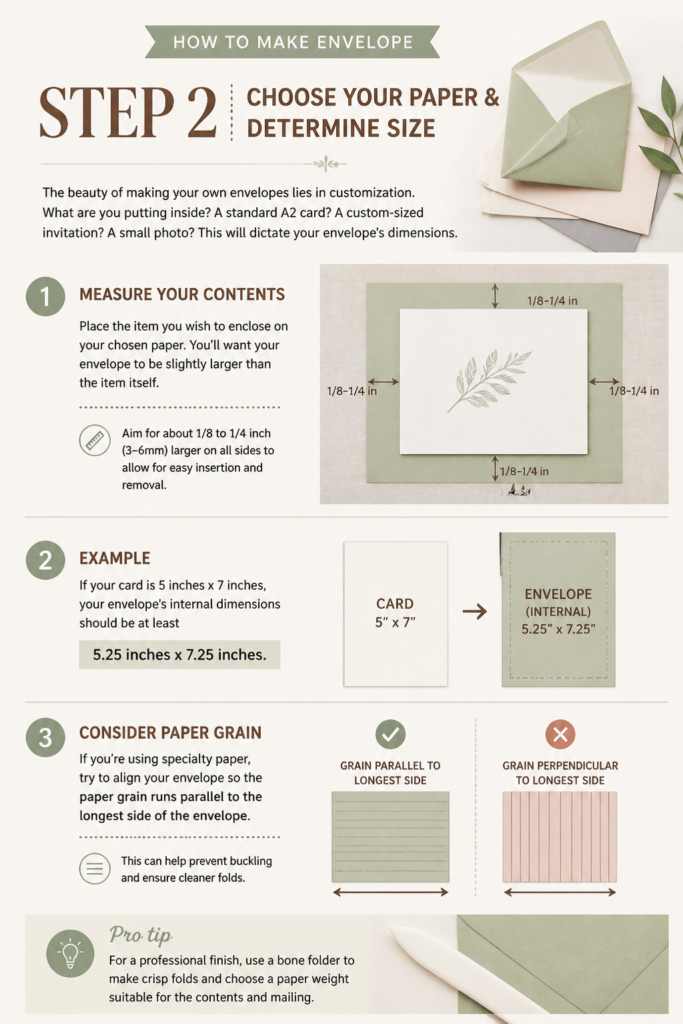
- Measure Your Contents: Place the item you wish to enclose on your chosen paper. You’ll want your envelope to be slightly larger than the item itself. Aim for about 1/8 to 1/4 inch (3-6mm) larger on all sides to allow for easy insertion and removal.
- Example: If your card is 5 inches x 7 inches, your envelope’s internal dimensions should be at least 5.25 inches x 7.25 inches.
- Consider Paper Grain: If you’re using specialty paper, try to align your envelope so the paper grain runs parallel to the longest side of the envelope. This can help prevent buckling and ensure cleaner folds.
- Pro tip: For a quick and easy way to determine envelope size, simply place your item (e.g., a greeting card) in the center of your paper. This gives you a visual guide for the central rectangle of your envelope.
Step 3: Measure & Mark Your Envelope Template
This is the most critical step for a well-fitting envelope. We’ll be creating a cross-shaped template. Let’s break it down:

- Draw the Central Rectangle:
- On the back (or less decorative side) of your paper, draw a rectangle that is slightly larger than your item (e.g., 5.25″ x 7.25″). This will be the front of your envelope.
- Ensure this rectangle is centered on your paper, leaving enough space around it for the flaps.
- Mark the Side Flaps:
- From the left and right sides of your central rectangle, extend lines outwards. The width of these side flaps should be about 1/3 to 1/2 the width of your central rectangle. For a 5.25″ wide rectangle, a 2-inch side flap is a good starting point.
- Draw vertical lines to define the outer edge of these side flaps.
- Mark the Bottom Flap:
- From the bottom edge of your central rectangle, extend a line downwards. The height of this flap should be slightly less than the side flaps, usually about 1/2 to 2/3 the height of your central rectangle. For a 7.25″ tall rectangle, a 3-4 inch bottom flap is usually sufficient.
- Draw a horizontal line to define the bottom edge of this flap.
- Mark the Top Flap:
- From the top edge of your central rectangle, extend a line upwards. This flap will be used for sealing your envelope, so it needs to be long enough to tuck in or secure. Make it slightly longer than the bottom flap, perhaps 3/4 the height of your central rectangle.
- Draw a horizontal line to define the top edge of this flap.
- Pro tip: For a more elegant look, you can round the corners of the top flap or cut it into a V-shape later.
- Connect the Flaps (Creating the “Wings”):
- Now, you have a central rectangle with a flap extending from each of its four sides. To ensure the side and bottom flaps meet neatly without excess bulk, you need to trim the corners between them.
- From the outer corners of your central rectangle, draw diagonal lines connecting to the inner corners of your side and bottom flaps. These lines will essentially create a slight taper on your side and bottom flaps.
- Example: If you’re looking at the bottom-left corner of your central rectangle, draw a diagonal line from that corner down to the inner corner where the bottom flap and left flap would meet if they were both perfectly rectangular.
- Pro tip: If this step feels complex, find an existing envelope that’s roughly the size you want. Carefully unglue and unfold it to use it as a template. Trace its shape onto your paper. This is a fantastic shortcut!
Step 4: Cut Out Your Envelope Shape
Once your template is fully marked, it’s time to cut!
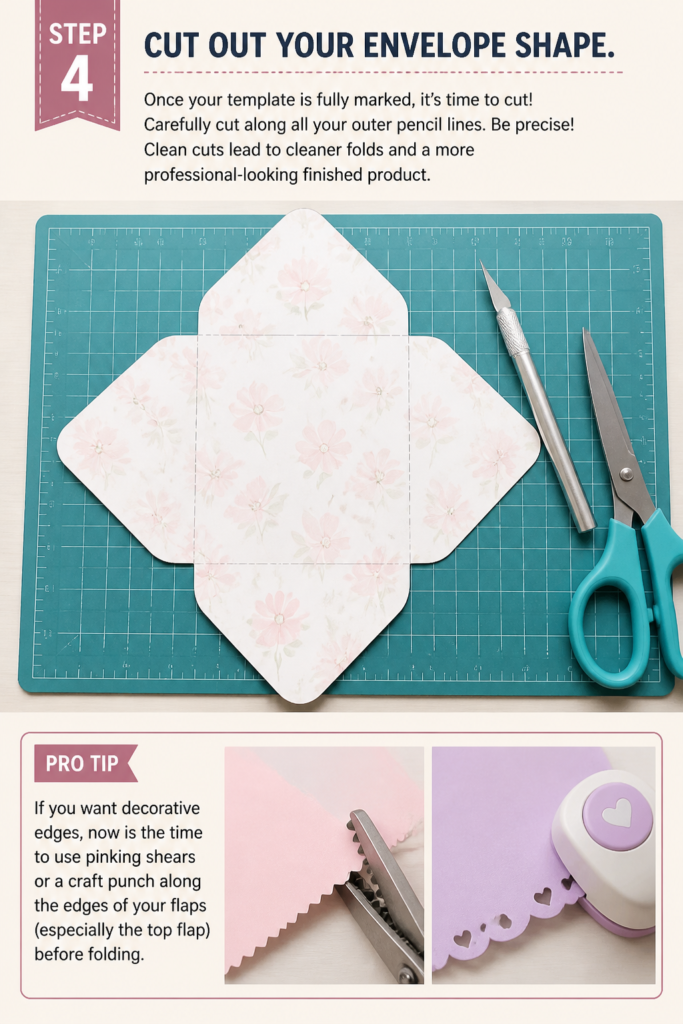
- Carefully cut along all your outer pencil lines.
- Be precise! Clean cuts lead to cleaner folds and a more professional-looking finished product.
- If you’re using a craft knife, use a fresh blade and a cutting mat for the sharpest edges.
- Pro tip: If you want decorative edges, now is the time to use pinking shears or a craft punch along the edges of your flaps (especially the top flap) before folding.
Step 5: Score & Fold with Precision
Scoring creates a crease line that allows paper to fold cleanly without cracking or tearing, especially with thicker papers.

- Score the Fold Lines: Using your ruler and a bone folder (or the back of a dull knife/stylus), score along the edges of your central rectangle. This means pressing a line along where each of the four flaps will fold inwards.
- Pro tip: Score lightly on the decorative side of the paper if you want the fold to “pop” inwards. Score on the back if you want the fold to “pop” outwards. For envelopes, you typically score on the back (the side with your pencil marks) as all flaps fold inwards.
- Fold the Flaps:
- Gently fold each of the four flaps inwards along your scored lines.
- Use your bone folder (or fingernail/back of a spoon) to press down firmly and create crisp, sharp creases. The crisper the fold, the neater your envelope will look.
- Unfold all flaps after creasing.
Step 6: Secure the Side & Bottom Flaps
Now we’re going to assemble the body of the envelope.
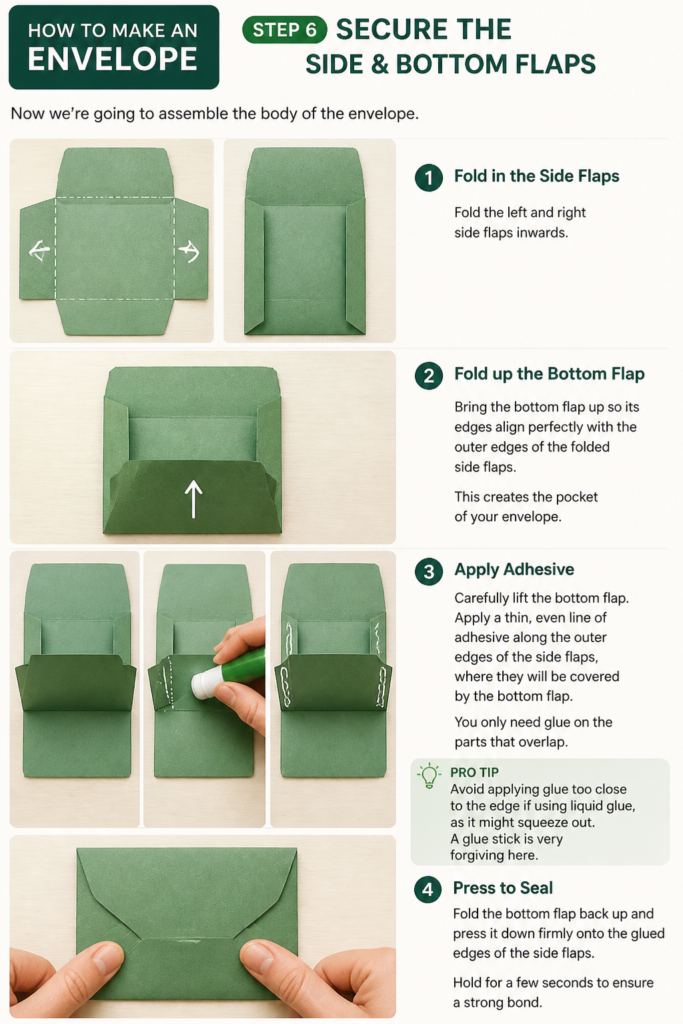
- Fold in the Side Flaps: Fold the left and right side flaps inwards.
- Fold up the Bottom Flap: Bring the bottom flap up so its edges align perfectly with the outer edges of the folded side flaps. This creates the pocket of your envelope.
- Apply Adhesive:
- Carefully lift the bottom flap.
- Apply a thin, even line of adhesive along the outer edges of the side flaps, where they will be covered by the bottom flap. You only need glue on the parts that overlap.
- Pro tip: Avoid applying glue too close to the edge if using liquid glue, as it might squeeze out. A glue stick is very forgiving here.
- Press to Seal: Fold the bottom flap back up and press it down firmly onto the glued edges of the side flaps. Hold for a few seconds to ensure a good bond. Use your bone folder on the inside to press along the glued seams for a stronger hold.
- Check the Pocket: Insert your item to ensure it fits comfortably and the seams are secure.
Step 7: Finalize the Top Flap & Decorate
Your envelope is almost complete! All that’s left is the sealing flap and any personal touches.
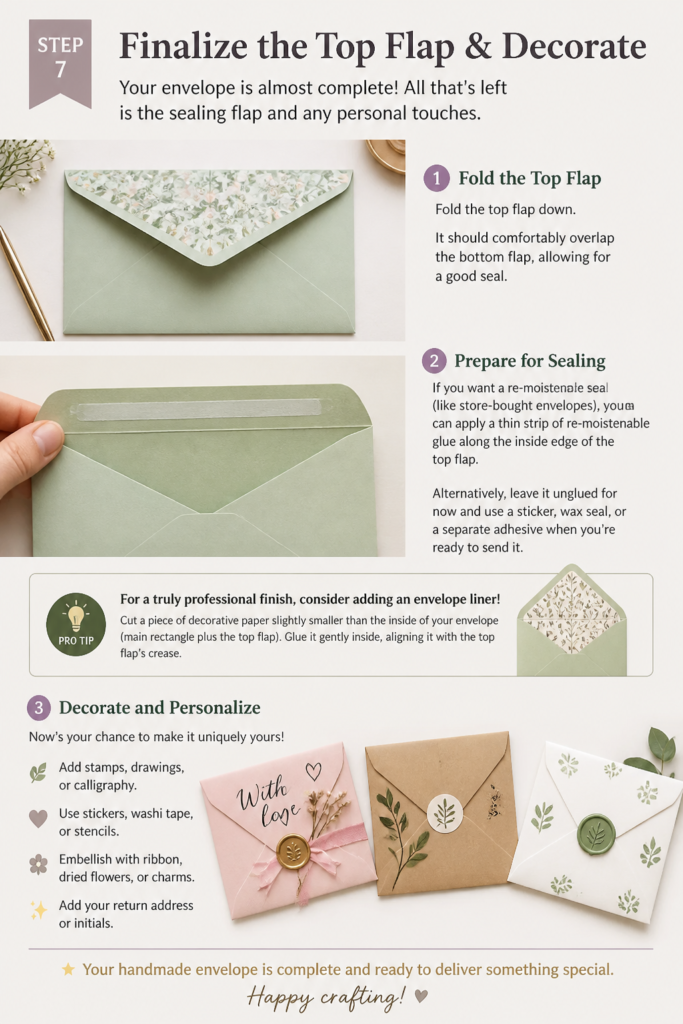
- Fold the Top Flap: Fold the top flap down. It should comfortably overlap the bottom flap, allowing for a good seal.
- Prepare for Sealing:
- If you want a re-moistenable seal (like store-bought envelopes), you can apply a thin strip of re-moistenable glue along the inside edge of the top flap.
- Alternatively, leave it unglued for now and use a sticker, wax seal, or a separate adhesive when you’re ready to send it.
- Pro tip: For a truly professional finish, consider adding an envelope liner! Cut a piece of decorative paper slightly smaller than the inside of your envelope (main rectangle plus the top flap). Glue it gently inside, aligning it with the top flap’s crease.
- Decorate and Personalize:
- Now’s your chance to make it truly unique!
- Stamps, stickers, drawings, calligraphy, glitter, ribbons, twine, or even a small charm can elevate your envelope from functional to fabulous.
- Consider adding a clear address label or writing directly on the envelope.
Beyond the Basic: Creative Envelope Ideas
Once you’ve mastered the basic technique, the possibilities for customization are truly endless. Let your imagination soar!
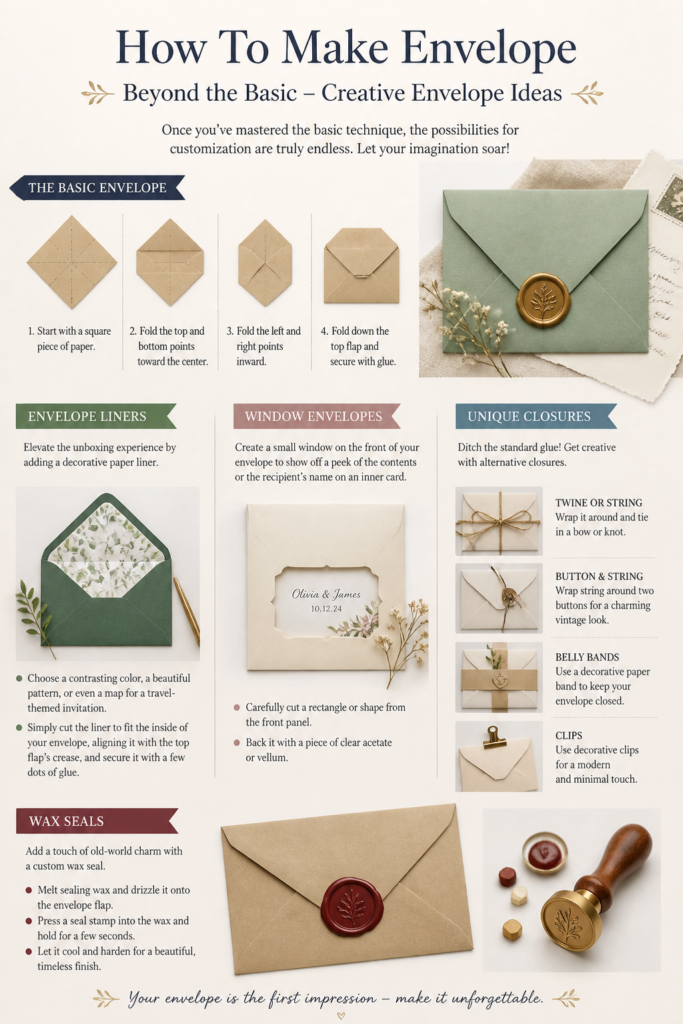
- Envelope Liners: Elevate the unboxing experience by adding a decorative paper liner. Choose a contrasting color, a beautiful pattern, or even a map for a travel-themed invitation. Simply cut the liner to fit the inside of your envelope, aligning it with the top flap’s crease, and secure it with a few dots of glue.
- Window Envelopes: Create a small “window” on the front of your envelope to show off a peek of the contents or the recipient’s name on an inner card. Carefully cut a rectangle or shape from the front panel and back it with a piece of clear acetate or vellum.
- Unique Closures: Ditch the standard glue!
- Wax Seals: Add a touch of old-world charm with a custom wax seal.
- Twine or Ribbon: Wrap twine or ribbon around the envelope and secure it with a tag or a bow.
- Belly Bands: A strip of decorative paper wrapped horizontally around the envelope can add elegance and hold it closed.
- Buttons & String: Attach two buttons (one on the flap, one on the body) and wrap string around them for a charming, reusable closure.
- Embellishments & Textures:
- Stamping & Embossing: Use rubber stamps, ink pads, and embossing powder for raised, textured designs.
- Die-Cuts & Punches: Add intricate shapes to the flaps or corners.
- Layering: Combine different papers, fabrics, or even dried flowers for a multi-dimensional look.
- Different Shapes & Sizes: Don’t limit yourself to rectangles!
- Square Envelopes: Follow the same principles, just start with a square central rectangle.
- Petal Envelopes: Instead of four distinct flaps, design four rounded “petals” that overlap in the center.
- Mini Envelopes: Perfect for gift tags, tiny notes, or hiding small treasures.
- Recycled & Upcycled Materials:
- Old calendars, maps, sheet music, magazine pages, or even gift wrap can be transformed into unique envelopes. This is not only eco-friendly but also results in truly one-of-a-kind creations.
- Pro tip: When using thinner, less sturdy materials, consider lining the envelope with a plain paper for added durability.
Common Mistakes to Avoid
Even seasoned crafters make errors, but knowing the common pitfalls can help you steer clear of them!
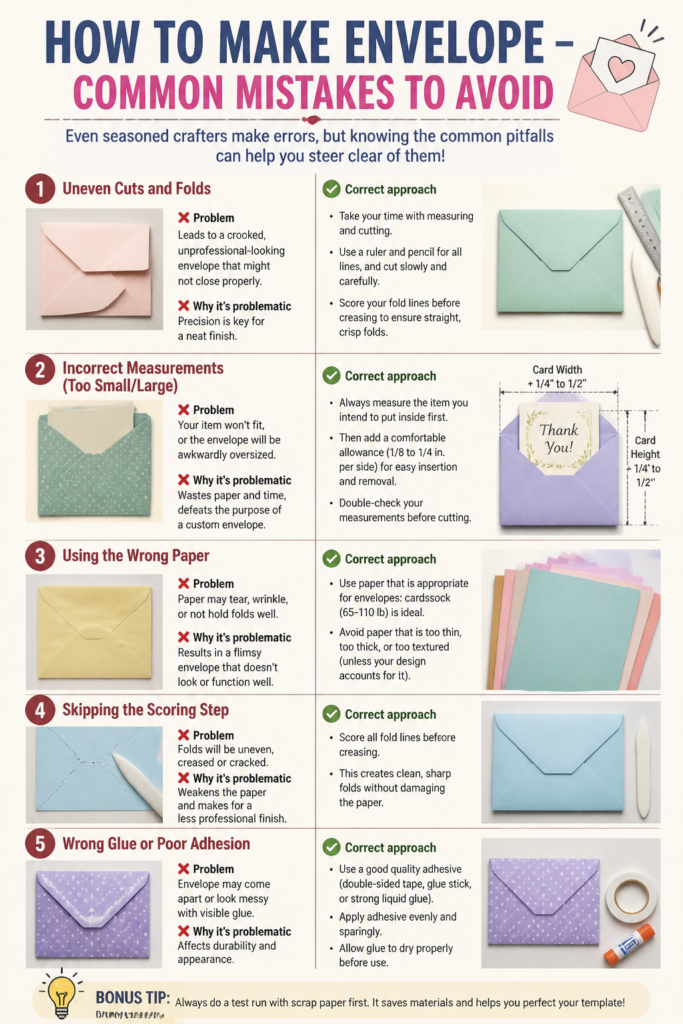
- Uneven Cuts and Folds:
- Problem: Leads to a crooked, unprofessional-looking envelope that might not close properly.
- Why it’s problematic: Precision is key for a neat finish.
- Correct approach: Take your time with measuring and cutting. Use a ruler and pencil for all lines, and cut slowly and carefully. Score your fold lines before creasing to ensure straight, crisp folds.
- Incorrect Measurements (Too Small/Large):
- Problem: Your item won’t fit, or the envelope will be awkwardly oversized.
- Why it’s problematic: Wastes paper and time, defeats the purpose of a custom envelope.
- Correct approach: Always measure the item you intend to put inside first, then add a comfortable allowance (1/8 to 1/4 inch) to your envelope’s central rectangle dimensions. Double-check your measurements before cutting.
- Too Much Glue/Wrong Adhesive:
- Problem: Paper warping, sticky residue, or weak bonds.
- Why it’s problematic: Can ruin the aesthetics and functionality of your envelope.
- Correct approach: Apply adhesive sparingly and evenly, especially with liquid glues. A glue stick is often the safest bet for beginners. For heavier papers, double-sided tape provides a strong, clean bond.
- Choosing Unsuitable Paper:
- Problem: Paper that’s too thin might tear, while paper that’s too thick can be difficult to fold and score.
- Why it’s problematic: Frustrating to work with and results in a less durable or aesthetically pleasing envelope.
- Correct approach: For general use, a paper weight between 65lb text and 80lb cardstock is ideal. Experiment with different papers to find what you like. Consider the purpose – a delicate invitation might use lighter, more decorative paper, while a sturdy envelope for a small gift needs heavier stock.
Troubleshooting
Encountering a snag? Here are quick fixes for common issues:

- My envelope doesn’t seal well or comes undone:
- Solution: Ensure you’re using enough adhesive and applying it evenly along the edges where the flaps overlap. Press firmly for several seconds, and use a bone folder to reinforce the bond from the inside. If using a glue stick, try a fresh one, or switch to a stronger liquid craft glue or double-sided tape for better adhesion.
- The flaps don’t meet neatly; there are gaps or overlaps:
- Solution: This usually points to uneven cutting or inaccurate scoring. Go back to your template. Did you draw the diagonal lines correctly to taper the side and bottom flaps? Ensure your initial central rectangle was perfectly square or rectangular. For future envelopes, consider using an existing envelope as a template to trace for perfect proportions. For the current envelope, you can try to carefully trim away any excess overlap with very sharp scissors, or fill small gaps with a thin line of glue.
- My paper tears or cracks when I fold it:
- Solution: This often happens with thicker paper or paper that has a strong grain running perpendicular to the fold. The key is proper scoring. Make sure you’re scoring firmly enough to create a distinct crease but not so hard that you cut through the paper. If you’re not using a bone folder, try using one – it makes a huge difference. For very thick cardstock, you might need to score on both sides of the fold line.
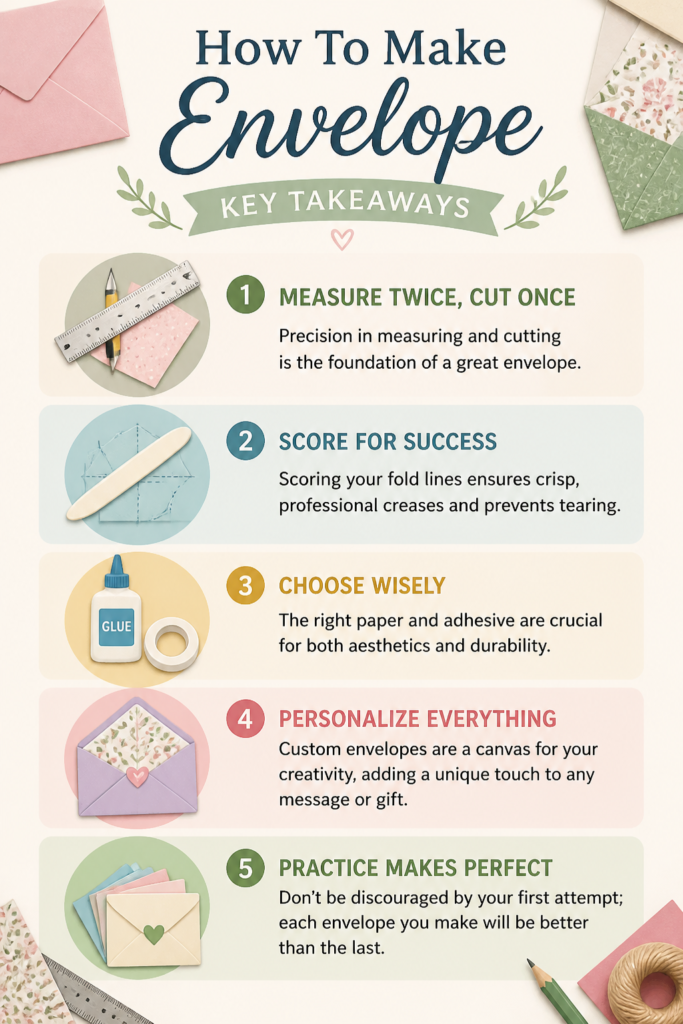
Key Takeaways
- Measure Twice, Cut Once: Precision in measuring and cutting is the foundation of a great envelope.
- Score for Success: Scoring your fold lines ensures crisp, professional creases and prevents tearing.
- Choose Wisely: The right paper and adhesive are crucial for both aesthetics and durability.
- Personalize Everything: Custom envelopes are a canvas for your creativity, adding a unique touch to any message or gift.
- Practice Makes Perfect: Don’t be discouraged by your first attempt; each envelope you make will be better than the last.
Frequently Asked Questions
Q: Can I make envelopes without a ruler?
A: While a ruler is highly recommended for precision, you can improvise! You can use a straight edge from a book, a piece of cardboard, or even an existing envelope as a guide. However, your measurements might be less accurate, leading to slightly less perfect results.
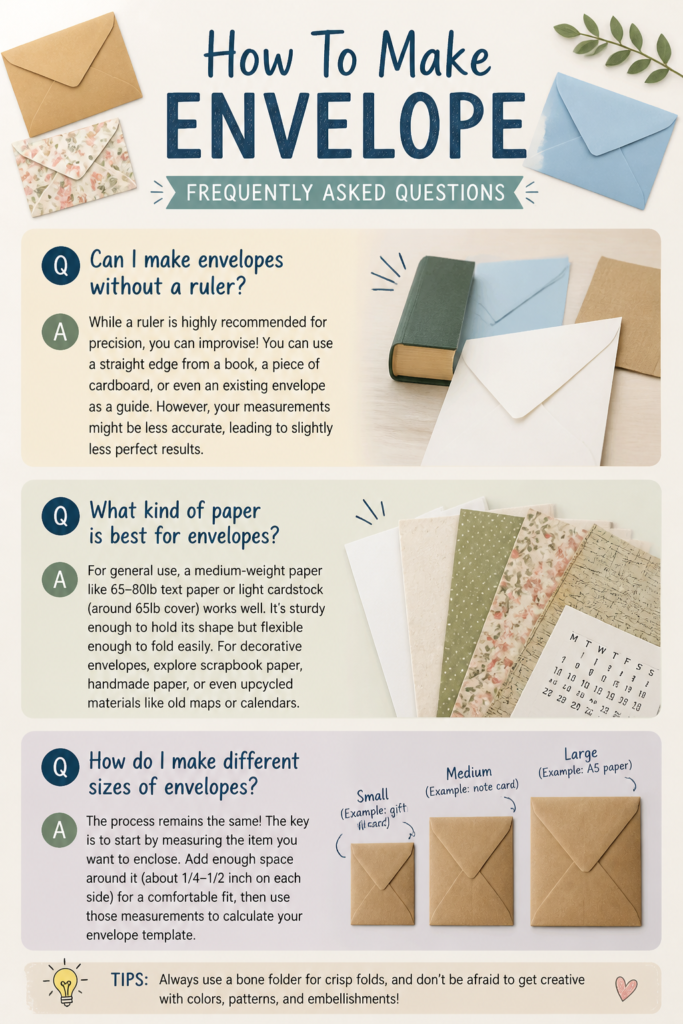
Q: What kind of paper is best for envelopes?
A: For general use, a medium-weight paper like 65-80lb text paper or light cardstock (around 65lb cover) works well. It’s sturdy enough to hold its shape but flexible enough to fold easily. For decorative envelopes, explore scrapbook paper, handmade paper, or even upcycled materials like old maps or calendars.
Q: How do I make different sizes of envelopes?
A: The process remains the same! The key is to start by measuring the item you want to enclose. Your central rectangle will always be slightly larger than that item. Then, scale your side, bottom, and top flaps proportionally to that central rectangle. For example, side flaps are typically 1/3 to 1/2 the width of the central rectangle, and the bottom flap is slightly shorter than the side flaps.
Q: How can I make my envelopes more durable for mailing?
A: Use a heavier weight paper or cardstock. For added protection, consider lining the envelope with a second layer of paper. Ensure all seams are securely glued with a strong adhesive like liquid craft glue or double-sided tape. For very precious contents, you might even consider adding a thin piece of cardboard inside for rigidity.
What’s Next?
You’ve just unlocked a fantastic new skill! The world of paper crafting is vast and exciting, and making envelopes is just the beginning.
Why not try making envelopes for:
- All your greeting cards: Give every card a custom home.
- Gift cards or small gifts: A handmade envelope adds a personal touch to any present.
- Organizing small items: Create custom envelopes for seeds, buttons, photos, or receipts.
- A stationery set: Design matching cards and envelopes for a truly cohesive look.
Don’t stop here! Experiment with different papers, decorative elements, and closure methods. Try making a square envelope, a petal envelope, or adding a window to your next creation. The more you practice, the more confident and creative you’ll become.
Grab some paper, your ruler, and your imagination. Start crafting your first custom envelope today and experience the joy of sending a truly personal message!