🧵 15 DIY Cut Shirts Step By Step
& CRAFT IDEAS
Beginner-friendly tutorials, creative projects,
and weekly inspiration in your inbox.
🛠️ The Ultimate Maker's Toolkit
I've tested thousands of craft tools over the years. Whether you are quilting, crafting, or building mixed-media art, these are the top 5 absolute non-negotiable tools I personally recommend to guarantee professional results.
🪡 SINGER Heavy Duty 4452 Sewing Machine
The sewing community highly recommends this as the ultimate "bulletproof" entry-level machine. Its heavy metal frame powerfully pushes through thick denim and heavy quilt layers that would instantly jam a standard plastic machine.
✂️ Fiskars 8" Orange-Handled Scissors
Never settle for dull dollar-store blades. Wirecutter repeatedly names Fiskars the absolute best all-purpose craft scissor due to its legendary precision-ground blades and an ergonomic grip that prevents hand-cramping.
🔥 Gorilla Dual Temp Hot Glue Gun
Named Wirecutter's top choice because it literally does the work of two tools. It features dual-temperature settings offering low heat for delicate florals and blistering high heat for heavy wood adhesion repairs.
🖌️ Mod Podge Waterbase Gloss Sealer
The absolute undisputed champion of decoupage and paper crafts. Experts rely exclusively on this exact water-based formula because it glues, seals, and finishes beautifully without yellowing or flaking over time.
🎨 Apple Barrel Acrylic Paint (2 oz)
The quintessential, incredibly inexpensive craft paint. Woodworkers and hobby painters swear by its smooth flow and matte finish, providing massive value and remarkably thick color coverage on rough surfaces.
Got a stack of tees begging for personality? Perfect. Grab scissors, channel your inner crafty gremlin, and let’s turn plain shirts into wearable art. Low effort, high payoff, zero sewing meltdown.
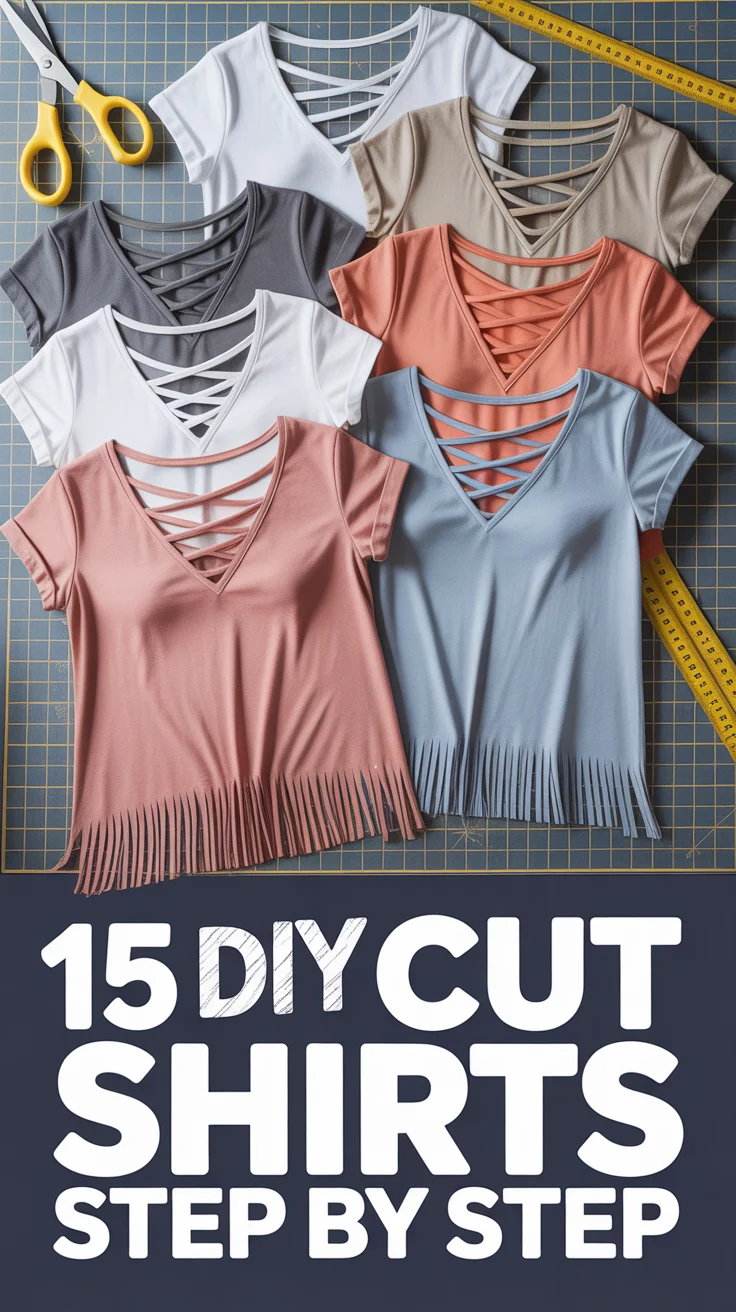
1. Classic Off-Shoulder Cut
Slide one shoulder out and instantly look cooler. This cut flatters everyone and pairs with anything.
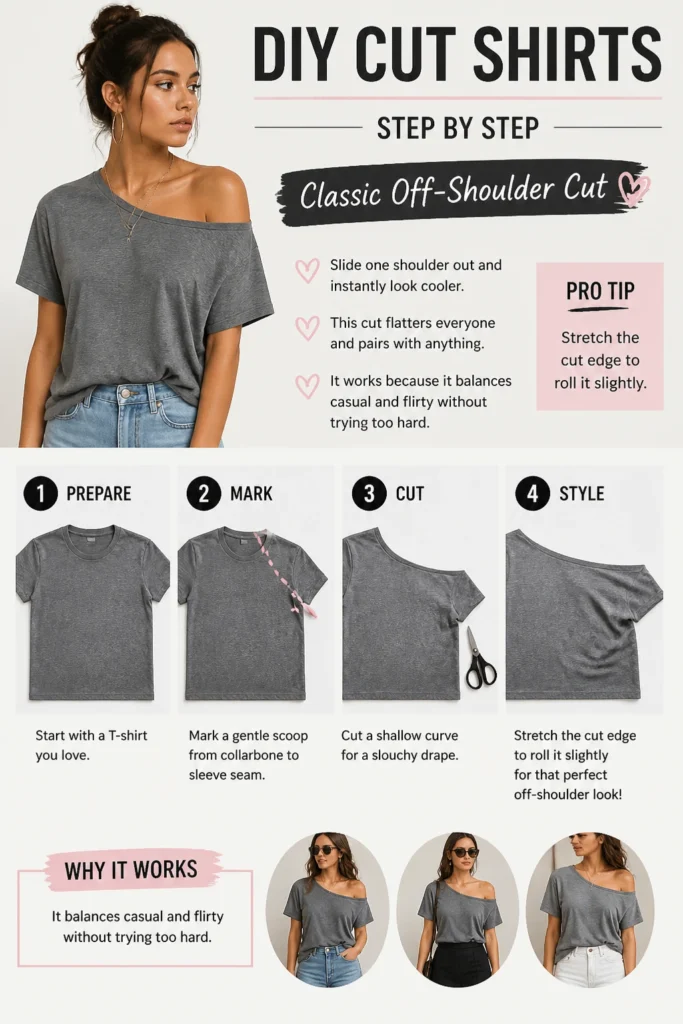
- Mark a gentle scoop from collarbone to sleeve seam.
- Cut a shallow curve for a slouchy drape.
- Pro tip: Stretch the cut edge to roll it slightly.
It works because it balances casual and flirty without trying too hard.
2. Cropped Front Tie Tee
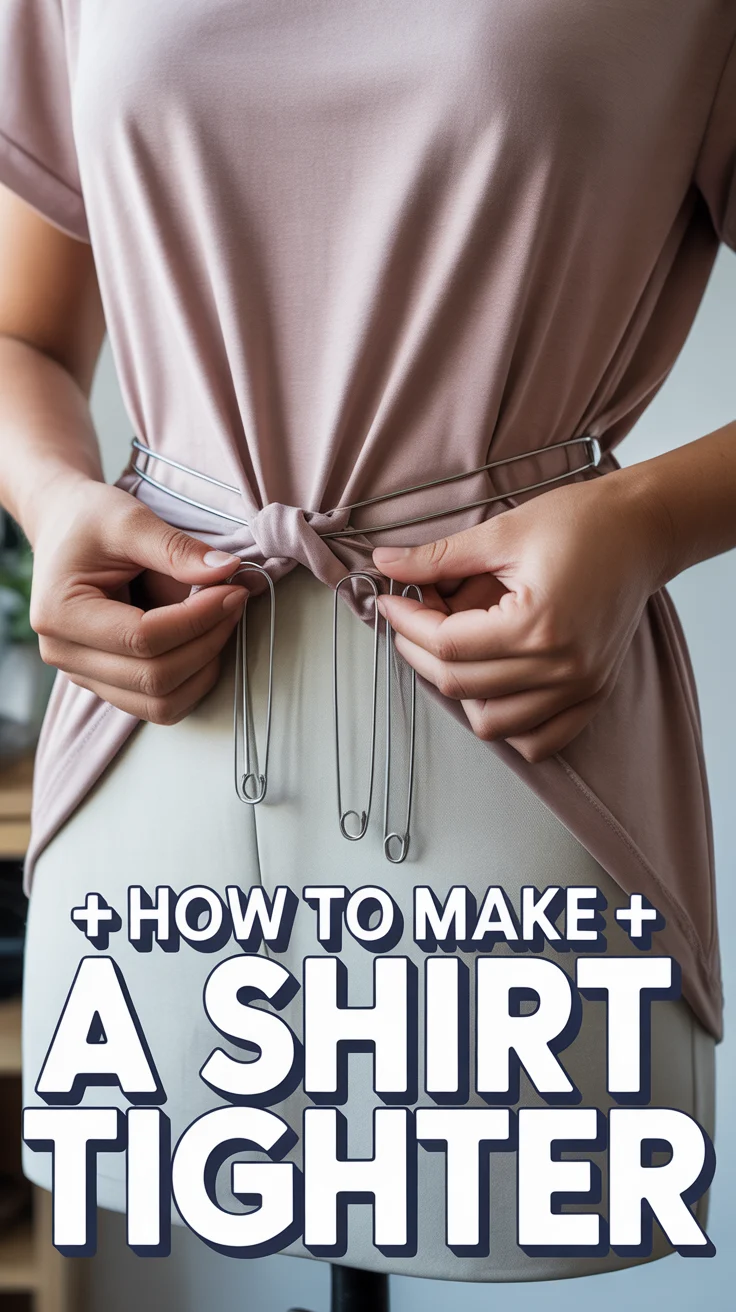
Turn a baggy tee into a waist-snatching top. Cute knot, instant shape.
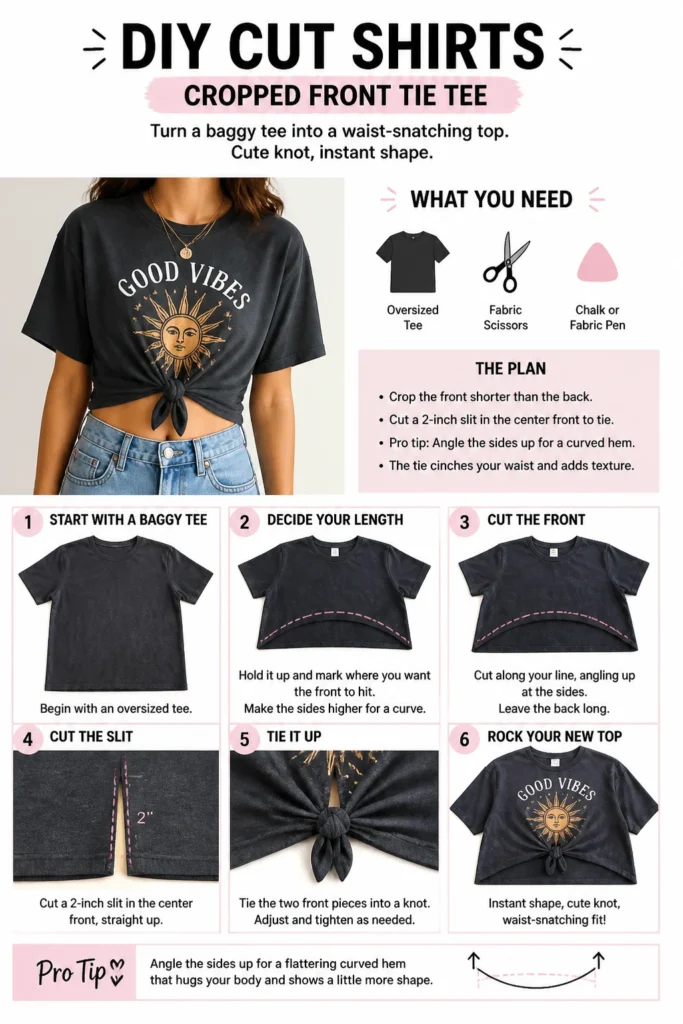
- Crop the front shorter than the back.
- Cut a 2-inch slit in the center front to tie.
- Pro tip: Angle the sides up for a curved hem.
The tie cinches your waist and adds texture.
3. Ladder Back Slashes
Back cut-outs that look boutique-level. No fancy tools, just patience.
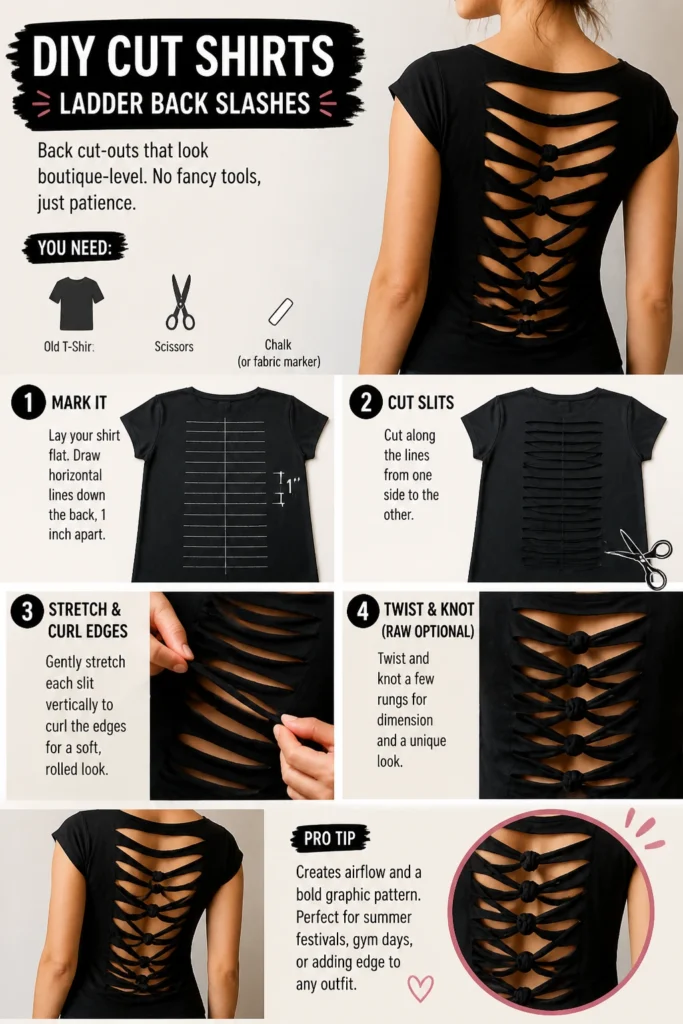
- Draw horizontal lines down the back, 1 inch apart.
- Cut slits, then gently stretch to curl edges.
- Pro tip: Twist and knot a few rungs for dimension.
Creates airflow and a bold graphic pattern.
4. Side-Slit Corset Lacing
Add drama to your sides without sewing. Adjustable fit, spicy detail.
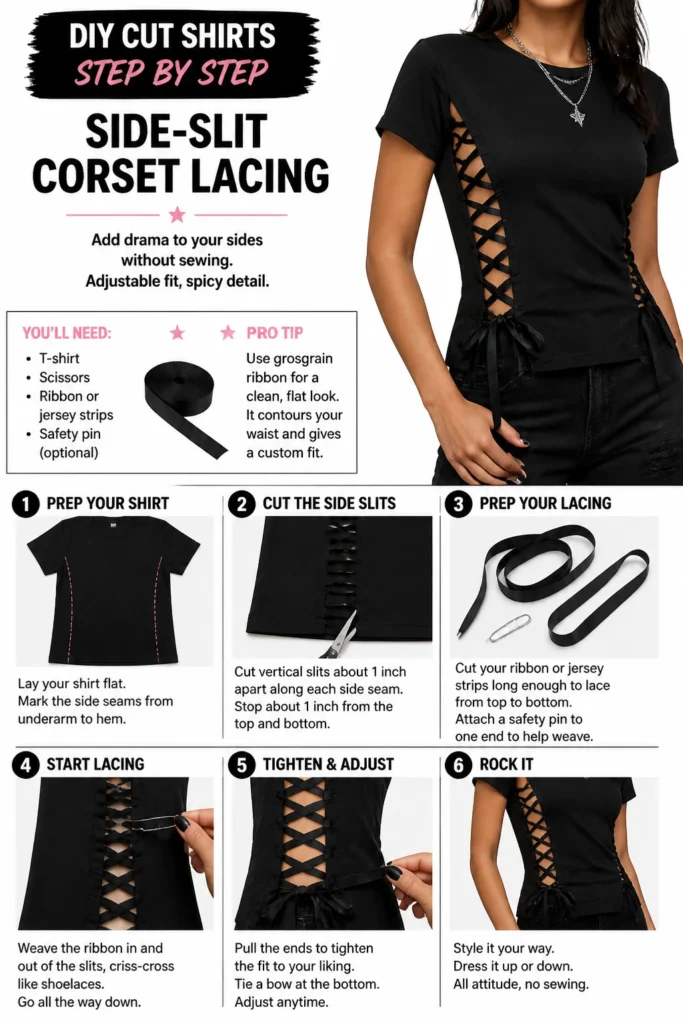
- Cut vertical slits along each side seam.
- Weave ribbon or jersey strips through like laces.
- Pro tip: Use grosgrain ribbon for a clean, flat look.
It contours your waist and gives a custom fit.
5. Fringe Hem Festival Tee
Fringe = movement and vibes. Perfect for music, markets, or your kitchen dance floor.
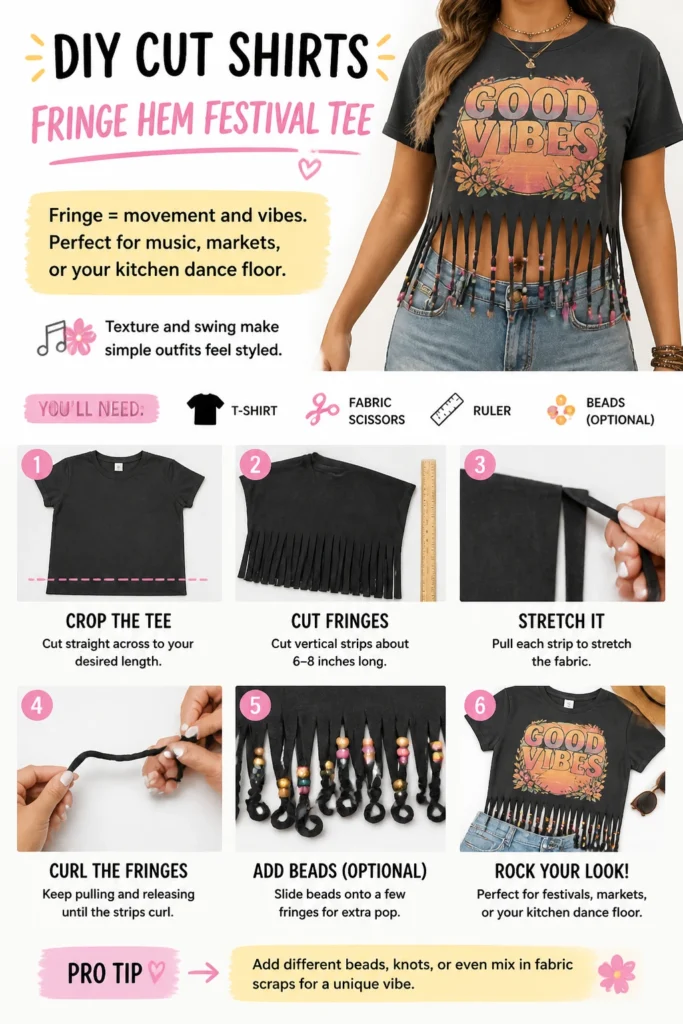
- Crop the tee, then cut vertical strips 6–8 inches long.
- Pull each strip to stretch and curl.
- Pro tip: Add beads to a few fringes for pop.
Texture and swing make simple outfits feel styled.
6. V-Neck Glow-Up
Upgrade a crew neck to a flattering V. Necklines change everything.
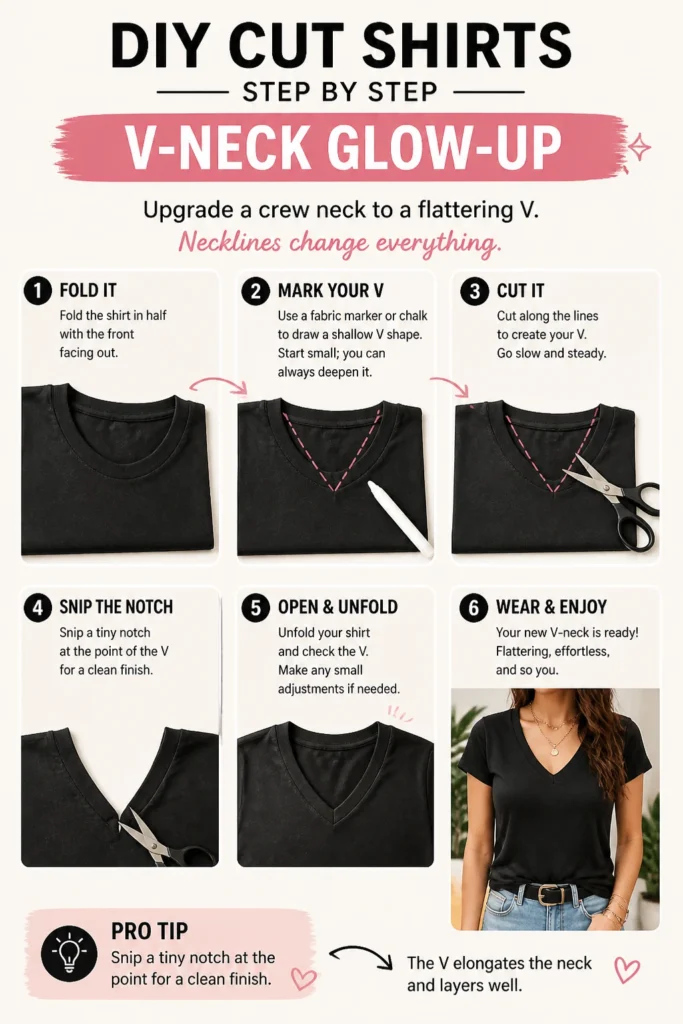
- Fold the shirt in half; cut a shallow V at the front.
- Start small; you can always deepen it.
- Pro tip: Snip a tiny notch at the point for a clean finish.
The V elongates the neck and layers well.
7. Racerback Tank Remix
Turn a tee into a gym-ready tank. Cleaner lines, cooler back.
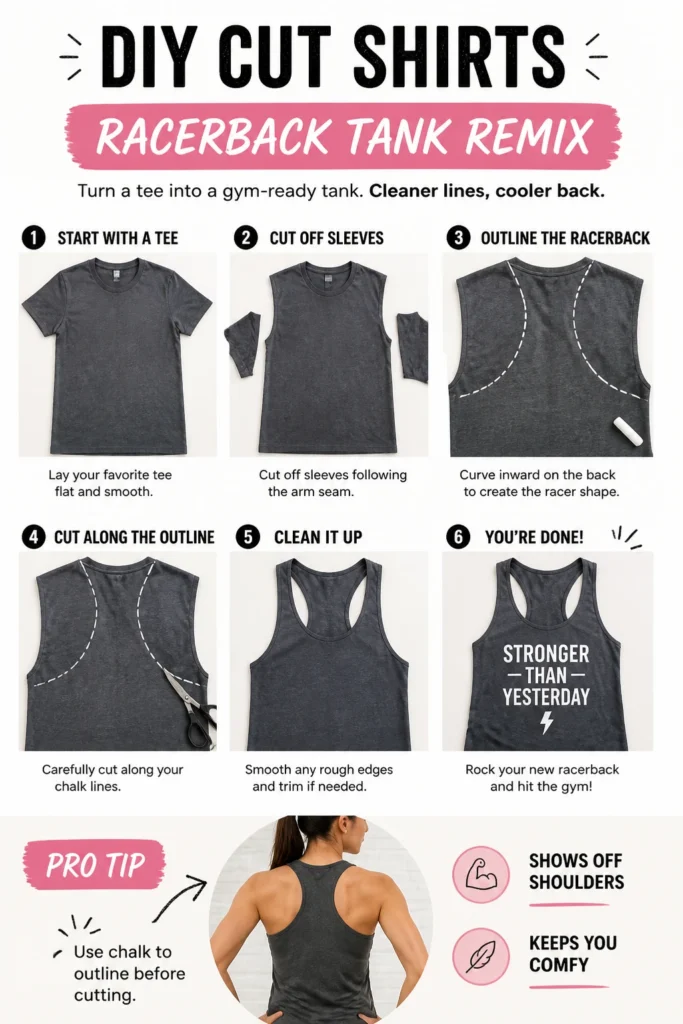
- Cut off sleeves following the arm seam.
- Curve inward on the back to create the racer shape.
- Pro tip: Use chalk to outline before cutting.
Shows off shoulders and keeps you comfy.
8. Peekaboo Shoulder Slits
Subtle cut-outs that look designer. Easy and classy.
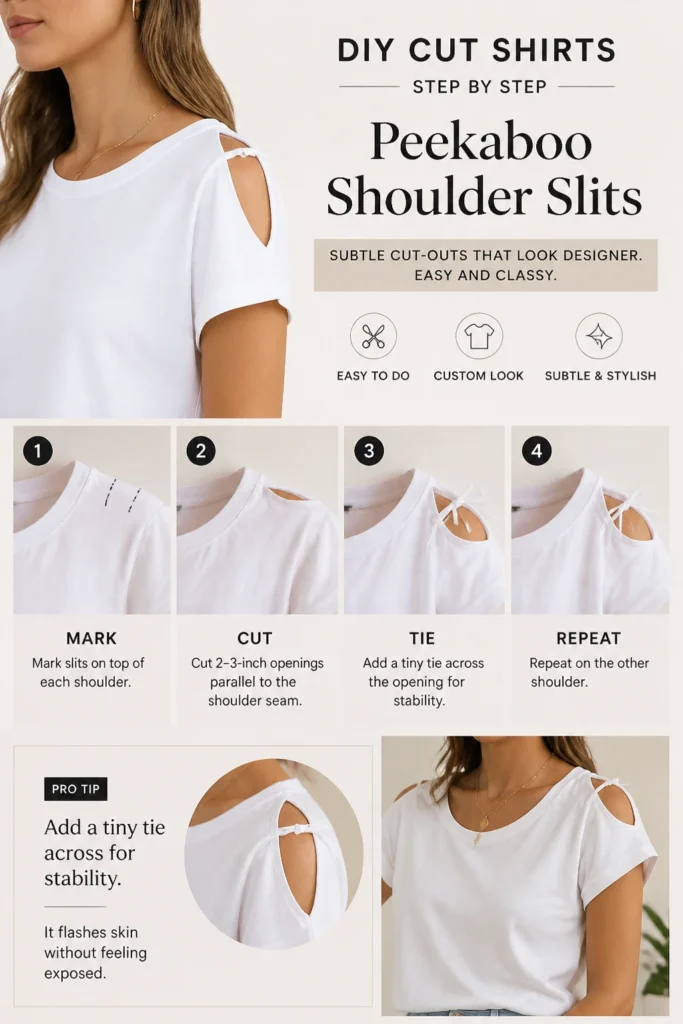
- Mark slits on top of each shoulder.
- Cut 2–3-inch openings parallel to the shoulder seam.
- Pro tip: Add a tiny tie across for stability.
It flashes skin without feeling exposed.
9. Braided Back Yoke
Elevate a plain tee with a faux braid. Looks intricate, made in minutes.
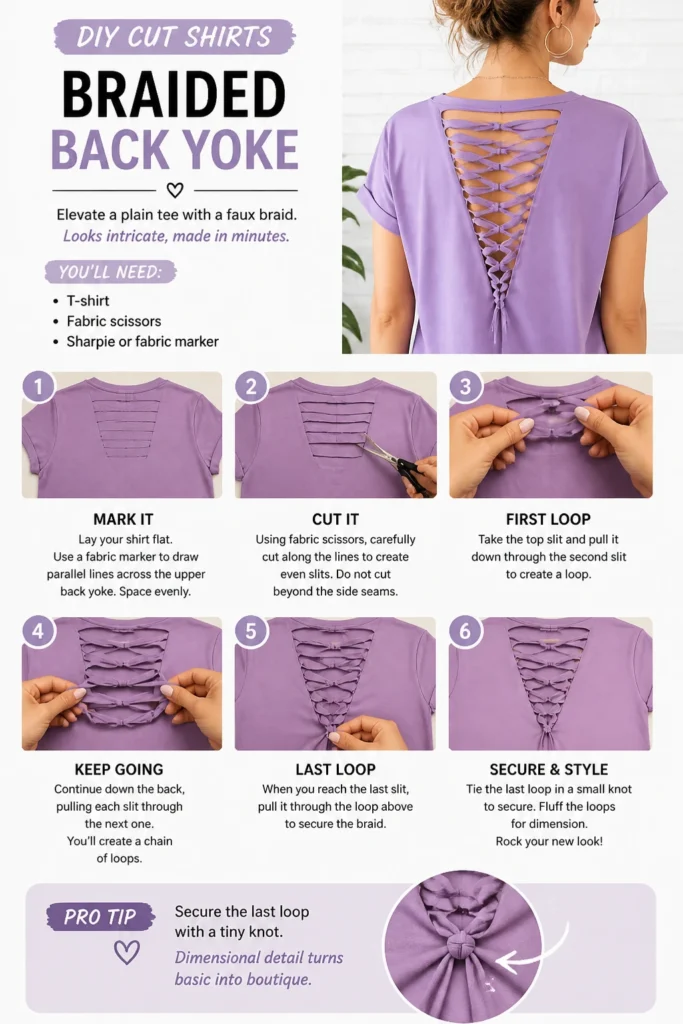
- Cut parallel slits across the upper back.
- Loop each slit through the next to create a braid.
- Pro tip: Secure the last loop with a tiny knot.
Dimensional detail turns basic into boutique.
10. Asymmetric Hem Crop
Angles = instant edge. Make your tee look custom without trying.
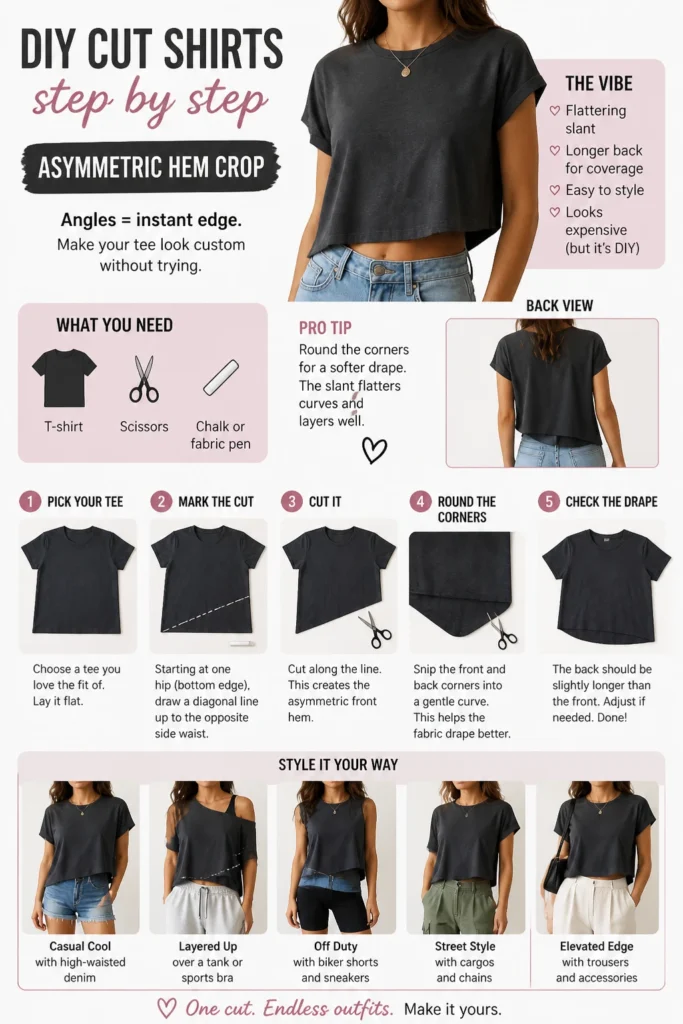
- Cut the front at a diagonal from hip to opposite waist.
- Leave the back slightly longer for coverage.
- Pro tip: Round the corners for a softer drape.
The slant flatters curves and layers well.
11. Off-Center Keyhole Neck
A tiny cut with big style. Off-center keeps it modern.
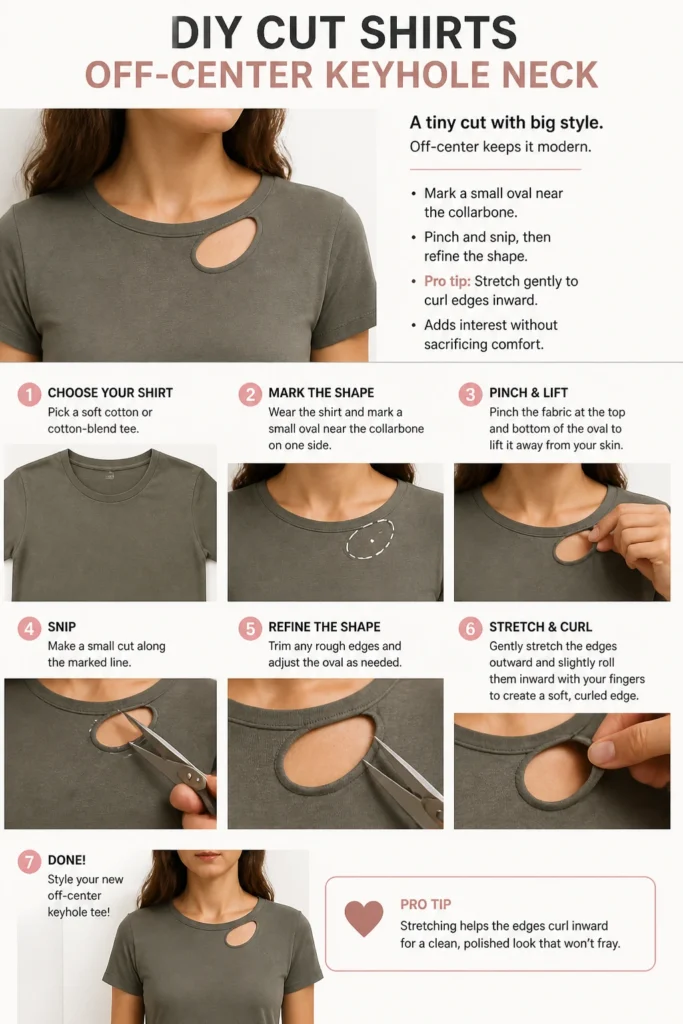
- Mark a small oval near the collarbone.
- Pinch and snip, then refine the shape.
- Pro tip: Stretch gently to curl edges inward.
Adds interest without sacrificing comfort.
12. Raw-Edge Rolled Sleeves
Make sleeves chic with two snips. Crisp, effortless, everyday.
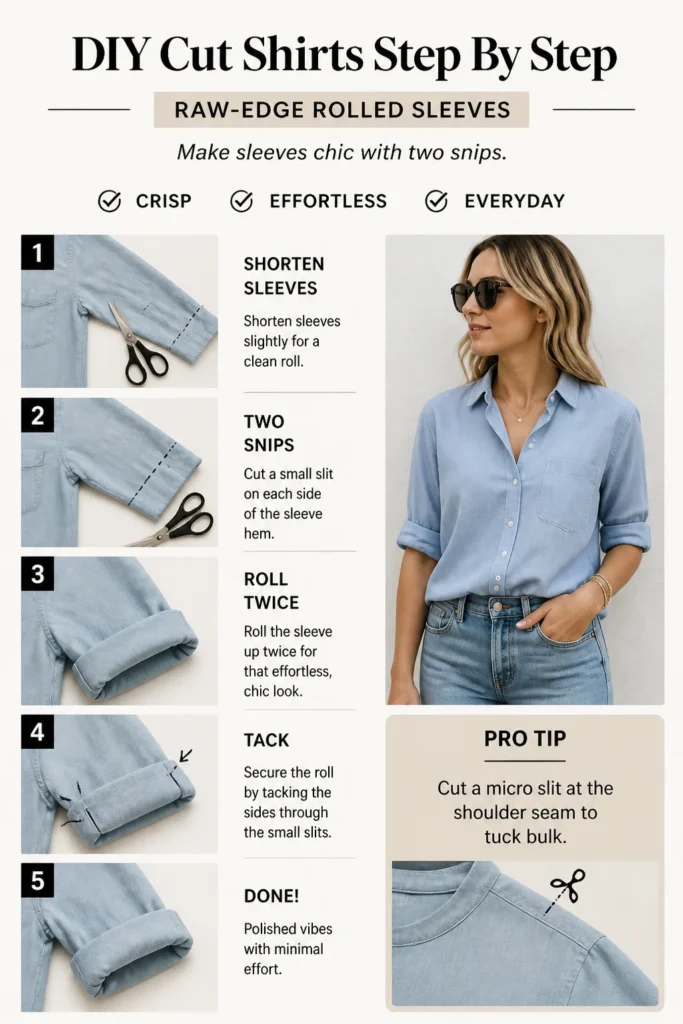
- Shorten sleeves slightly for a clean roll.
- Roll twice and tack with tiny side slits.
- Pro tip: Cut a micro slit at the shoulder seam to tuck bulk.
Polished vibes with minimal effort.
13. Back Bow Cutout
Sweet but not saccharine. A bow keeps it playful.
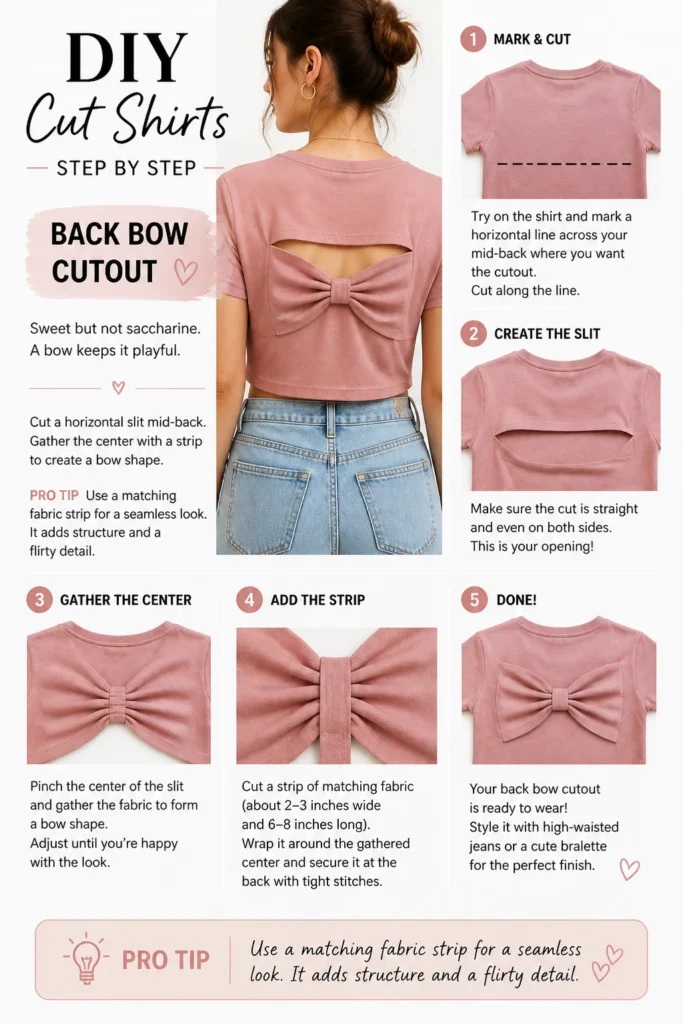
- Cut a horizontal slit mid-back.
- Gather the center with a strip to create a bow shape.
- Pro tip: Use a matching fabric strip for a seamless look.
It adds structure and a flirty detail.
14. Side Knot Tee With Scoop
Side knots snatch the waist and add drape. Instant shape-shifter.
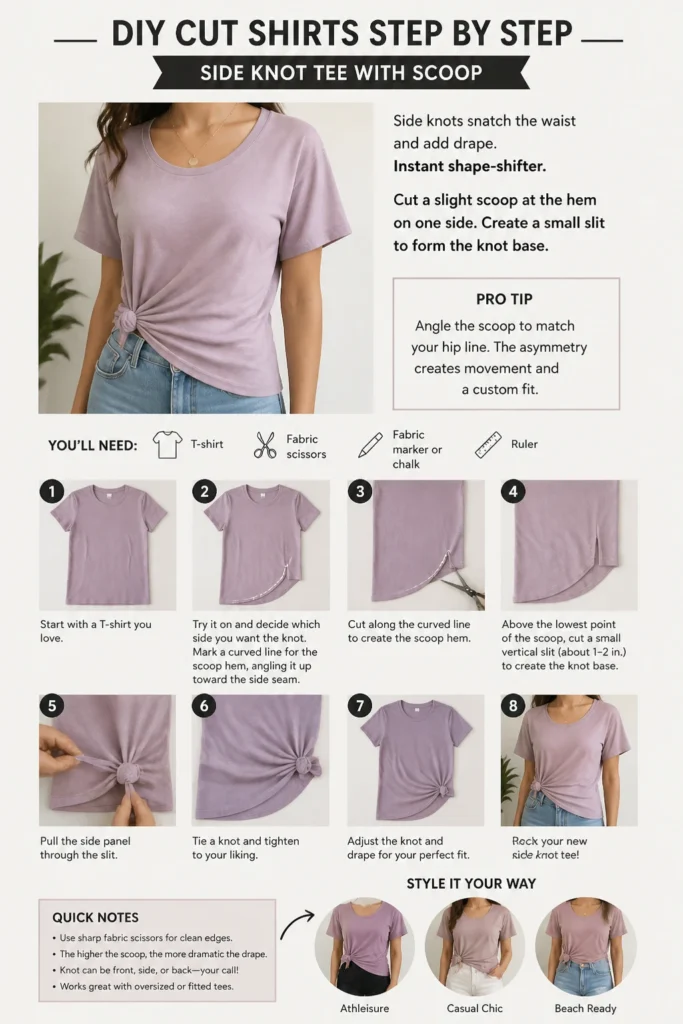
- Cut a slight scoop at the hem on one side.
- Create a small slit to form the knot base.
- Pro tip: Angle the scoop to match your hip line.
The asymmetry creates movement and a custom fit.
15. Shoulder Strap Tee
Turn sleeves into straps for a tank-top upgrade. Light, breezy, chic.
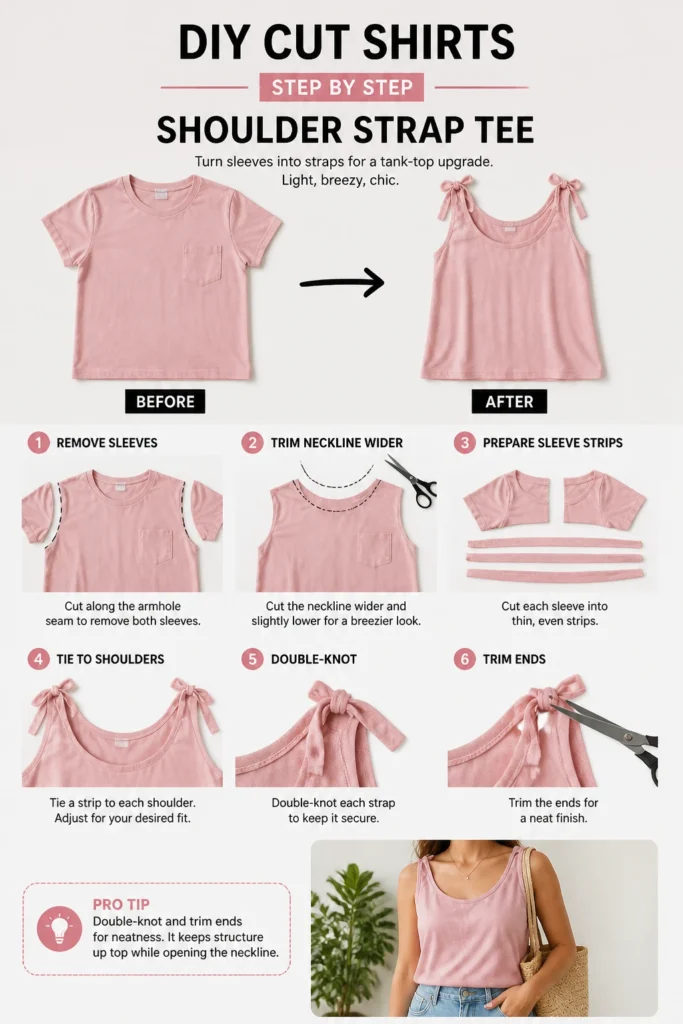
- Remove sleeves and trim the neckline wider.
- Cut thin straps from the removed sleeves and tie to the shoulders.
- Pro tip: Double-knot and trim ends for neatness.
It keeps structure up top while opening the neckline.
Conclusion
Your scissors just became a stylist. With a few bold cuts and smart tweaks, any tee can serve main-character energy. Keep it simple, keep it fun, and remember: start small, cut slow, and let the edges roll in your favor.
& CRAFT IDEAS
Beginner-friendly tutorials, creative projects,
and weekly inspiration in your inbox.