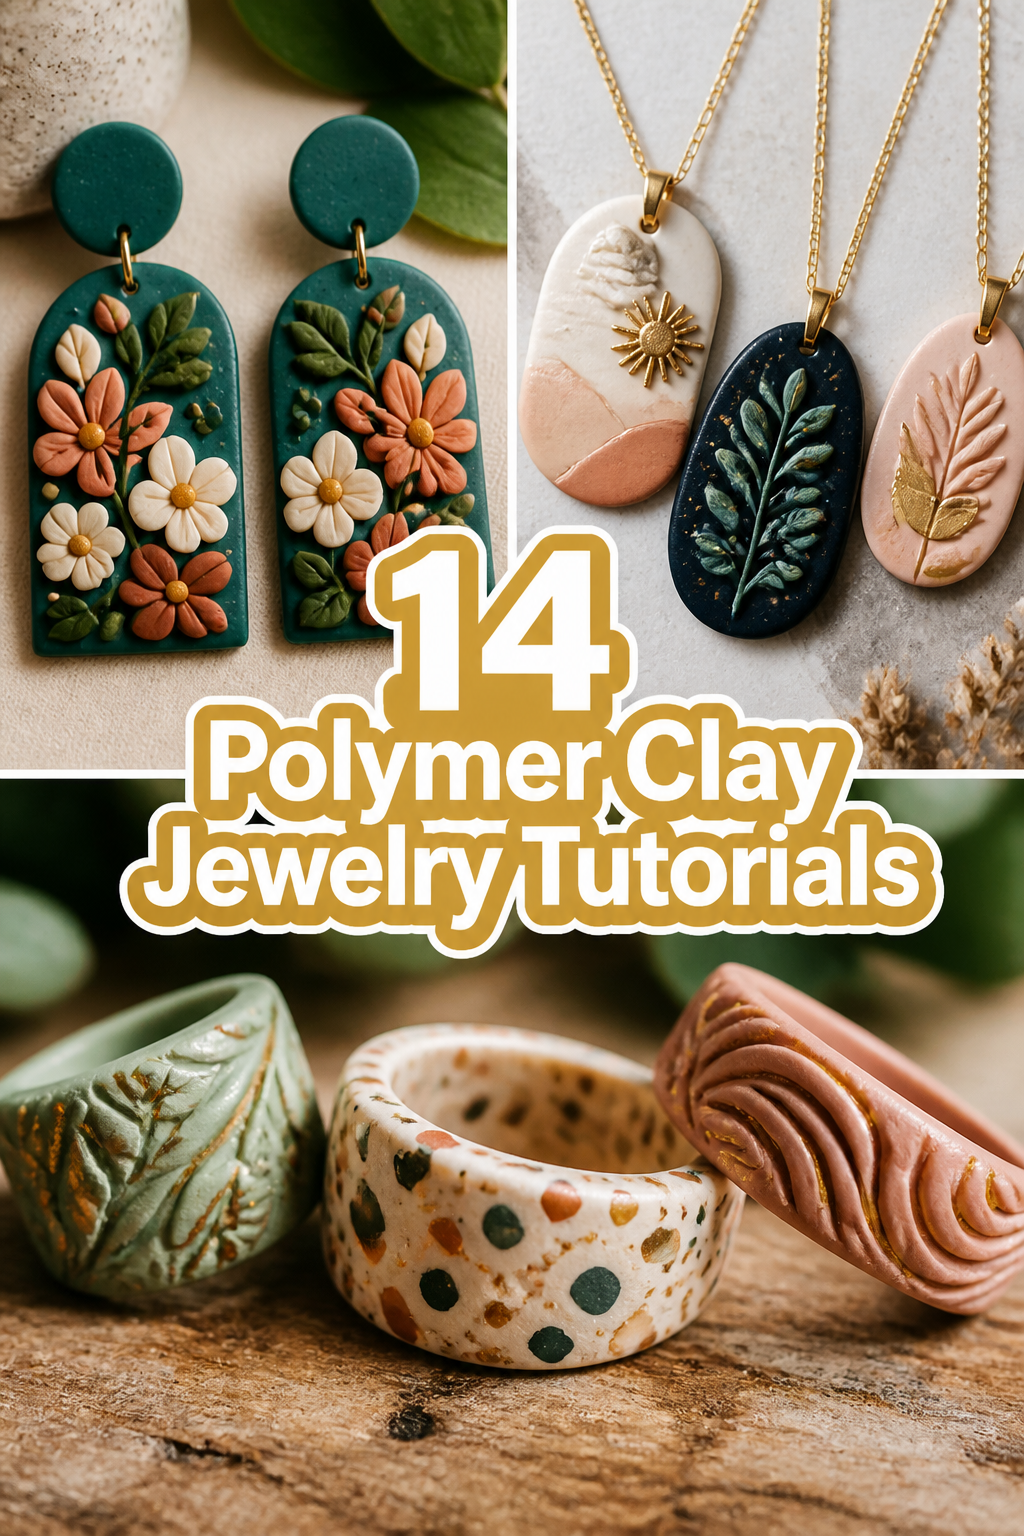
✨ 14 Polymer Clay Jewelry Tutorials
🛠️ The Ultimate Maker's Toolkit
I've tested thousands of craft tools over the years. Whether you are quilting, crafting, or building mixed-media art, these are the top 5 absolute non-negotiable tools I personally recommend to guarantee professional results.
🪡 SINGER Heavy Duty 4452 Sewing Machine
The sewing community highly recommends this as the ultimate "bulletproof" entry-level machine. Its heavy metal frame powerfully pushes through thick denim and heavy quilt layers that would instantly jam a standard plastic machine.
✂️ Fiskars 8" Orange-Handled Scissors
Never settle for dull dollar-store blades. Wirecutter repeatedly names Fiskars the absolute best all-purpose craft scissor due to its legendary precision-ground blades and an ergonomic grip that prevents hand-cramping.
🔥 Gorilla Dual Temp Hot Glue Gun
Named Wirecutter's top choice because it literally does the work of two tools. It features dual-temperature settings offering low heat for delicate florals and blistering high heat for heavy wood adhesion repairs.
🖌️ Mod Podge Waterbase Gloss Sealer
The absolute undisputed champion of decoupage and paper crafts. Experts rely exclusively on this exact water-based formula because it glues, seals, and finishes beautifully without yellowing or flaking over time.
🎨 Apple Barrel Acrylic Paint (2 oz)
The quintessential, incredibly inexpensive craft paint. Woodworkers and hobby painters swear by its smooth flow and matte finish, providing massive value and remarkably thick color coverage on rough surfaces.
Feeling that familiar pang of “I have nothing to wear” when eyeing your accessories?
Totally get it. Your jewelry box might be craving a fresh, handmade vibe.
Good news, creative pal. We’ve got the lowdown on some seriously cool polymer clay projects that will upgrade your style game, no major investment required.

1. Abstract Geo Dangle Earrings
- Best For: Art Gallery Hoppers, Brunch Dates
- Vibe: Modern Minimalist, Effortlessly Chic
- Why it works: Geometric shapes and negative space make these surprisingly versatile.
Cut various abstract shapes using small cookie cutters or a craft knife. Think triangles, arches, and irregular blobs. Combine them into asymmetrical dangle earrings using jump rings and ear wires.
Pro Tip: Mix two contrasting colors, like a deep emerald green and a soft blush pink, for that high-end look without the price tag. Bake them perfectly, obviously.
2. Faux Terrazzo Statement Necklace
- Best For: Fashion Forward Folks, Gifting Your Trendiest Friend
- Vibe: Playful Italian Summer, Artsy Cool
- Why it works: It mimics a pricey stone finish and looks super custom.
Condition a base color of clay, perhaps a creamy off-white or light grey. Roll out tiny bits of various vibrant colors – think mustard yellow, terracotta, and teal – and press them randomly into your base clay. Flatten the whole thing, then cut out a large, irregular pendant shape.
Pro Tip: Don’t be shy with the “chips.” The more varied the sizes and colors, the more authentic your faux terrazzo will appear. Just don’t overmix.
3. Marbled Effect Studs
- Best For: Everyday Wear, Subtle Style Boost
- Vibe: Elegant Earthy, Understated Sophistication
- Why it works: Marbling is deceptively easy and always looks unique.
Twist together two or three complementary clay colors, like black, white, and a touch of gold. Gently roll and fold the clay until you achieve a beautiful marbled pattern, but stop before the colors fully blend. Cut out small circular or square studs.
Pro Tip: A little goes a long way with marbling. Over-mixing turns your gorgeous swirls into a muddy mess. You’ve been warned.
4. Rainbow Arch Earrings
- Best For: Festival Goers, Anyone Who Loves Color
- Vibe: Joyful Bohemian, Retro Fun
- Why it works: Arches are super popular, and a rainbow gradient just screams happiness.
Create thin snakes of clay in a rainbow spectrum. Gently press them together side-by-side, then roll flat. Use an arch-shaped cutter to create your vibrant earring components. Attach them with jump rings for a playful dangle.
Pro Tip: For crisp color separation, chill your clay for a few minutes before cutting. This prevents smudging your perfect rainbow layers. Nobody wants a sad, blurry rainbow.
5. Textured Leaf Pendants
- Best For: Nature Lovers, Autumn Enthusiasts
- Vibe: Organic Woodland, Rustic Charm
- Why it works: Using real leaves creates an instant, intricate pattern.
Roll out a sheet of clay in an earthy tone, like forest green or burnt orange. Press a real leaf firmly onto the clay to transfer its intricate vein pattern. Carefully peel the leaf away, then cut out your pendant shape.
Pro Tip: Choose leaves with prominent veins for the best texture transfer. Maple or oak leaves work wonders. Just make sure they are clean and dry, obviously.
6. Stackable Ring Set
- Best For: Daily Accessorizing, Minimalist Personalization
- Vibe: Chic & Modern, Custom Comfort
- Why it works: You can mix and match colors and textures endlessly.
Roll thin ropes of clay, varying the thickness slightly. Form them into rings that fit your fingers, making sure they are sturdy enough. Experiment with different textures using stamps or tools before baking.
Pro Tip: Use a ring mandrel or even a marker pen to shape your rings before baking. This ensures a consistent size and avoids wonky circles. Nobody wants a lopsided ring.
7. Faux Ceramic Bead Bracelet
- Best For: Boho Chic Enthusiasts, Arm Candy Collectors
- Vibe: Hand-Thrown Pottery, Artisanal Feel
- Why it works: It’s a great way to mimic expensive ceramic beads on a budget.
Roll various sizes of clay into bead shapes. Use a needle tool to create a hole through the center of each. Before baking, add subtle textures or paint with acrylics for a glazed effect. String them onto elastic cord.
Pro Tip: After baking, use a sanding block to smooth any rough edges on your beads. A little buffing makes them feel super professional and comfortable against your skin.
8. Color Block Drop Earrings
- Best For: Statement Makers, Office Chic
- Vibe: Retro Glam, Bold & Bright
- Why it works: The clean lines and contrasting colors make a powerful visual impact.
Condition two or three solid, vibrant colors of clay. Cut precise geometric shapes – maybe a large circle, a smaller square, and a tiny rectangle. Layer and connect these shapes with jump rings to create eye-catching drop earrings.
Pro Tip: Ensure your cuts are super clean for that polished, professional look. A sharp blade is your best friend here. Don’t cheap out on the tools.
9. Sweet Fruit Slice Charms
- Best For: Quirky Personalization, Kids’ Jewelry
- Vibe: Whimsical Summer, Adorably Playful
- Why it works: They are tiny, cute, and surprisingly detailed with a bit of patience.
Create miniature logs of clay in fruit colors like red and white for watermelon, or yellow and white for lemon. Assemble the colors to mimic the fruit’s interior, then slice thin rounds. Add tiny black seeds for extra realism.
Pro Tip: Bake these little guys on parchment paper to prevent sticking. A clear glaze after baking will give them that juicy, realistic shine. You know, like actual fruit.
10. Gold Flake Resin-Look Pendants
- Best For: Elegant Evenings, Special Occasions
- Vibe: Luxurious Glam, Modern Art Deco
- Why it works: Gold flakes elevate simple clay into something truly dazzling.
Roll out a transparent or very light-colored polymer clay. Gently press delicate gold leaf or imitation gold flakes onto the surface. Cut out elegant shapes like ovals or teardrops. A clear liquid clay or resin finish after baking enhances the effect.
Pro Tip: Handle gold leaf with tweezers, as it’s super delicate. A thin layer of liquid clay before baking helps seal the flakes in place. Nobody wants flakes falling off.
11. Braided Clay Bracelet
- Best For: Casual Outings, Handmade Gift Giving
- Vibe: Rustic Chic, Friendship Bracelet Elevated
- Why it works: It looks intricate but is surprisingly simple to achieve.
Roll three long, thin ropes of different colored clay. Gently braid them together, keeping the tension even. Form the braid into a bracelet shape and trim the ends neatly. Add findings after baking.
Pro Tip: Lightly dust your work surface with cornstarch to prevent the clay from sticking while you braid. This keeps your colors clean and your braid tight. Trust me on this.
12. Faux Druzy Stud Earrings
- Best For: Sparkle Lovers, Affordable Bling
- Vibe: Glamorous Glimmer, Subtle Sparkle
- Why it works: It perfectly mimics the look of expensive druzy stones.
Condition a small amount of clay in your desired color, like deep blue or amethyst purple. Sprinkle it generously with fine glitter or microbeads. Gently press the glitter in, then cut out small stud shapes.
Pro Tip: Use extra-fine glitter for the most convincing druzy effect. A thin layer of liquid clay or clear glaze after baking will seal in all that sparkle. Don’t be a glitter miser.
13. Whimsical Mushroom Charms
- Best For: Cottagecore Enthusiasts, Fantasy Fans
- Vibe: Enchanted Forest, Cute & Playful
- Why it works: They add a touch of storybook magic to any accessory.
Form a small stem from white or tan clay and a colorful cap, perhaps red with white dots, for the mushroom top. Attach them securely. You can add tiny details like gills underneath the cap with a needle tool. Bake and add to a necklace or bracelet.
Pro Tip: Use a tiny dotting tool or the blunt end of a toothpick to create perfectly round white spots on your mushroom caps. Precision makes all the difference.
14. Ombre Gradient Pendants
- Best For: Modern Minimalists, Color Enthusiasts
- Vibe: Smooth Transition, Sophisticated Simplicity
- Why it works: The subtle color shift is incredibly elegant and eye-catching.
Blend two or three similar shades of clay together, gradually transitioning from dark to light. Roll the blended clay flat, then cut out a simple pendant shape like a circle or rectangle. Drill a hole for stringing before baking.
Pro Tip: A pasta machine is your secret weapon for achieving super smooth and seamless ombre blends. Run the clay through on progressively thinner settings. You won’t regret it.
Our Top Recommended Finds
- Polymer Clay Starter Kit: Seriously, if you’re just dipping your toes in, a kit with a variety of colors and basic tools is a no-brainer. It saves you the headache of individual purchases.
- Acrylic Clay Roller: This isn’t just for baking. A good, non-stick roller gets your clay to that perfect, even thickness every single time. No more lumpy disasters.
- Precision Craft Knife Set: For those super clean cuts and intricate details, a sharp set of blades is non-negotiable. It truly elevates your finished pieces from “homemade” to “handmade chic.”
Which of these will you try first?
So, there you have it, 14 ways to conquer your jewelry box boredom with some polymer clay magic. Go on, get your hands dirty and craft something amazing. We’re pretty sure your future self will thank you.
Drop a comment below and tell us which tutorial you’re eyeing up for your next creative adventure!