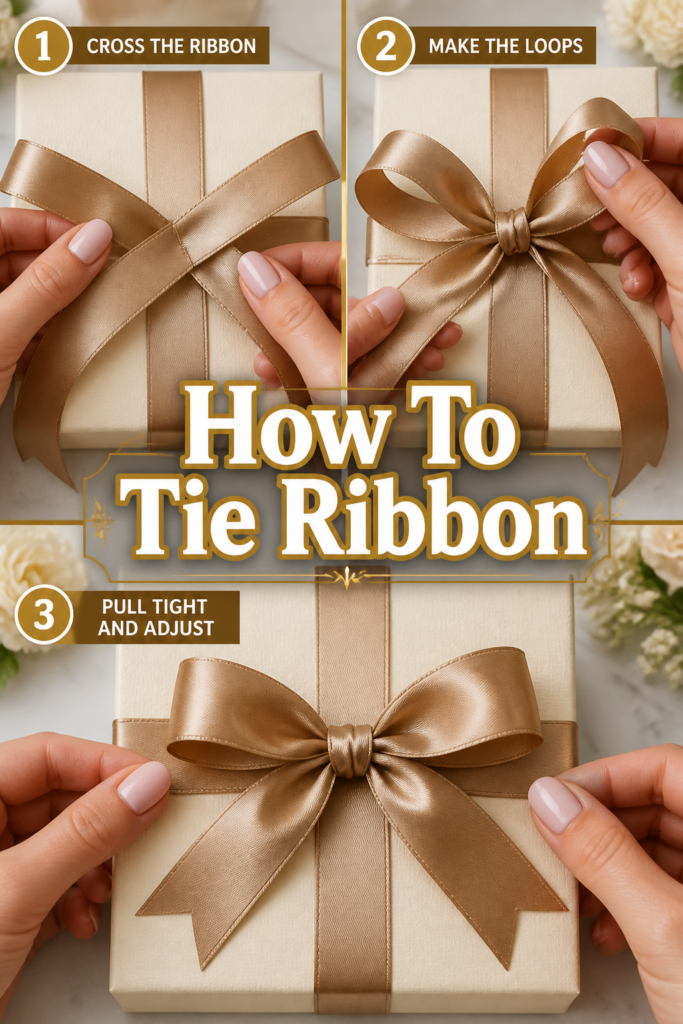
🎀 How To Tie Ribbon
🛠️ The Ultimate Maker's Toolkit
I've tested thousands of craft tools over the years. Whether you are quilting, crafting, or building mixed-media art, these are the top 5 absolute non-negotiable tools I personally recommend to guarantee professional results.
🪡 SINGER Heavy Duty 4452 Sewing Machine
The sewing community highly recommends this as the ultimate "bulletproof" entry-level machine. Its heavy metal frame powerfully pushes through thick denim and heavy quilt layers that would instantly jam a standard plastic machine.
✂️ Fiskars 8" Orange-Handled Scissors
Never settle for dull dollar-store blades. Wirecutter repeatedly names Fiskars the absolute best all-purpose craft scissor due to its legendary precision-ground blades and an ergonomic grip that prevents hand-cramping.
🔥 Gorilla Dual Temp Hot Glue Gun
Named Wirecutter's top choice because it literally does the work of two tools. It features dual-temperature settings offering low heat for delicate florals and blistering high heat for heavy wood adhesion repairs.
🖌️ Mod Podge Waterbase Gloss Sealer
The absolute undisputed champion of decoupage and paper crafts. Experts rely exclusively on this exact water-based formula because it glues, seals, and finishes beautifully without yellowing or flaking over time.
🎨 Apple Barrel Acrylic Paint (2 oz)
The quintessential, incredibly inexpensive craft paint. Woodworkers and hobby painters swear by its smooth flow and matte finish, providing massive value and remarkably thick color coverage on rough surfaces.
There’s a special kind of joy in presenting a beautifully wrapped gift or adding a decorative flourish to a craft project.
Learning to tie a perfect ribbon bow might seem tricky at first, but it’s a skill that truly elevates your creations.
I remember struggling with my first few attempts, creating lopsided knots and floppy loops. But with a little practice and the right technique, you’ll be crafting stunning bows in no time!
Quick Overview
This guide will walk you through the simple steps to create a classic, elegant ribbon bow.
You’ll soon master the art of tying neat, symmetrical loops that impress and delight.
- Time needed: 5-15 minutes (per bow, once you get the hang of it)
- Difficulty: Beginner
- What you’ll need: Ribbon, scissors, your hands
Step-by-Step Instructions
Step 1: Gather Your Tools and Ribbon
First, collect your chosen ribbon and a sharp pair of scissors.
Having everything ready ensures a smooth, uninterrupted crafting process.
- Choose a ribbon that suits your project. Satin, grosgrain, sheer, or wired ribbons all have unique properties.
- Ensure your scissors are sharp. Clean cuts prevent fraying and make tying much easier.
Pro Tip: For beginners, start with a medium-width grosgrain or satin ribbon (around 1 inch wide). These ribbons hold their shape well and are easy to manipulate. Wired ribbon offers even more structure and is excellent for larger, dramatic bows.
Step 2: Measure and Cut Your Ribbon
The length of your ribbon is crucial for a well-proportioned bow.
It’s always better to start with a little extra than to run short.
- Estimate the length you’ll need. A good rule of thumb is to allow for about 18-24 inches for a small-to-medium bow.
- Cut the ribbon cleanly at both ends. You can cut straight across or create a decorative V-shape or diagonal cut later.
Step 3: Create the First Loop
This is where your bow begins to take shape.
Holding the ribbon correctly sets the foundation for a beautiful result.
- Hold one end of the ribbon in your dominant hand, leaving a tail of a few inches.
- Form a loop with the ribbon, bringing it over your thumb and forefinger. This will be one side of your bow.
- Adjust the size of this loop. This will dictate the overall size of your finished bow.
Step 4: Form the Second Loop
Now you’ll mirror your first action to create the opposite side of the bow.
Aim for symmetry as you create this second loop.
- Bring the remaining long end of the ribbon around and create a second loop, similar in size to the first.
- Ensure both loops are facing the same direction and are roughly equal in length.
Pro Tip: Practice making loops of consistent size. You can lay the first loop against the second to compare their lengths before you proceed. This helps prevent lopsided bows.
Step 5: Cross the Loops and Thread Through
This step creates the central knot that holds your bow together.
It’s the core of the tying process.
- Cross the second loop over the first, right in the center where they meet.
- Thread the second loop underneath the first loop and pull it up through the opening you’ve created. Imagine tying a shoelace, but with loops instead of loose ends.
Step 6: Gently Pull to Tighten
Tightening is a delicate balance between securing the knot and not crushing the loops.
Take your time with this part.
- Pull both loops gently, but firmly, away from each other.
- Watch as the knot forms in the center, securing your two loops.
Pro Tip: Don’t yank! A sudden pull can distort the loops or make the knot too tight to adjust. A slow, steady pull is best.
Step 7: Adjust Your Loops and Tails
This is where you refine your bow, giving it that polished, professional look.
Symmetry and grace are key here.
- Finesse the loops. Gently pull each loop to make them perfectly symmetrical and plump.
- Position the tails. Arrange the two loose ends (tails) so they fall gracefully.
- Fluff the bow if necessary, especially with wired or stiffer ribbons, to give it volume.
Step 8: Trim the Tails for a Perfect Finish
The final touch makes a big difference in presentation.
Clean, intentional cuts enhance the overall appeal.
- Cut the tails to your desired length.
- Consider a decorative cut: a diagonal slant, a V-shape (swallowtail), or a simple straight cut.
- Ensure both tails are cut evenly for a balanced look.
Common Mistakes to Avoid
Uneven Loop Sizes
One of the most common issues is having loops that aren’t the same size.
This results in a lopsided, less appealing bow. Always compare your loops before tightening the knot.
Tying Too Tightly, Too Soon
Pulling the knot too tight before adjusting the loops can make it impossible to refine your bow.
Tighten gently at first, then firm up once the loops are perfectly placed.
Frayed Ribbon Ends
Using dull scissors or tearing the ribbon instead of cutting it can lead to frayed ends.
Always use sharp scissors for a clean, crisp cut that prevents unraveling.
Forgetting to Position the Knot
Sometimes the knot ends up off-center or twisted.
Make sure the center of your ribbon is where you want the knot to form before you begin crossing and threading.
Troubleshooting
My Bow Looks Lopsided
If your bow looks uneven, don’t despair! It’s a common issue.
Gently loosen the central knot just enough to manipulate the loops. Pull on the shorter loop or tail to adjust its length until it matches the other side. Then, re-tighten the knot carefully.
The Ribbon Slips and Won’t Hold Its Shape
This often happens with very slippery ribbons like satin, especially if they are thin.
Try using a slightly wider ribbon, or consider a ribbon with a bit more texture, like grosgrain. For very slippery ribbons, you can also use a small dab of hot glue or a tiny piece of double-sided tape under the knot to secure it to the package or project surface.
The Tails Aren’t Hanging Nicely
Sometimes ribbon tails can curl oddly or refuse to lie flat.
For wired ribbons, you can gently bend and shape the tails. For fabric ribbons, you might need to iron them on a low setting (check ribbon material first!) or gently run them over a curling iron (again, low heat and caution!) to encourage a graceful curl or straighten them out.
Key Takeaways
- Practice is key to mastering symmetrical loops.
- Always start with more ribbon than you think you’ll need.
- Gentle tightening allows for better adjustment of the bow.
- Sharp scissors make a significant difference in the final look.
- Don’t be afraid to experiment with different ribbon types and widths.
- A well-tied bow elevates any gift or craft project.
Frequently Asked Questions
What’s the best ribbon for beginners?
Grosgrain ribbon is often recommended for beginners. It has a nice texture, holds its shape well, and is less slippery than satin, making it easier to handle.
How do I make a bow with multiple loops?
To create a multi-loop bow, you’ll make several loops on each side before securing the center. Instead of just two loops, you’ll fold the ribbon back and forth, creating a series of “bunny ears” on each side, then tie the center with a separate piece of ribbon or floral wire.
Can I use fabric scraps to tie a bow?
Absolutely! Fabric scraps, especially from cotton or linen, can make charming, rustic bows. Just ensure the fabric is cut into a long, even strip, and consider hemming the edges if fraying is a concern for a neater look.
How do I make a bow stand up straight on a gift?
For a bow to stand up, it needs structure. Wired ribbon is excellent for this, as you can shape it. For non-wired ribbons, ensure your loops are full and tight. You can also use a small dab of hot glue or a glue dot on the back of the knot to secure it directly to the package.
Our Top Recommended Finds
- Assorted Grosgrain Ribbon Pack: Perfect for practicing with various colors and widths, offering good grip and shape retention.
- Fabric Scissors: A dedicated pair of sharp, comfortable fabric scissors will make clean cuts and prevent fraying, lasting for years of crafting.
- Wired Ribbon Collection: Ideal for when you want to create bows that hold dramatic shapes and add extra flair to your projects.
Your Bow-Tying Journey Begins Now
You now have all the tools and knowledge to tie beautiful, elegant ribbons.
From gift wrapping to hair accessories, the possibilities are endless once you master this fundamental skill.
Grab some ribbon, find a quiet moment, and let your hands discover the rhythm of knotting and shaping. Happy crafting!