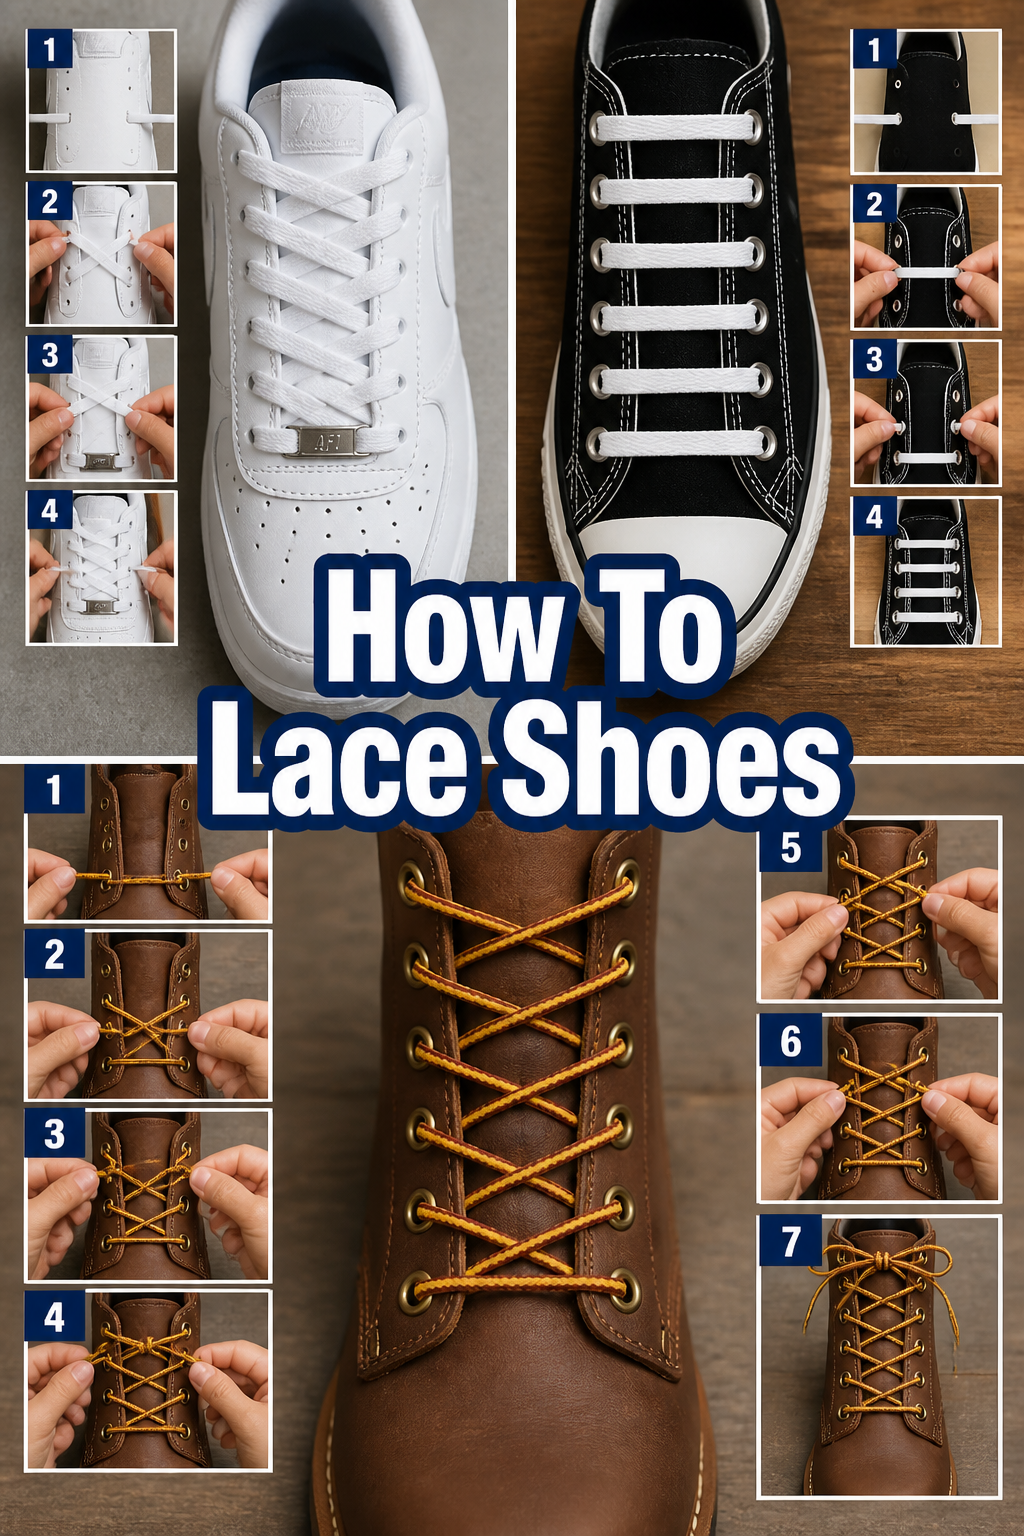
👟 How To Lace Shoes
🛠️ The Ultimate Maker's Toolkit
I've tested thousands of craft tools over the years. Whether you are quilting, crafting, or building mixed-media art, these are the top 5 absolute non-negotiable tools I personally recommend to guarantee professional results.
🪡 SINGER Heavy Duty 4452 Sewing Machine
The sewing community highly recommends this as the ultimate "bulletproof" entry-level machine. Its heavy metal frame powerfully pushes through thick denim and heavy quilt layers that would instantly jam a standard plastic machine.
✂️ Fiskars 8" Orange-Handled Scissors
Never settle for dull dollar-store blades. Wirecutter repeatedly names Fiskars the absolute best all-purpose craft scissor due to its legendary precision-ground blades and an ergonomic grip that prevents hand-cramping.
🔥 Gorilla Dual Temp Hot Glue Gun
Named Wirecutter's top choice because it literally does the work of two tools. It features dual-temperature settings offering low heat for delicate florals and blistering high heat for heavy wood adhesion repairs.
🖌️ Mod Podge Waterbase Gloss Sealer
The absolute undisputed champion of decoupage and paper crafts. Experts rely exclusively on this exact water-based formula because it glues, seals, and finishes beautifully without yellowing or flaking over time.
🎨 Apple Barrel Acrylic Paint (2 oz)
The quintessential, incredibly inexpensive craft paint. Woodworkers and hobby painters swear by its smooth flow and matte finish, providing massive value and remarkably thick color coverage on rough surfaces.
Ever felt a little tug of frustration when your shoelaces just don’t sit right?
I’ve been there, fumbling with uneven ends and twisted strands.
But mastering the art of lacing isn’t just about utility; it’s about comfort, style, and making your favorite shoes truly yours.

Quick Overview
Get ready to transform your footwear from merely functional to perfectly fitted and stylish.
This guide will walk you through the classic lacing techniques, ensuring your shoes look great and feel fantastic.
- Time needed: 5-15 minutes (depending on shoe type and desired style)
- Difficulty: Beginner
- What you’ll need: A pair of shoes, a fresh set of shoelaces
Step-by-Step Instructions
We’ll start with the universally popular Criss-Cross lacing method, then explore some creative variations.
This approach offers excellent comfort and a secure fit for most casual and athletic shoes.
Step 1: Gather Your Gear
Before you begin, make sure you have everything laid out.
A clean, flat surface can make the process much easier.
- Pick your shoes and your chosen shoelaces.
- Ensure your laces are free of knots or tangles.
Pro Tip: Choose laces that complement your shoes. Thinner laces work well for dress shoes, while thicker, more durable laces are great for sneakers or boots.
Step 2: Find Your Starting Point
The first step sets the foundation for the entire lacing pattern.
Consistency here is key for a balanced look.
- Locate the two lowest eyelets on your shoe, closest to the toe.
- Thread one end of the shoelace down through the top of the left eyelet.
- Thread the other end down through the top of the right eyelet.
Step 3: Create the First Bar
This initial bar should be neat and even, forming the base of your lacing.
It’s important to make sure both sides of the lace are equal in length.
- Pull the lace through until an even horizontal bar forms across the inside of the shoe, connecting the two lowest eyelets.
- Adjust the lace so both ends emerging from the top of the eyelets are exactly the same length.
Pro Tip: Hold the lace ends up to ensure they’re even. A slight difference here can lead to a very noticeable imbalance later on.
Step 4: Begin the Criss-Cross Pattern
Now, let’s start forming the signature criss-cross.
This is where the magic of this lacing style truly begins.
- Take the left lace end and cross it diagonally over the tongue of the shoe.
- Feed it down through the next available eyelet on the right side.
- Take the right lace end and cross it diagonally over the tongue.
- Feed it down through the next available eyelet on the left side.
Step 5: Continue the Pattern
Maintain the rhythm and direction as you work your way up the shoe.
Consistency ensures a clean and appealing look.
- Repeat the criss-cross motion, always bringing the lace over the tongue and down through the next eyelet.
- Ensure that each lace always crosses over the previous one in the same direction (e.g., the left lace always crosses over the right lace).
Step 6: Ensure Even Tension
Tension is crucial for both comfort and appearance.
Too loose, and your foot will slide; too tight, and it will be uncomfortable.
- Gently pull each criss-cross section to tighten it slightly as you go.
- Avoid yanking too hard, which can distort the shoe’s shape.
- Check the tension periodically to ensure it feels snug but not restrictive.
Pro Tip: For a more custom fit, you can adjust tension differently in various sections. Tighten more over the arch for support, or loosen near the toes for comfort.
Step 7: Finish at the Top
You’re almost there! The final eyelets need careful attention.
This step determines where your bow will sit.
- Continue the criss-cross pattern until you reach the uppermost eyelets on your shoe.
- Pull both lace ends through the top eyelets, ensuring they emerge from the top of the eyelets.
Step 8: Adjust and Admire
Now it’s time for the final touches and a moment of appreciation.
Slip your foot in and feel the difference.
- Do a final check for even tension throughout the entire lacing.
- Tie your laces in your preferred knot (a simple bow works for most).
- Admire your perfectly laced shoes!
Creative Variation: Straight Bar Lacing
For a sleek, minimalist look, especially popular on dress shoes or sneakers with an even number of eyelets.
This method hides most of the lace underneath the eyelets.
- Start by threading the lace down through the lowest eyelets, creating an even bar across the top of the shoe.
- Take the left lace end and feed it underneath the eyelets, bringing it up through the next eyelet on the same side.
- Cross this lace straight across the top to the eyelet opposite it, feeding it down through.
- Repeat with the right lace end, feeding it underneath and up through the next eyelet on its side, then crossing straight over and down through.
- Continue alternating, always feeding underneath on one side and over on the other, creating parallel bars.
Pro Tip: Straight Bar lacing works best with an even number of eyelet pairs. If you have an odd number, one of the top bars will need to be formed differently, or you can skip an eyelet pair.
Common Mistakes to Avoid
Even simple tasks can have common pitfalls. Knowing them helps you achieve a perfect lace every time.
Uneven Lace Length
Starting with one lace end significantly shorter than the other leads to an awkward bow or not enough lace to tie.
Always double-check that your initial bar leaves both ends perfectly equal before you start criss-crossing.
Skipping Eyelets
Missing an eyelet can throw off the entire pattern, making your lacing look incomplete and providing uneven support.
Work methodically, eyelet by eyelet, and always ensure each lace passes through its designated hole.
Too Tight or Too Loose
Lacing your shoes too tightly can cause discomfort, restrict blood flow, and even damage the shoe material.
Too loose, and your foot will slide around, leading to blisters and poor support. Aim for a snug, comfortable fit that allows for natural foot movement.
Twisted Laces
When laces twist as you thread them, they can look messy and uncomfortable against your foot.
Keep your laces flat and untwisted as you feed them through each eyelet for a cleaner look and feel.
Troubleshooting
Sometimes, despite your best efforts, issues arise. Here’s how to fix common lacing problems.
Laces Keep Untying
If your laces constantly come undone, the knot might be the issue, or the lace material itself.
Try tying a “reef knot” (the classic square knot) which is more secure than a “granny knot.” Also, consider laces made from natural fibers like cotton or laces with a slight wax coating, which offer more friction than slick synthetic ones.
Shoes Feel Uncomfortable
Discomfort often stems from uneven tension or the wrong lacing style for your foot shape.
Experiment with loosening or tightening specific sections. If you have high arches, try skipping the middle eyelets for less pressure. If your toes feel cramped, loosen the bottom sections.
Laces Look Messy
A messy appearance usually comes from twisted laces or inconsistent tension.
Unlace your shoes completely and start over, paying close attention to keeping the laces flat and applying even tension at each step. Straight bar lacing can also provide a much cleaner aesthetic.
Key Takeaways
- Start with even lace ends for a balanced finish.
- Maintain consistent tension throughout the lacing process for comfort and appearance.
- Choose the right lacing style for your shoe type and personal comfort needs.
- Keep laces flat and untwisted for a neat and tidy look.
- Practice makes perfect – don’t be afraid to experiment and re-lace until it feels right.
- Consider lace material for durability and knot security.
Frequently Asked Questions
How often should I replace shoelaces?
It depends on how frequently you wear your shoes and the quality of the laces. For daily wear, replacing laces every 6-12 months can keep your shoes looking fresh and prevent unexpected breaks. If they look frayed or dirty, it’s time for a change.
What’s the best lacing for running shoes?
For running, a standard criss-cross lacing often works best for overall support and flexibility. However, many runners use specific lacing patterns to address pressure points, such as “heel lock” lacing to prevent heel slippage, or skipping eyelets over the arch to relieve pressure.
Can I wash my shoelaces?
Yes, most shoelaces can be washed! Remove them from your shoes, place them in a mesh laundry bag to prevent tangling, and wash them with your regular laundry on a gentle cycle. Air dry them afterward to prevent shrinking or damage.
How do I stop my laces from coming undone?
Beyond tying a secure knot like the reef knot, consider using waxed cotton laces which have more grip. You can also try double-knotting or using lace anchors/clips for extra security, especially for active wear.
Our Top Recommended Finds
Elevate your lacing game with these helpful additions.
- Waxed Cotton Shoelaces: These laces offer superior grip, reducing the chances of untying, and add a touch of sophistication.
- Elastic No-Tie Laces: Perfect for convenience, these laces transform any shoe into a slip-on, great for kids or those on the go.
- Lace Anchors/Clips: These small devices secure your laces at the end, eliminating bows and creating a clean, custom-fit look.
Embrace Your Lacing Journey
You’ve just taken a significant step toward making your shoes not just wearable, but truly comfortable and stylish.
No more fumbling, no more uneven bows, just perfectly laced footwear ready for your next adventure.
Take a moment to appreciate your handiwork, then slip into your newly laced shoes and feel the difference.
Why not try a different lacing style on another pair of shoes tomorrow?
The world of shoelace customization is vast and waiting for you to explore!