✂️ 12 Ways To Cut Shirts
🛠️ The Ultimate Maker's Toolkit
I've tested thousands of craft tools over the years. Whether you are quilting, crafting, or building mixed-media art, these are the top 5 absolute non-negotiable tools I personally recommend to guarantee professional results.
🪡 SINGER Heavy Duty 4452 Sewing Machine
The sewing community highly recommends this as the ultimate "bulletproof" entry-level machine. Its heavy metal frame powerfully pushes through thick denim and heavy quilt layers that would instantly jam a standard plastic machine.
✂️ Fiskars 8" Orange-Handled Scissors
Never settle for dull dollar-store blades. Wirecutter repeatedly names Fiskars the absolute best all-purpose craft scissor due to its legendary precision-ground blades and an ergonomic grip that prevents hand-cramping.
🔥 Gorilla Dual Temp Hot Glue Gun
Named Wirecutter's top choice because it literally does the work of two tools. It features dual-temperature settings offering low heat for delicate florals and blistering high heat for heavy wood adhesion repairs.
🖌️ Mod Podge Waterbase Gloss Sealer
The absolute undisputed champion of decoupage and paper crafts. Experts rely exclusively on this exact water-based formula because it glues, seals, and finishes beautifully without yellowing or flaking over time.
🎨 Apple Barrel Acrylic Paint (2 oz)
The quintessential, incredibly inexpensive craft paint. Woodworkers and hobby painters swear by its smooth flow and matte finish, providing massive value and remarkably thick color coverage on rough surfaces.
Okay, let’s be real. We all have that one tee in the back of the closet. You know, the one that’s a little too baggy, a little too basic, or just screaming for a glow-up. Before you toss it into the donation pile (or worse, the trash, gasp!), let’s unleash your inner DIY fashionista. Fast fashion is so last season anyway, right?
Grab your sharpest scissors, a marker, and maybe a mirror for dramatic effect. We’re about to transform those forgotten fabrics into statement pieces. Prepare to turn heads and answer, “OMG, where did you get that?” with a smug, “Oh, this old thing? I made it.”
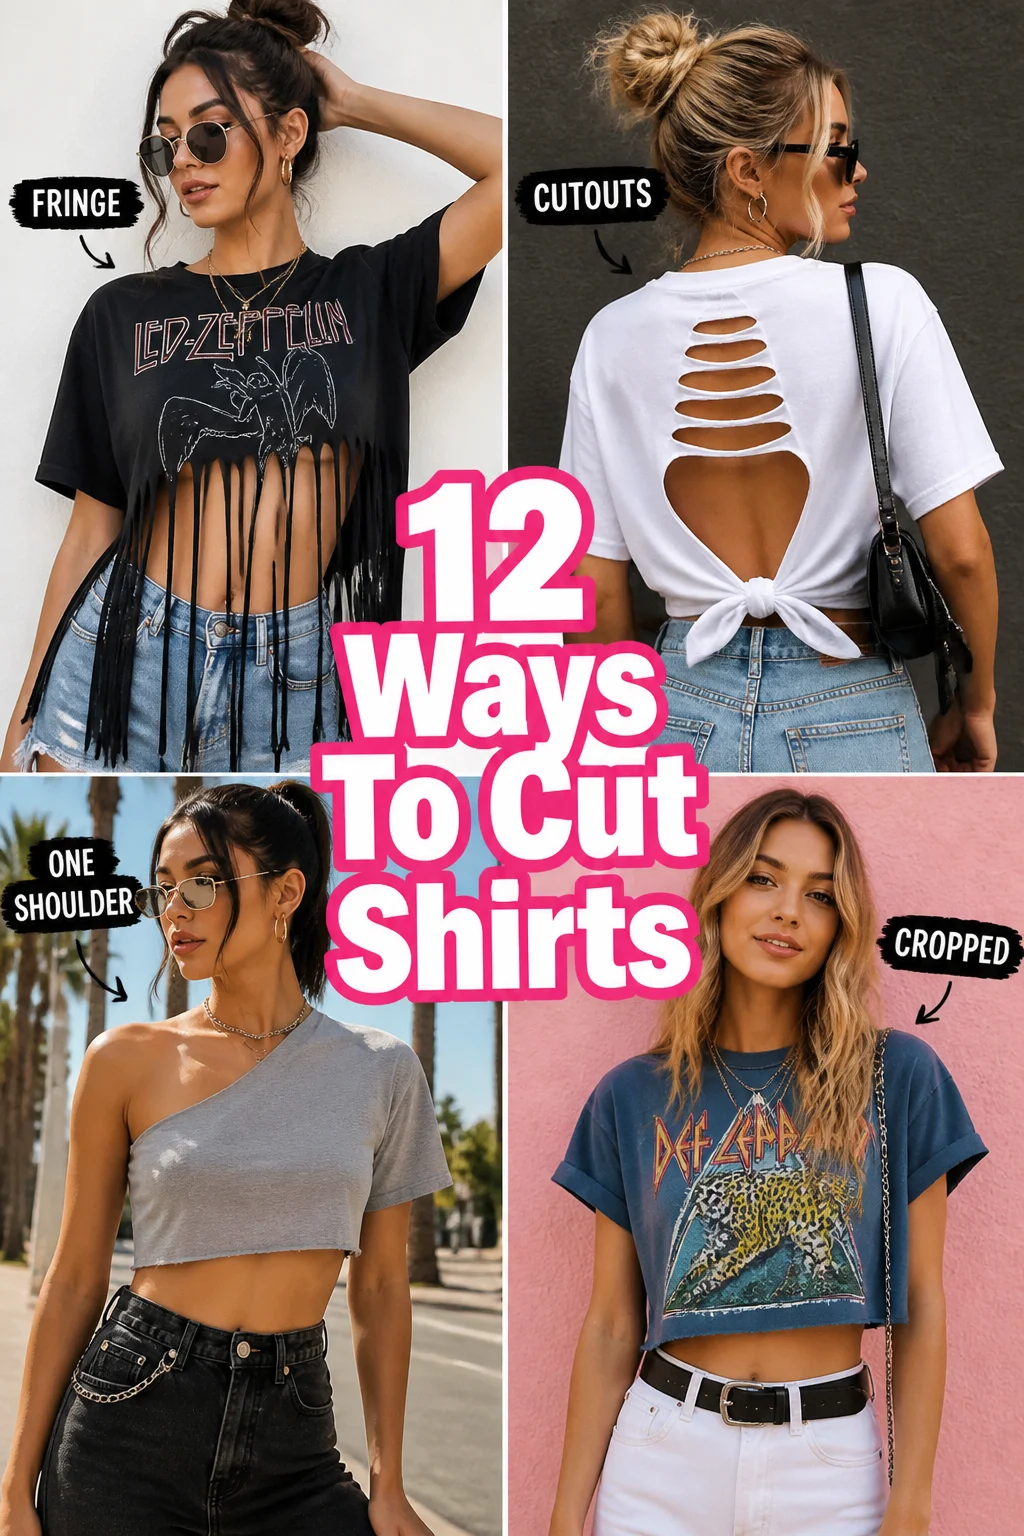
1. The Classic Crop
Ready to show a little midriff, or just want to avoid looking like you’re drowning in fabric? The crop is your best friend. It’s the OG shirt surgery for a reason.
Simply decide on your ideal length – just above the belly button, or a little longer for a more modest vibe. Cut straight across, or give it a slight curve for a softer edge. You can leave the hem raw for a casual look or fold it under and glue/sew if you’re feeling fancy.
Pro tip: Try it on, mark with a pencil, then cut a bit longer than you think you want. You can always go shorter, but adding fabric back is a whole other magic trick.
Why it works: Instantly updates an oversized tee, perfect for high-waisted bottoms, and makes you feel effortlessly cool.
2. Side Slit Sensation
Want to add some movement and a touch of subtle edge without going full-on shred? Side slits are your answer. They’re surprisingly simple but look super chic.
Lay your shirt flat and folded evenly. Mark a point a few inches up from the hem on both sides, then cut straight up from the hem to that mark. You can make them as high or as low as you dare. For extra flair, you can tie the ends of the slits in tiny knots.
Pro tip: Reinforce the top of your slit with a tiny stitch or a dab of fabric glue to prevent it from ripping higher than intended. We’re going for fashion, not wardrobe malfunction.
Why it works: Adds an airy feel, great for layering, and gives a basic tee a high-fashion twist.
3. Off-the-Shoulder Charm
Hello, collarbones! This cut is perfect for transforming a plain crew neck into something flirty and romantic. It’s surprisingly easy to achieve that effortlessly chic, “I just threw this on” vibe.
Fold your shirt in half lengthwise. Starting from the collar, cut a wide, shallow curve across the top, removing the existing neckband and a bit of the shoulder area. When you unfold it, you’ll have a boat neck that naturally falls off the shoulders. Don’t go too wide, or it’ll just fall down.
Pro tip: If the fabric doesn’t want to stay put, thread some elastic through the new neckline hem. It’ll gather slightly and keep everything perfectly in place.
Why it works: Instantly elevates a casual top, highlights your décolletage, and feels totally summery.
4. Lace-Up Love
Ready for a slightly more involved but totally worth it project? A lace-up detail can add serious wow-factor to a plain front or back. Think festival vibes meets street style.
Decide where you want your lace-up: down the front, up the back, or even along the sides. Cut a straight line down the center (or wherever you choose). Then, cut small, evenly spaced horizontal slits along both edges of your cut. Thread ribbon, shoelaces, or even strips of old t-shirt fabric through the slits and tie them up.
Pro tip: Before cutting the main line, draw it with a ruler and fabric marker. Precision is your friend here for that clean, symmetrical look. And use grommets if you’re feeling extra fancy and want a super durable finish.
Why it works: Creates a custom, edgy detail, allows for adjustable fit, and screams “I’m crafty and cool.”
5. Fringe Frenzy
Embrace your inner bohemian goddess with a fringe hem. This is one of the easiest ways to add instant texture and movement to any shirt, especially if it’s a bit too long.
Lay your shirt flat. Decide how long you want your fringe to be, then cut horizontal strips straight up from the hem. Aim for strips about half an inch to an inch wide. Give them a gentle tug to encourage them to curl and soften. You can even add beads to the ends for extra flair.
Pro tip: Use a piece of cardboard or a ruler as a guide to ensure your fringe strips are all the same length. Consistency makes all the difference here, trust me.
Why it works: Adds a playful, free-spirited vibe, hides an uneven hem, and looks fantastic when you’re dancing.
6. Deep Scoop or V-Neck Reveal
Sometimes, all it takes is a little neckline adjustment to make a shirt feel brand new. Transform a suffocating crew neck into a breezy scoop or a daring V-neck.
For a scoop: Cut a wider, deeper curve from the existing neckline. For a V-neck: Fold your shirt in half, then cut a diagonal line from the shoulder seam down towards the center front, stopping at your desired depth. Unfold, and you’ve got a V. Don’t be afraid to go a little deeper, it’s liberating!
Pro tip: Start small. You can always cut more fabric away, but you can’t put it back. Try it on after a small cut to gauge if you want to go deeper.
Why it works: Opens up your chest, perfect for layering necklaces, and instantly makes a top feel lighter and more stylish.
7. Sleeve Cut-Outs
Who says the neckline gets all the fun? Adding cut-outs to your sleeves is a subtle yet super cool way to update a plain long-sleeve or even a short-sleeve tee.
Think shoulder cut-outs (cold shoulder style), or even a small slit or hole near the bicep. Mark your desired shape (circles, ovals, or just a straight slit) and carefully cut it out. Remember, less is often more with this one.
Pro tip: Place a piece of cardboard inside the sleeve when cutting to avoid snipping through both layers. This isn’t a two-for-one deal you want.
Why it works: Adds an unexpected, trendy detail, perfect for showing a little skin without going overboard, and makes a basic top feel custom.
8. Distressed and Shredded
Channel your inner rockstar or embrace that perfectly worn-in aesthetic. Distressing and shredding can give an old tee instant grunge cred and a whole lot of character.
Grab sandpaper, a cheese grater, or even just your scissors. Rub, scrape, and snip small holes or lines. Focus on areas that would naturally wear: collar, cuffs, hem, and shoulders. Don’t be afraid to pull at the threads to create that authentic shredded look. The more “imperfect,” the better.
Pro tip: Start with a small area and step back to assess. It’s easy to go overboard, and suddenly your shirt is more hole than fabric. Unless that’s the look you’re going for, in which case, full speed ahead!
Why it works: Creates a unique, lived-in feel, hides minor stains or imperfections, and effortlessly cool.
9. Braided Back or Front Panel
This one requires a bit more patience but delivers serious style points. A braided panel can turn a boring back into a work of art, or add a unique texture to the front.
Cut a rectangular panel from the back (or front) of your shirt. Then, cut this panel into several vertical strips, leaving them attached at the top and bottom. Braid these strips together. Once braided, you can either re-attach the panel to the shirt or leave it loose, depending on the look you want. You can also cut strips directly into the back and braid them without removing a panel.
Pro tip: Use a safety pin to hold your strips in place at the top while you braid. It’s like having an extra set of hands, which is always a win.
Why it works: Creates an intricate, eye-catching detail, adds texture and dimension, and makes people wonder if you bought it from a fancy boutique.
10. T-Shirt Dress Transformation
Got a really long, oversized tee that’s just begging for a new life? Turn it into a mini dress! This works best with men’s XL shirts or tunic-length tops.
First, try it on and decide on your desired length. You might just need to hem it. To give it more shape, you can add side slits (see #2), or even cinch the waist with elastic or a drawstring. Cut the sleeves off for a sleeveless look, or roll and tack them for a cap sleeve. Boom, instant summer dress.
Pro tip: If the shirt is too wide, take it in at the sides. Pin it while you’re wearing it (carefully!), then sew a new seam. Or, just embrace the oversized, comfy vibe.
Why it works: Upcycles a bulky top into a versatile new garment, perfect for hot weather, and super comfortable.
11. Knotted Side or Front
Sometimes the simplest cuts create the biggest impact. A strategic knot can transform the fit and silhouette of a shirt, giving it instant style and shape.
For a side knot: Cut a small slit a few inches up from the hem on one side, then cut a strip of fabric from the hem directly below the slit. Tie this strip into a knot. For a front knot: cut a small triangle from the center hem, then gather the fabric and tie it. This creates a cute, ruched effect.
Pro tip: Don’t make your knot too tight right away. Adjust it while wearing the shirt to get the perfect amount of cinch and drape.
Why it works: Adds instant shape and waist definition, creates a casual yet put-together look, and no sewing required.
12. The Mighty Muscle Tank
Transforming a regular tee into a muscle tank is a classic move for a reason. It’s effortless, cool, and perfect for workouts, lounging, or just looking effortlessly stylish.
Lay your shirt flat. Cut off the sleeves entirely, following the seam line. Then, decide how deep you want the armholes to be. For a true muscle tank, you’ll cut down further towards the hem, creating a wider opening that shows off a bit of your side. Leave the edges raw for that perfectly undone look.
Pro tip: Try on the shirt and mark with a pencil where you want the armholes to end. Remember, you can always cut more, but you can’t add back. And make sure to cut both sides symmetrically!
Why it works: Super comfortable, perfect for hot weather or layering over a cute bralette, and gives off major “I just left the gym” cool vibes.
✨ New Member Etsy Shops (100% Unsponsored!)
We are incredibly proud of the talent in this community! 💖 We've rounded up some gorgeous new Etsy shops launched by our very own members.
There are ZERO affiliate links in this post—just 100% pure support for our makers. Click below to shop small, show them some love, and find your new favorite items! 👇🛍️


Conclusion
There you have it, twelve ways to rescue those forgotten tees and turn them into something fabulous. You don’t need to be a sewing wizard or a fashion school grad to make these transformations happen. Just a little courage, a sharp pair of scissors, and a willingness to experiment.
So, go forth and snip with confidence! Your wardrobe (and your wallet) will thank you. Who knew a simple cut could spark so much joy?