🃏 15 Fun Fold Cards Tutorials Templates
🛠️ The Ultimate Maker's Toolkit
I've tested thousands of craft tools over the years. Whether you are quilting, crafting, or building mixed-media art, these are the top 5 absolute non-negotiable tools I personally recommend to guarantee professional results.
🪡 SINGER Heavy Duty 4452 Sewing Machine
The sewing community highly recommends this as the ultimate "bulletproof" entry-level machine. Its heavy metal frame powerfully pushes through thick denim and heavy quilt layers that would instantly jam a standard plastic machine.
✂️ Fiskars 8" Orange-Handled Scissors
Never settle for dull dollar-store blades. Wirecutter repeatedly names Fiskars the absolute best all-purpose craft scissor due to its legendary precision-ground blades and an ergonomic grip that prevents hand-cramping.
🔥 Gorilla Dual Temp Hot Glue Gun
Named Wirecutter's top choice because it literally does the work of two tools. It features dual-temperature settings offering low heat for delicate florals and blistering high heat for heavy wood adhesion repairs.
🖌️ Mod Podge Waterbase Gloss Sealer
The absolute undisputed champion of decoupage and paper crafts. Experts rely exclusively on this exact water-based formula because it glues, seals, and finishes beautifully without yellowing or flaking over time.
🎨 Apple Barrel Acrylic Paint (2 oz)
The quintessential, incredibly inexpensive craft paint. Woodworkers and hobby painters swear by its smooth flow and matte finish, providing massive value and remarkably thick color coverage on rough surfaces.
Ready to level up your card game? These fun folds turn basic paper into tiny surprises that flip, pop, and spin. No engineering degree required, just some cardstock, a bone folder, and a mildly chaotic crafting table. Let’s fold magic.
1. Z-Fold Pop
Sleek, simple, and wildly satisfying. The Z-Fold opens in layers so your design feels dynamic without extra bulk. Great for contrasting panels and bold sentiment strips.
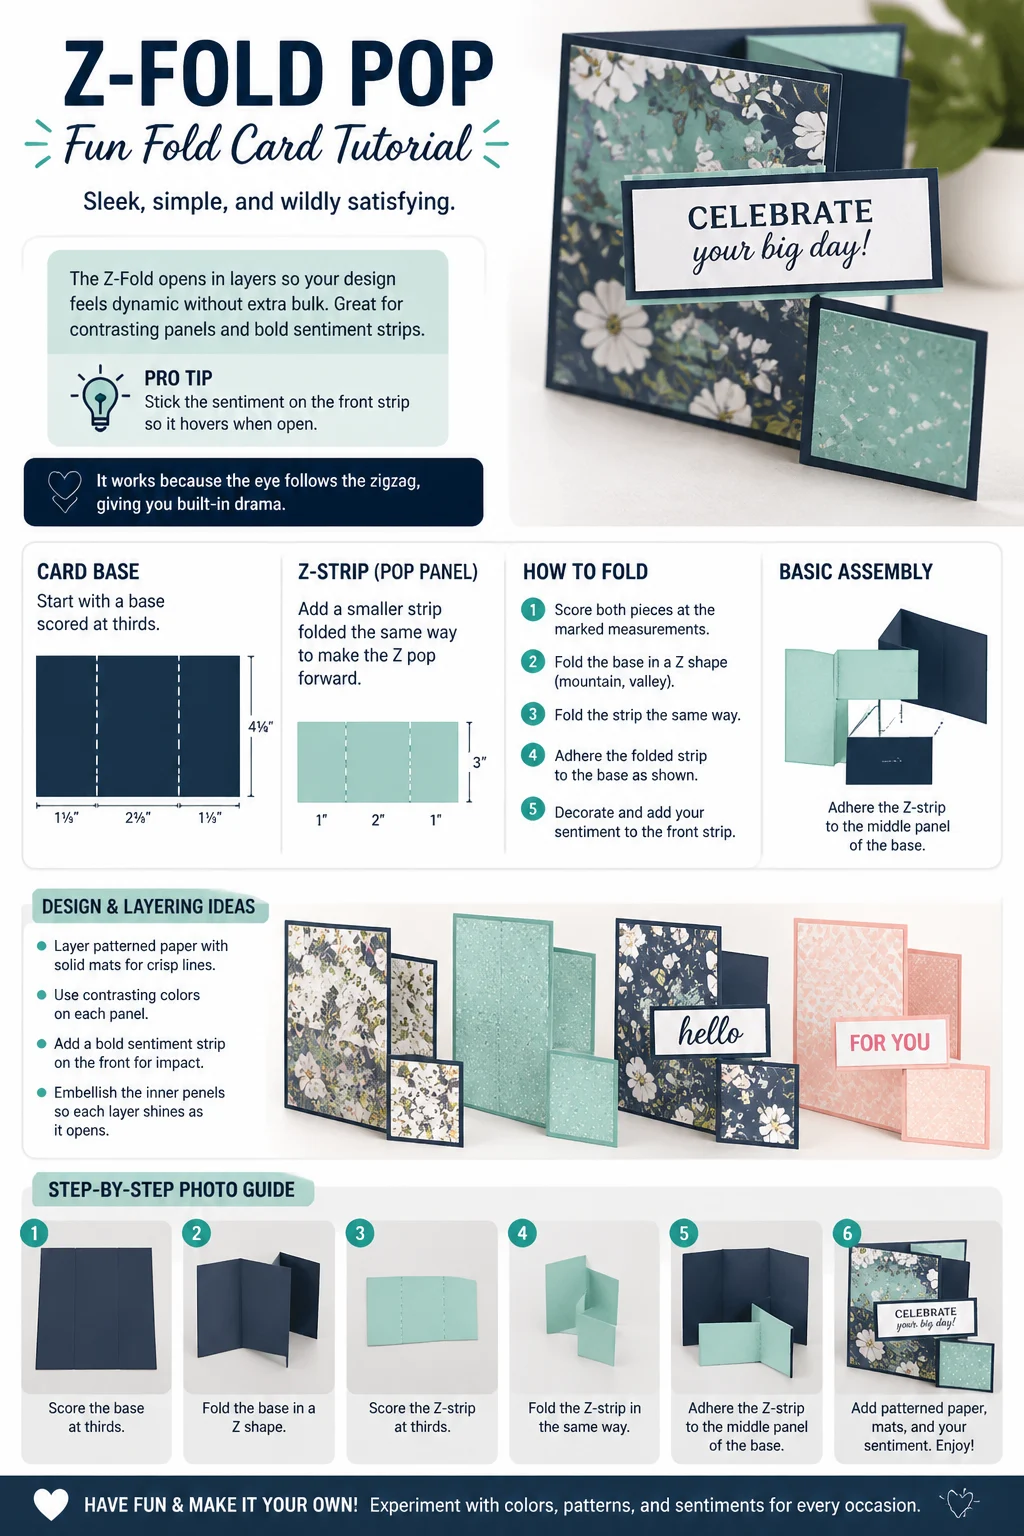
Use a base scored at thirds, then add a smaller strip folded the same way to make the Z pop forward. Layer patterned paper with solid mats for crisp lines.
Pro tip: Stick the sentiment on the front strip so it hovers when open.
It works because the eye follows the zigzag, giving you built-in drama.
2. Gatefold Classic
Think double doors for your card. It opens from the middle, inviting a big reveal. Perfect for photo panels and belly bands.
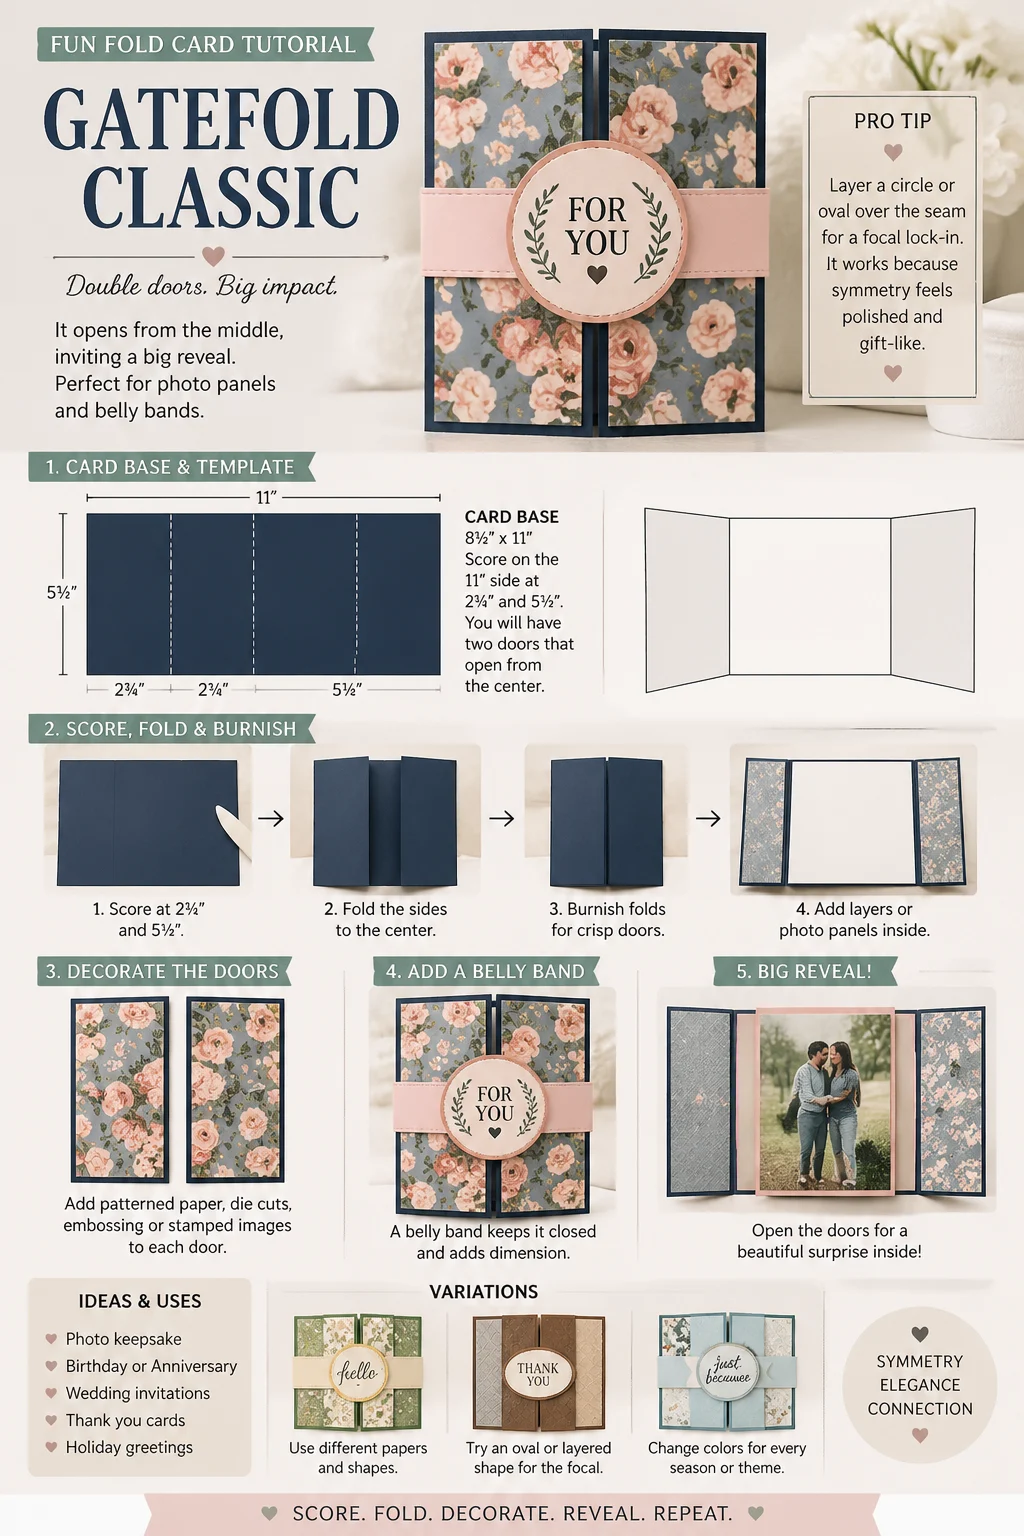
Score the card so both sides meet at center, then decorate each “door.” Add a belly band to keep it tidy and add dimension.
Pro tip: Layer a circle or oval over the seam for a focal lock-in.
It works because symmetry feels polished and gift-like.
3. Double Gatefold
Twice the drama, same tidy footprint. More panels = more spots for patterns and messages.
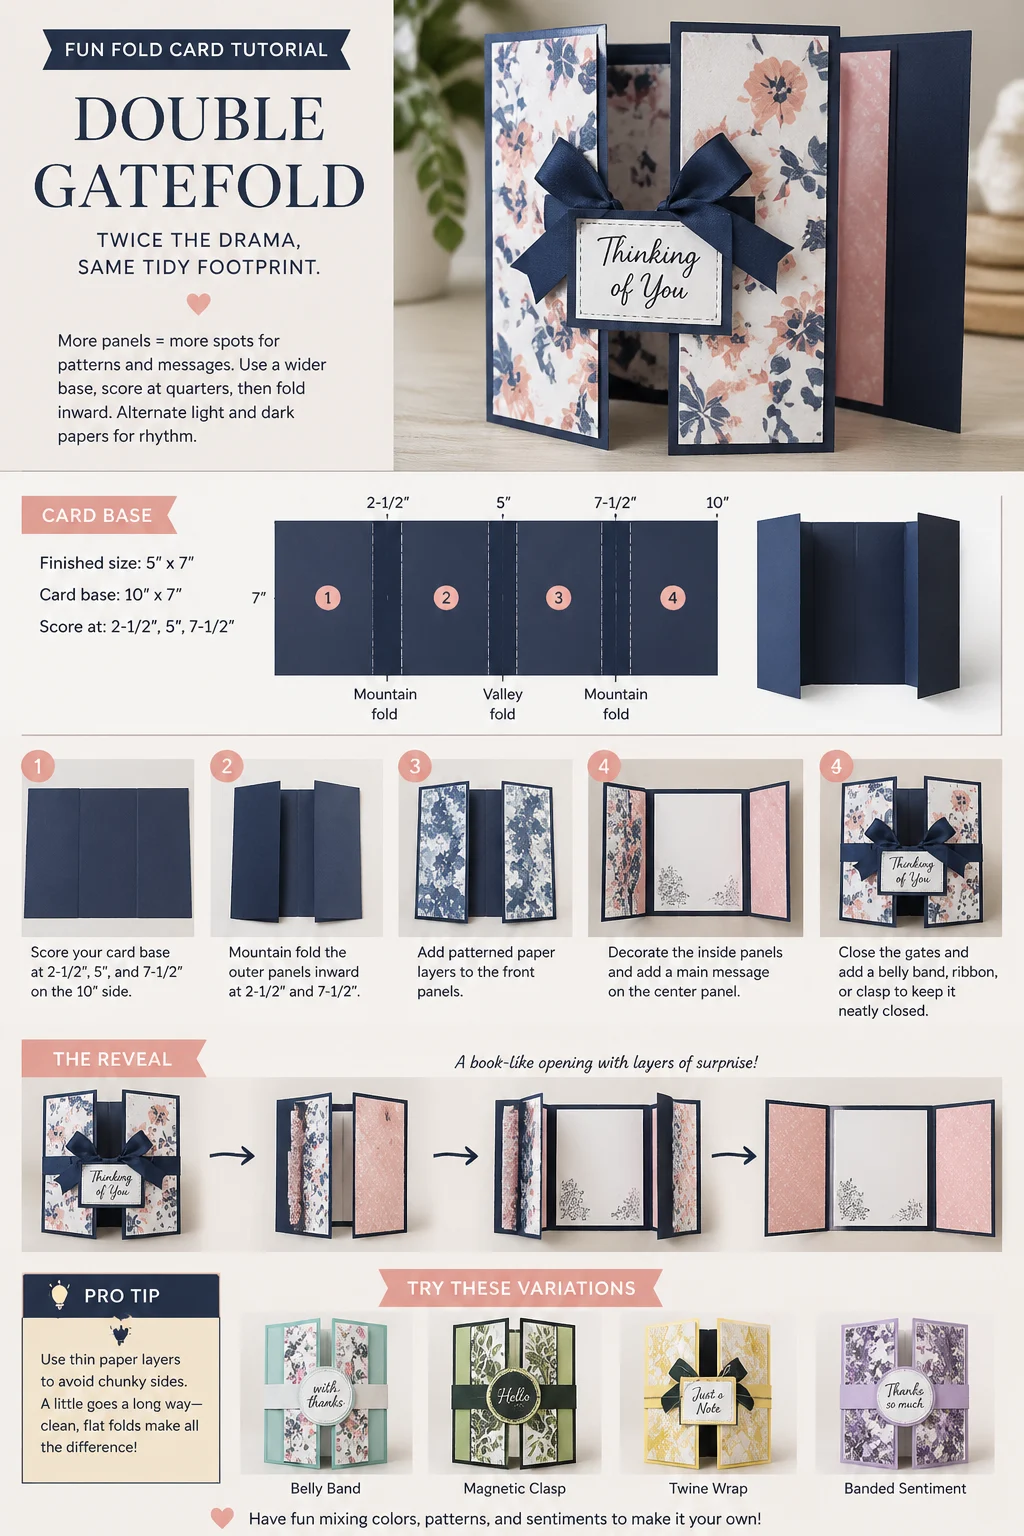
Use a wider base, score at quarters, then fold inward. Alternate light and dark papers for rhythm.
Pro tip: Use thin paper layers to avoid chunky sides.
It works because it gives you a book-like reveal with layers of surprise.
4. Explosion Fold
Looks flat, then whoosh—paper fireworks. Ideal for celebrations and confetti vibes.
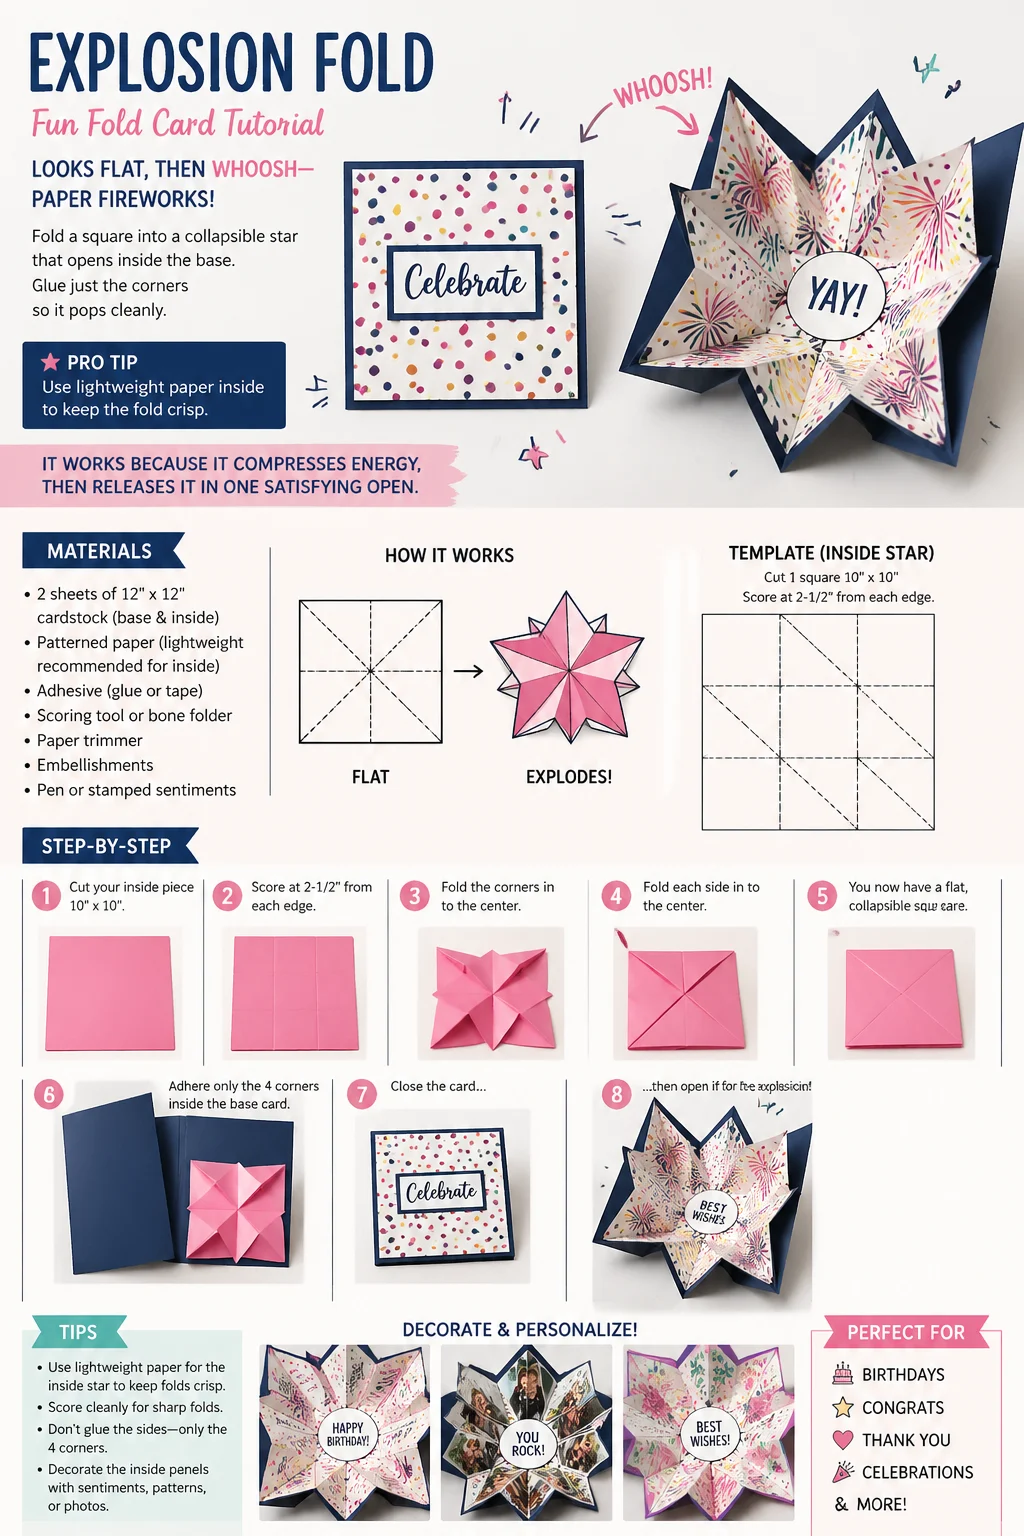
Fold a square into a collapsible star that opens inside the base. Glue just the corners so it pops cleanly.
Pro tip: Use lightweight paper inside to keep the fold crisp.
It works because it compresses energy, then releases it in one satisfying open.
5. Easel Stand-Up
From card to mini display in one flip. Your art gets to sit up and be admired.
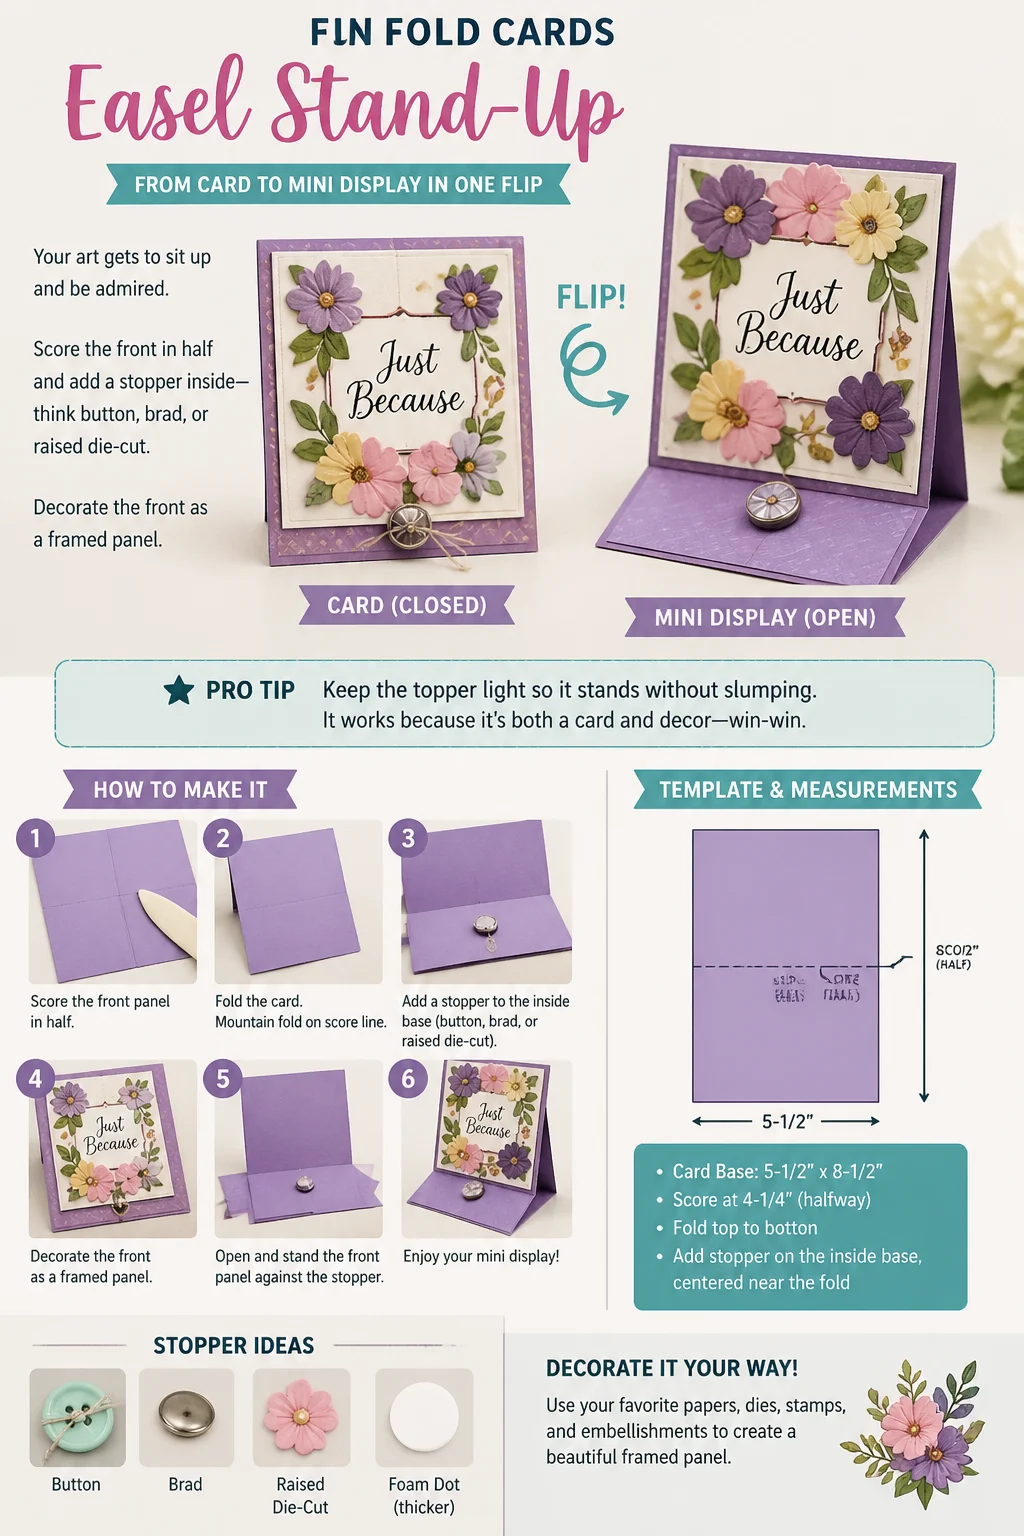
Score the front in half and add a stopper inside—think button, brad, or raised die-cut. Decorate the front as a framed panel.
Pro tip: Keep the topper light so it stands without slumping.
It works because it’s both a card and decor—win-win.
6. Center Step Card
Tiered, dimensional, and surprisingly easy. The center rises like a stage for your star image.
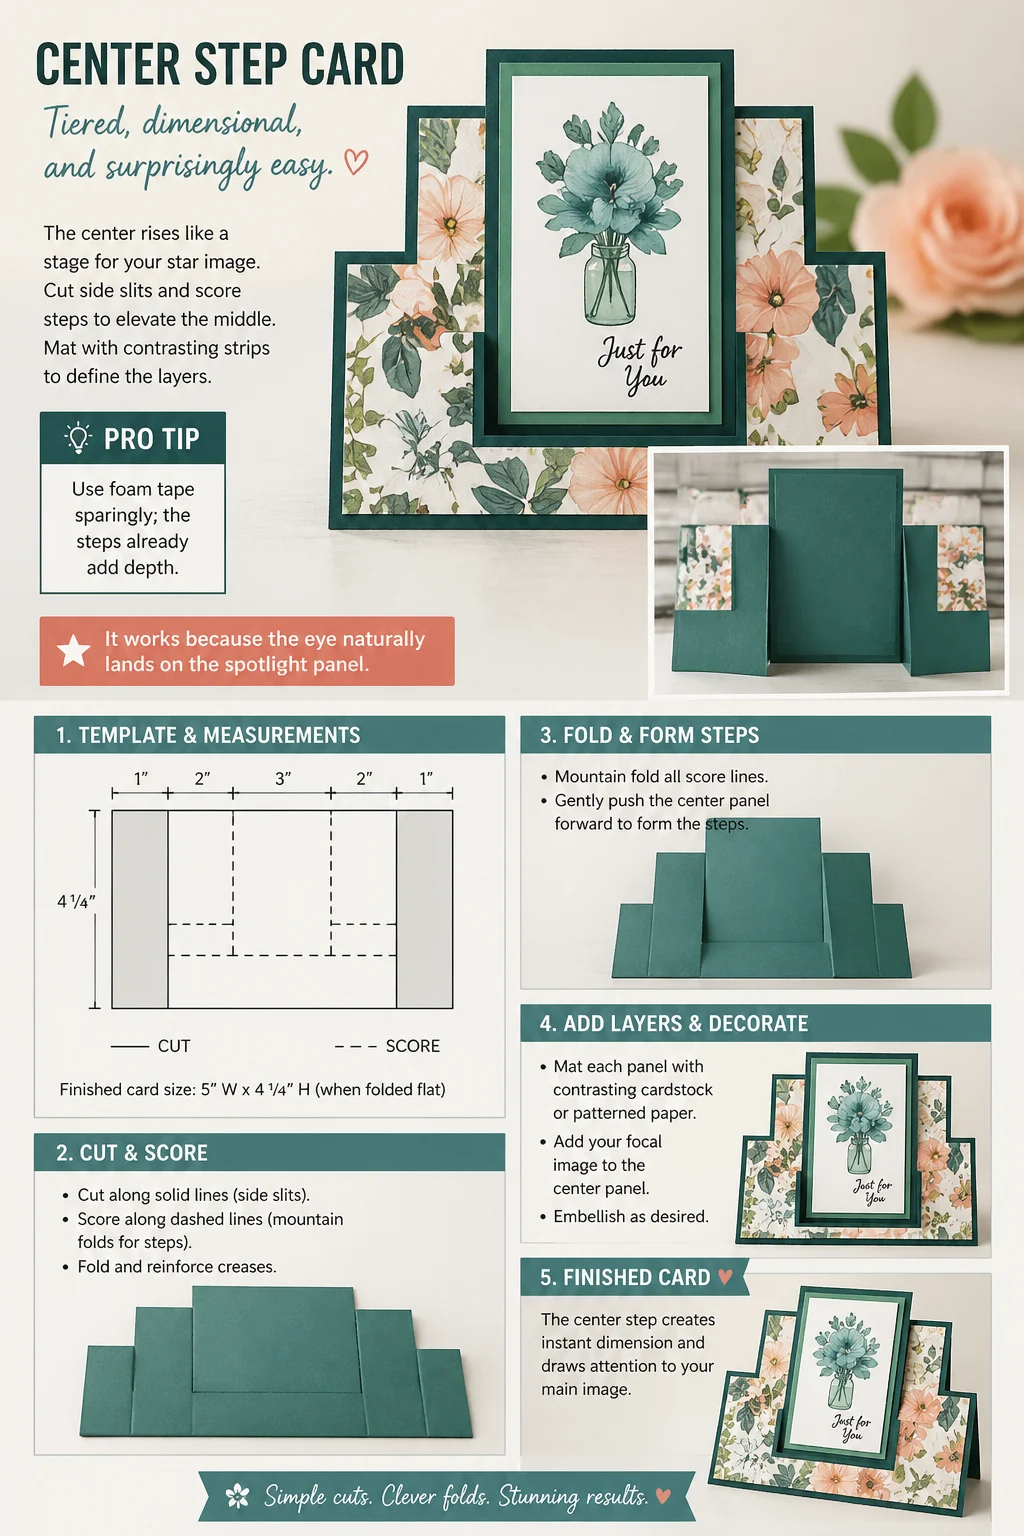
Cut side slits and score steps to elevate the middle. Mat with contrasting strips to define the layers.
Pro tip: Use foam tape sparingly; the steps already add depth.
It works because the eye naturally lands on the spotlight panel.
7. Side Step Card
Asymmetry that looks designer. The steps sit on one side for a modern edge.
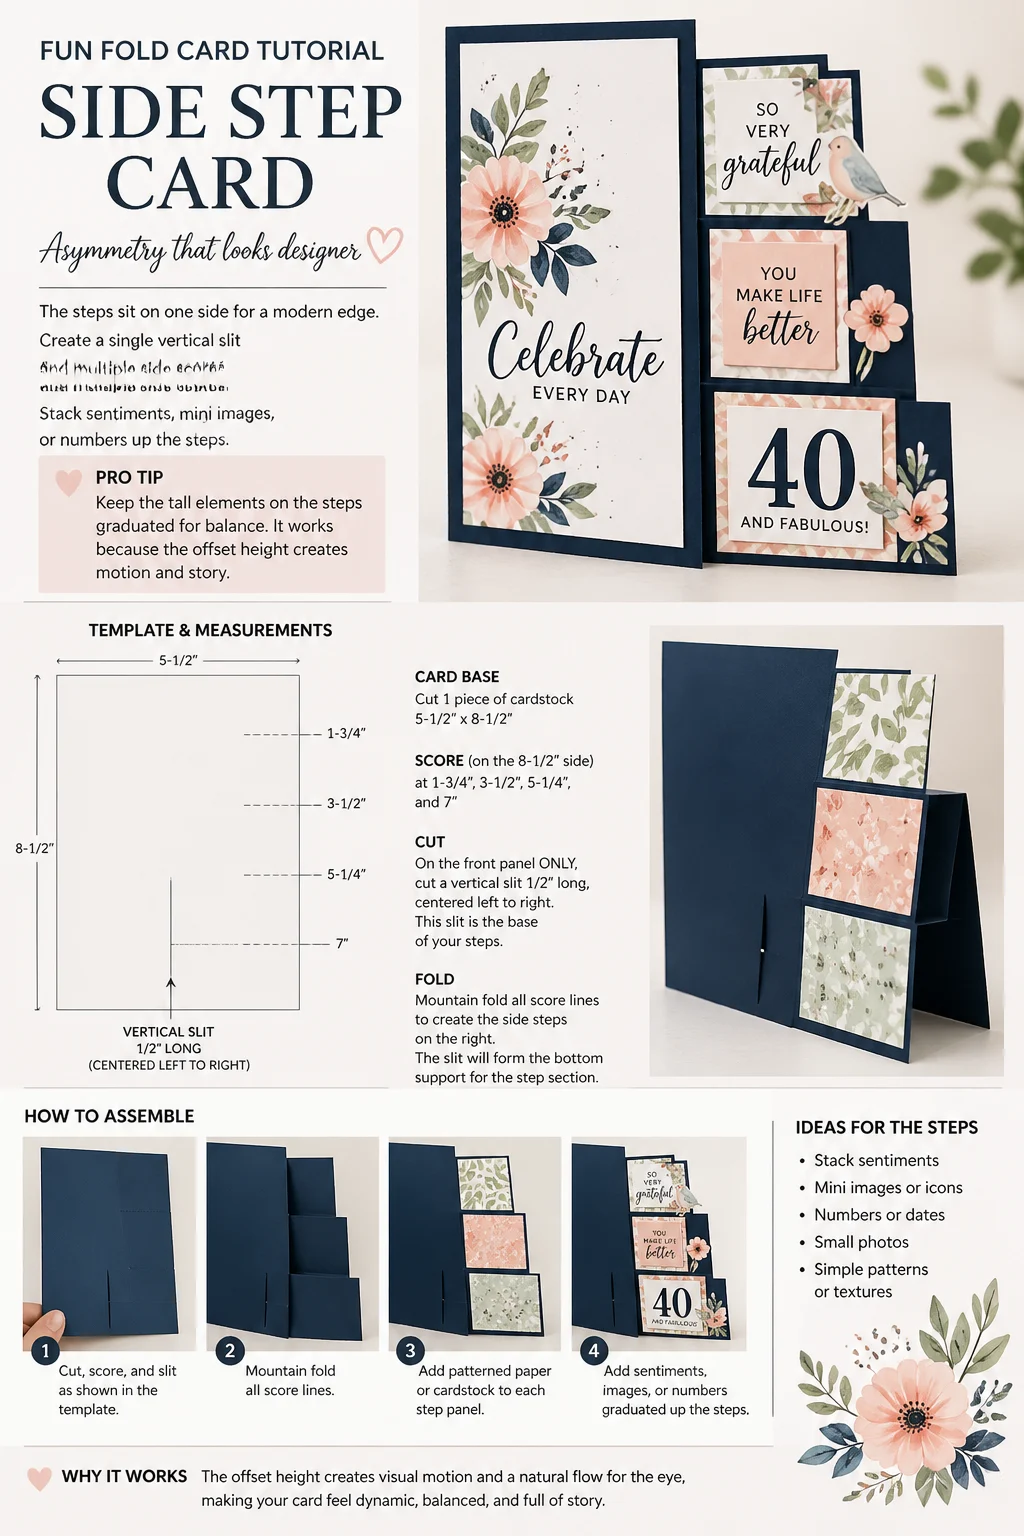
Create a single vertical slit and multiple side scores. Stack sentiments, mini images, or numbers up the steps.
Pro tip: Keep the tall elements on the steps graduated for balance.
It works because the offset height creates motion and story.
8. Flip-Flap Window
Lift the flap for a secret message. Interactive without being fussy.
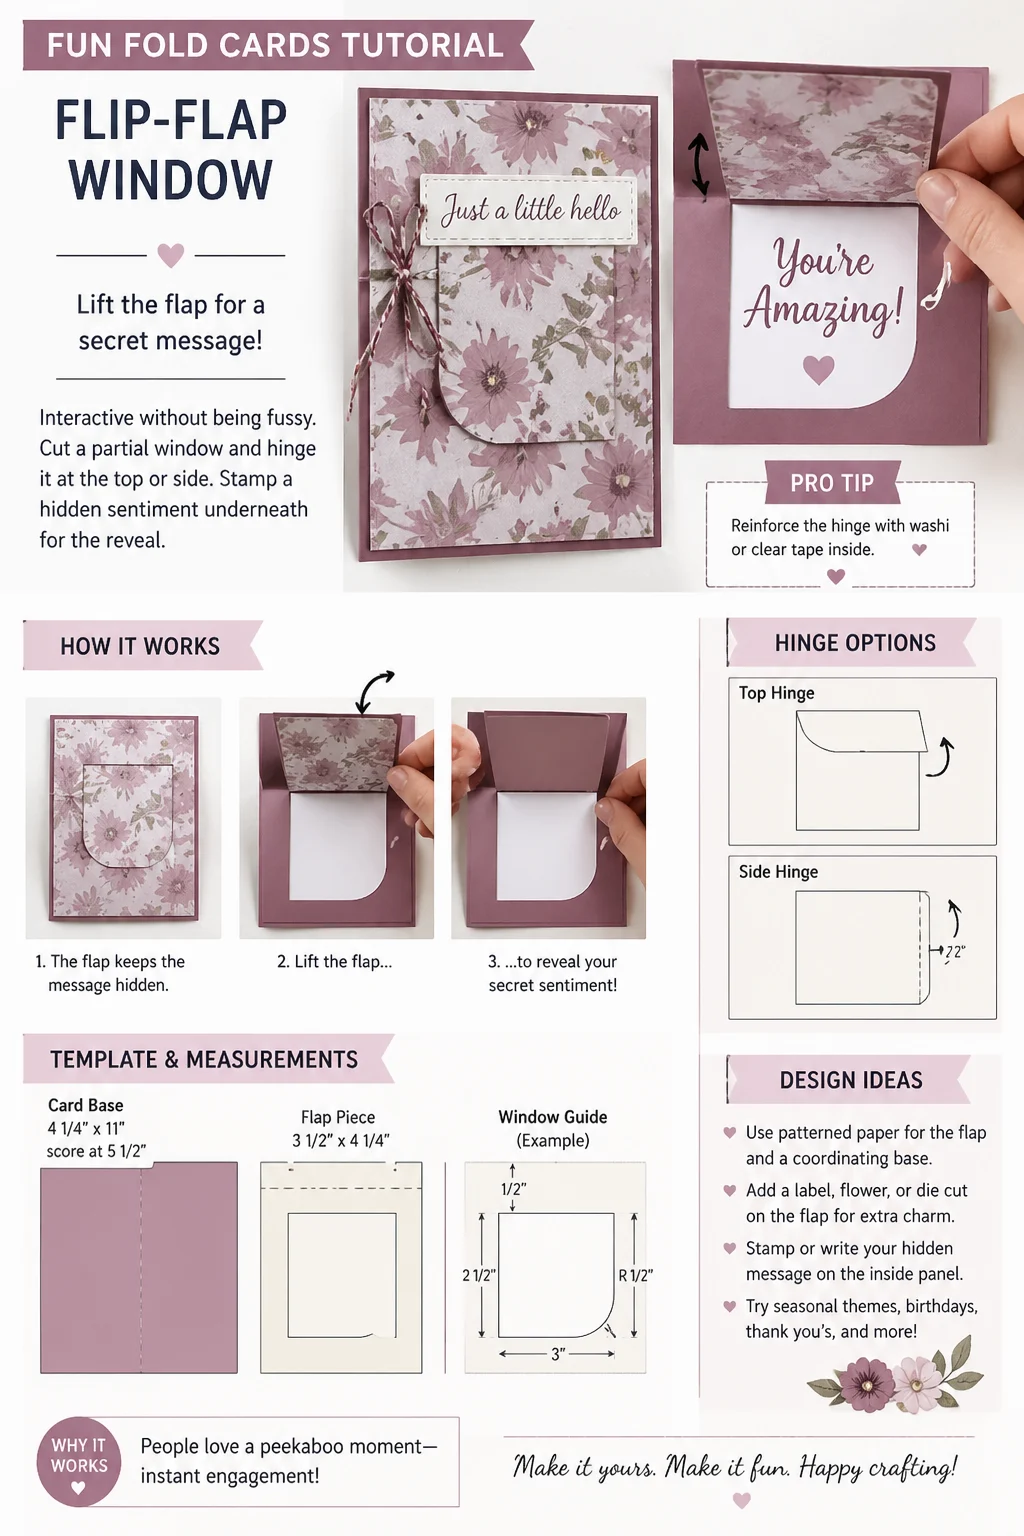
Cut a partial window and hinge it at the top or side. Stamp a hidden sentiment underneath for the reveal.
Pro tip: Reinforce the hinge with washi or clear tape inside.
It works because people love a peekaboo moment—instant engagement.
9. Twist and Pop Panel
Open the card and a panel twists up like a billboard. It’s a show-off, in the best way.
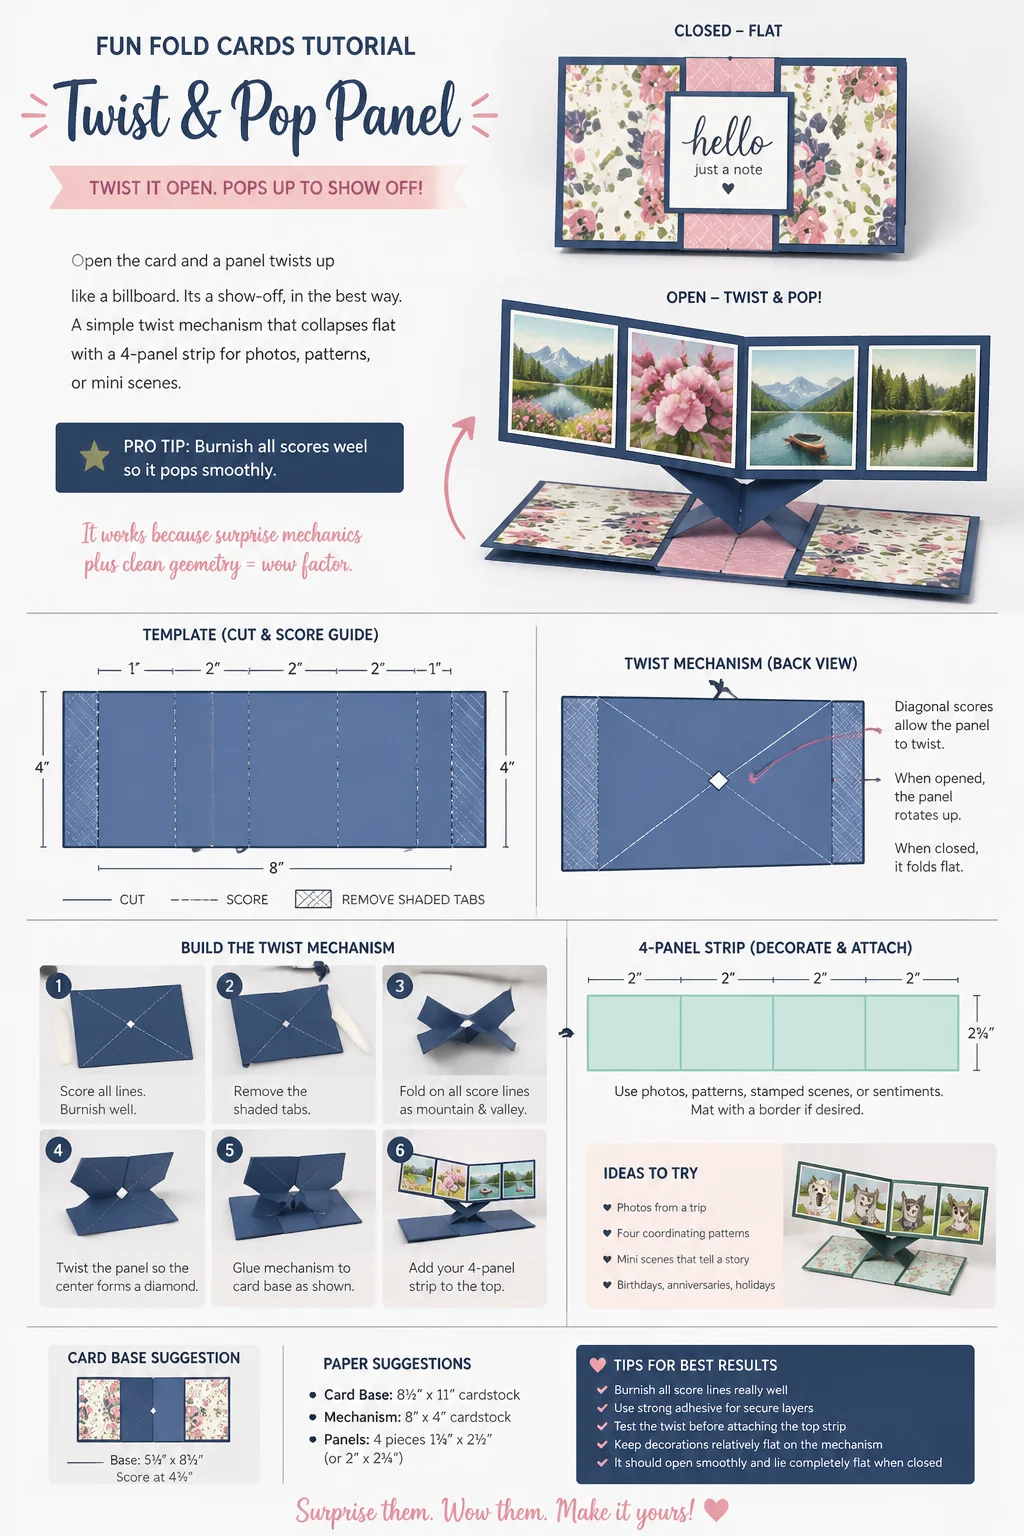
Build a simple twist mechanism that collapses flat. Add a 4-panel strip for photos, patterns, or mini scenes.
Pro tip: Burnish all scores well so it pops smoothly.
It works because surprise mechanics plus clean geometry = wow factor.
10. Wiper Card
Slide open and a tiny element swipes up to say hi. Cute overload.
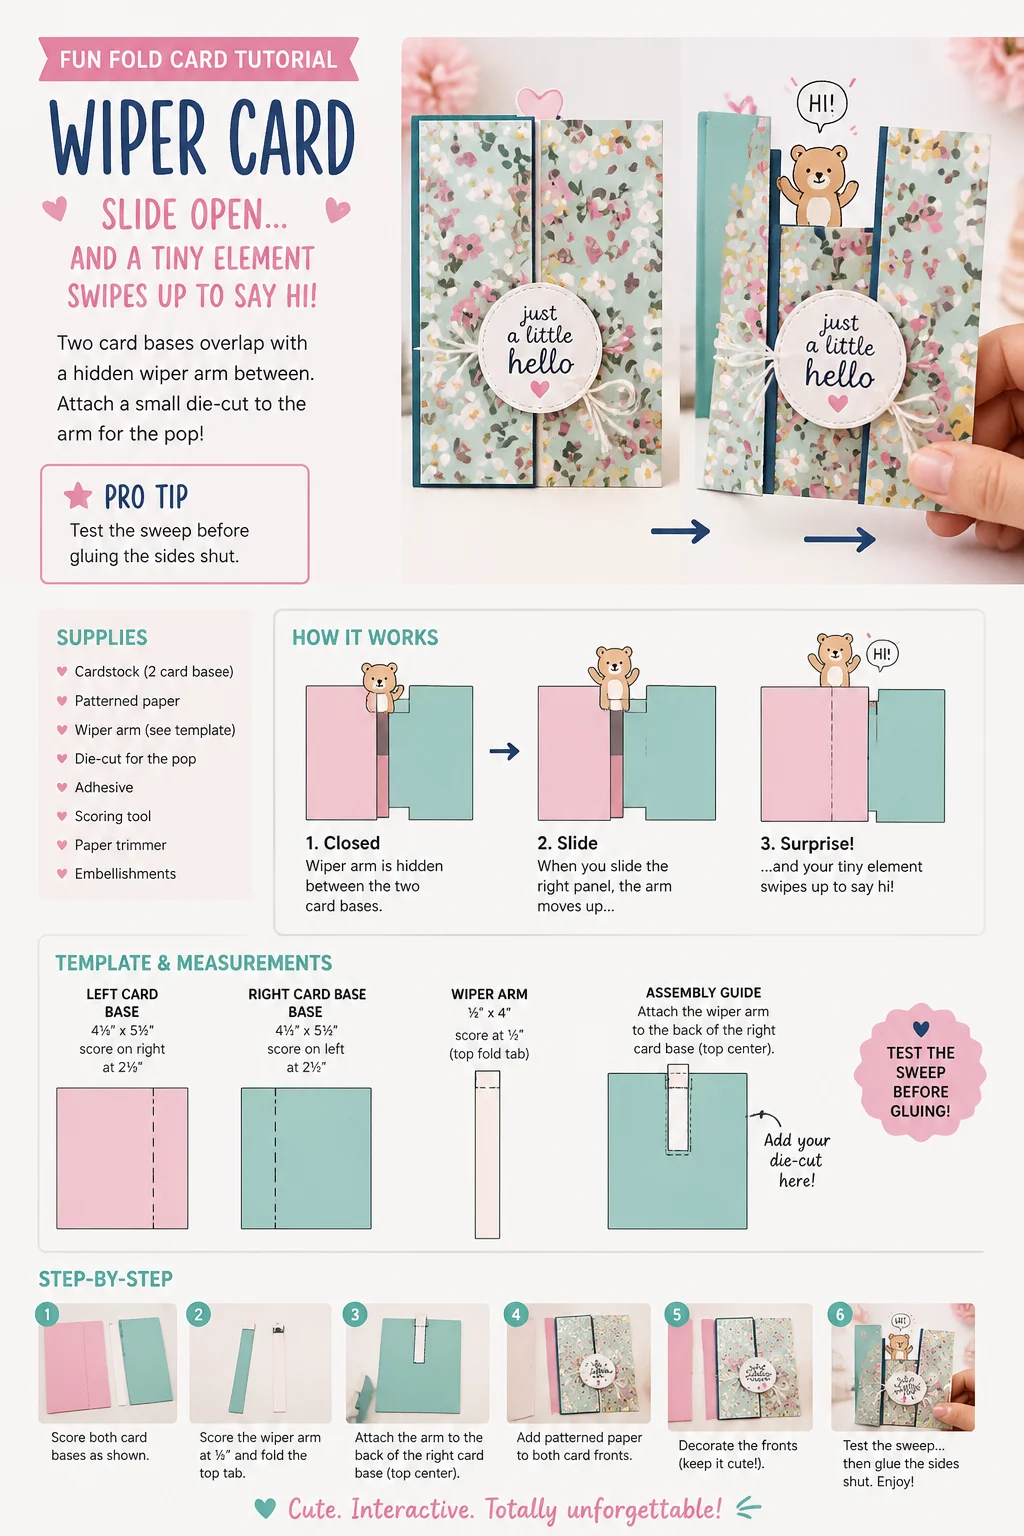
Two card bases overlap with a hidden wiper arm between. Attach a small die-cut to the arm for the pop.
Pro tip: Test the sweep before gluing the sides shut.
It works because the movement is playful and perfectly repeatable.
11. Accordion Fold
Like a mini photo book that stretches out. Tons of real estate for storytelling.
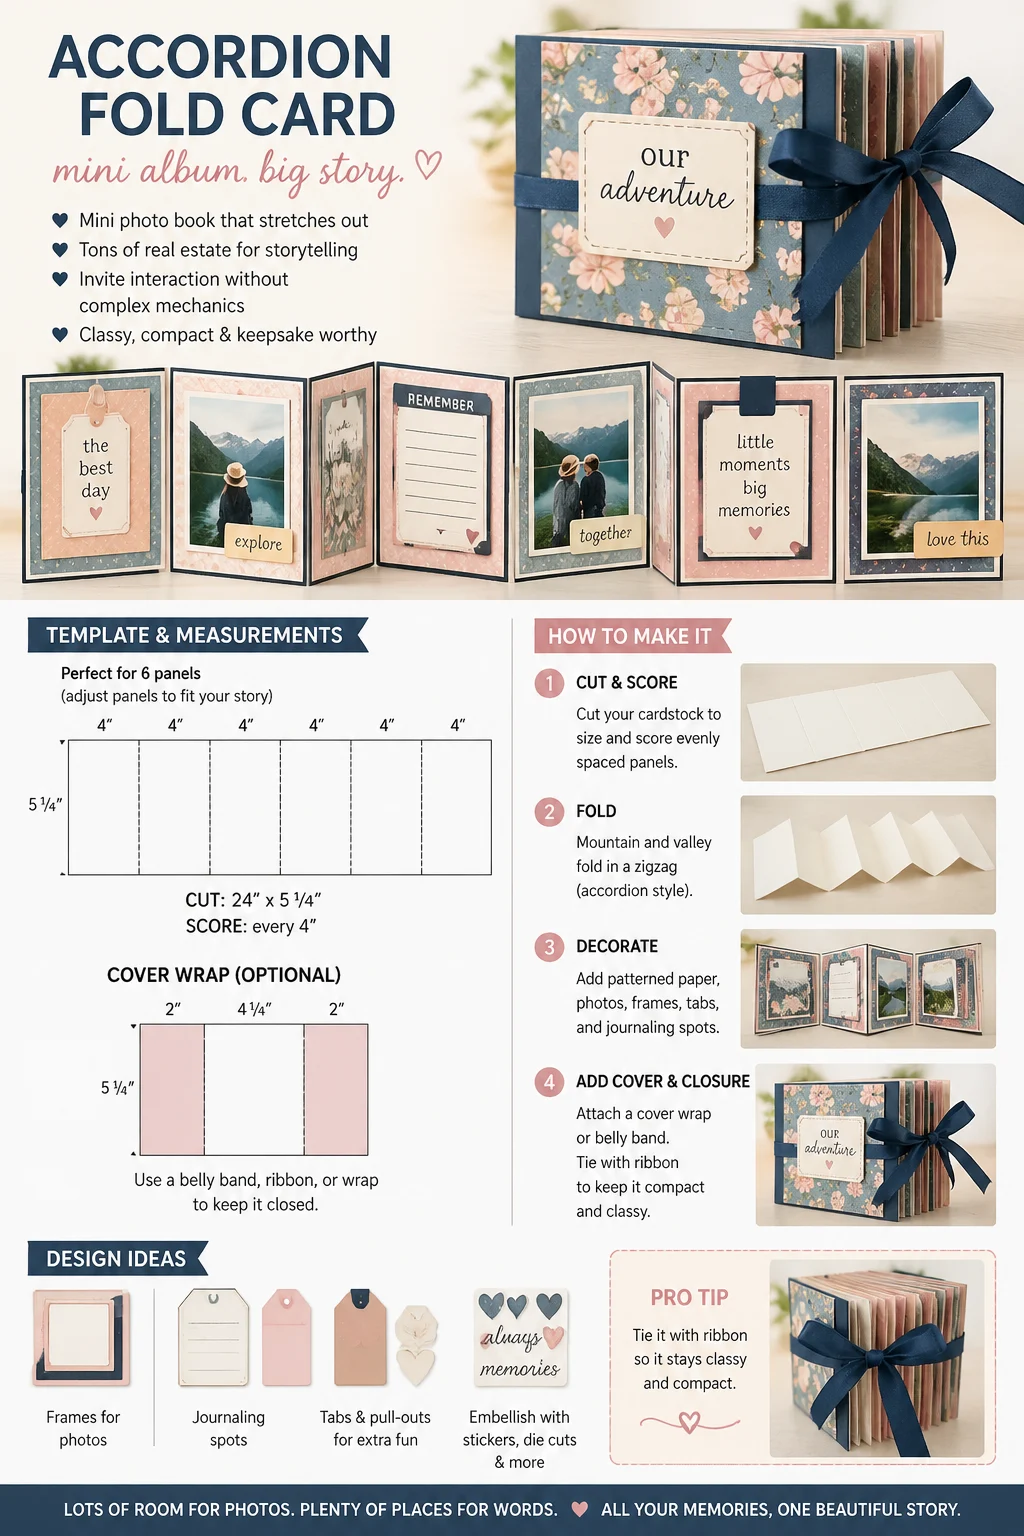
Score evenly spaced panels and zigzag fold. Add journaling spots, frames, and tabs.
Pro tip: Tie it with ribbon so it stays classy and compact.
It works because it invites interaction without complex mechanics.
12. Bridge Card
3D look, flat-mail friendly. A front “bridge” connects two sides for a diorama vibe.
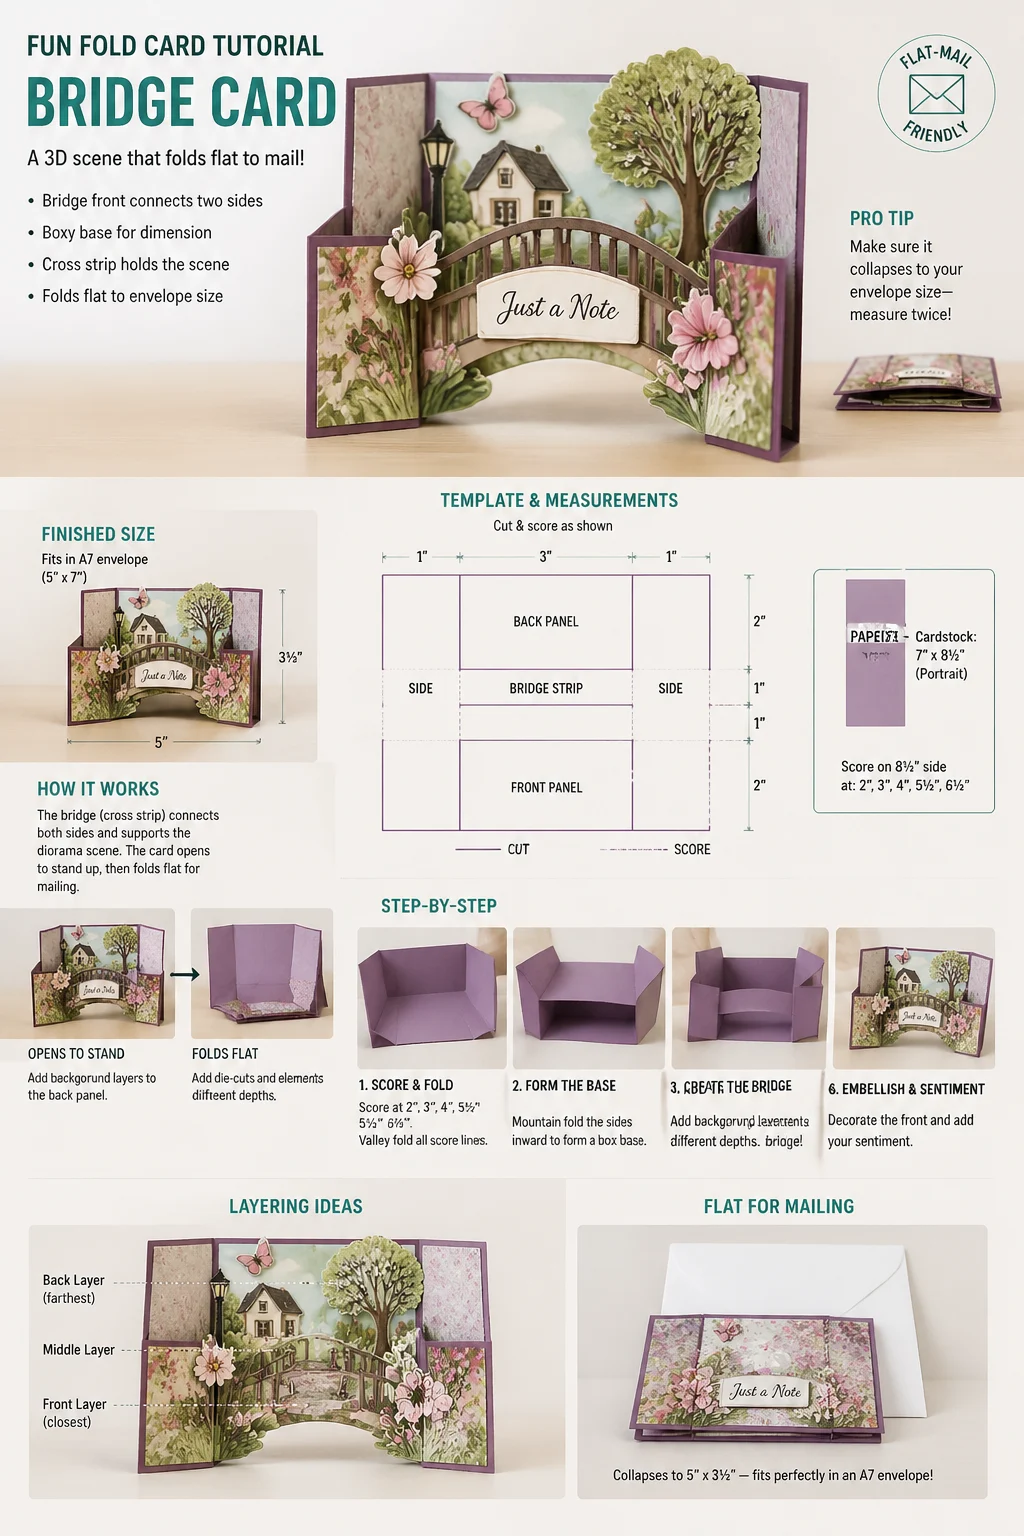
Create a boxy base with a cross strip holding the scene. Layer die-cut elements at different depths.
Pro tip: Make sure it collapses to your envelope size—measure twice.
It works because it frames a scene while staying mailable.
13. Diagonal Pocket Fold
Built-in pocket for notes, gift cards, or tea sachets. Cute and functional.
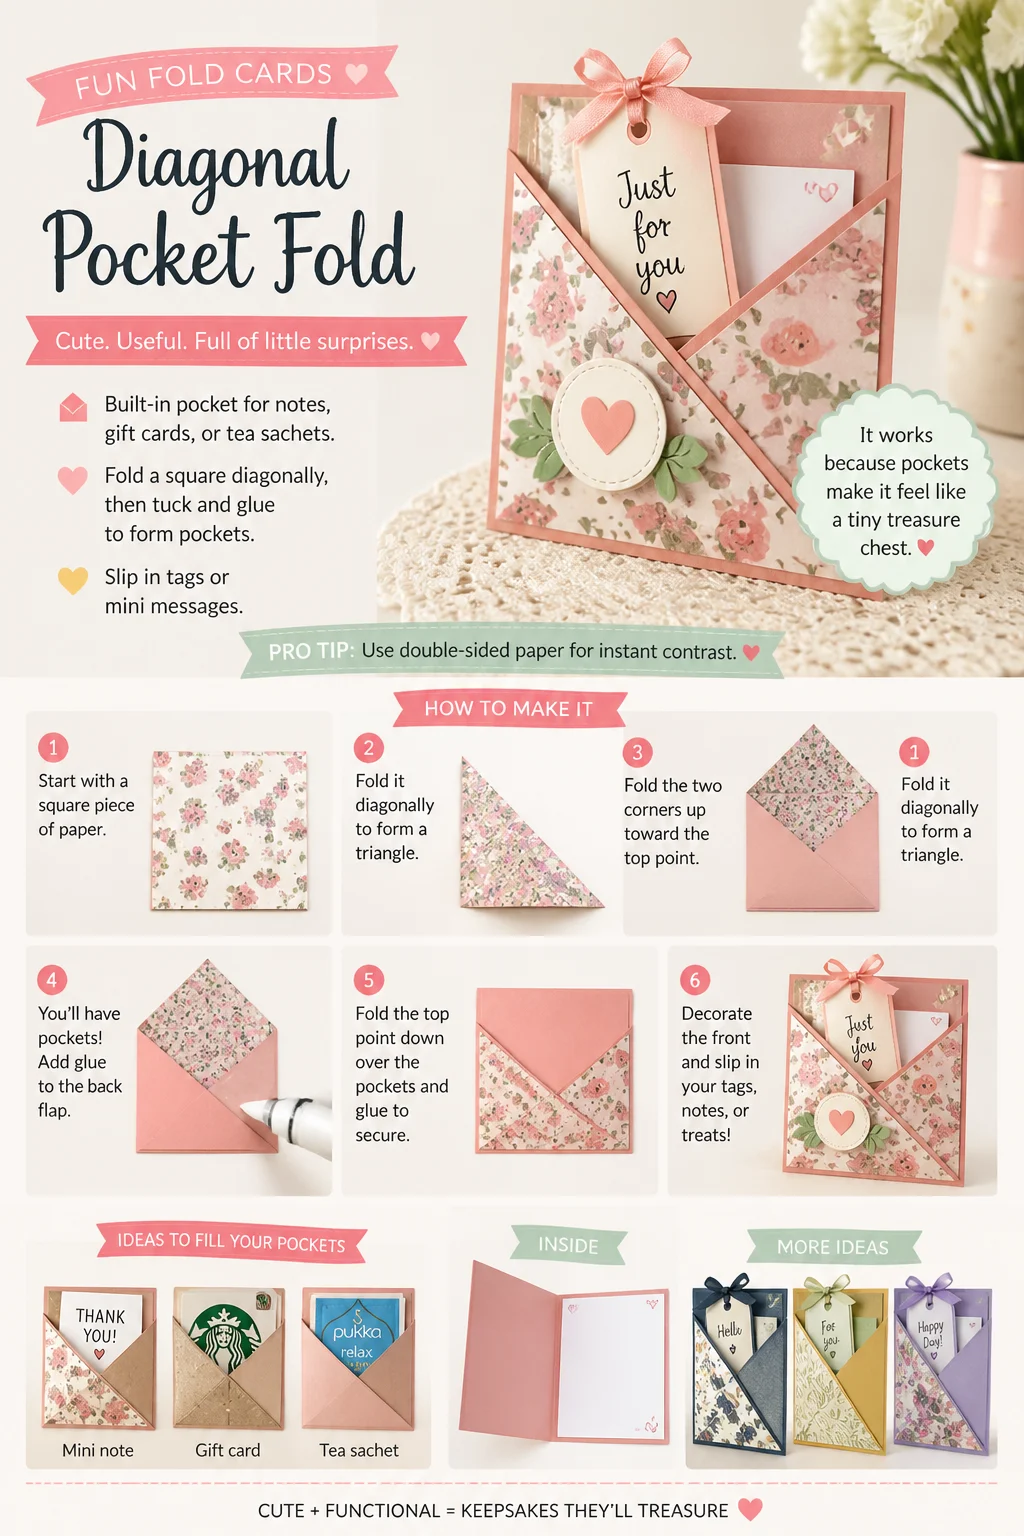
Fold a square diagonally, then tuck and glue to form pockets. Slip in tags or mini messages.
Pro tip: Use double-sided paper for instant contrast.
It works because pockets make it feel like a tiny treasure chest.
14. Theater Slider
Pull the tabs and the curtains open. Center panel gets the spotlight.

Construct side channels with a sliding mechanism. Add “curtains” using patterned paper or vellum.
Pro tip: Dust channels with a bit of cornstarch to reduce stick.
It works because it mimics a stage—drama, but make it paper.
15. Interlocking Circles
Two shapes overlap to lock the card closed. Looks clever, takes minutes.
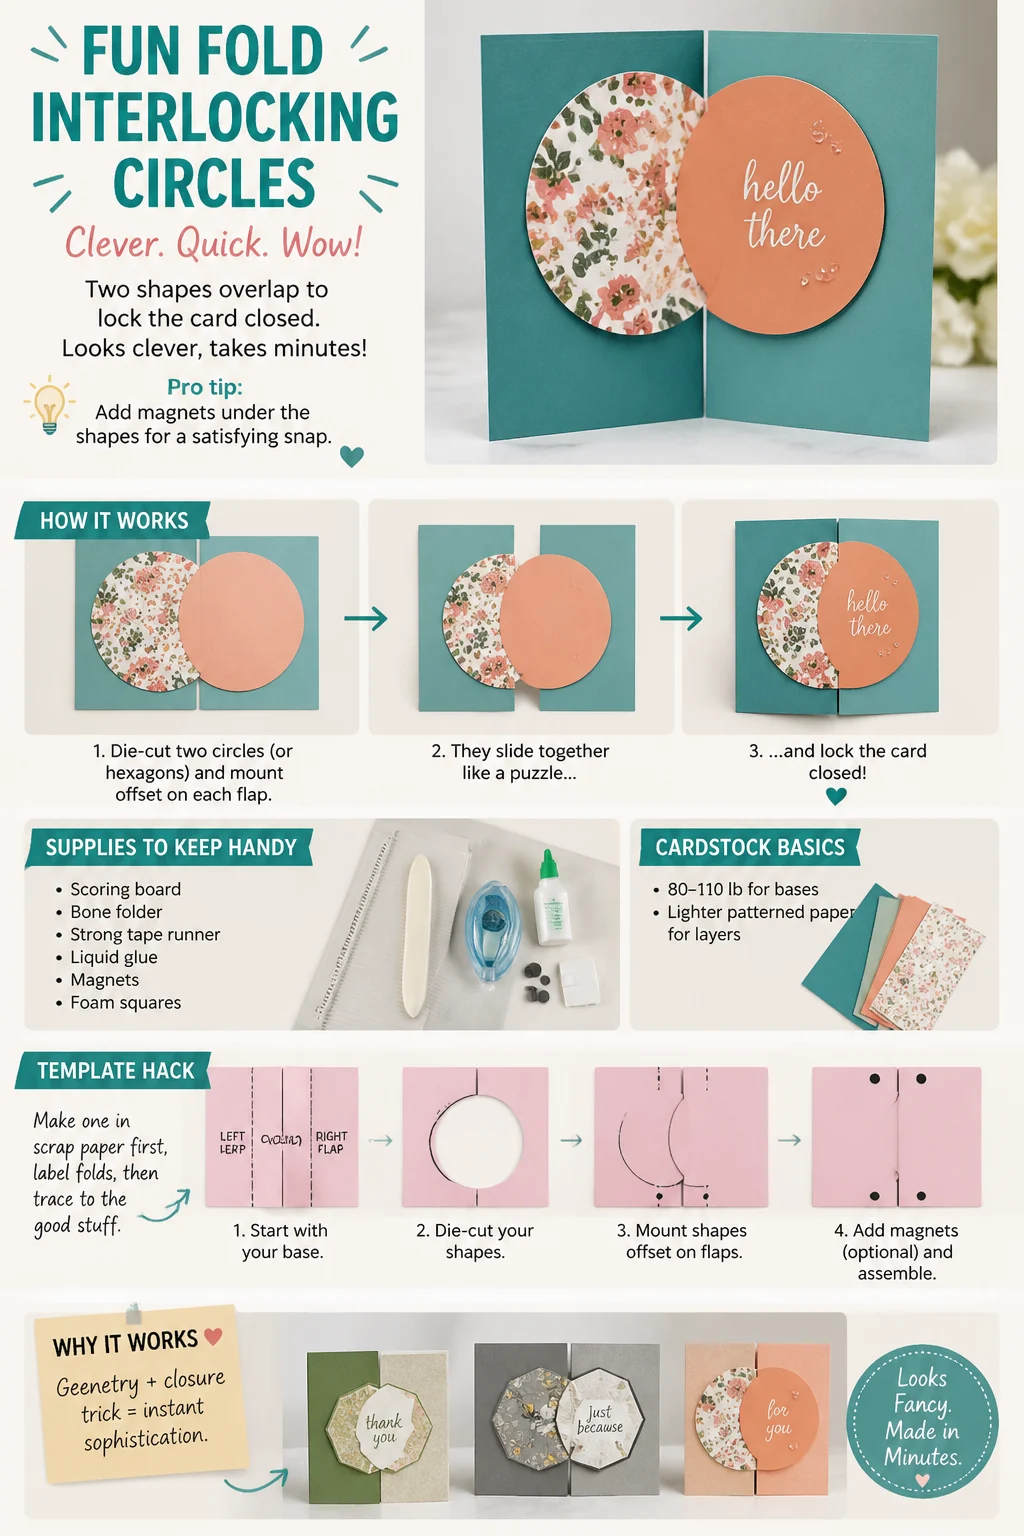
Die-cut two circles or hexagons and mount them offset on each flap. They slide together like a puzzle.
Pro tip: Add magnets under the shapes for a satisfying snap.
It works because geometry + closure trick = instant sophistication.
- Supplies to keep handy: scoring board, bone folder, strong tape runner, liquid glue, magnets, foam squares.
- Cardstock basics: 80–110 lb for bases, lighter patterned paper for layers.
- Template hack: Make one in scrap paper first, label folds, then trace to the good stuff.
✨ New Member Etsy Shops (100% Unsponsored!)
We are incredibly proud of the talent in this community! 💖 We've rounded up some gorgeous new Etsy shops launched by our very own members.
There are ZERO affiliate links in this post—just 100% pure support for our makers. Click below to shop small, show them some love, and find your new favorite items! 👇🛍️


Conclusion
Folded cards aren’t just cards—they’re tiny experiences. With these templates, you get motion, surprise, and style without stress. Grab your trimmer, queue a cozy playlist, and start folding happiness, one panel at a time.