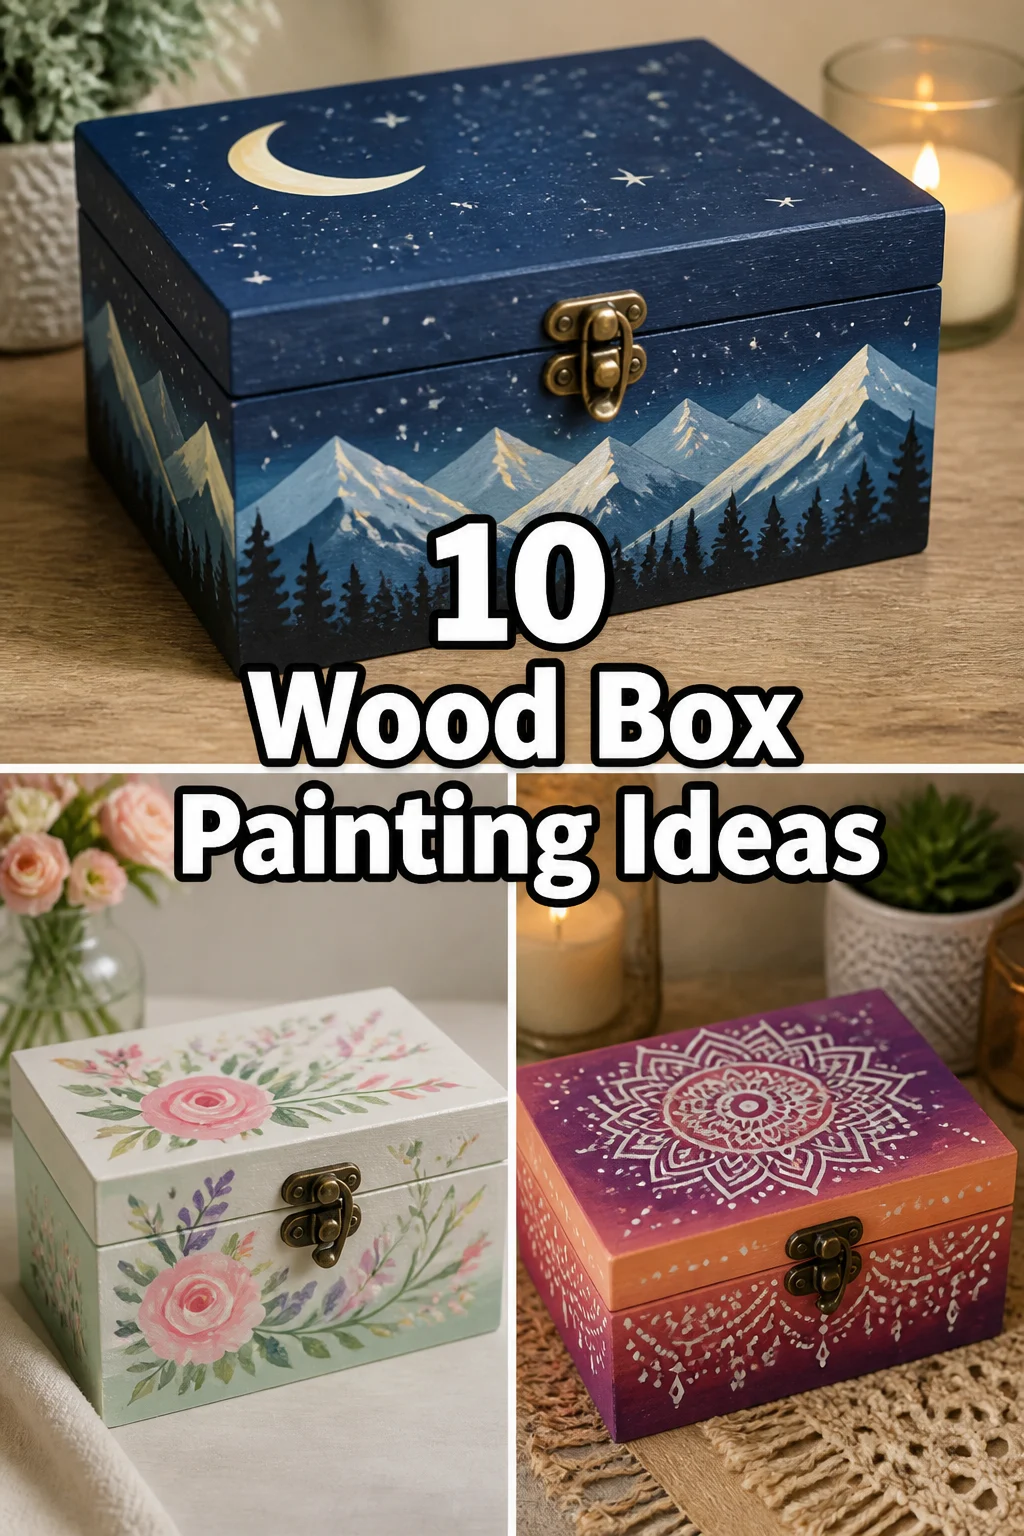
🎨 10 Wood Box Painting Ideas
🛠️ The Ultimate Maker's Toolkit
I've tested thousands of craft tools over the years. Whether you are quilting, crafting, or building mixed-media art, these are the top 5 absolute non-negotiable tools I personally recommend to guarantee professional results.
🪡 SINGER Heavy Duty 4452 Sewing Machine
The sewing community highly recommends this as the ultimate "bulletproof" entry-level machine. Its heavy metal frame powerfully pushes through thick denim and heavy quilt layers that would instantly jam a standard plastic machine.
✂️ Fiskars 8" Orange-Handled Scissors
Never settle for dull dollar-store blades. Wirecutter repeatedly names Fiskars the absolute best all-purpose craft scissor due to its legendary precision-ground blades and an ergonomic grip that prevents hand-cramping.
🔥 Gorilla Dual Temp Hot Glue Gun
Named Wirecutter's top choice because it literally does the work of two tools. It features dual-temperature settings offering low heat for delicate florals and blistering high heat for heavy wood adhesion repairs.
🖌️ Mod Podge Waterbase Gloss Sealer
The absolute undisputed champion of decoupage and paper crafts. Experts rely exclusively on this exact water-based formula because it glues, seals, and finishes beautifully without yellowing or flaking over time.
🎨 Apple Barrel Acrylic Paint (2 oz)
The quintessential, incredibly inexpensive craft paint. Woodworkers and hobby painters swear by its smooth flow and matte finish, providing massive value and remarkably thick color coverage on rough surfaces.
Alright, listen up, fellow craft rebels. You know those plain, unassuming wooden boxes lurking in the back of your closet or haunting the aisles of your favorite craft store? Yeah, those. They’re basically begging for a glow-up, a total personality transplant from “meh” to “OMG, where did you get that?!” Ditch the boring, embrace the brush, because we’re about to unleash some seriously cool vibes on those forgotten squares. No more excuses, let’s turn those blank canvases into tiny works of art that actually deserve a spot on your shelf.
1. Geometric Glam
Ready for some sharp angles and even sharper style? Geometric patterns are basically the cool kids of the design world. Think clean lines, bold shapes, and maybe a little metallic shimmer to really make it pop.
Grab some painter’s tape and go wild creating squares, triangles, or even abstract mazes. Pick two or three contrasting colors – maybe a matte black with a shiny gold accent? The trick is to press the tape down super firmly to avoid bleed-through. Pro tip: Pull off the tape while the paint is still slightly damp for the cleanest lines, trust me on this one. This look is effortlessly modern and makes your box instantly Instagram-worthy.
2. Boho Mandala Magic
Feeling a little zen and want to channel some inner peace onto your wood? A mandala design is your spiritual path to a stunning box. It’s all about repetitive patterns and soothing symmetry.
Start with a simple base color, maybe a calming cream or an earthy terracotta. Then, armed with some dotting tools (or even the back of a paintbrush), start building your design from the center outwards. Don’t overthink it; the beauty is in the flow. Pro tip: Practice your dots on a scrap piece of paper first to get a feel for the paint consistency and tool size. The end result is a deeply personal and wonderfully intricate piece.
3. Ombre Dreamscape
Who doesn’t love a good gradient? Ombre is still having its moment, and for good reason – it’s sophisticated, subtle, and looks way harder to achieve than it actually is. Prepare for compliments.
Pick two or three colors that blend well together, like a sky blue fading into a deep indigo, or a soft pink melting into a vibrant fuchsia. Apply your darkest color at the bottom, your lightest at the top, and then use a clean, damp brush or sponge to gently blend the colors where they meet. Pro tip: Work quickly and in small sections to keep the paint wet enough for seamless blending. It creates such a dreamy, ethereal effect that transforms any basic box.
4. Stenciled Storyteller
Not everyone is a freehand Picasso, and that’s totally fine! Stencils are your secret weapon for achieving intricate designs without breaking a sweat (or your artistic confidence).
There are a gazillion stencils out there – floral, geometric, letters, quotes, anything! Choose one that speaks to your soul, then secure it firmly to your box. Use a sponge dauber or a stiff brush to apply paint in thin layers, dabbing straight down to prevent paint from seeping under the edges. Pro tip: A light spray adhesive on the back of your stencil works wonders for keeping it in place and minimizing bleed. This method gives you a crisp, professional-looking finish every single time.
5. Abstract Expressionist Flash
If rules feel restrictive and you just want to let loose, abstract is your jam. Think Jackson Pollock meets your craft table. It’s all about emotion, movement, and a glorious mess.
Choose a few bold, contrasting colors. Then, grab your brushes, maybe a palette knife, or even just your fingers. Swirl, dab, splatter, and drip paint onto the box with abandon. Don’t aim for perfection; aim for feeling. Pro tip: Lay down a massive drop cloth or old newspaper, because things are about to get delightfully messy. This style is incredibly freeing and guarantees a truly unique, energetic piece.
6. Vintage Decoupage Delight
Why just paint when you can layer on some history and charm? Decoupage combines painting with paper magic, giving your box an instant aged, storybook feel.
Start with a base coat of paint in a coordinating color. Then, find some cool paper – old maps, sheet music, vintage postcards, fabric scraps, even printed photos. Cut them out, apply Mod Podge to the back, stick them on, and then seal everything with more Mod Podge. Pro tip: Use a brayer or a credit card to smooth out any air bubbles as you apply your paper elements. It’s a fantastic way to personalize your box with a touch of nostalgia.
7. Chalkboard Chic
Want a box that changes its mind as often as you do? Chalkboard paint is the answer. It’s functional, fun, and gives you endless opportunities for creative expression.
Paint your entire box, or just a section, with chalkboard paint. Once it’s fully cured (check the can for timing, usually a few days), you can write on it with regular chalk or liquid chalk markers. Label your contents, draw a quick doodle, or write an inspirational quote that you can switch up daily. Pro tip: Before first use, “condition” your chalkboard surface by rubbing the side of a piece of chalk over the entire painted area, then erase. So practical, so cool.
8. Galaxy Gaze
Bring the cosmos down to earth (or onto your box, rather). A galaxy-painted box is surprisingly easy to create and looks absolutely out of this world.
Start with a dark base – deep blue, black, or purple. Then, use sponges to dab on swirls of lighter blues, pinks, and purples to create nebulae. Finally, load an old toothbrush with white paint and flick the bristles to create tiny stars. Pro tip: Layering is key here. Start dark, build up lighter colors, and then add your stars for depth. It’s a mystical, mesmerizing effect that’ll make you feel like you’re holding a piece of the universe.
9. Textured Terrain
Who says paint has to be flat? Adding texture can elevate your box from a simple surface to a tactile work of art that begs to be touched.
You can mix sand or coffee grounds into your paint for a gritty feel, or use modeling paste to create raised patterns. Apply these with a palette knife or even a stiff brush, letting them dry completely before adding your final paint colors. Pro tip: Experiment with different tools – a comb, a fork, or even crumpled plastic wrap can create cool patterns in wet texture paste. This technique adds incredible depth and an artisanal vibe to your box.
10. Storybook Scene
Let your imagination run wild and paint a miniature world on your box. Think whimsical landscapes, charming characters, or a tiny snippet from your favorite fantasy tale.
This is where you get to be a true illustrator. Sketch your scene lightly with a pencil first, then bring it to life with vibrant acrylic paints. Keep the details simple and the colors playful. Pro tip: Use small brushes for the finer details and don’t be afraid to simplify shapes for a more illustrative look. It’s a delightful way to create a unique, narrative piece that tells its own little story.
✨ New Member Etsy Shops (100% Unsponsored!)
We are incredibly proud of the talent in this community! 💖 We've rounded up some gorgeous new Etsy shops launched by our very own members.
There are ZERO affiliate links in this post—just 100% pure support for our makers. Click below to shop small, show them some love, and find your new favorite items! 👇🛍️


Conclusion
See? Those humble wooden boxes never stood a chance against your newfound creative superpowers. Whether you’re all about geometric precision, cosmic wonder, or telling a whimsical tale, there’s a painting idea out there with your name on it. So grab your brushes, pick your poison (paint, obviously), and transform those plain planks into something truly spectacular. Your shelves (and your inner artist) will thank you.