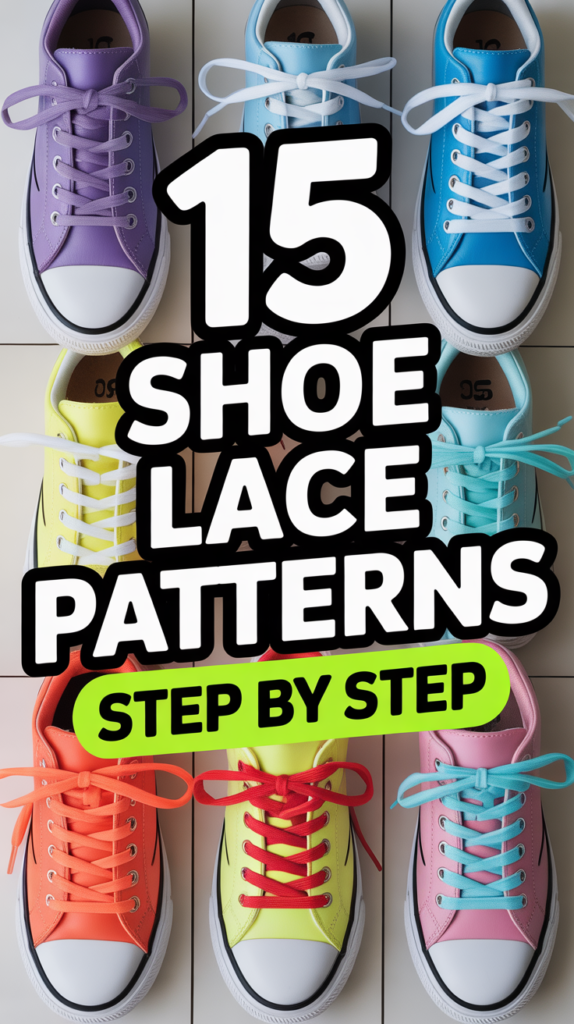
👟 15 Shoe Lace Patterns Step By Step
Your shoes are basically billboards for your personality. Let’s level them up with lace patterns that look cool, stay snug, and don’t take a degree in knot-ology. Grab your kicks, channel your inner scout, and let’s weave some magic.
1. Criss-Cross Classic
The MVP of lacing. Clean, balanced, and fast. If you can lace anything, you can lace this.
Run the lace straight across the bottom eyelets, then alternate crossing diagonally. It creates even tension and a timeless look. Great for sneakers and running shoes.
Pro tip: Start from the inside-out on each cross for a tidier line.
It works because it distributes pressure evenly while staying easy to tighten on the fly.
2. Straight Bar
Minimalist vibes only. Looks sleek and hides the chaos underneath.
Keep the visible bars straight across, with the lace threading vertically inside. Ideal for dress shoes and clean sneaker looks.
Pro tip: Use flat laces to keep the bars aligned and crisp.
It works because it reduces pressure points and looks neat in photos and real life.
3. Over-Under Runner’s Lock
Zero heel slip, zero drama. Your ankles will send a thank-you note.
Lace criss-cross until the top, then use the extra eyelets to create loops and lock the lace. Tighten to secure the heel for running or HIIT.
Pro tip: Pull up, not out, to cinch the lock without crushing your foot.
It works because it anchors the heel and prevents blisters from movement.
4. Ladder Lacing
Bold and boxy. Looks like armor for your feet.
Run straight bars across, then loop vertically up the sides before crossing under the next bar. Great for boots and high-tops.
Pro tip: Slightly loosen each rung before you wear to avoid over-tightening.
It works because it creates strong structure and even support across the tongue.
5. Zipper Lacing
Spiraled and stylish. Like your shoe got a tech upgrade.
Lace one side straight up and weave the other side diagonally over each bar, repeating. Best with contrasting laces for extra pop.
Pro tip: Keep tension consistent to maintain the spiral effect.
It works because it’s visually striking without messing up comfort.
6. Hidden Knot
No bows, no fuss. All business up top.
Lace straight bar style and tie the knot under the tongue. Great for slip-on vibes and dressy looks.
Pro tip: Use slightly elastic laces for easy on-off without retying.
It works because it keeps the silhouette clean and snag-free.
7. Double Helix
DNA drip for your sneakers. Twisty and clever.
Cross the laces with a twist in the middle each time, forming a spiral down the tongue. Best on 6–8 eyelet shoes.
Pro tip: Use two-tone laces for maximum helix flex.
It works because the twists lock tension while looking futuristic.
8. Checkerboard
Statement piece alert. Streetwear’s favorite party trick.
Use two laces. Lace one straight bars, then weave the second vertically over-under. Perfect for skate shoes.
Pro tip: Go one size longer on laces to finish the weave cleanly.
It works because it’s bold, stable, and surprisingly comfy across the top.
9. Army Ladder
Orderly and rugged. March-ready but make it stylish.
Create vertical columns and feed laces horizontally through each level like rungs. Excellent for combat boots.
Pro tip: Tighten from bottom to top in stages for an even lock.
It works because it delivers strong ankle support and uniform tension.
10. Hash Lacing
Hashtag chic. Subtle cross-hatching that looks intentional.
Alternate short diagonal crosses with straight bars to form hash marks. Works well with flat laces.
Pro tip: Keep diagonals shallow for a clean pattern.
It works because it spreads pressure while adding texture.
11. Bow Tie Center
Bow’s not at the top. It’s the star in the middle.
Lace normally until mid-eyelets, tie a small bow, then continue lacing up. Cute for fashion sneakers.
Pro tip: Use waxed laces so the center bow stays tiny and tight.
It works because it balances function with an unexpected style moment.
12. Surgeon’s Knot Tightener
For slippery laces and fussy shoes. Knots that don’t ghost you.
Lace criss-cross, but add a surgeon’s knot (double wrap) every two eyelets for micro-locks. Ideal for trail running.
Pro tip: Place a knot right above your foot’s widest point to prevent slippage.
It works because it locks sections so tension doesn’t migrate.
13. Gap Lacing for High Instep
Foot feels squished Try this pressure release.
Skip a pair of eyelets over the instep so the lace doesn’t press on hot spots. Great for high arches or top-of-foot pain.
Pro tip: Mark the pressure point with tape first so you skip precisely.
It works because it removes downward pressure exactly where you need relief.
14. Wide Forefoot Comfort
Toes want space? Give them VIP room.
Start with a straight bar at the bottom, then use parallel runs for the first few eyelets before switching to criss-cross. Perfect for wide toe boxes.
Pro tip: Leave the bottom bars slightly looser for natural splay.
It works because it opens the forefoot while still securing the midfoot.
15. Heel Lock Plus Bar Combo
Hybrid security for movers and shakers. No slip, no pinch.
Lace straight bars up to midfoot for comfort, then switch to criss-cross and finish with a runner’s loop at the top. Ideal for workouts and long days.
Pro tip: Test tension in two zones: forefoot comfy, ankle locked.
It works because it blends comfort where you flex and stability where you need hold.
Conclusion
Your laces are tiny levers of style and comfort. Mix patterns for your day, your foot, and your vibe. Lock what slips, loosen what pinches, and flex a look that’s uniquely yours. Lace up, step out, and let your shoes do the talking—quietly but confidently.