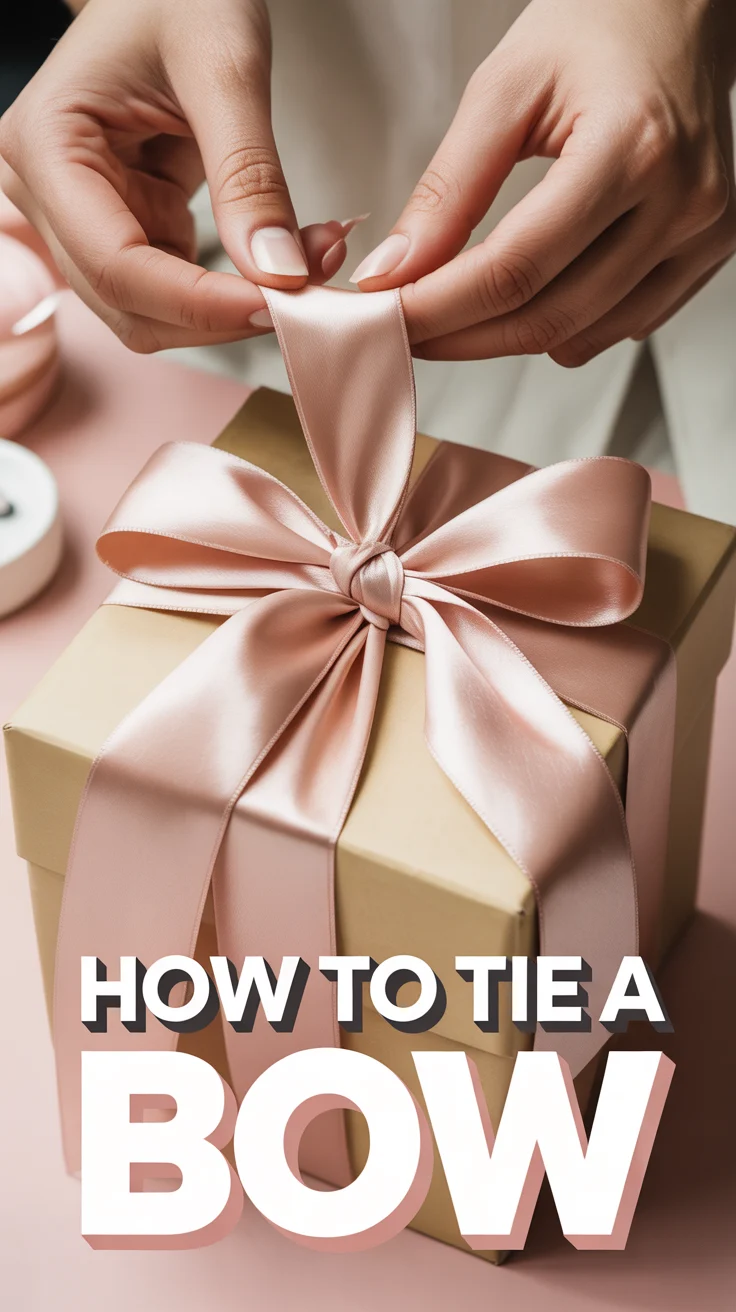
🎀 How To Tie A Bow
🛠️ The Ultimate Maker's Toolkit
I've tested thousands of craft tools over the years. Whether you are quilting, crafting, or building mixed-media art, these are the top 5 absolute non-negotiable tools I personally recommend to guarantee professional results.
🪡 SINGER Heavy Duty 4452 Sewing Machine
The sewing community highly recommends this as the ultimate "bulletproof" entry-level machine. Its heavy metal frame powerfully pushes through thick denim and heavy quilt layers that would instantly jam a standard plastic machine.
✂️ Fiskars 8" Orange-Handled Scissors
Never settle for dull dollar-store blades. Wirecutter repeatedly names Fiskars the absolute best all-purpose craft scissor due to its legendary precision-ground blades and an ergonomic grip that prevents hand-cramping.
🔥 Gorilla Dual Temp Hot Glue Gun
Named Wirecutter's top choice because it literally does the work of two tools. It features dual-temperature settings offering low heat for delicate florals and blistering high heat for heavy wood adhesion repairs.
🖌️ Mod Podge Waterbase Gloss Sealer
The absolute undisputed champion of decoupage and paper crafts. Experts rely exclusively on this exact water-based formula because it glues, seals, and finishes beautifully without yellowing or flaking over time.
🎨 Apple Barrel Acrylic Paint (2 oz)
The quintessential, incredibly inexpensive craft paint. Woodworkers and hobby painters swear by its smooth flow and matte finish, providing massive value and remarkably thick color coverage on rough surfaces.
You’ve got the ribbon. You’ve got the vibe. Now let’s make a bow that doesn’t look like it fought a blender. We’ll keep it simple, stylish, and just extra enough to impress your future self in photos.
1. Classic Shoe-Lace Bow
Meet the reliable bestie of bows. It’s quick, cute, and works on shoelaces, gift wrap, and headbands without drama.
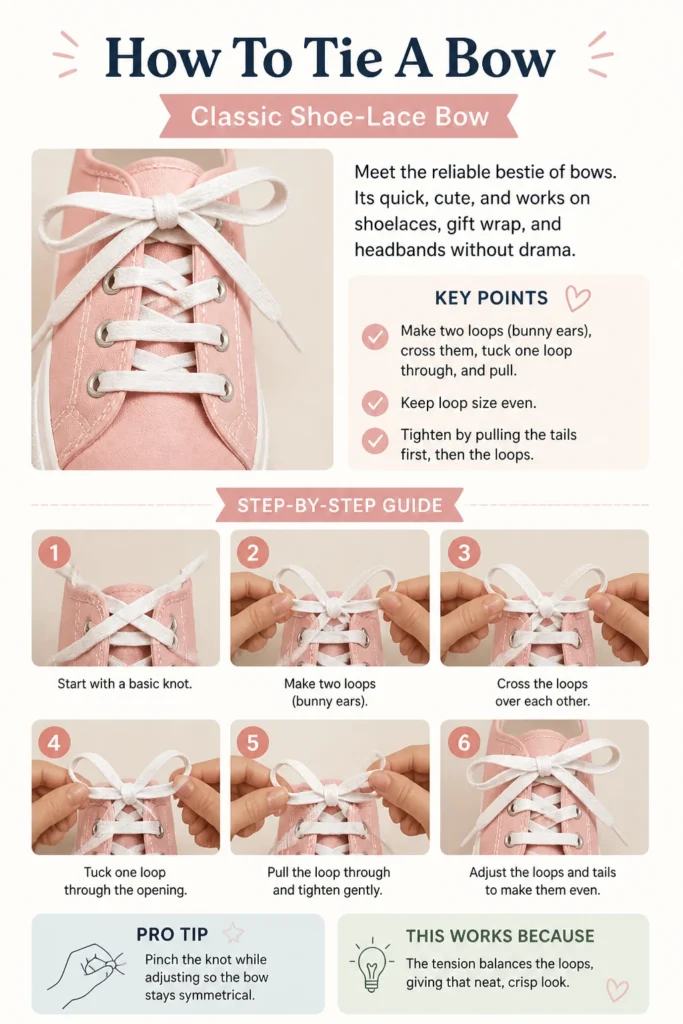
Key points: Make two loops (bunny ears), cross them, tuck one loop through, and pull. Keep loop size even. Tighten by pulling the tails first, then the loops.
Pro tip: Pinch the knot while adjusting so the bow stays symmetrical.
This works because the tension balances the loops, giving that neat, crisp look.
2. Loop-and-Tail Gift Bow
For when your present needs main-character energy. Fluffy, photogenic, and done in a minute.
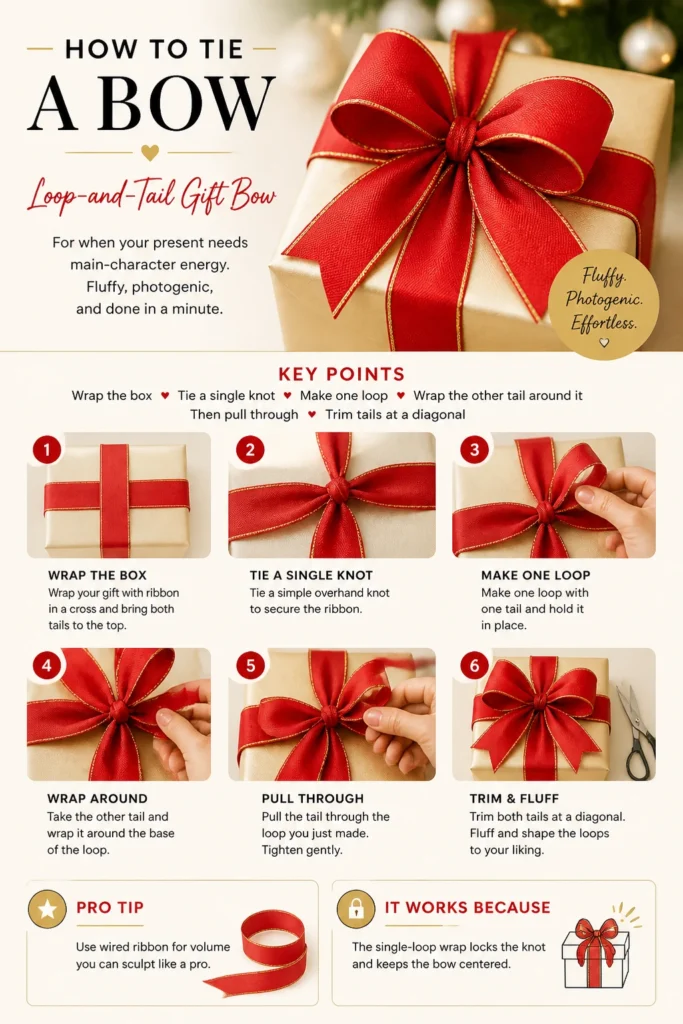
Key points: Wrap the box, tie a single knot, make one loop, wrap the other tail around it, then pull through. Trim tails at a diagonal.
Pro tip: Use wired ribbon for volume you can sculpt like a pro.
It works because the single-loop wrap locks the knot and keeps the bow centered.
3. Double-Loop Bow
Same effort, more drama. Two loops per side for a fuller bow that looks boutique-level.
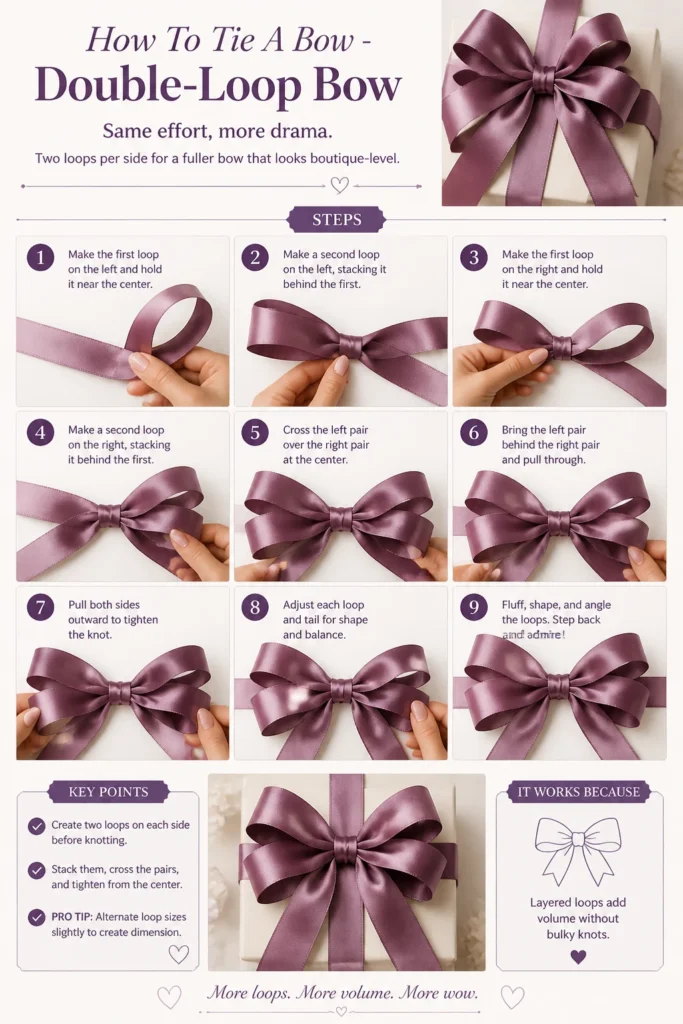
Key points: Create two loops on each side before knotting. Stack them, cross the pairs, and tighten from the center.
Pro tip: Alternate loop sizes slightly to create dimension.
It works because layered loops add volume without bulky knots.
4. Tail-Down Ribbon Bow
Sleek and polished with tails that drape like they pay rent. Perfect for dresses and waist ties.
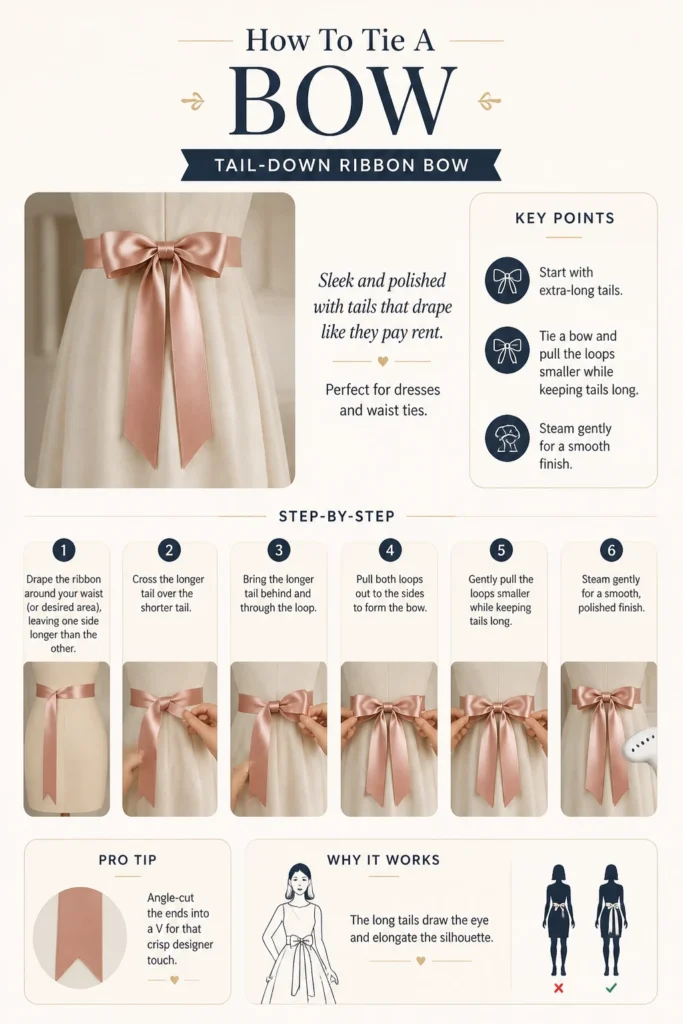
Key points: Start with extra-long tails. Tie a bow and pull the loops smaller while keeping tails long. Steam gently for a smooth finish.
Pro tip: Angle-cut the ends into a V for that crisp designer touch.
It works because the long tails draw the eye and elongate the silhouette.
5. The French Boutique Bow
Minimalist, chic, and a little smug. Great on hair ribbons, blouses, and gift cards.
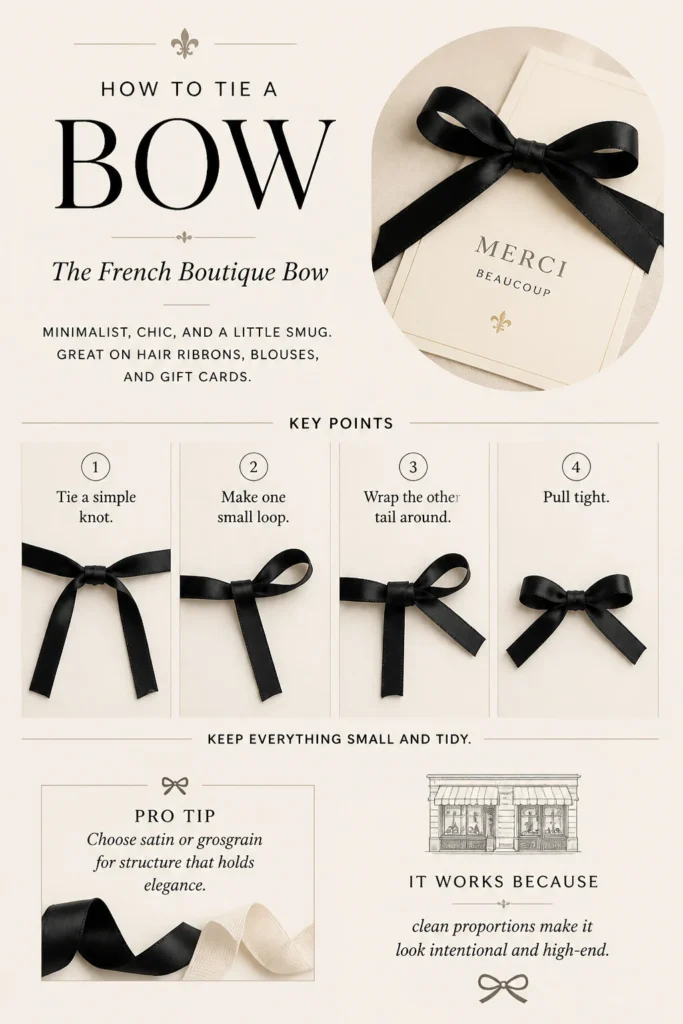
Key points: Tie a simple knot, make one small loop, wrap the other tail around, and pull tight. Keep everything small and tidy.
Pro tip: Choose satin or grosgrain for structure that holds elegance.
It works because clean proportions make it look intentional and high-end.
6. Hair Bow With Elastic
Say goodbye to floppy hair ribbons. This one stays put through selfies and coffee runs.

Key points: Thread ribbon through an elastic hair tie, center it, tie your bow around the elastic, then adjust loops.
Pro tip: Secure the knot with a tiny bobby pin under the bow for extra hold.
It works because the elastic anchors the bow without crushing volume.
7. Bow Tie for Collars
For shirts that want to flirt. Crisp and tailored without looking try-hard.
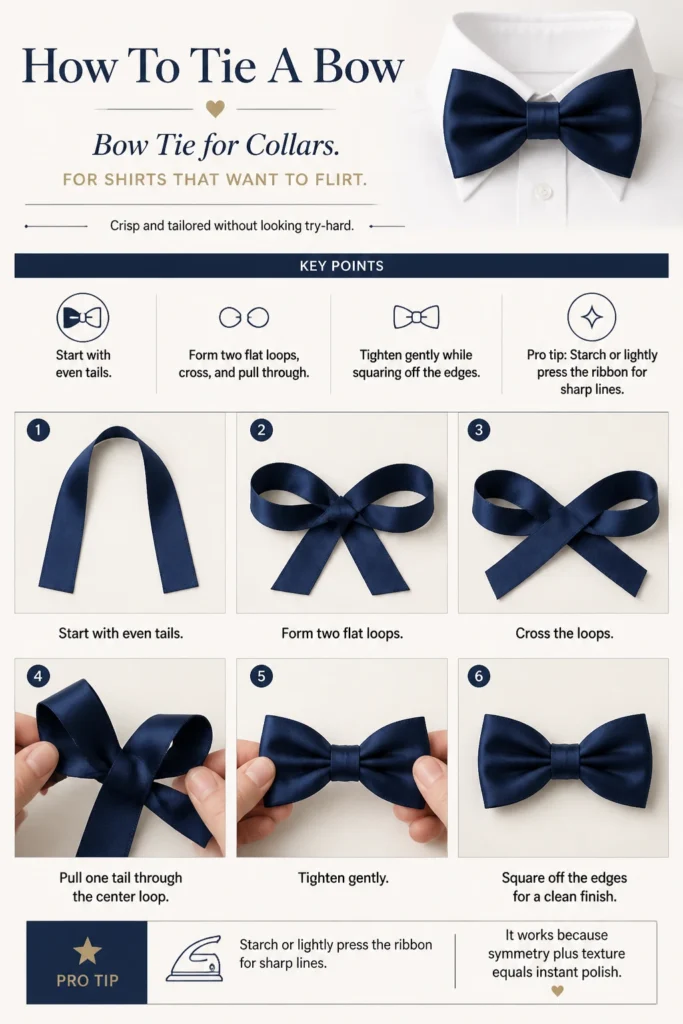
Key points: Start with even tails. Form two flat loops, cross, and pull through. Tighten gently while squaring off the edges.
Pro tip: Starch or lightly press the ribbon for sharp lines.
It works because symmetry plus texture equals instant polish.
8. Oversized Statement Bow
Go big or go home. This one is for waist belts, back-of-dress drama, and bold gifts.
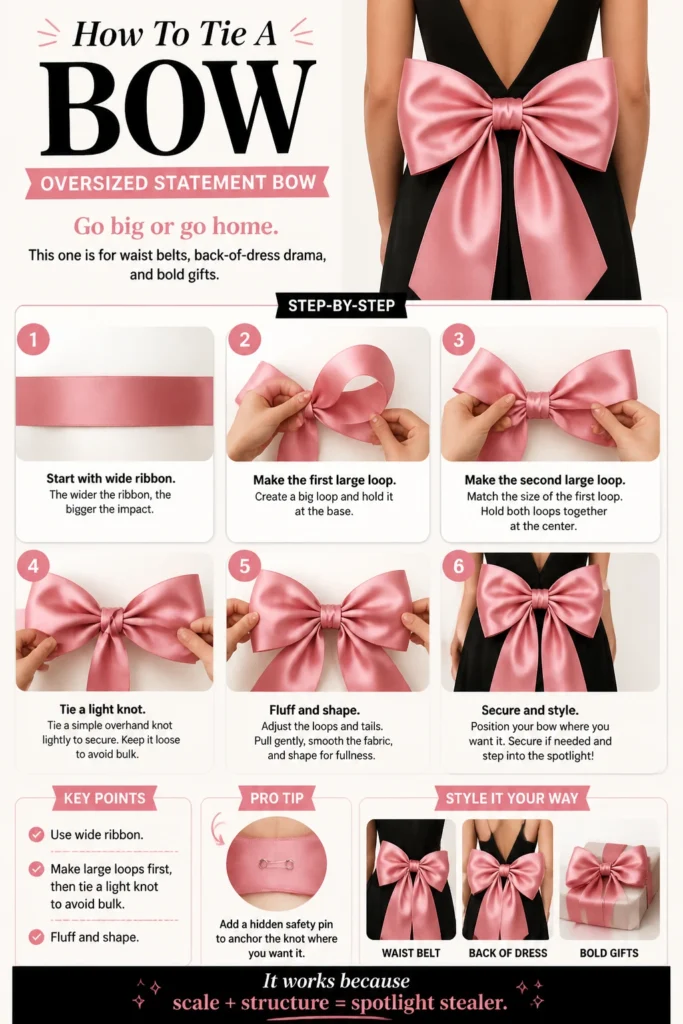
Key points: Use wide ribbon. Make large loops first, then tie a light knot to avoid bulk. Fluff and shape.
Pro tip: Add a hidden safety pin to anchor the knot where you want it.
It works because scale + structure = spotlight stealer.
9. Tiny Accent Bow
Subtle but adorable. Use it on napkins, favors, or the end of braids.
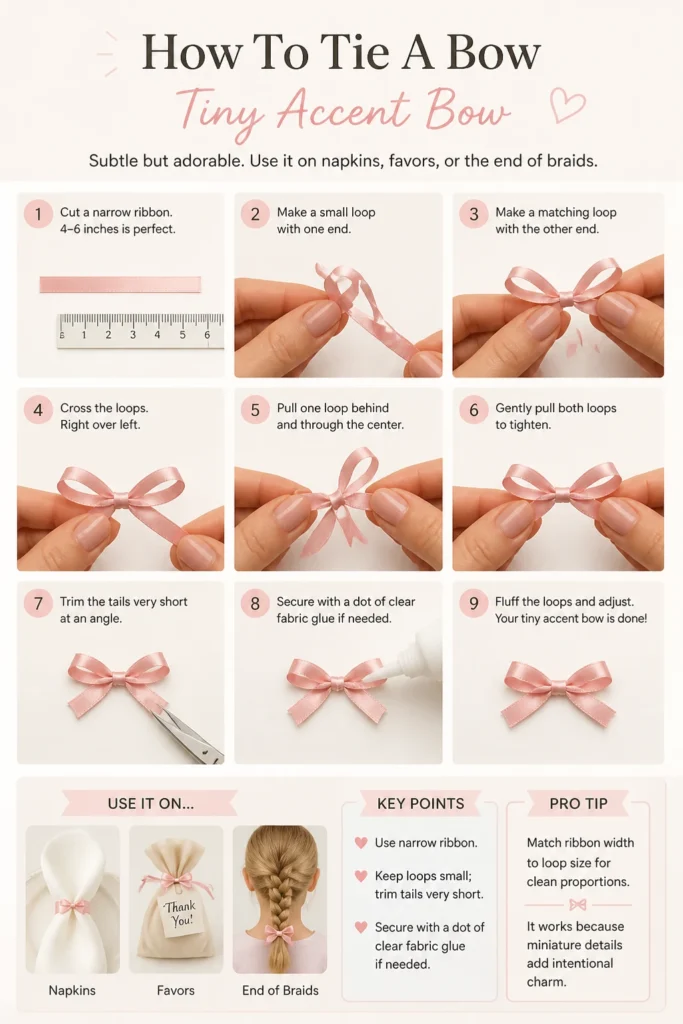
Key points: Use narrow ribbon. Keep loops small; trim tails very short. Secure with a dot of clear fabric glue if needed.
Pro tip: Match ribbon width to loop size for clean proportions.
It works because miniature details add intentional charm.
10. Floral Stem Bow
Make bouquets look florist-made in 30 seconds. Soft, romantic, and secure.
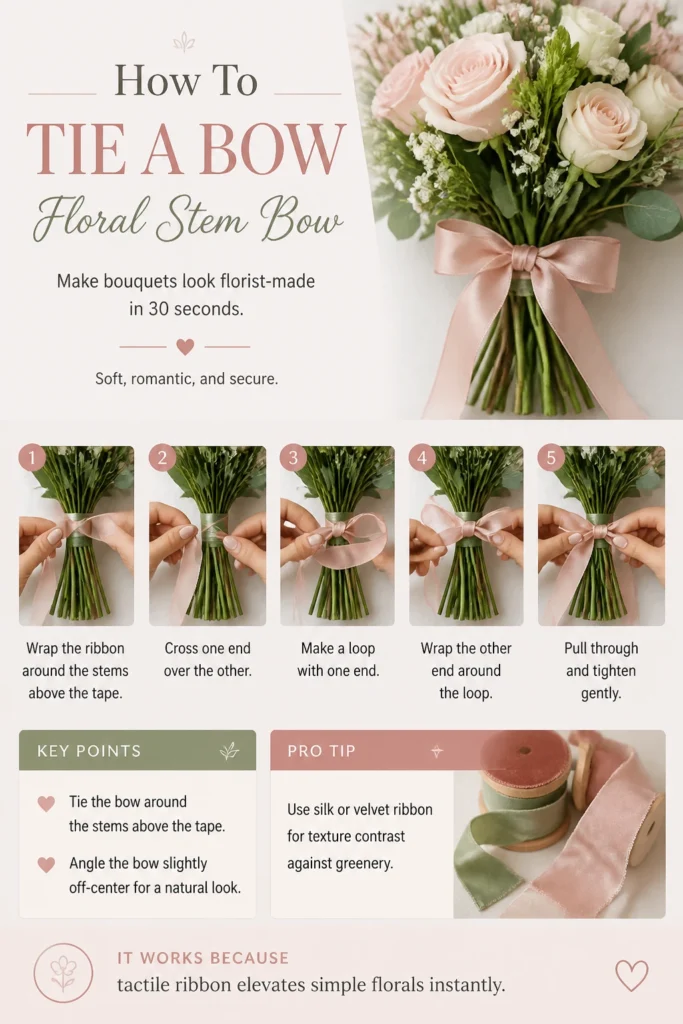
Key points: Tie the bow around the stems above the tape. Angle the bow slightly off-center for a natural look.
Pro tip: Use silk or velvet ribbon for texture contrast against greenery.
It works because tactile ribbon elevates simple florals instantly.
11. No-Slip Athletic Shoelace Bow
Because double-knotting is chaos. This version stays put without a tangled breakup later.
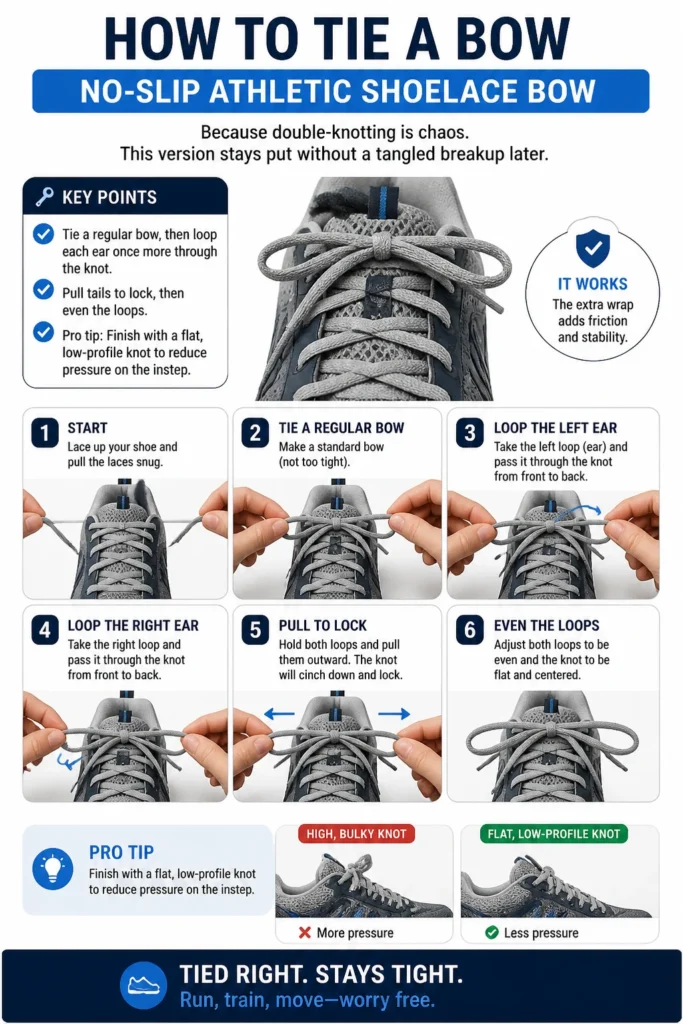
Key points: Tie a regular bow, then loop each ear once more through the knot. Pull tails to lock, then even the loops.
Pro tip: Finish with a flat, low-profile knot to reduce pressure on the instep.
It works because the extra wrap adds friction and stability.
12. Ribbon Bow With Center Wrap
Professional finish with zero fancy tools. Looks like you bought it—spoiler: you didn’t.

Key points: Tie a basic bow, then wrap a short strip of ribbon around the center and secure at the back.
Pro tip: Use double-sided tape or a discreet stitch to keep the wrap invisible.
It works because the center wrap hides the knot and adds a clean, elevated detail.
✨ New Member Etsy Shops (100% Unsponsored!)
We are incredibly proud of the talent in this community! 💖 We've rounded up some gorgeous new Etsy shops launched by our very own members.
There are ZERO affiliate links in this post—just 100% pure support for our makers. Click below to shop small, show them some love, and find your new favorite items! 👇🛍️


Conclusion
Your bow era has begun. From tiny accents to full-on drama, you’ve got twelve ways to tie it tight and style it right. Keep it symmetrical, mind your ribbon texture, and remember: confidence is the final knot.
- Symmetry first: adjust loops before tightening.
- Match ribbon to job: wired for structure, satin for sleek, grosgrain for grip.
- Finish smart: trim tails, steam lightly, secure discreetly.