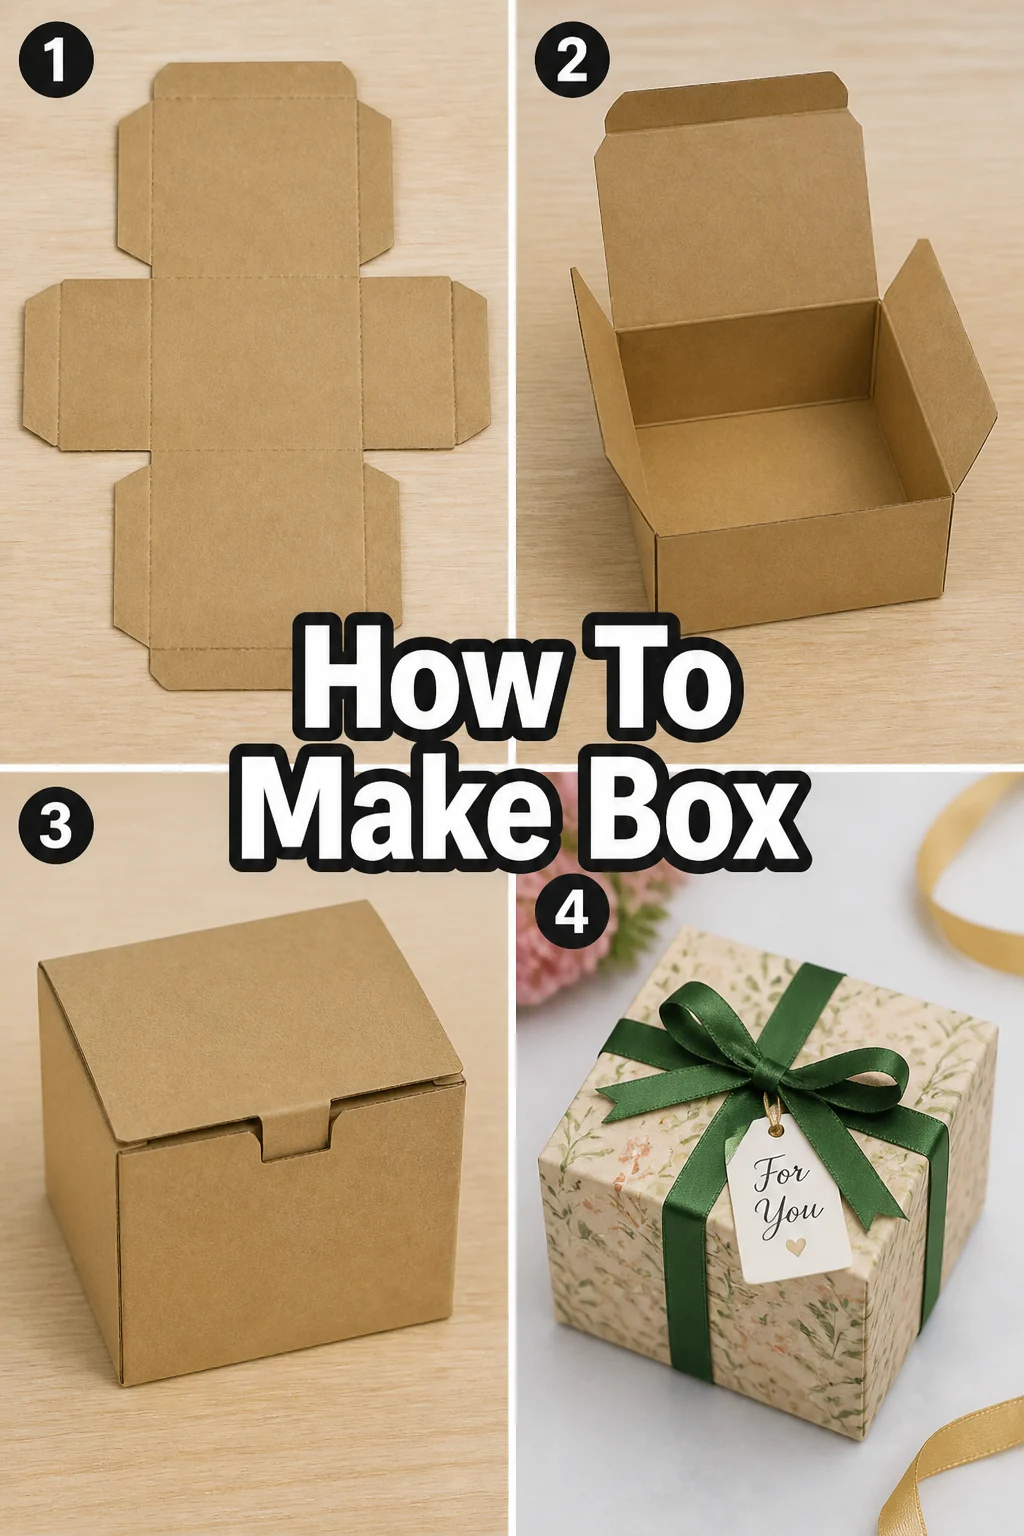
📦 How To Make Box
🛠️ The Ultimate Maker's Toolkit
I've tested thousands of craft tools over the years. Whether you are quilting, crafting, or building mixed-media art, these are the top 5 absolute non-negotiable tools I personally recommend to guarantee professional results.
🪡 SINGER Heavy Duty 4452 Sewing Machine
The sewing community highly recommends this as the ultimate "bulletproof" entry-level machine. Its heavy metal frame powerfully pushes through thick denim and heavy quilt layers that would instantly jam a standard plastic machine.
✂️ Fiskars 8" Orange-Handled Scissors
Never settle for dull dollar-store blades. Wirecutter repeatedly names Fiskars the absolute best all-purpose craft scissor due to its legendary precision-ground blades and an ergonomic grip that prevents hand-cramping.
🔥 Gorilla Dual Temp Hot Glue Gun
Named Wirecutter's top choice because it literally does the work of two tools. It features dual-temperature settings offering low heat for delicate florals and blistering high heat for heavy wood adhesion repairs.
🖌️ Mod Podge Waterbase Gloss Sealer
The absolute undisputed champion of decoupage and paper crafts. Experts rely exclusively on this exact water-based formula because it glues, seals, and finishes beautifully without yellowing or flaking over time.
🎨 Apple Barrel Acrylic Paint (2 oz)
The quintessential, incredibly inexpensive craft paint. Woodworkers and hobby painters swear by its smooth flow and matte finish, providing massive value and remarkably thick color coverage on rough surfaces.
There is something profoundly satisfying about transforming a flat, unassuming sheet of material into a sturdy, three-dimensional vessel with your own two hands. Learning how to make box is not just a craft project; it is an essential skill that unlocks endless possibilities for personalized gift-giving, bespoke home organization, and creative expression. Whether you are looking to house a precious heirloom or simply want to tidy up your desk with custom containers, this guide will empower you to master the geometry and artistry of box-making.
Quick Overview
In this guide, you will learn the fundamental “Tab and Score” method to create a classic lidded box. This technique is the gold standard for handmade packaging because it provides structural integrity while remaining accessible to beginners. By the end of this process, you will have a beautiful, functional two-piece box (a base and a lid) that looks professional and feels substantial.
- Time needed: 45 to 60 minutes (depending on decoration time).
- Difficulty: Beginner – No prior woodworking or advanced engineering required.
- What you’ll need: Heavy cardstock or corrugated cardboard, a sharp craft knife or scissors, a metal ruler, a pencil, a “scoring” tool (like a dried-out ballpoint pen or a bone folder), and high-quality adhesive (double-sided tape or quick-dry tacky glue).
Step-by-Step Instructions
Step 1: Select Your Foundation Material
The success of your box begins with the material you choose. For a decorative gift box, look for cardstock between 200gsm and 300gsm. This weight is thick enough to hold its shape but pliable enough to fold cleanly. If you are making a storage box for heavier items, consider upcycling clean corrugated cardboard from shipping parcels. The texture of your material matters too; a matte finish is easier to glue, while a glossy finish might require a stronger adhesive like a hot glue gun or specialized double-sided red-line tape.

Pro tip: If you are a beginner, start with a patterned cardstock that has a white or plain reverse side. This makes your pencil marks easy to see while ensuring the outside of your box looks stunning without extra effort.
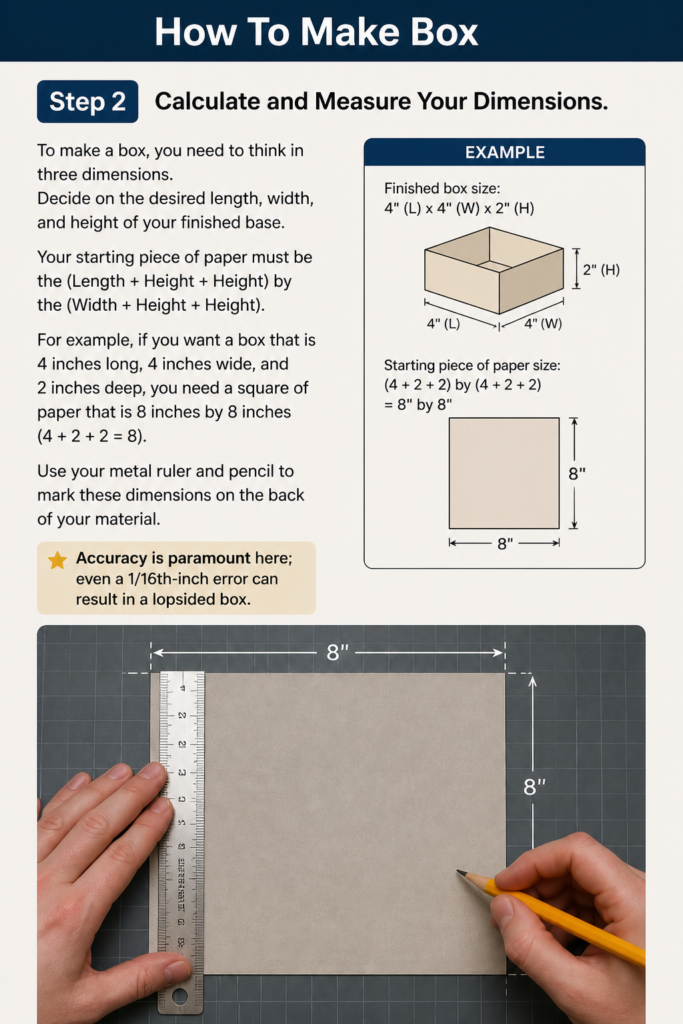
Step 2: Calculate and Measure Your Dimensions
To make a box, you need to think in three dimensions. Decide on the desired length, width, and height of your finished base. Your starting piece of paper must be the (Length + Height + Height) by the (Width + Height + Height). For example, if you want a box that is 4 inches long, 4 inches wide, and 2 inches deep, you need a square of paper that is 8 inches by 8 inches (4 + 2 + 2 = 8). Use your metal ruler and pencil to mark these dimensions on the back of your material. Accuracy is paramount here; even a 1/16th-inch error can result in a lopsided box.
Step 3: Create the Grid Layout
Once you have your outer square or rectangle cut out, you need to draw the “fold lines.” Place your ruler against the edge and measure in the distance of your “Height” from all four sides. Draw these lines lightly with your pencil. You should now see a smaller rectangle in the center (this will be the bottom of your box) surrounded by four outer rectangles (these will be the walls). The four squares in the corners where the lines intersect are the “tabs” that will hold your box together.
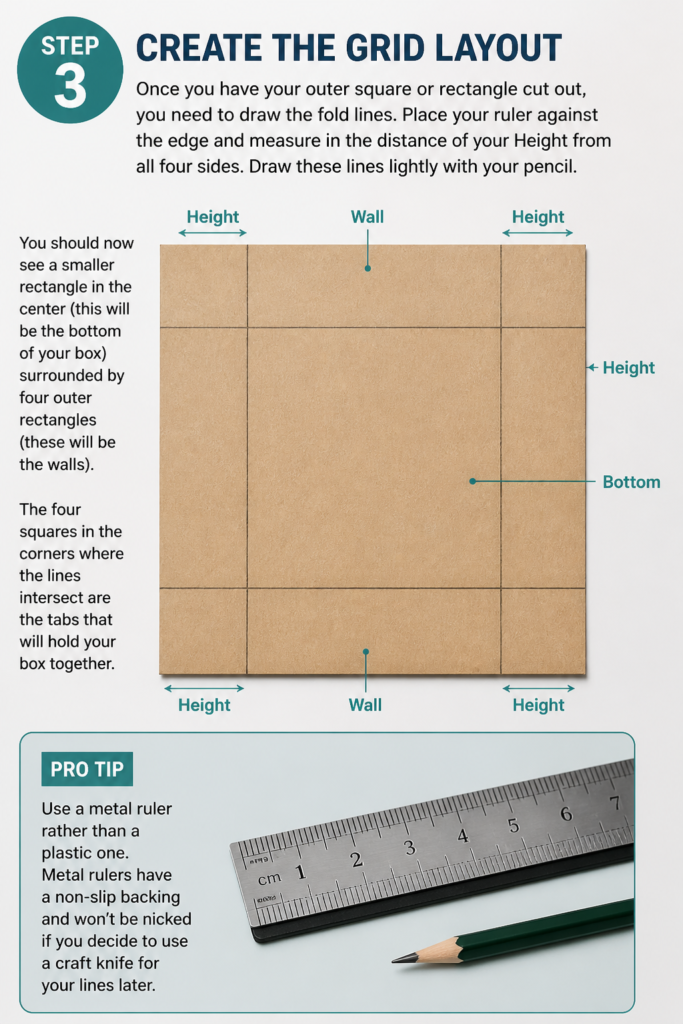
Pro tip: Use a metal ruler rather than a plastic one. Metal rulers have a non-slip backing and won’t be nicked if you decide to use a craft knife for your lines later.
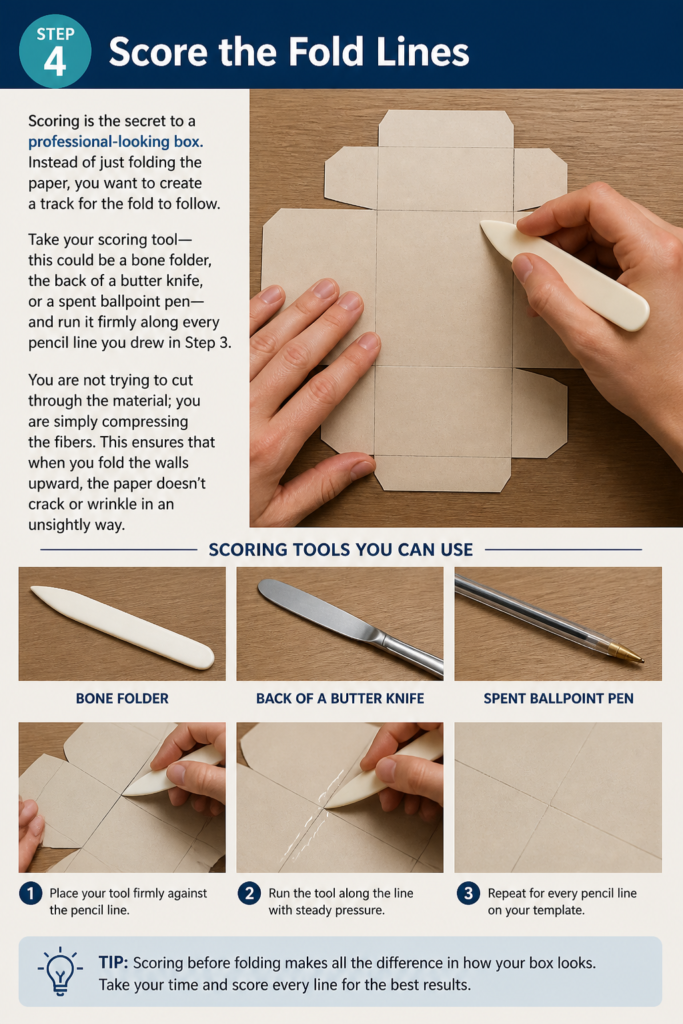
Step 4: Score the Fold Lines
Scoring is the secret to a professional-looking box. Instead of just folding the paper, you want to create a “track” for the fold to follow. Take your scoring tool—this could be a bone folder, the back of a butter knife, or a spent ballpoint pen—and run it firmly along every pencil line you drew in Step 3. You are not trying to cut through the material; you are simply compressing the fibers. This ensures that when you fold the walls upward, the paper doesn’t crack or wrinkle in an unsightly way.
Step 5: Cut the Corner Tabs
To allow the walls to stand up, you need to make four strategic cuts. Look at the four corner squares created by your grid. On two opposite sides of your paper, cut along the score line from the outer edge to the point where it meets the inner rectangle. Do not cut the corner square off entirely! You are creating “flaps” or “tabs.” You should now have a shape that looks somewhat like a cross or a plus sign with four loose flaps attached to the side walls.
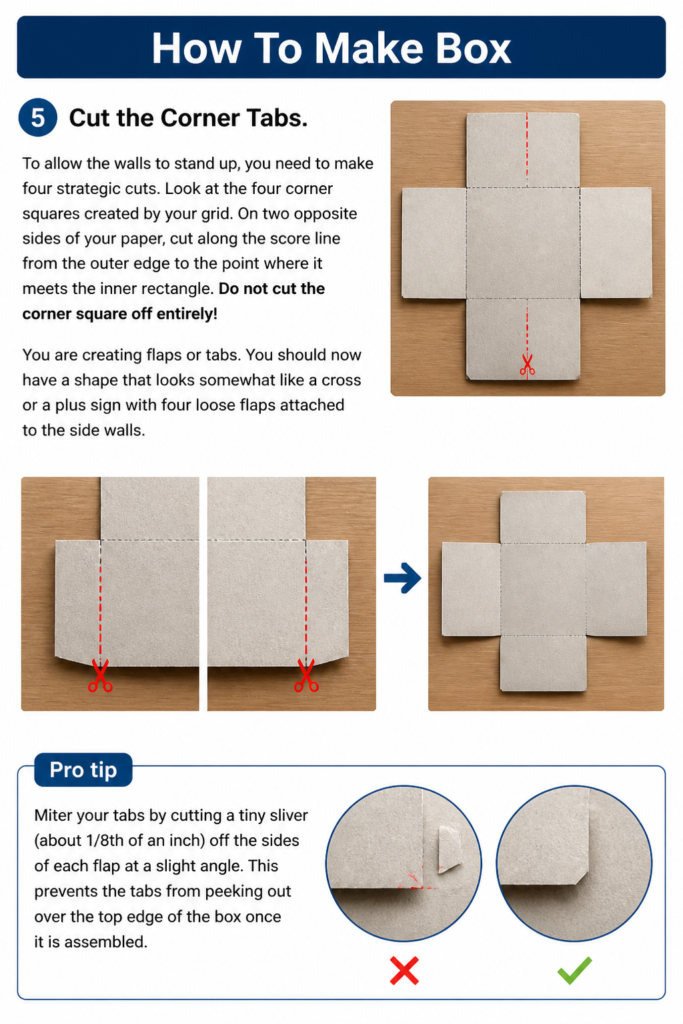
Pro tip: “Miter” your tabs by cutting a tiny sliver (about 1/8th of an inch) off the sides of each flap at a slight angle. This prevents the tabs from peeking out over the top edge of the box once it is assembled.
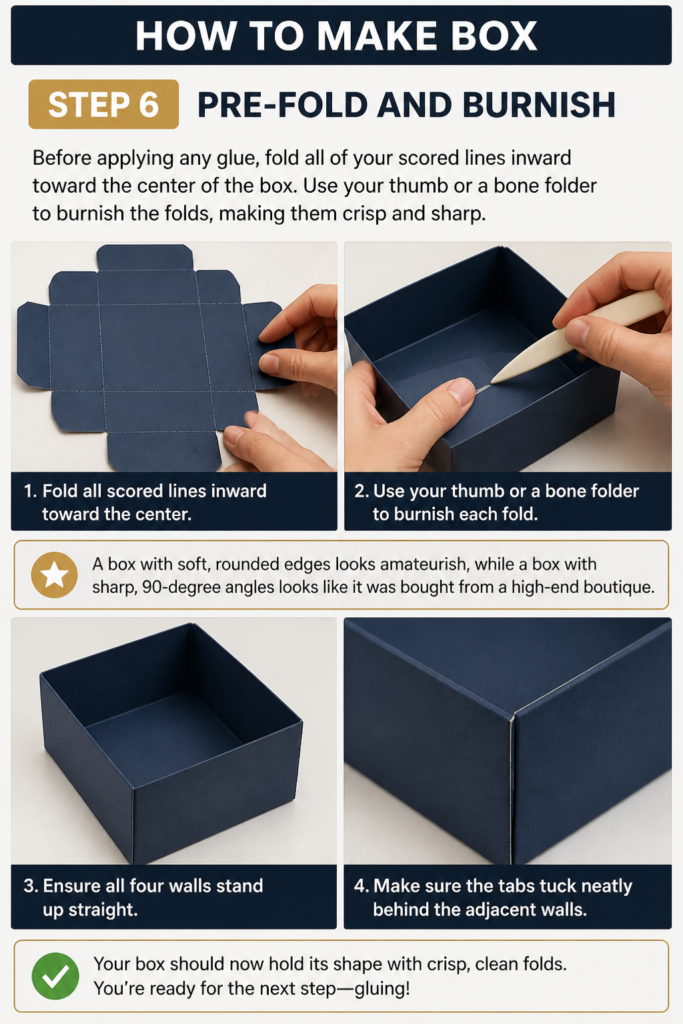
Step 6: Pre-Fold and Burnish
Before applying any glue, fold all of your scored lines inward toward the center of the box. Use your thumb or a bone folder to “burnish” the folds, making them crisp and sharp. A box with soft, rounded edges looks amateurish, while a box with sharp, 90-degree angles looks like it was bought from a high-end boutique. Ensure all four walls stand up straight and the tabs tuck neatly behind the adjacent walls.
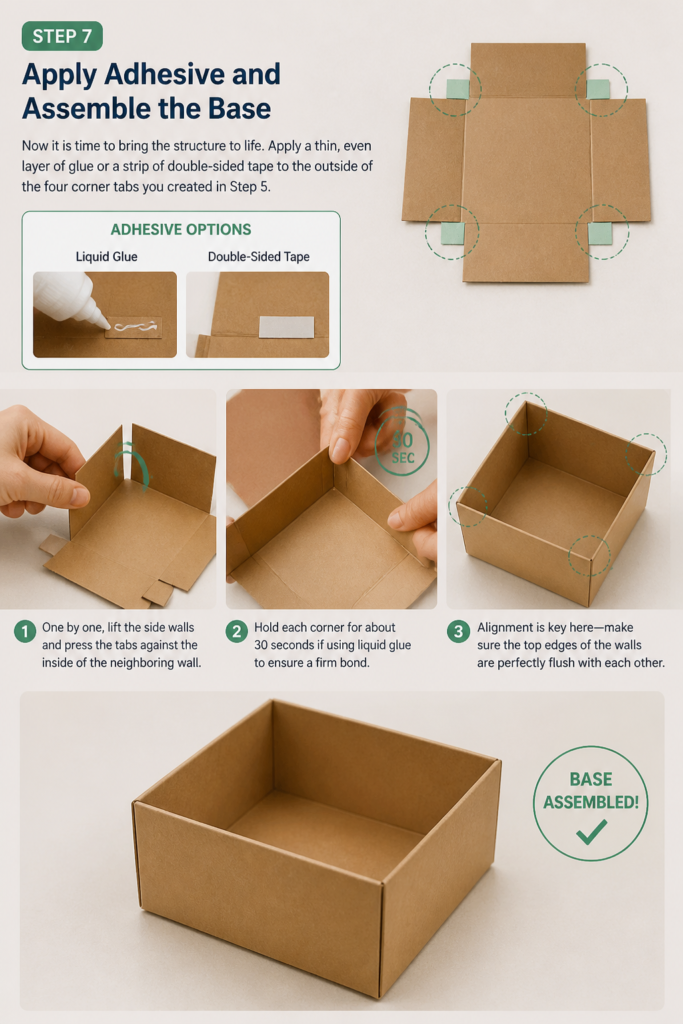
Step 7: Apply Adhesive and Assemble the Base
Now it is time to bring the structure to life. Apply a thin, even layer of glue or a strip of double-sided tape to the outside of the four corner tabs you created in Step 5. One by one, lift the side walls and press the tabs against the inside of the neighboring wall. Hold each corner for about 30 seconds if using liquid glue to ensure a firm bond. Alignment is key here—make sure the top edges of the walls are perfectly flush with each other.
Step 8: Construct the Lid
A box is rarely complete without its lid. To make a lid that fits perfectly, repeat Steps 2 through 7, but with one crucial adjustment: your starting piece of paper should be approximately 1/8th of an inch (3mm) larger than your base piece. This extra “wiggle room” accounts for the thickness of the paper and ensures the lid can slide on and off smoothly. You can also make the “Height” of the lid walls shorter than the base walls for a classic “shoebox” look.
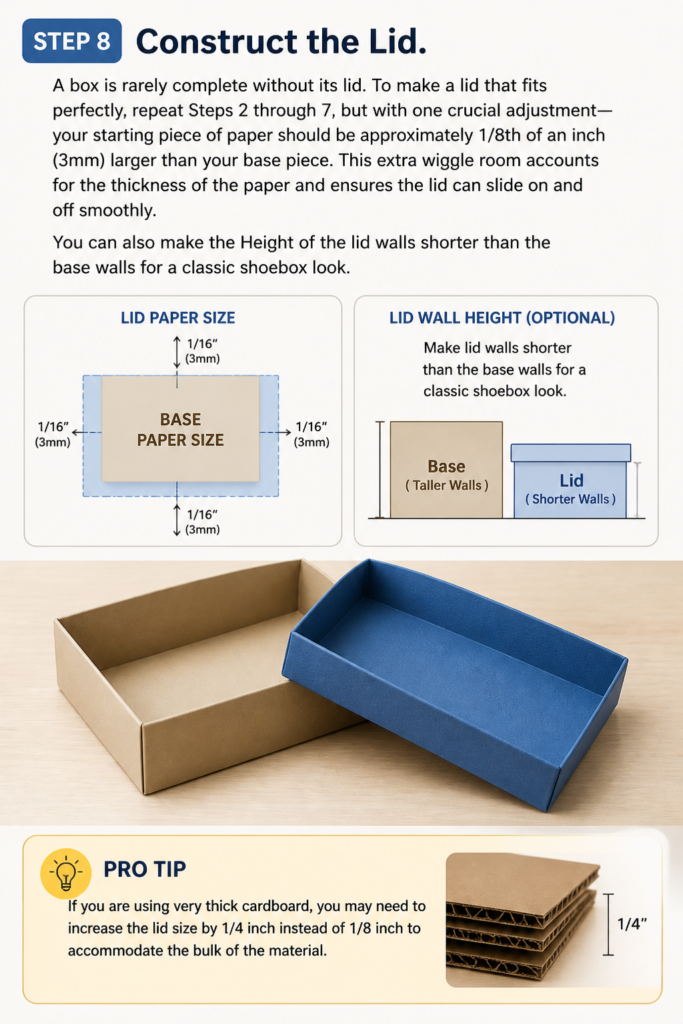
Pro tip: If you are using very thick cardboard, you may need to increase the lid size by 1/4 inch instead of 1/8 inch to accommodate the bulk of the material.
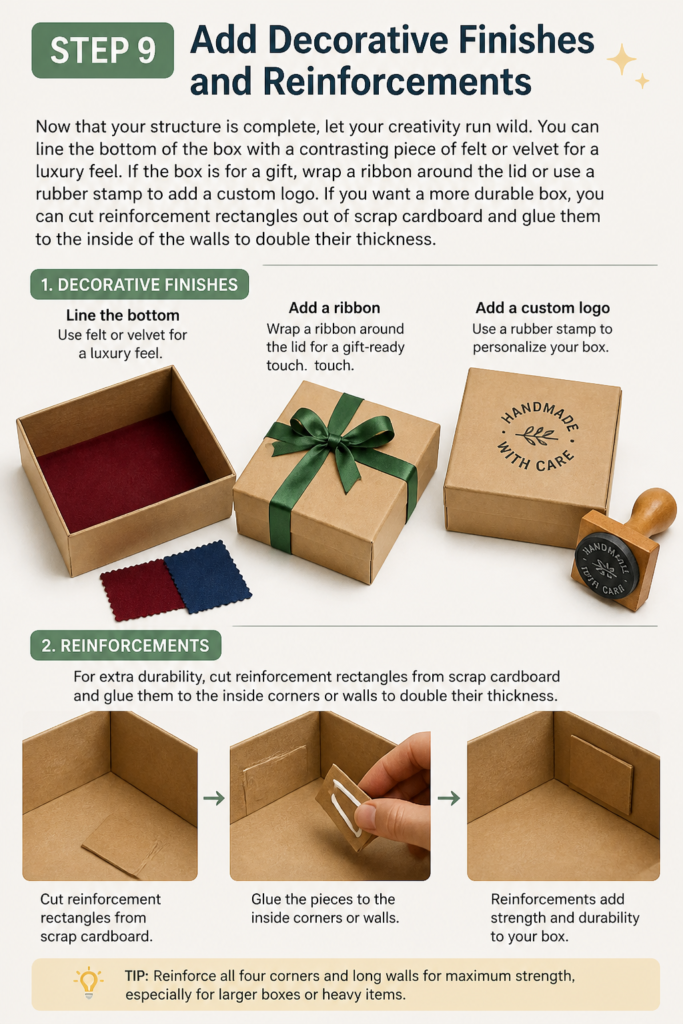
Step 9: Add Decorative Finishes and Reinforcements
Now that your structure is complete, let your creativity run wild. You can line the bottom of the box with a contrasting piece of felt or velvet for a luxury feel. If the box is for a gift, wrap a ribbon around the lid or use a rubber stamp to add a custom logo. If you want a more durable box, you can cut “reinforcement” rectangles out of scrap cardboard and glue them to the inside of the walls to double their thickness.
Common Mistakes to Avoid
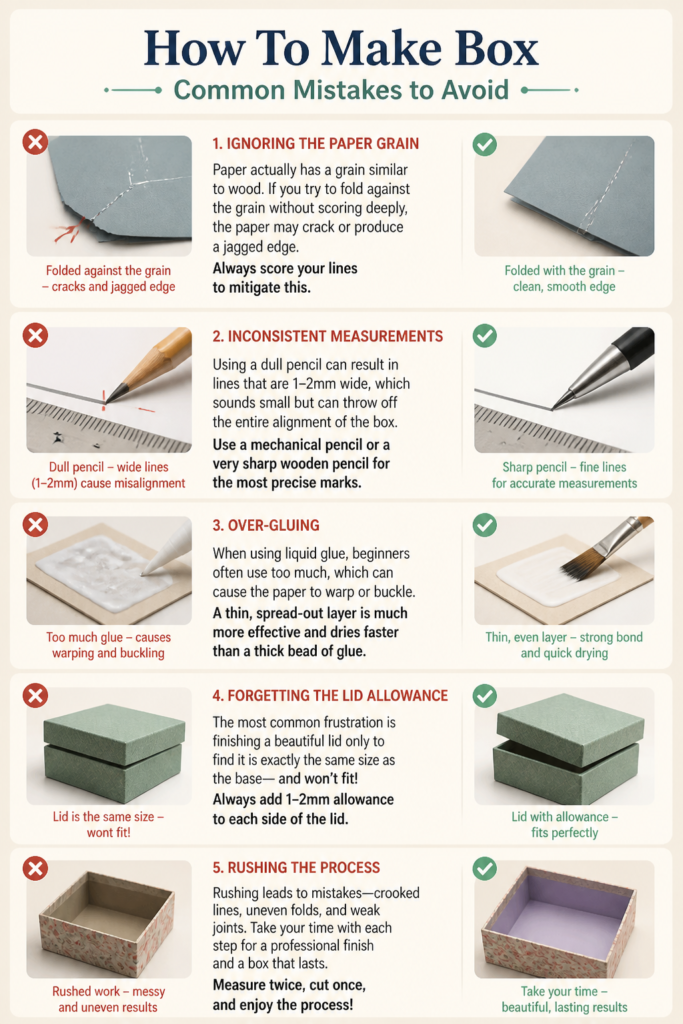
- Ignoring the Paper Grain: Paper actually has a “grain” similar to wood. If you try to fold against the grain without scoring deeply, the paper may crack or produce a jagged edge. Always score your lines to mitigate this.
- Inconsistent Measurements: Using a dull pencil can result in lines that are 1-2mm wide, which sounds small but can throw off the entire alignment of the box. Use a mechanical pencil or a very sharp wooden pencil for the most precise marks.
- Over-Gluing: When using liquid glue, beginners often use too much, which can cause the paper to warp or “buckle.” A thin, spread-out layer is much more effective and dries faster than a thick bead of glue.
- Forgetting the Lid Allowance: The most common frustration is finishing a beautiful lid only to find it is exactly the same size as the base, making it impossible to close. Always remember to add that tiny bit of extra width to your lid measurements.
Troubleshooting
Issue: The box walls are leaning outward.
This usually happens if your score lines aren’t deep enough or if the adhesive wasn’t held long enough during the drying process. To fix this, you can “over-fold” the walls inward slightly to train the fibers, or add a small “brace” of cardboard inside the corner to force it into a 90-degree angle.
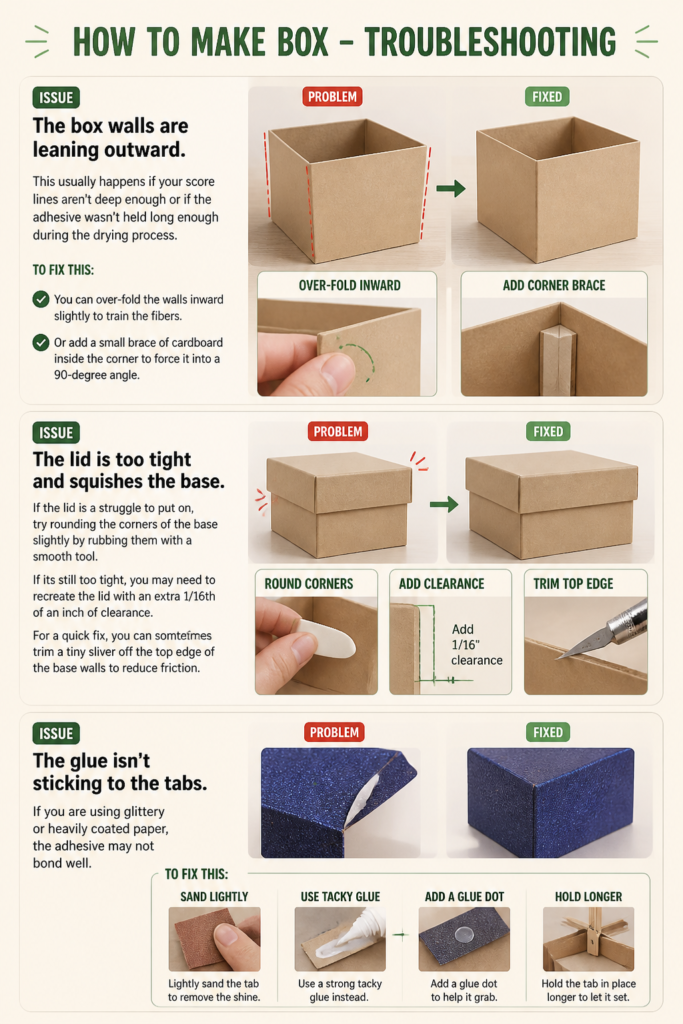
Issue: The lid is too tight and squishes the base.
If the lid is a struggle to put on, try “rounding” the corners of the base slightly by rubbing them with a smooth tool. If it’s still too tight, you may need to recreate the lid with an extra 1/16th of an inch of clearance. For a quick fix, you can sometimes trim a tiny sliver off the top edge of the base walls to reduce friction.
Issue: The glue isn’t sticking to the tabs.
If you are using glittery or metallic cardstock, standard school glue won’t work because the surface is non-porous. You will need to use a “tacky” glue, a hot glue gun, or a high-strength double-sided adhesive tape designed for scrapbooking.
Key Takeaways
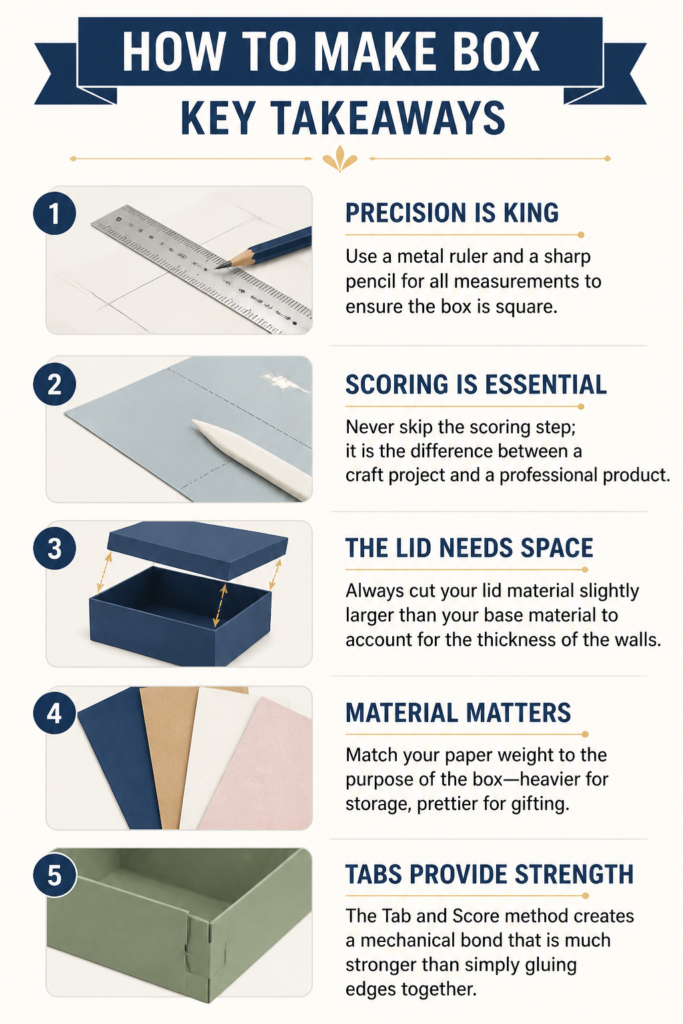
- Precision is King: Use a metal ruler and a sharp pencil for all measurements to ensure the box is square.
- Scoring is Essential: Never skip the scoring step; it is the difference between a “craft project” and a professional product.
- The Lid Needs Space: Always cut your lid material slightly larger than your base material to account for the thickness of the walls.
- Material Matters: Match your paper weight to the purpose of the box—heavier for storage, prettier for gifting.
- Tabs Provide Strength: The “Tab and Score” method creates a mechanical bond that is much stronger than simply gluing edges together.
Frequently Asked Questions
Can I make a box out of fabric?
Yes, but you will need to use a technique called “cartonnage.” This involves gluing fabric onto pre-cut pieces of stiff bookbinding board or heavy cardboard. The cardboard provides the structure, and the fabric provides the aesthetic finish.
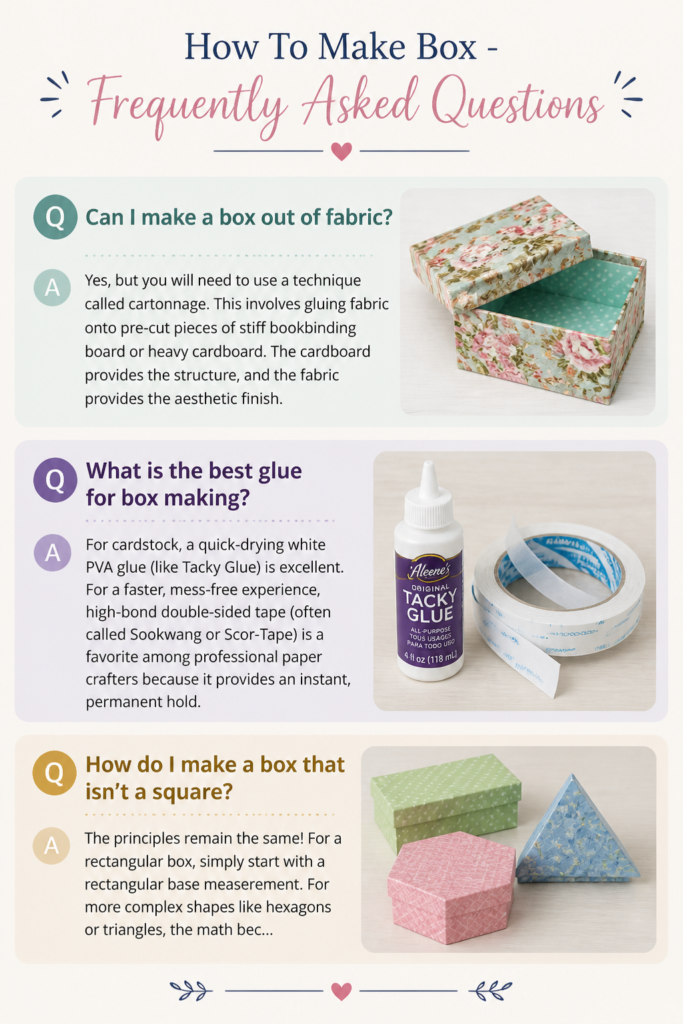
What is the best glue for box making?
For cardstock, a quick-drying white PVA glue (like Tacky Glue) is excellent. For a faster, mess-free experience, high-bond double-sided tape (often called “Sookwang” or “Scor-Tape”) is a favorite among professional paper crafters because it provides an instant, permanent hold.
How do I make a box that isn’t a square?
The principles remain the same! For a rectangular box, simply start with a rectangular base measurement. For more complex shapes like hexagons or triangles, the math becomes more involved regarding the angles of the tabs, but the “Score, Cut, Fold” workflow remains your foundation.
What’s Next?
Now that you have mastered the basic lidded box, why stop there? You can experiment with “Explosion Boxes” where the sides fall down when the lid is removed, or try your hand at “Nesting Boxes” by creating a series of containers that fit perfectly inside one another. If you’re feeling ambitious, look into the world of “Bookbinding” to learn how to create hinged-lid boxes or “Clamshell” cases. The best way to improve is to start today—grab a piece of scrap paper and make a miniature prototype. Once you see the structure come together, you’ll be hooked on the rewarding art of box making!