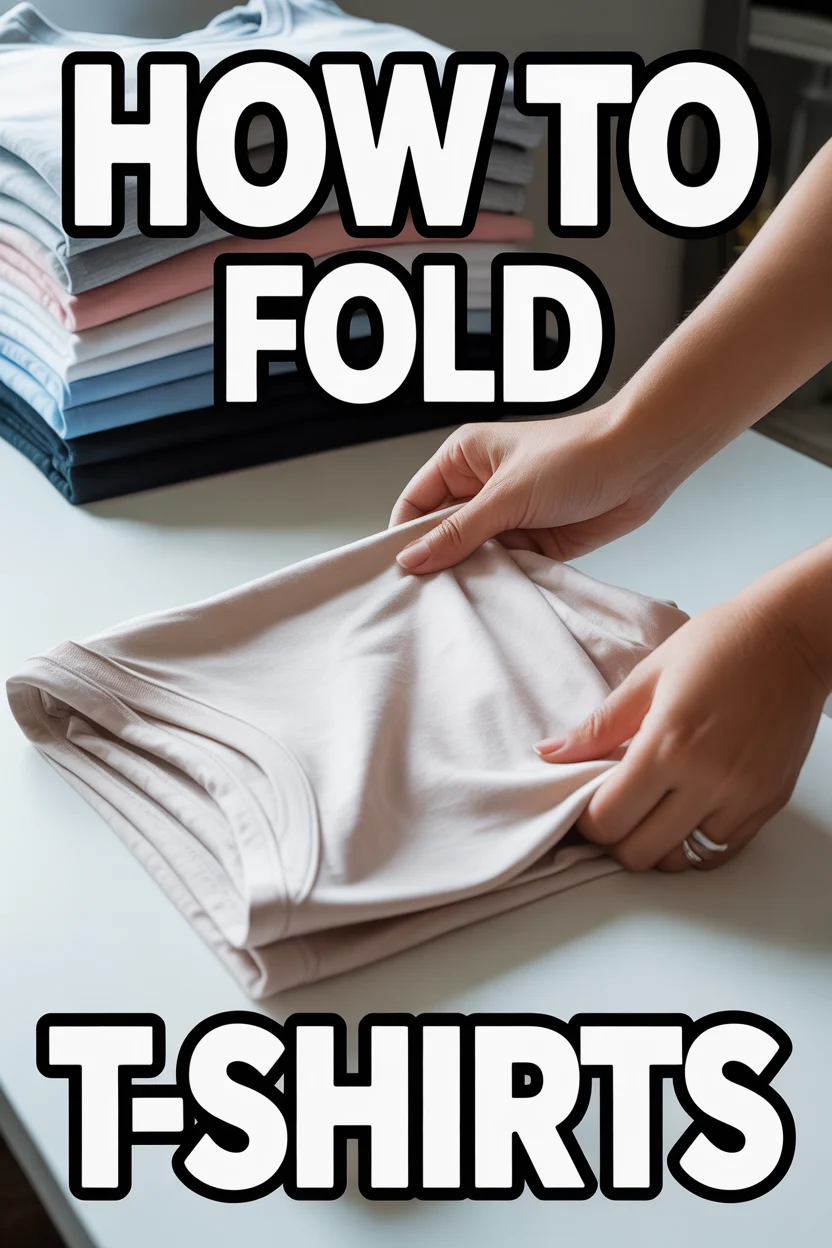
👕 How To Fold Tshirts
🛠️ The Ultimate Maker's Toolkit
I've tested thousands of craft tools over the years. Whether you are quilting, crafting, or building mixed-media art, these are the top 5 absolute non-negotiable tools I personally recommend to guarantee professional results.
🪡 SINGER Heavy Duty 4452 Sewing Machine
The sewing community highly recommends this as the ultimate "bulletproof" entry-level machine. Its heavy metal frame powerfully pushes through thick denim and heavy quilt layers that would instantly jam a standard plastic machine.
✂️ Fiskars 8" Orange-Handled Scissors
Never settle for dull dollar-store blades. Wirecutter repeatedly names Fiskars the absolute best all-purpose craft scissor due to its legendary precision-ground blades and an ergonomic grip that prevents hand-cramping.
🔥 Gorilla Dual Temp Hot Glue Gun
Named Wirecutter's top choice because it literally does the work of two tools. It features dual-temperature settings offering low heat for delicate florals and blistering high heat for heavy wood adhesion repairs.
🖌️ Mod Podge Waterbase Gloss Sealer
The absolute undisputed champion of decoupage and paper crafts. Experts rely exclusively on this exact water-based formula because it glues, seals, and finishes beautifully without yellowing or flaking over time.
🎨 Apple Barrel Acrylic Paint (2 oz)
The quintessential, incredibly inexpensive craft paint. Woodworkers and hobby painters swear by its smooth flow and matte finish, providing massive value and remarkably thick color coverage on rough surfaces.
Tired of rummaging through a chaotic drawer of crumpled tees? Imagine opening your closet to a symphony of perfectly stacked, wrinkle-free shirts, each one a neat, tidy rectangle waiting for its moment to shine. Folding t-shirts might seem like a mundane chore, but with the right technique, it transforms into a satisfying act of organization that saves space, time, and keeps your beloved garments looking their best. Get ready to transform your wardrobe from disarray to dazzling!
Quick Overview
This guide will empower you to master the art of the perfect t-shirt fold, resulting in compact, uniform stacks that will revolutionize your drawers and shelves. You’ll learn a versatile method that works for most shirt types and discover how to maintain that freshly laundered look.
- Time needed: 3-5 minutes per shirt (initially), less than 30 seconds once mastered.
- Difficulty: Beginner
- What you’ll need: A clean, flat surface (table, bed, or even a lap), and your t-shirts!
Step-by-Step Instructions
Step 1: Prepare Your Canvas
Begin your folding journey by laying your t-shirt face-down on a clean, flat surface. This could be a table, your bed, or even a sturdy ironing board. Ensure the shirt is as flat and smooth as possible. Spread it out completely, making sure there are no major wrinkles or bunched-up areas from the get-go. Think of it as preparing your canvas before painting a masterpiece – a smooth foundation is key to a beautiful result.
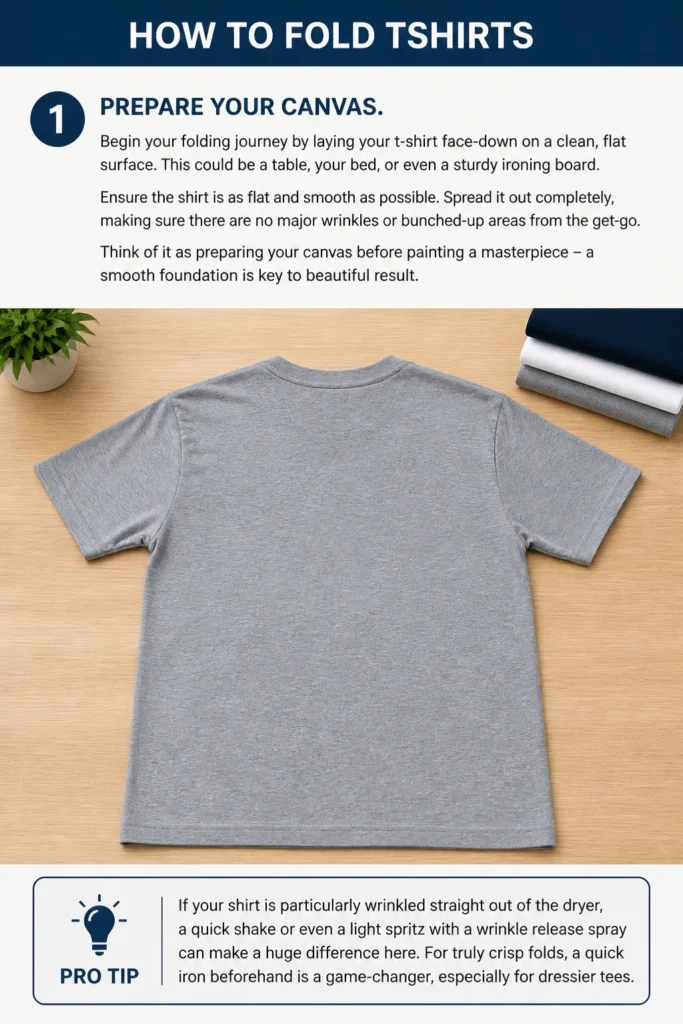
Pro tip: If your shirt is particularly wrinkled straight out of the dryer, a quick shake or even a light spritz with a wrinkle release spray can make a huge difference here. For truly crisp folds, a quick iron beforehand is a game-changer, especially for dressier tees.
Step 2: Visualize Your Lines
This step is all about mental preparation and understanding the geometry of the fold. Imagine a vertical line running from the middle of the shoulder down to the bottom hem on one side of the shirt. Now, imagine a similar vertical line on the other side. These lines will guide where you bring in the outer edges of the shirt. You’re aiming to create a central rectangle that’s roughly the width of your finished fold – usually about 8-10 inches, depending on the shirt size and your storage space.
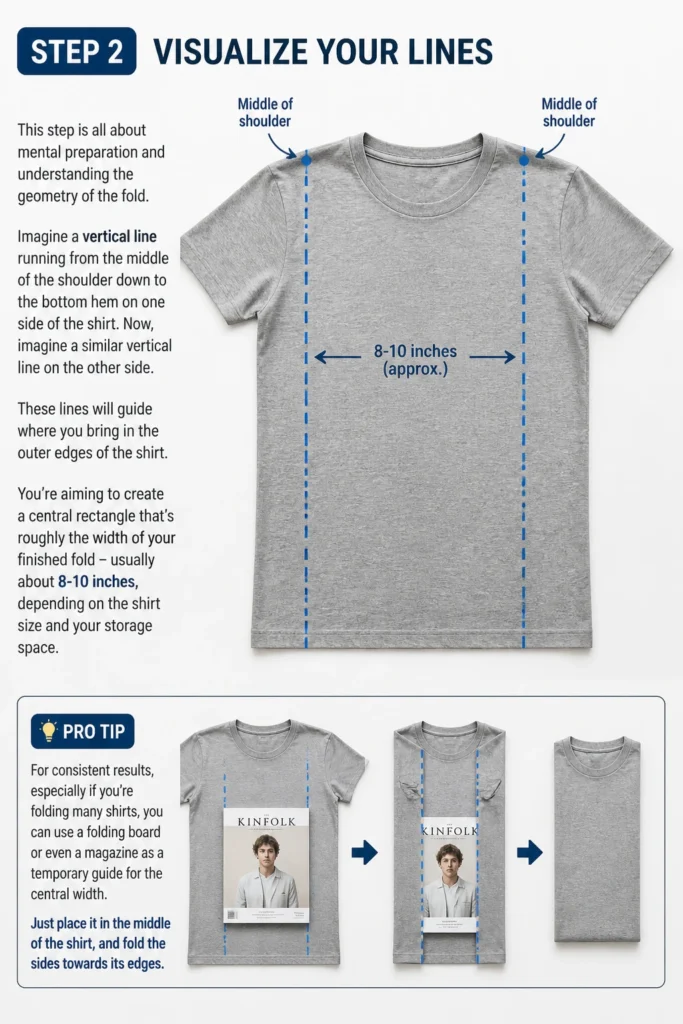
Pro tip: For consistent results, especially if you’re folding many shirts, you can use a folding board or even a magazine as a temporary guide for the central width. Just place it in the middle of the shirt, and fold the sides towards its edges.
Step 3: Fold in the First Side
Grab the t-shirt from the middle of one shoulder and pull it towards the center of the shirt, aligning it with your imaginary vertical line. As you do this, the sleeve will naturally come with it. Now, fold that sleeve back on itself, so it runs parallel to the side you just folded in. The goal is to create a clean, straight edge from the top of the shoulder to the bottom hem, with the sleeve tucked neatly inside the fold. Smooth out any wrinkles that appear as you fold.
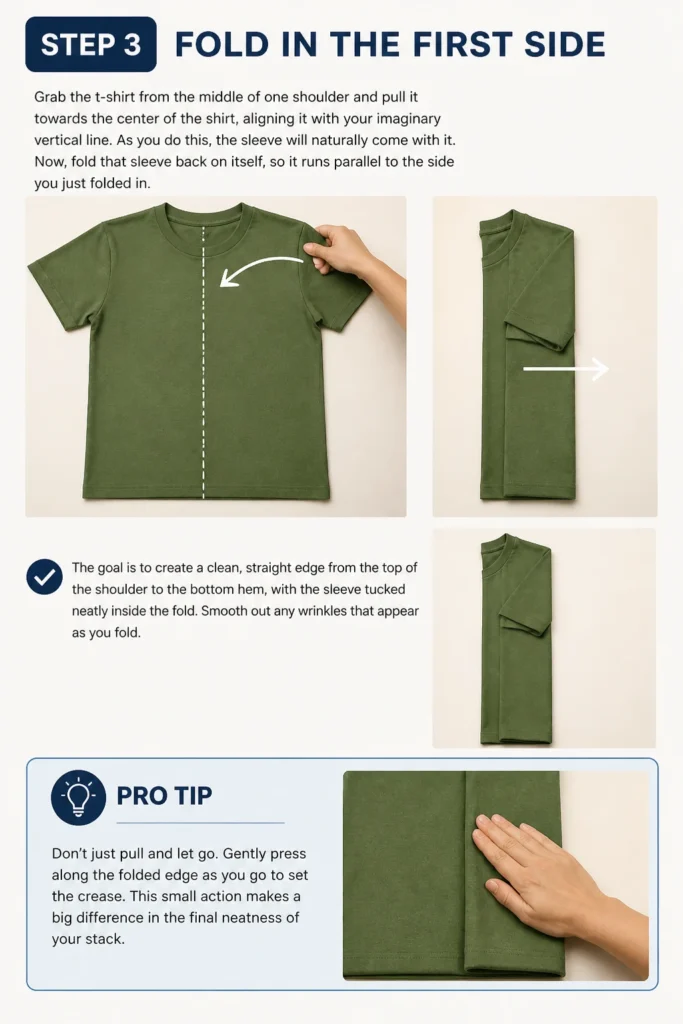
Pro tip: Don’t just pull and let go. Gently press along the folded edge as you go to set the crease. This small action makes a big difference in the final neatness of your stack.
Step 4: Mirror the Second Side
Repeat the exact process from Step 3 on the opposite side of the t-shirt. Grab the middle of the other shoulder, pull it towards the center, aligning it with your second imaginary vertical line. Fold the sleeve back so it’s tucked neatly within the new fold. At this point, your t-shirt should resemble a long, narrow rectangle, with both sleeves folded inward and the original side seams now hidden. The width of this rectangle is crucial – it’s the final width of your folded shirt.
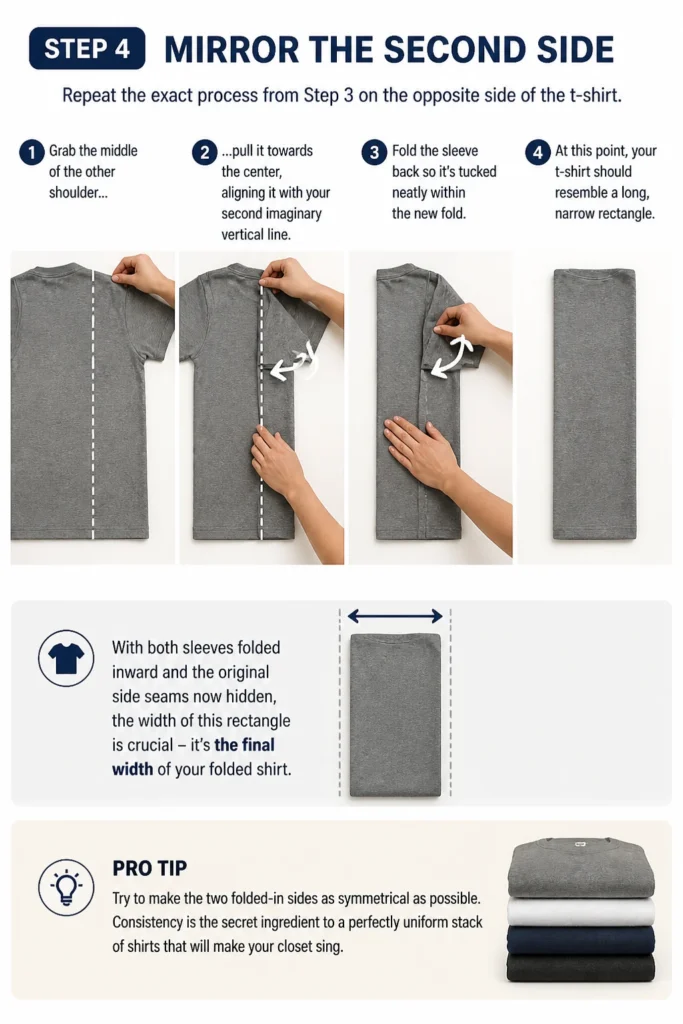
Pro tip: Try to make the two folded-in sides as symmetrical as possible. Consistency is the secret ingredient to a perfectly uniform stack of shirts that will make your closet sing.
Step 5: Define the Lower Edge
Now, turn your attention to the bottom hem of the t-shirt. Grab the bottom edge and fold it up by about 2-3 inches. This initial small fold serves two purposes: it creates a clean, reinforced edge for the final fold, and it helps to prevent the bottom from unraveling or looking messy when the shirt is stacked vertically. Smooth this fold down firmly.
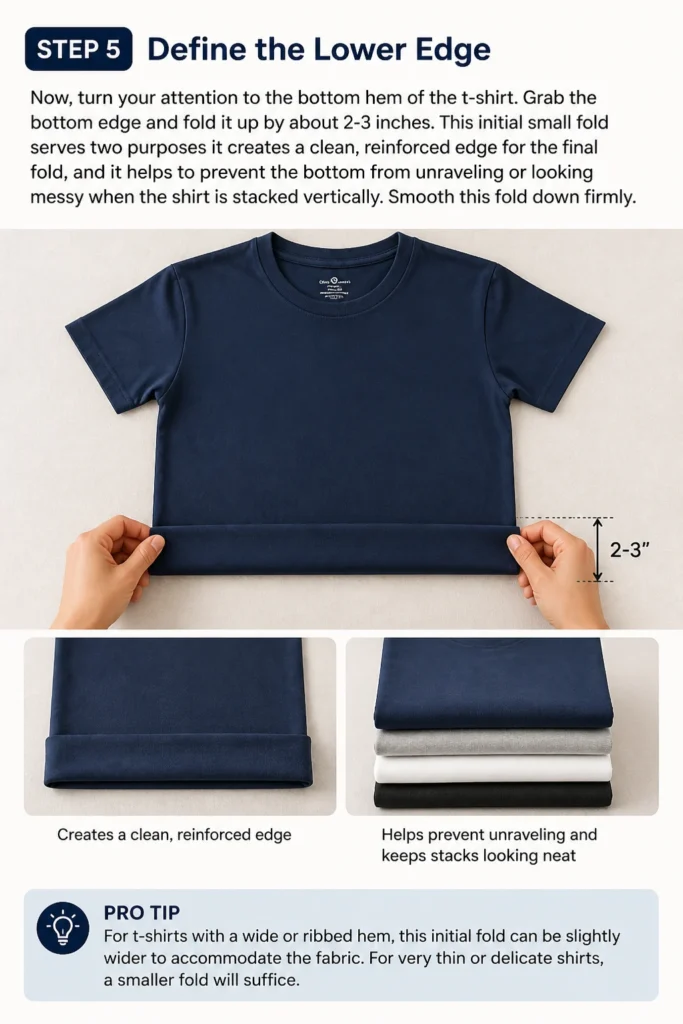
Pro tip: For t-shirts with a wide or ribbed hem, this initial fold can be slightly wider to accommodate the fabric. For very thin or delicate shirts, a smaller fold will suffice.
Step 6: The First Upward Fold
With the bottom hem now folded up, grab the entire bottom section of the shirt (from the newly created hem upwards) and fold it upwards towards the collar. The aim here is to bring the bottom edge of the shirt to meet the base of the collar or just below the armpits, effectively folding the shirt in half lengthwise. Press firmly along this crease to ensure a crisp, defined fold. You should now have a shorter, thicker rectangle.

Pro tip: If you’re using the KonMari method for vertical storage, this fold is critical. Ensure the top edge of this fold is as straight as possible, as it will be the “top” of your standing shirt.
Step 7: The Final Tuck and Compact Finish
You’re almost there! Now, take the newly folded section and fold it over one more time. This means bringing the folded edge (which is currently near the collar/armpit area) down to meet the bottom folded edge. This final fold creates a compact, self-contained rectangle that is robust enough to stand on its own if desired, or to stack neatly. Smooth out any final wrinkles and admire your handiwork.
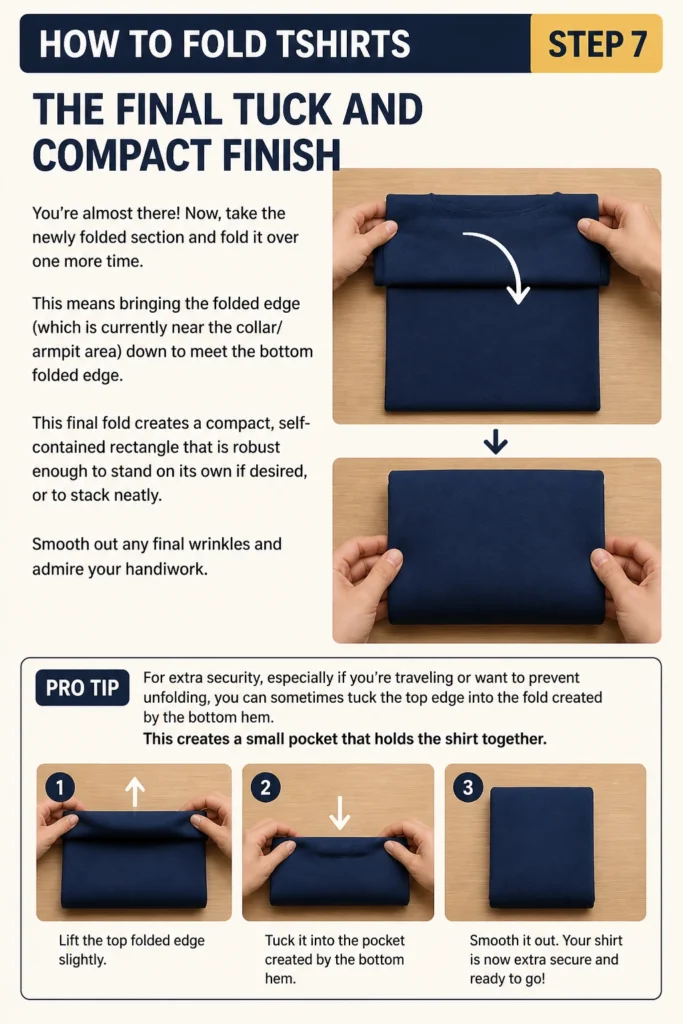
Pro tip: For extra security, especially if you’re traveling or want to prevent unfolding, you can sometimes tuck the top edge into the fold created by the bottom hem. This creates a small “pocket” that holds the shirt together.
Step 8: The Stand Test (Optional, but Satisfying!)
Gently pick up your freshly folded t-shirt. If you’ve followed the steps correctly, it should be a neat, firm rectangle. Try standing it on its side. If it holds its shape and stands upright, congratulations! You’ve mastered the art of the perfect, space-saving t-shirt fold. This technique is fantastic for drawers, shelves, and even packing suitcases, as it minimizes wrinkles and maximizes space.
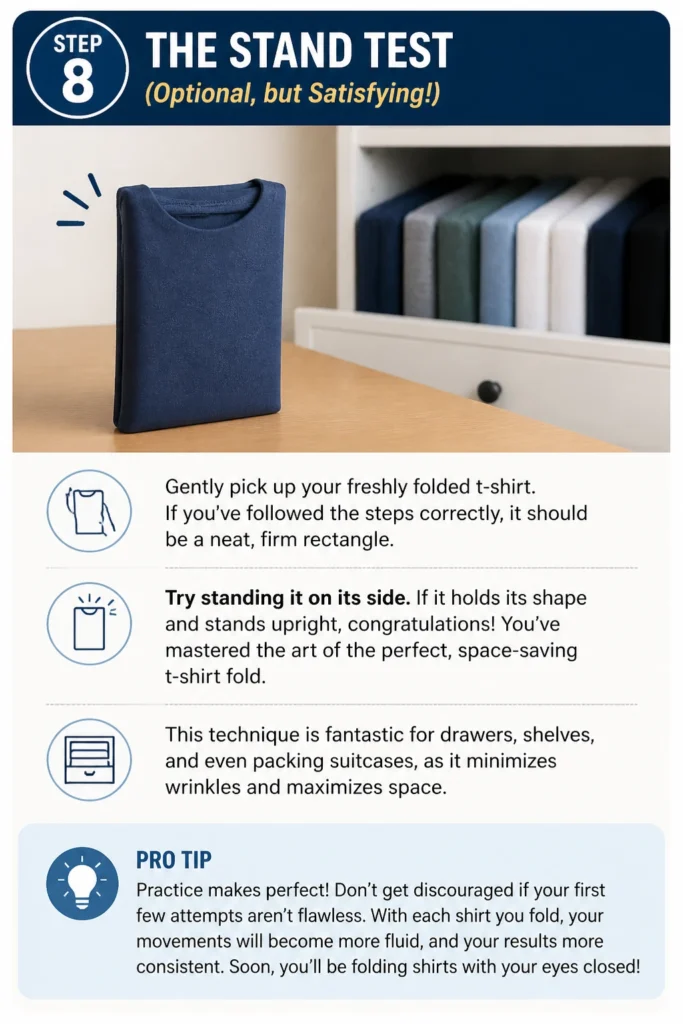
Pro tip: Practice makes perfect! Don’t get discouraged if your first few attempts aren’t flawless. With each shirt you fold, your movements will become more fluid, and your results more consistent. Soon, you’ll be folding shirts with your eyes closed!
Common Mistakes to Avoid
Even seasoned folders can fall into common pitfalls. Awareness is the first step to perfection!
-
Folding with Wrinkles Already Present
Why it’s problematic: Folding a wrinkled shirt simply bakes those creases deeper into the fabric, making them harder to remove later. It also gives your folded stack a messy, unkempt appearance, even if the fold itself is perfect.
The correct approach: Always start with as smooth a surface as possible. Give shirts a good shake, or for stubborn wrinkles, a quick steam or iron before you begin. A little prep goes a long way in achieving that crisp, clean look.
-
Uneven Side Folds
Why it’s problematic: If one side is folded in more than the other, your final rectangle will be lopsided. This not only looks untidy but also makes stacking difficult, as uneven shirts tend to lean, slide, and collapse your carefully built piles.
The correct approach: Pay close attention to your imaginary vertical lines in Steps 2-4. Try to make the distance from the center to the folded edge symmetrical on both sides. Using a folding board or a visual guide can be incredibly helpful for consistency.
-
Not Smoothing as You Go
Why it’s problematic: Each time you make a fold, tiny wrinkles or air pockets can get trapped underneath. If you don’t smooth these out, they become permanent creases, and the overall fold will look puffy and less compact.
The correct approach: After each major fold (sides, bottom up), take a moment to run your hands firmly over the folded fabric. Press down to remove air and flatten any small bumps. This ensures a tight, neat package every time.
-
Folding Too Loosely
Why it’s problematic: A loose fold lacks structure. It won’t stand on its own, it will unravel easily, and it takes up more space than necessary. This defeats the purpose of an efficient folding technique.
The correct approach: While you don’t need to apply extreme force, aim for a firm, deliberate fold. Each crease should be well-defined. Think of it as creating a sturdy building block for your wardrobe. The goal is compact efficiency.
Troubleshooting
Even with the best intentions, sometimes things don’t go quite as planned. Here are a few common hiccups and how to fix them.
-
“My shirt still looks lumpy and uneven!”
Quick solution: This usually means the initial side folds weren’t symmetrical or you didn’t smooth out wrinkles thoroughly. Unfold the shirt completely and start again from Step 1, paying extra attention to making your initial side folds even and pressing out any air or creases after each step. Sometimes, a fresh start is all you need.
-
“My folded shirt won’t stand up on its own.”
Quick solution: The “stand test” requires a firm, compact fold. Revisit Steps 6 and 7. Ensure your upward folds are tight and that you’re pressing down firmly on each crease to remove air and create a solid block. If the fabric is very thin or stretchy, it might be harder to achieve a perfect stand, but a compact rectangle is still achievable. Try making your final fold slightly tighter.
-
“My sleeves keep popping out!”
Quick solution: This happens when the sleeves aren’t fully tucked in during Steps 3 and 4. Make sure when you fold the shoulder in, you then fold the sleeve back on itself so it’s completely contained within the new side panel of the shirt. It should be parallel to the folded edge, not sticking out. For long-sleeved tees, you might need an extra fold to keep the cuff tucked in.
Key Takeaways
- Start Smooth: Always begin with a flat, unwrinkled t-shirt for the best results.
- Visualize and Align: Use imaginary lines to guide your side folds for symmetry.
- Smooth as You Go: Press out wrinkles and air after each fold for a crisp, compact finish.
- Consistency is Key: Aim for uniform folds across all your shirts for neat stacking.
- Practice Makes Perfect: The more you fold, the faster and more precise you’ll become.
- Space-Saving Power: This method creates compact, organized bundles perfect for drawers, shelves, and travel.
Frequently Asked Questions
Here are some common questions you might have as you embark on your t-shirt folding adventure!
-
What’s the best way to store these perfectly folded shirts?
For vertical storage (like the KonMari method), place them in drawers standing upright, side-by-side. This allows you to see every shirt at a glance. For shelf storage, stack them neatly on top of each other, ensuring each shirt is the same size for a stable pile.
-
Does this method work for all types of t-shirts?
Yes, this versatile method works wonderfully for most t-shirt types – short-sleeved, long-sleeved, crew neck, V-neck, and even some polo shirts. For very bulky or thick materials, you might need to adjust the final fold to be slightly looser to prevent excessive bulk, but the core steps remain the same.
-
How can I make my folds even faster?
Speed comes with practice! Focus on developing a rhythm. Many people find using a t-shirt folding board (a simple plastic or cardboard template) incredibly helpful for achieving consistent results rapidly. Once you’ve done it a few dozen times, your muscle memory will take over, and you’ll be folding shirts in seconds.
-
What about t-shirts with graphics or delicate embellishments?
For shirts with large front graphics, you might want to adjust Step 1 to lay the shirt face-up instead of face-down. This allows you to ensure the graphic is centered and visible when folded. For delicate embellishments, consider placing a piece of tissue paper over the embellishment before folding to prevent snagging or creasing. Always handle these shirts with extra care.
What’s Next?
You’ve mastered the art of the perfect t-shirt fold – a skill that brings immediate satisfaction and lasting order to your wardrobe. But why stop there? Now that your t-shirts are looking sharp, consider applying these principles to other garments!
- Conquer Your Drawers: Take on your entire t-shirt collection. Dedicate an afternoon to folding every single tee using this method. You’ll be amazed at how much space you gain and how much calmer your mornings become.
- Extend Your Skills: Try applying similar folding techniques to other items like sweaters, pants, or even towels. The principles of creating neat rectangles and compact storage are universal.
- Invest in Organizers: Once your shirts are perfectly folded, consider drawer dividers or storage bins to keep them categorized and prevent them from toppling over.
- Share Your Superpowers: Teach a friend or family member your newfound skills! Spreading the joy of an organized closet is a gift in itself.
Don’t just read about it – grab a t-shirt right now and give it a try! You’re capable, you’re creative, and your closet is about to thank you. Happy folding!