💌 14 DIY Thank You Cards
🛠️ The Ultimate Maker's Toolkit
I've tested thousands of craft tools over the years. Whether you are quilting, crafting, or building mixed-media art, these are the top 5 absolute non-negotiable tools I personally recommend to guarantee professional results.
🪡 SINGER Heavy Duty 4452 Sewing Machine
The sewing community highly recommends this as the ultimate "bulletproof" entry-level machine. Its heavy metal frame powerfully pushes through thick denim and heavy quilt layers that would instantly jam a standard plastic machine.
✂️ Fiskars 8" Orange-Handled Scissors
Never settle for dull dollar-store blades. Wirecutter repeatedly names Fiskars the absolute best all-purpose craft scissor due to its legendary precision-ground blades and an ergonomic grip that prevents hand-cramping.
🔥 Gorilla Dual Temp Hot Glue Gun
Named Wirecutter's top choice because it literally does the work of two tools. It features dual-temperature settings offering low heat for delicate florals and blistering high heat for heavy wood adhesion repairs.
🖌️ Mod Podge Waterbase Gloss Sealer
The absolute undisputed champion of decoupage and paper crafts. Experts rely exclusively on this exact water-based formula because it glues, seals, and finishes beautifully without yellowing or flaking over time.
🎨 Apple Barrel Acrylic Paint (2 oz)
The quintessential, incredibly inexpensive craft paint. Woodworkers and hobby painters swear by its smooth flow and matte finish, providing massive value and remarkably thick color coverage on rough surfaces.
Let’s face it, your handwriting is probably tragic, but a physical card still beats a “thx” text any day of the week. Sending a store-bought card says you stopped at a drugstore; sending a handmade one says you actually like the person. We are bringing back the art of the handwritten note with a side of glitter and zero stress. Grab your craft supplies and let’s make some magic that won’t end up immediately in the recycling bin.
- Heavy cardstock for that premium feel
- A pen that doesn’t smudge every five seconds
- A healthy dose of creative audacity
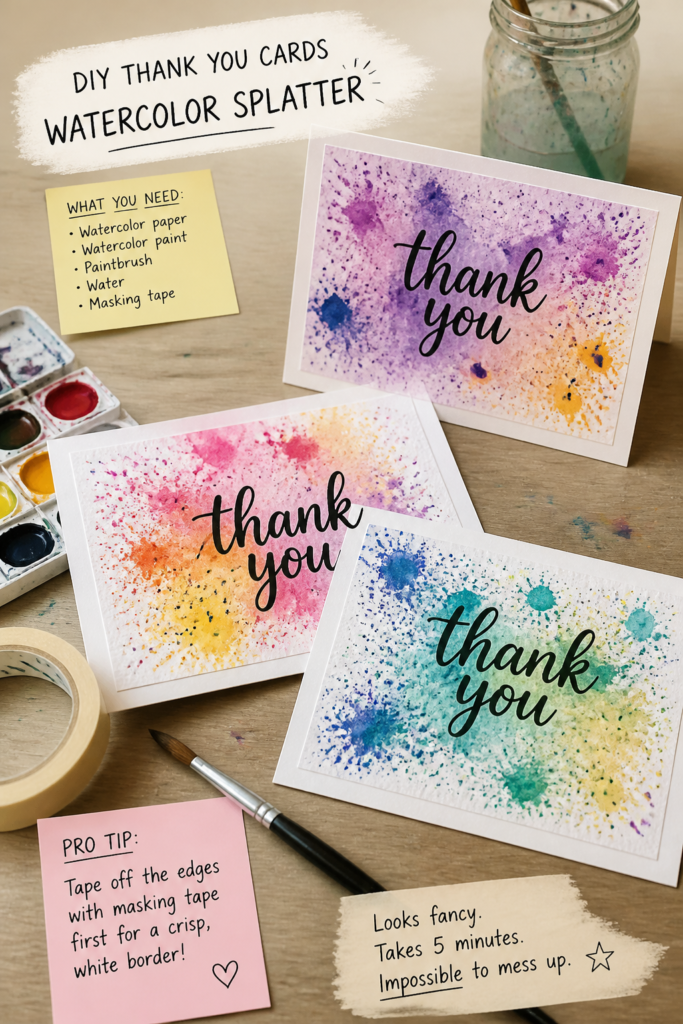
1. Watercolor Splatter
Stop overthinking your brushstrokes and just flick some vibrant pigment onto your paper. This method turns a potential mess into a high-end abstract masterpiece that looks intentional. Pro tip: Tape off the edges with masking tape first to create a crisp, white border once the paint dries. Your recipient thinks you’re the next Monet while you just had a minor tantrum with a brush. It works because it’s impossible to mess up “random.”
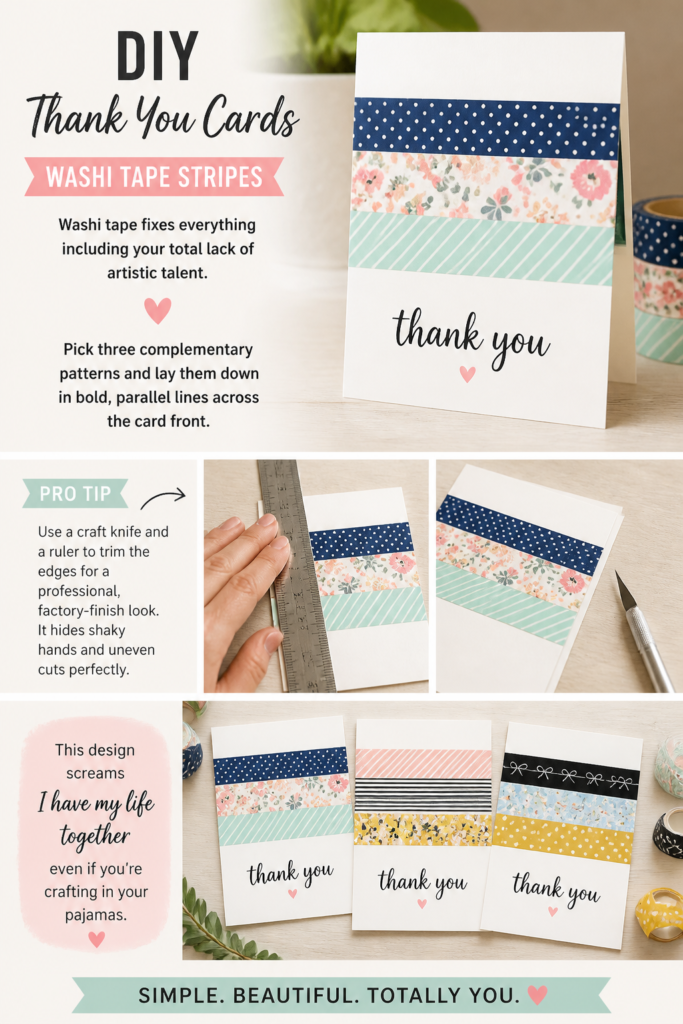
2. Washi Tape Stripes
Washi tape fixes everything including your total lack of artistic talent. Pick three complementary patterns and lay them down in bold, parallel lines across the card front. Pro tip: Use a craft knife and a ruler to trim the edges for a professional, factory-finish look. It hides shaky hands and uneven cuts perfectly. This design screams “I have my life together” even if you’re crafting in your pajamas.
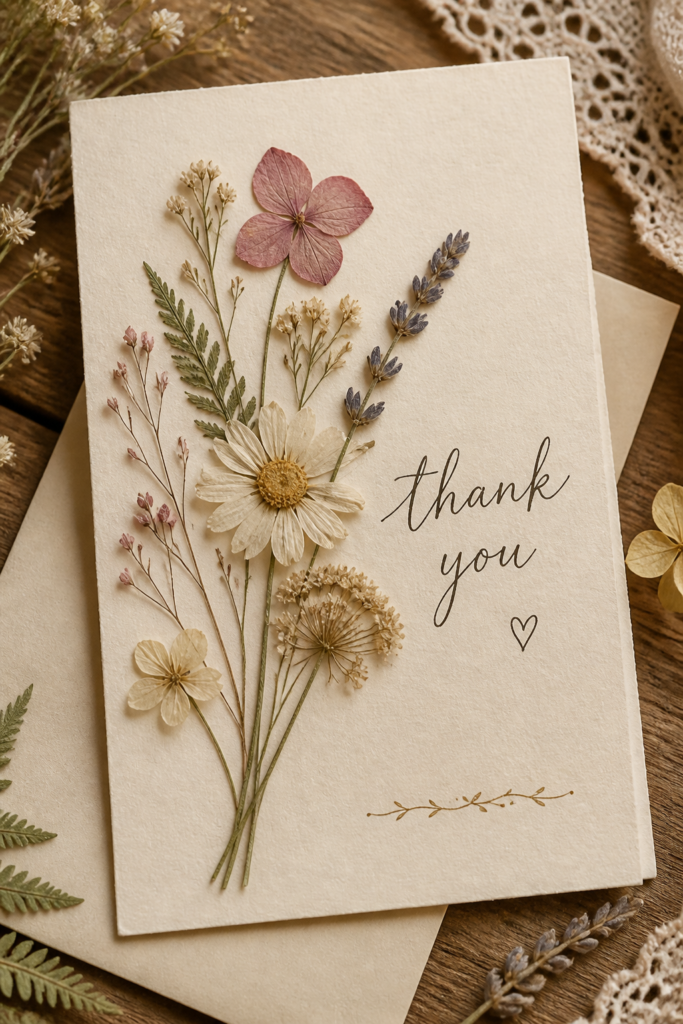
3. Pressed Flowers
Channel your inner forest fairy and glue some dried wildflowers to a heavy cream cardstock. It’s delicate, romantic, and slightly dramatic in the best way possible. Pro tip: Use a tiny dot of clear-drying glue on the stem only to keep the petals looking soft and natural. Nature does all the heavy lifting here so you don’t have to. It’s cottagecore excellence in an envelope.
4. Potato Stamps
Go raid the pantry because your dinner is now your primary art tool. Carve a simple heart or triangle into a raw potato and dip it into some thick acrylic paint. Pro tip: Blot the potato on a paper towel before hitting the card to avoid soggy, blurry shapes. This proves you can make magic out of a basic starch. It’s rustic, charming, and weirdly therapeutic.

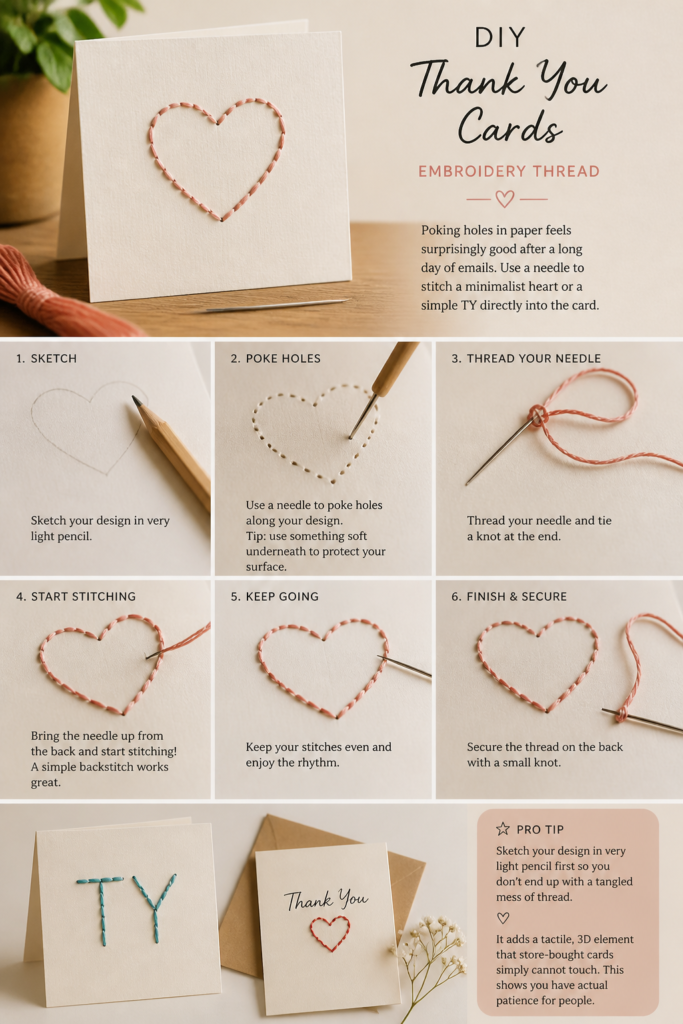
5. Embroidery Thread
Poking holes in paper feels surprisingly good after a long day of emails. Use a needle to stitch a minimalist heart or a simple “TY” directly into the card. Pro tip: Sketch your design in very light pencil first so you don’t end up with a tangled mess of thread. It adds a tactile, 3D element that store-bought cards simply cannot touch. This shows you have actual patience for people.
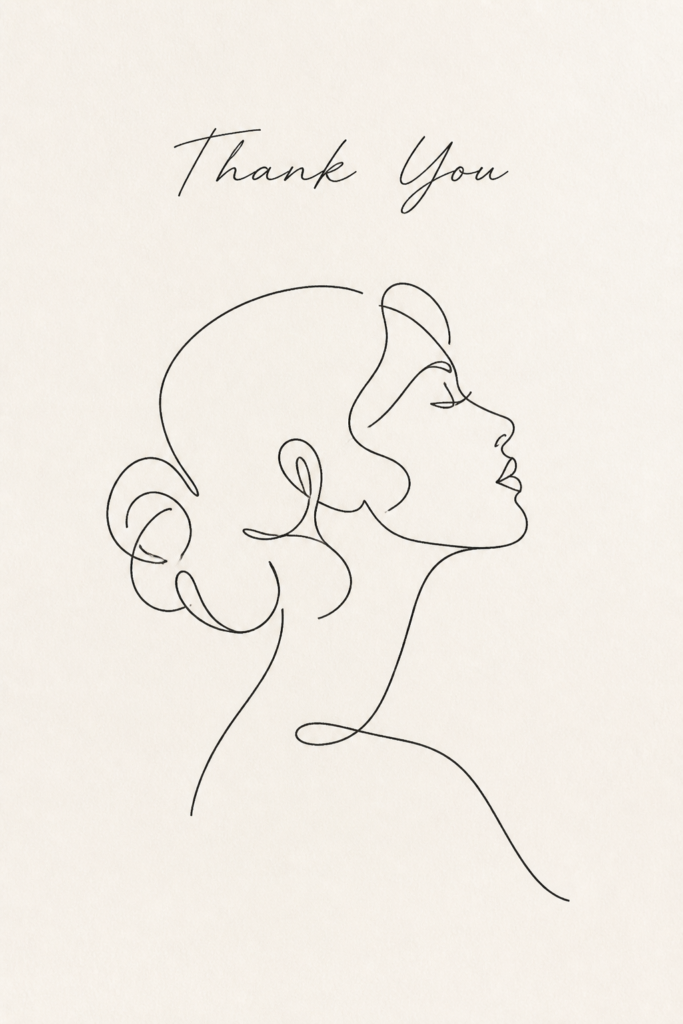
6. Minimalist Line Art
One continuous line makes you look like a sophisticated gallery owner with a minimalist aesthetic. Use a fine-liner pen to draw a single flower or a profile without ever lifting the tip from the page. Pro tip: Keep your hand moving steadily to avoid ink blobs at the turning points. Simplicity is the ultimate flex. It looks expensive because it’s so understated.
7. Polaroid Style
Turn your card into a faux photo frame for a hit of instant nostalgia. Cut a square out of the front and tape a real photo or a printed memory behind the window. Pro tip: Use double-sided foam tape to give the frame a little bit of lift and depth. It’s personal and doubles as a keepsake for their fridge. Everyone loves a trip down memory lane.

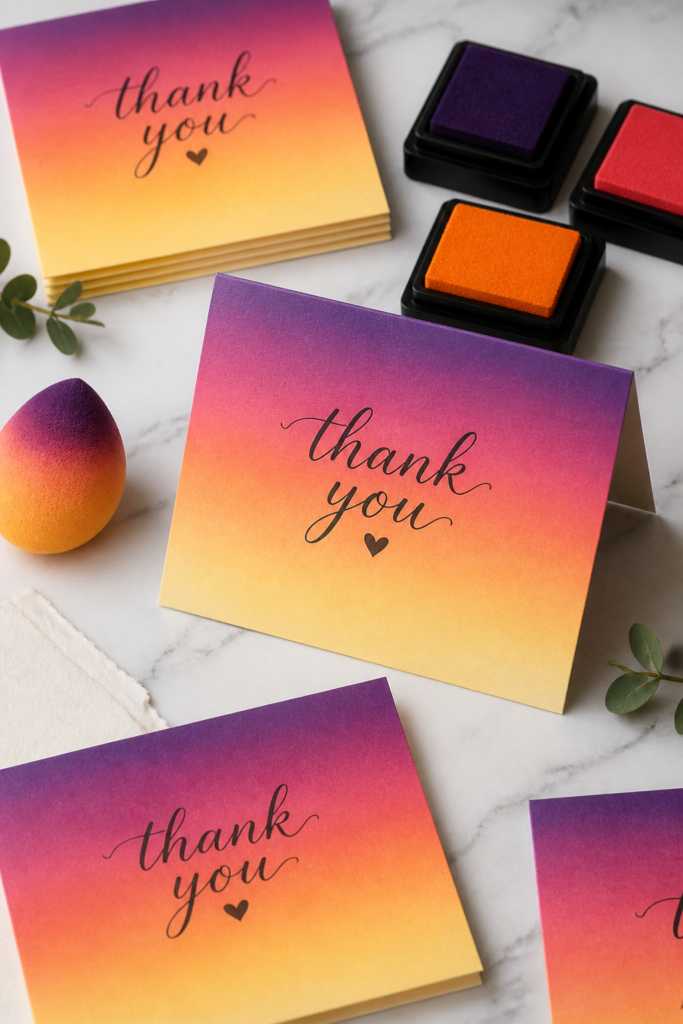
8. Ombre Gradient
Blend your colors like you’re a professional makeup artist working a runway show. Use a makeup sponge to dab ink from dark to light across the card surface. Pro tip: Work while the ink is still slightly damp to get those seamless transitions between shades. It looks like a sunset and feels incredibly polished. It’s a total mood booster for the recipient.
9. Confetti Pockets
Give them a little party they have to vacuum up later. Glue a piece of clear vellum over the front and fill the gap with colorful sequins or glitter. Pro tip: Use a sewing machine or heavy-duty double-sided tape to seal the edges so the glitter doesn’t leak in the mail. It’s loud, fun, and slightly chaotic. Everyone deserves a surprise celebration in their mailbox.

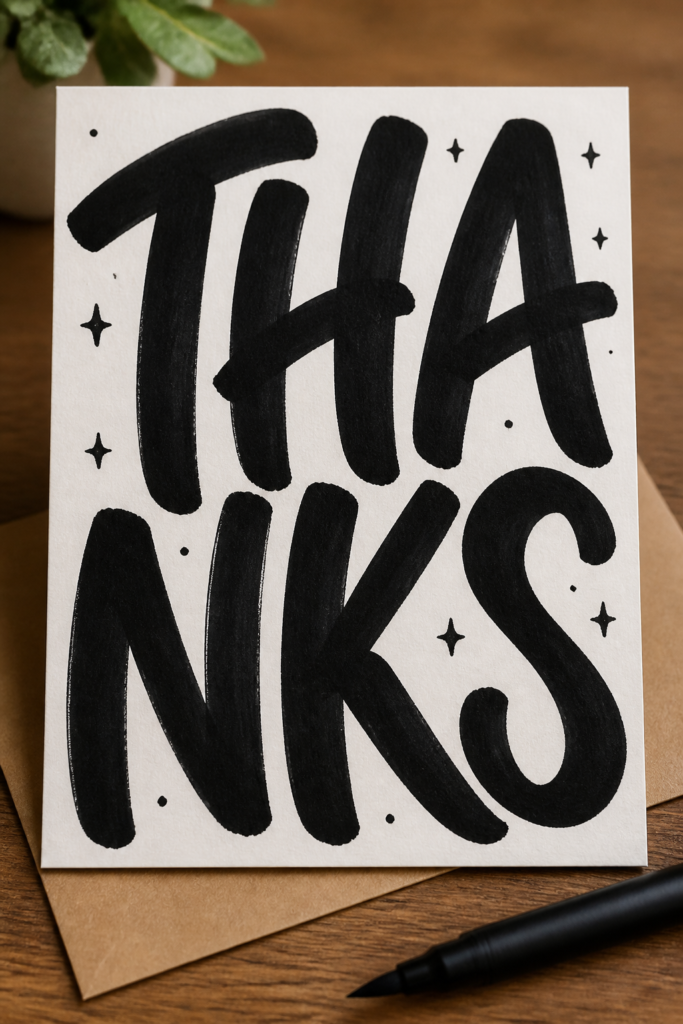
10. Typographic Hand-Lettering
Your handwriting isn’t messy; it’s “organic” and “bespoke.” Use a thick brush pen to write a massive “THANKS” that takes up the entire card face. Pro tip: Add tiny dots or stars in the negative space to fill out the design without extra effort. Bold letters make a bold statement. It’s the ultimate “fake it till you make it” craft move.
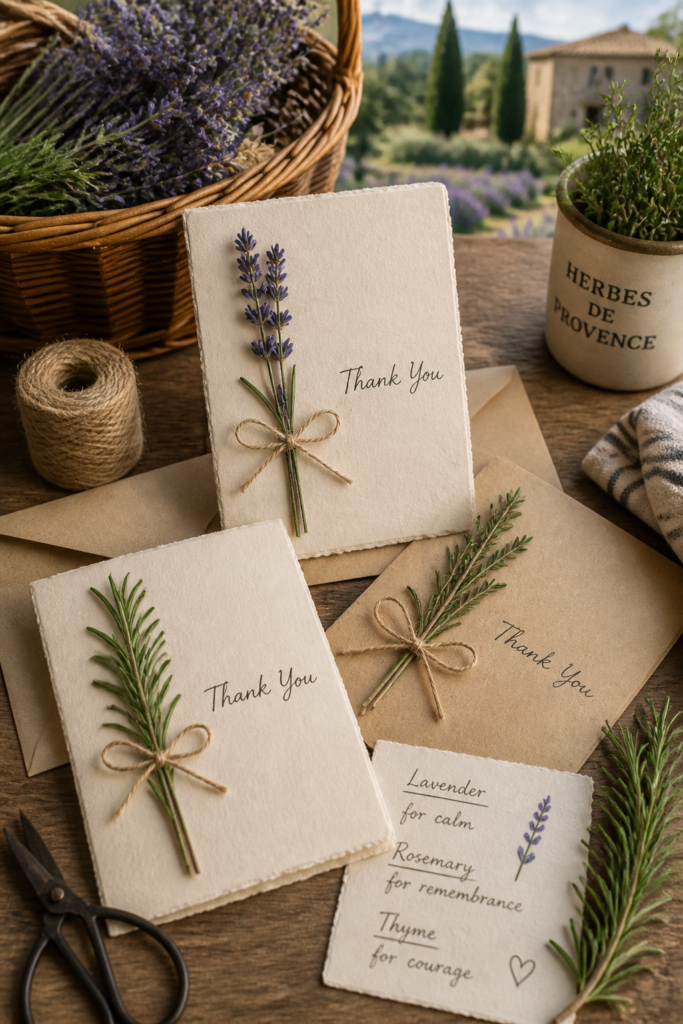
11. Dried Herb Bundles
Tie a small sprig of rosemary or lavender to the front of the card with some rustic twine. It looks like you live on a farm in Provence and spend your days harvesting herbs. Pro tip: Use a flat sprig so the envelope doesn’t get too bulky for a standard postage stamp. It’s a sensory experience that smells as good as it looks. Classy is an understatement.
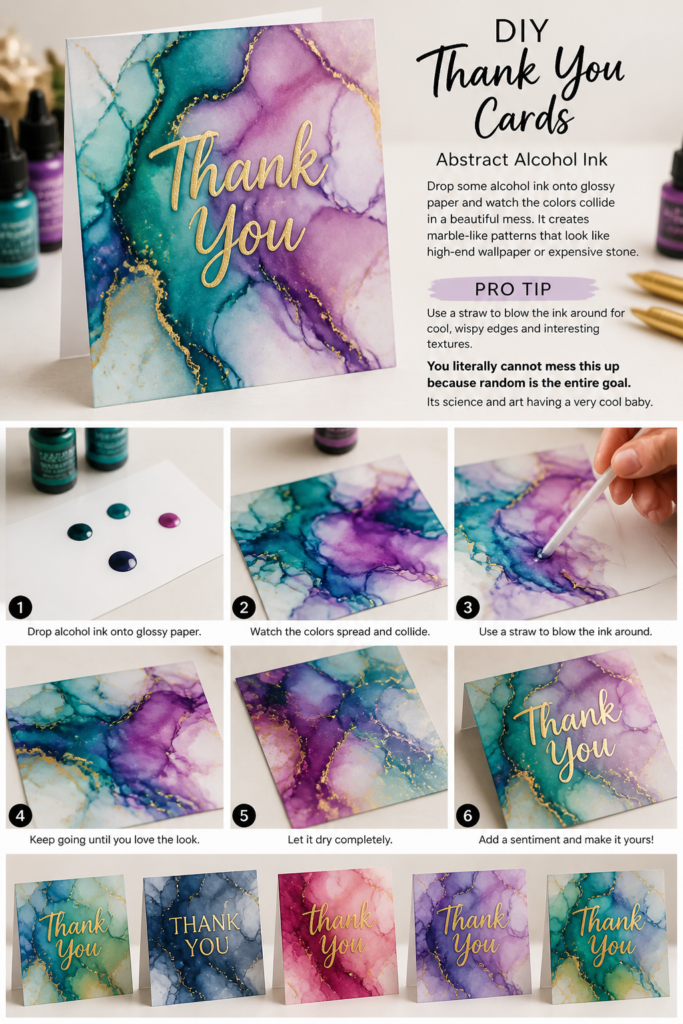
12. Abstract Alcohol Ink
Drop some alcohol ink onto glossy paper and watch the colors collide in a beautiful mess. It creates marble-like patterns that look like high-end wallpaper or expensive stone. Pro tip: Use a straw to blow the ink around for cool, wispy edges and interesting textures. You literally cannot mess this up because “random” is the entire goal. It’s science and art having a very cool baby.
13. Geometric Cut-outs
Grab an X-Acto knife and get a little bit surgical with your cardstock. Cut triangles or hexagons out of the front cover to reveal a bright, contrasting color underneath. Pro tip: Use a self-healing mat so you don’t ruin your dining table in the name of gratitude. It’s modern, clean, and looks way harder to make than it actually is. It’s architectural chic for the masses.

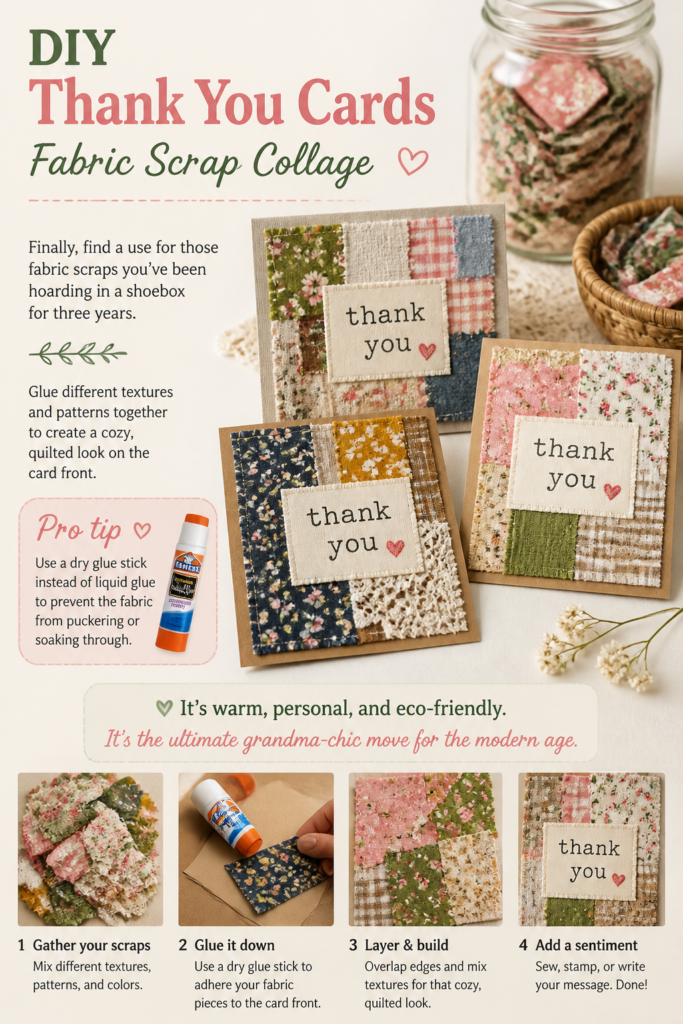
14. Fabric Scrap Collage
Finally, find a use for those fabric scraps you’ve been hoarding in a shoebox for three years. Glue different textures and patterns together to create a cozy, quilted look on the card front. Pro tip: Use a dry glue stick instead of liquid glue to prevent the fabric from puckering or soaking through. It’s warm, personal, and eco-friendly. It’s the ultimate “grandma-chic” move for the modern age.
✨ New Member Etsy Shops (100% Unsponsored!)
We are incredibly proud of the talent in this community! 💖 We've rounded up some gorgeous new Etsy shops launched by our very own members.
There are ZERO affiliate links in this post—just 100% pure support for our makers. Click below to shop small, show them some love, and find your new favorite items! 👇🛍️


Conclusion
Stop sending boring, mass-produced cards that have zero soul. Your friends deserve the effort, and your craft drawer deserves to finally see the light of day. Pick one of these ideas, grab your glue gun, and start making someone’s afternoon. Gratitude looks good on you, especially when it comes with a little bit of glitter.