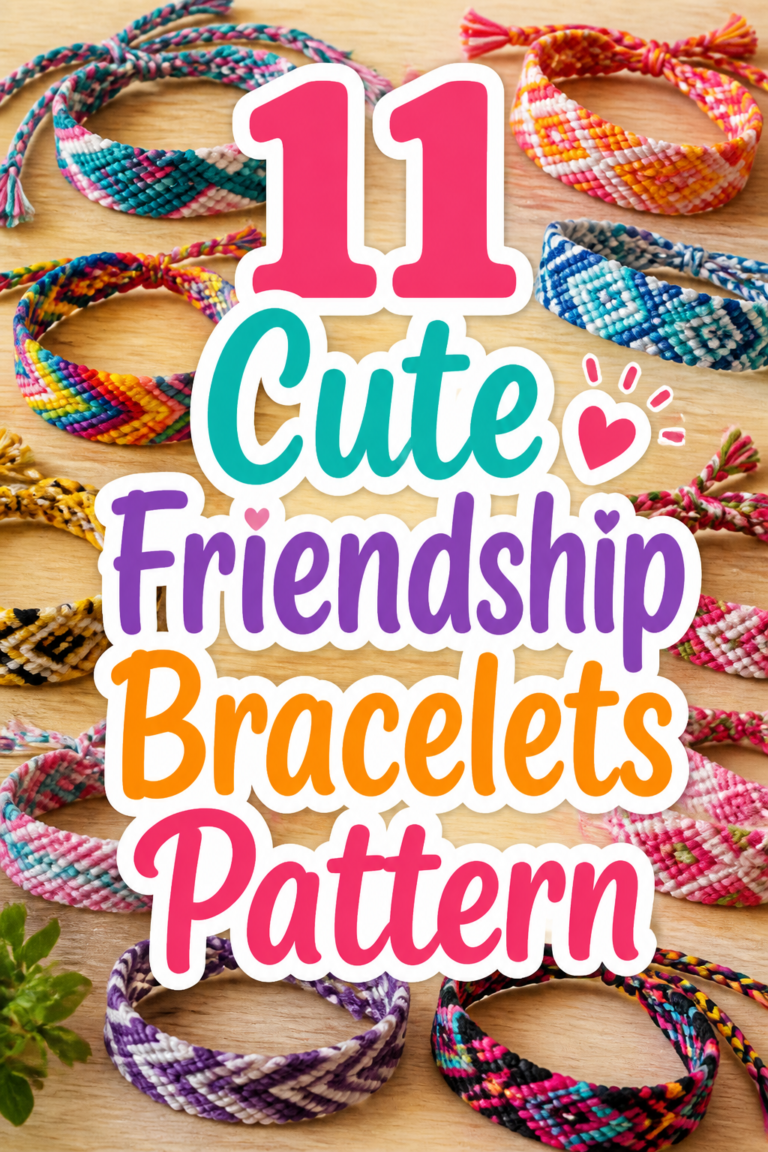
🌈 11 DIY Friendship Bracelets Patterns
🛠️ The Ultimate Maker's Toolkit
I've tested thousands of craft tools over the years. Whether you are quilting, crafting, or building mixed-media art, these are the top 5 absolute non-negotiable tools I personally recommend to guarantee professional results.
🪡 SINGER Heavy Duty 4452 Sewing Machine
The sewing community highly recommends this as the ultimate "bulletproof" entry-level machine. Its heavy metal frame powerfully pushes through thick denim and heavy quilt layers that would instantly jam a standard plastic machine.
✂️ Fiskars 8" Orange-Handled Scissors
Never settle for dull dollar-store blades. Wirecutter repeatedly names Fiskars the absolute best all-purpose craft scissor due to its legendary precision-ground blades and an ergonomic grip that prevents hand-cramping.
🔥 Gorilla Dual Temp Hot Glue Gun
Named Wirecutter's top choice because it literally does the work of two tools. It features dual-temperature settings offering low heat for delicate florals and blistering high heat for heavy wood adhesion repairs.
🖌️ Mod Podge Waterbase Gloss Sealer
The absolute undisputed champion of decoupage and paper crafts. Experts rely exclusively on this exact water-based formula because it glues, seals, and finishes beautifully without yellowing or flaking over time.
🎨 Apple Barrel Acrylic Paint (2 oz)
The quintessential, incredibly inexpensive craft paint. Woodworkers and hobby painters swear by its smooth flow and matte finish, providing massive value and remarkably thick color coverage on rough surfaces.
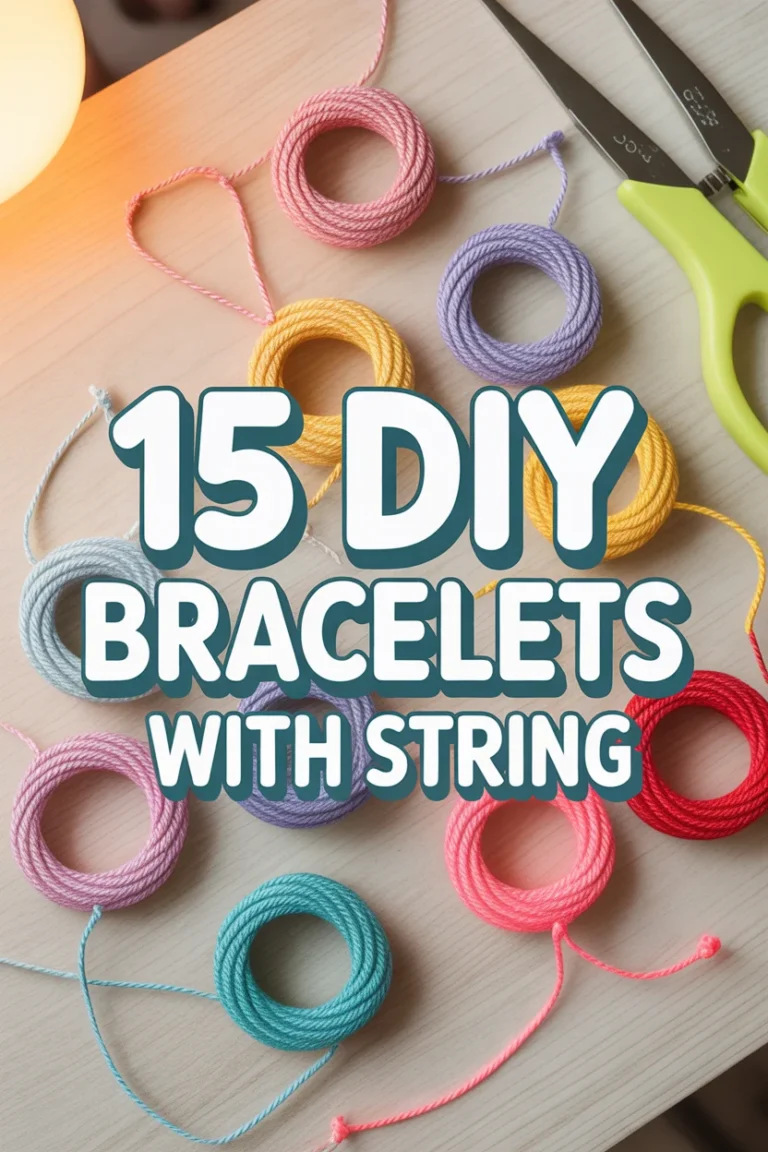
Okay, bestie, let’s talk about leveling up your wrist game. Forget those sad, store-bought trinkets that scream “I tried, but not really.” We’re diving headfirst into the glorious world of DIY friendship bracelets, because nothing says “I adore you” quite like a hand-knotted token of affection (or “I was bored and had some string” – your secret, not mine).
Seriously, why buy when you can craft a masterpiece? We’ve rounded up 11 patterns that are easy enough for a beginner but still chic enough to impress even your most discerning pals. So grab your floss, maybe a snack, and let’s get knotty. Your friends are about to feel extra special.
1. The Classic Candy Stripe
Alright, let’s kick things off with a true OG. The candy stripe is basically the gateway drug to bracelet making, and honestly, we’re still obsessed. It’s super simple, looks effortlessly cool, and you can whip up a bunch while binging your favorite show.
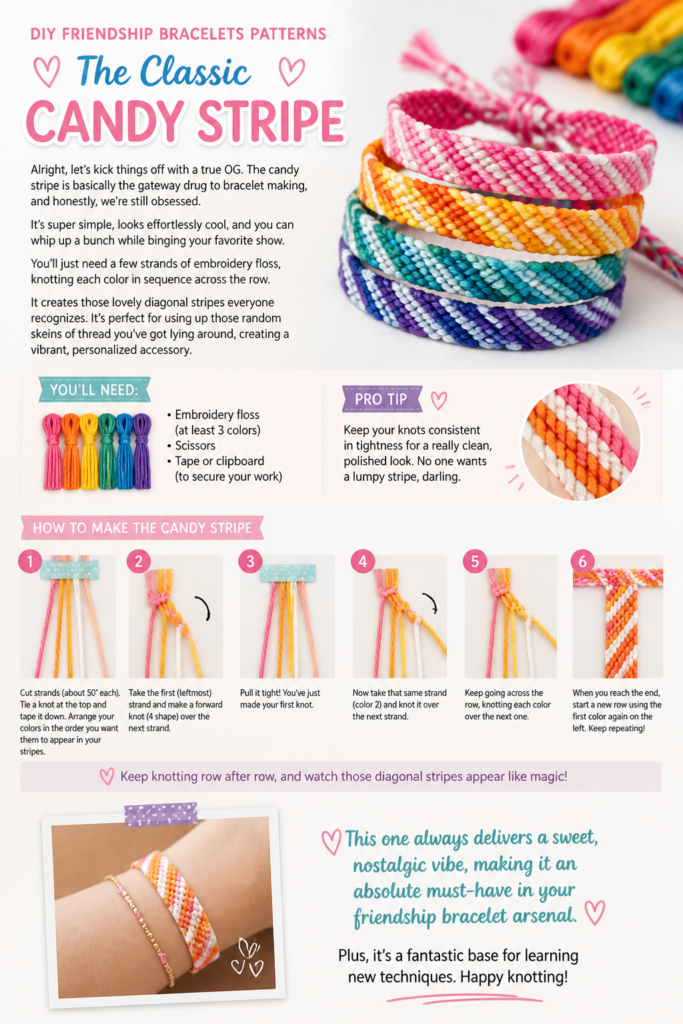
You’ll just need a few strands of embroidery floss, knotting each color in sequence across the row. It creates those lovely diagonal stripes everyone recognizes. It’s perfect for using up those random skeins of thread you’ve got lying around, creating a vibrant, personalized accessory.
Pro tip: Keep your knots consistent in tightness for a really clean, polished look. No one wants a lumpy stripe, darling.
This one always delivers a sweet, nostalgic vibe, making it an absolute must-have in your friendship bracelet arsenal. Plus, it’s a fantastic warm-up before you tackle anything crazier.
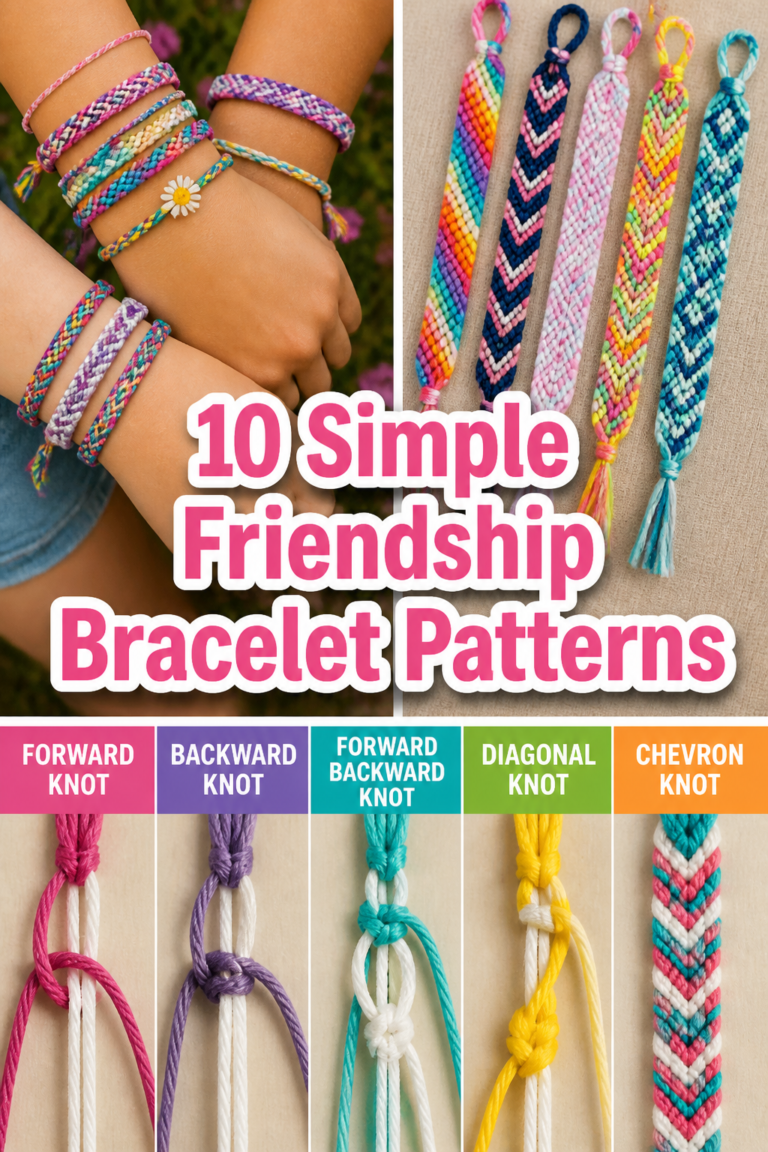
2. The Chevron Charm
Ready to zig and zag your way to bracelet greatness? The chevron pattern is the candy stripe’s slightly more sophisticated cousin, giving you those cool arrow-like designs. It looks way more complicated than it actually is, which is always a win in our book.
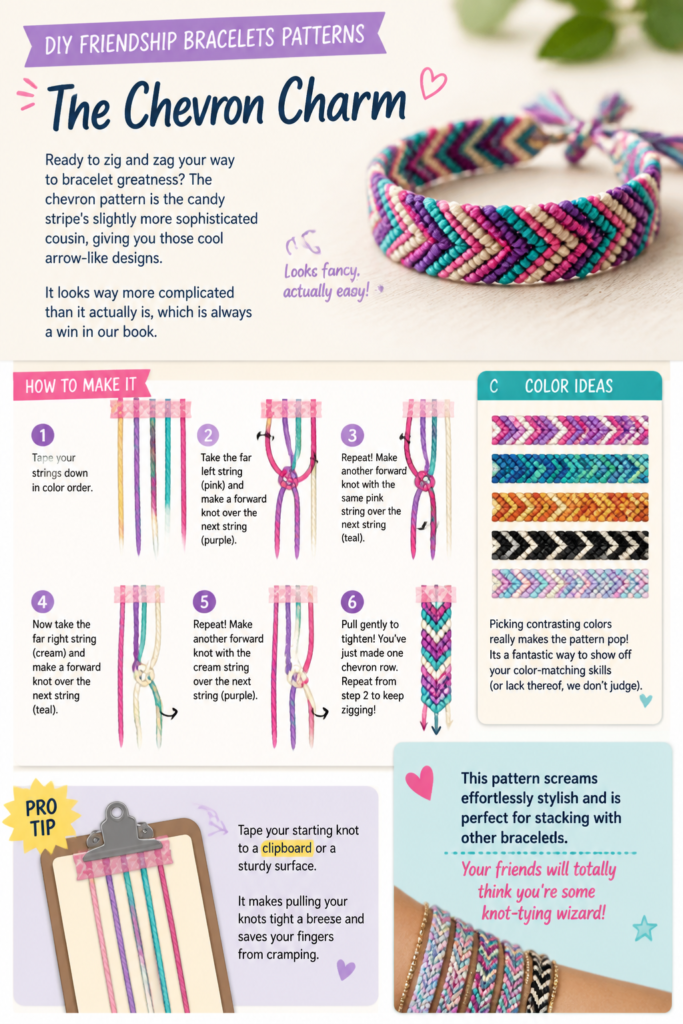
You’ll work with pairs of strings, knotting from the outside in to create that iconic ‘V’ shape. Picking contrasting colors really makes the pattern pop. It’s a fantastic way to show off your color-matching skills (or lack thereof, we don’t judge).
Pro tip: Tape your starting knot to a clipboard or a sturdy surface. It makes pulling your knots tight a breeze and saves your fingers from cramping.
This pattern screams “effortlessly stylish” and is perfect for stacking with other bracelets. Your friends will totally think you’re some kind of knotting wizard.
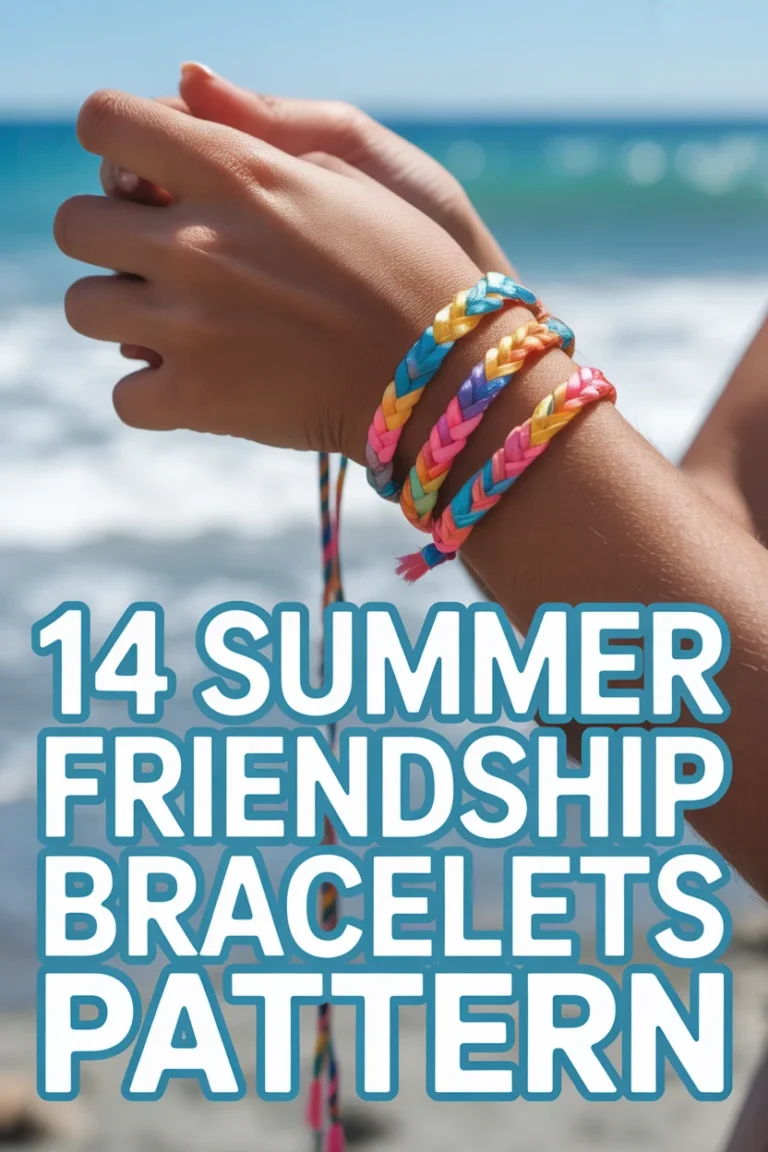
3. The Fishtail Braid
Okay, this isn’t your grandma’s fishtail braid, unless your grandma was secretly a cool teen in the 90s. This pattern is ridiculously easy but looks incredibly intricate, giving off those chic, bohemian vibes without all the fuss.
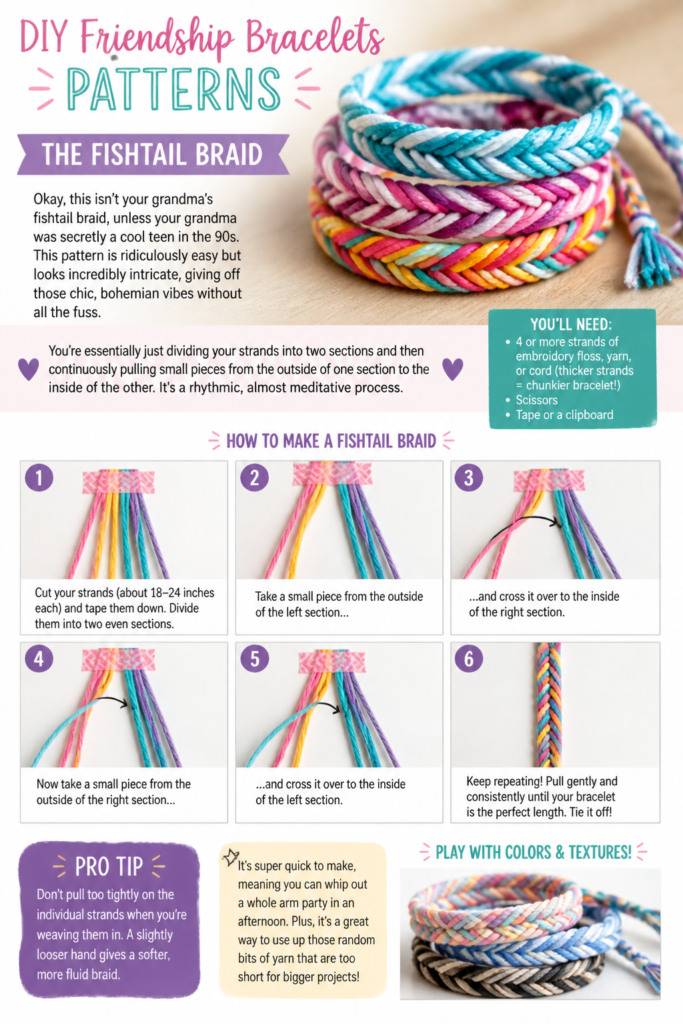
You’re essentially just dividing your strands into two sections and then continuously pulling small pieces from the outside of one section to the inside of the other. It’s a rhythmic, almost meditative process. Choose thicker strands for a chunkier, statement piece.
Pro tip: Don’t pull too tightly on the individual strands when you’re weaving them in. A slightly looser hand gives a softer, more fluid braid.
It’s super quick to make, meaning you can whip out a whole arm party in an afternoon. Plus, it’s a great way to use up those random bits of yarn that are too pretty to throw away.
4. The Braided Twist
Sometimes simple is just better, right? The braided twist is exactly what it sounds like: a basic braid, but with a slight modification that gives it a cool, spiraled effect. It’s an elevated take on the classic plait.
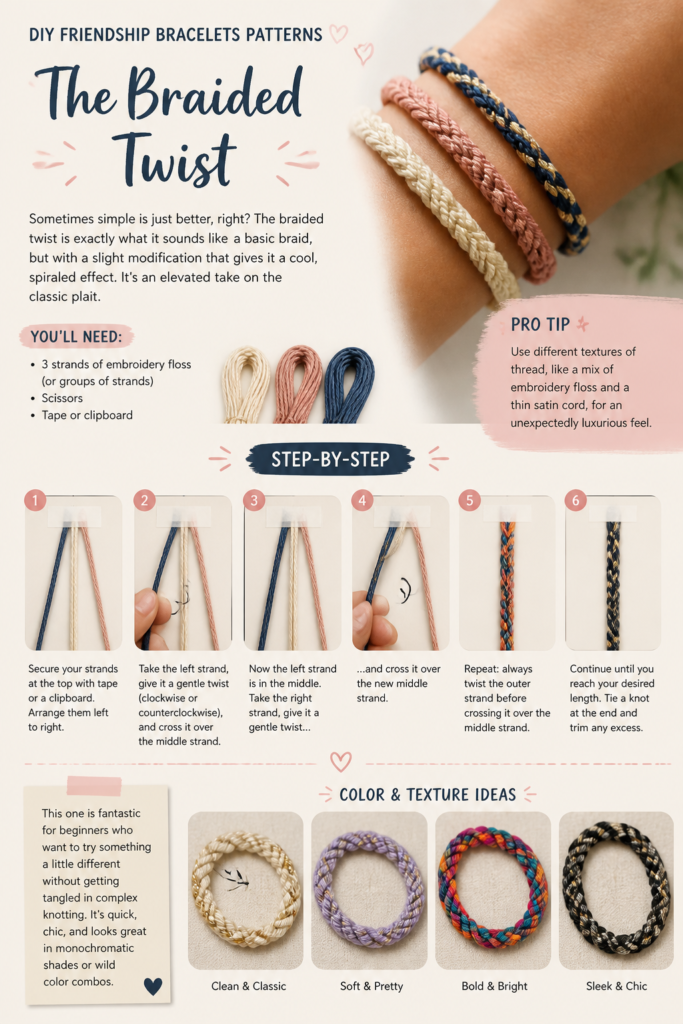
You’ll take three strands (or groups of strands), just like a regular braid, but instead of keeping them flat, you gently twist each strand before incorporating it into the braid. This subtle move creates a beautiful, rope-like texture.
Pro tip: Use different textures of thread, like a mix of embroidery floss and a thin satin cord, for an unexpectedly luxurious feel.
This one is fantastic for beginners who want to try something a little different without getting tangled in complex knotting. It’s quick, chic, and looks great in monochromatic shades or wild color combos.
5. The Macrame Square Knot
Feeling a little fancy? The square knot is the foundation of most macrame projects, and it makes for a seriously sturdy and stylish bracelet. It’s a little more involved than a simple braid but totally worth the extra brain power.
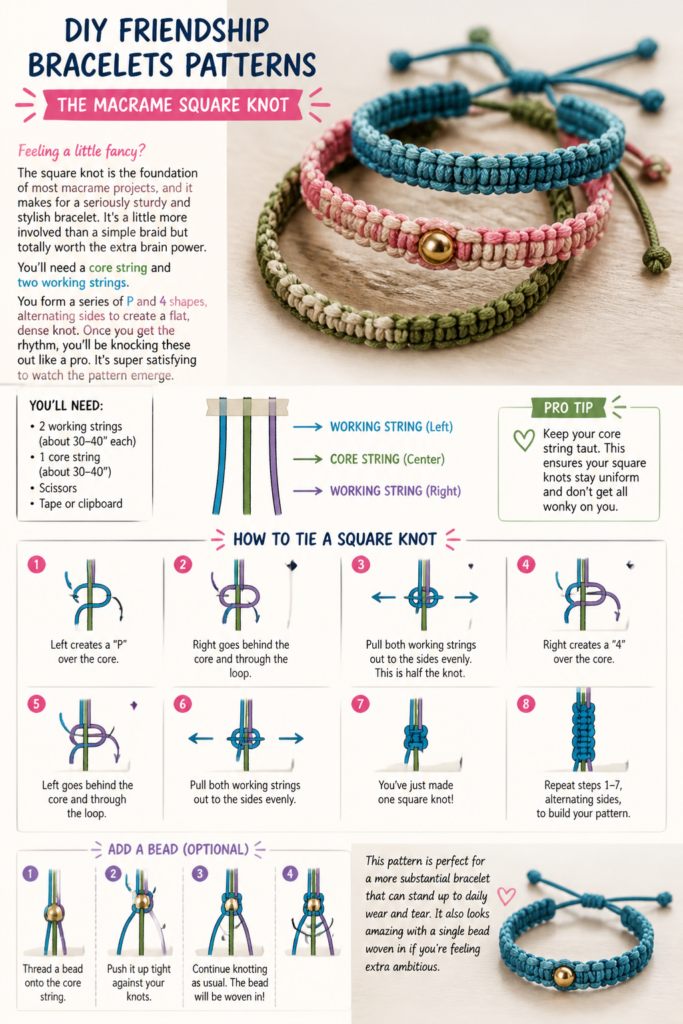
You’ll need a core string and two working strings. You form a series of “P” and “4” shapes, alternating sides to create a flat, dense knot. Once you get the rhythm, you’ll be knocking these out like a pro. It’s super satisfying to watch the pattern emerge.
Pro tip: Keep your core string taut. This ensures your square knots stay uniform and don’t get all wonky on you.
This pattern is perfect for a more substantial bracelet that can stand up to daily wear and tear. It also looks amazing with a single bead woven in if you’re feeling extra ambitious.
6. The Heart Pattern
Okay, prepare for maximum cuteness overload. A heart pattern friendship bracelet is the ultimate symbol of love and friendship, without being too cheesy. It’s a little more advanced, but trust us, the “aww” factor is off the charts.
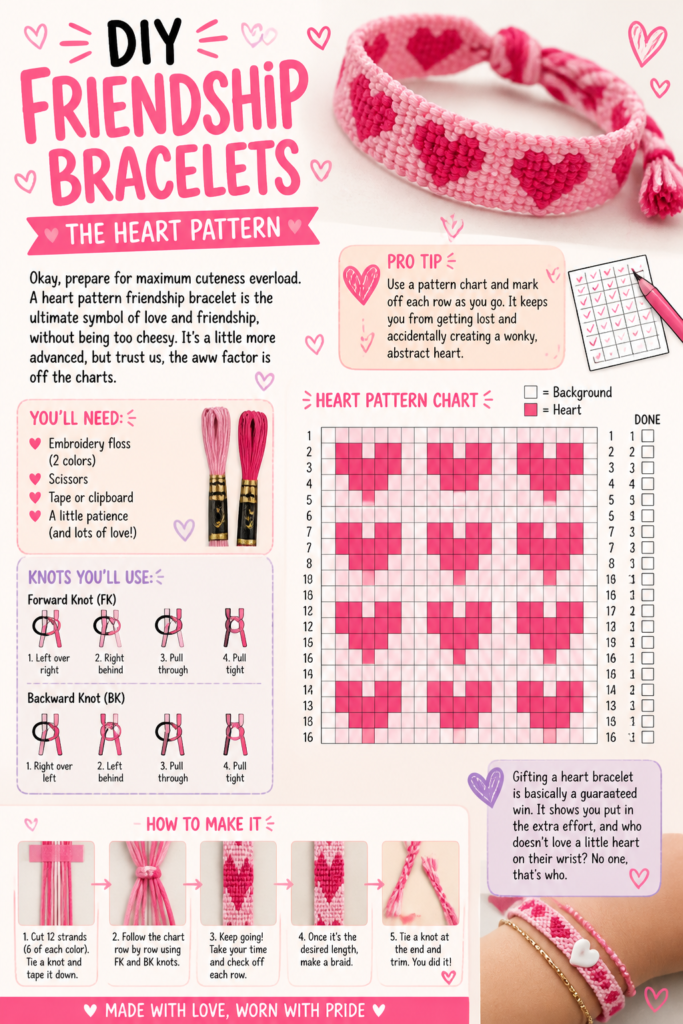
This pattern typically involves a series of forward and backward knots, strategically placed to form those adorable little hearts. You’ll usually have a background color and a contrasting color for the hearts. Patience is your friend here, literally.
Pro tip: Use a pattern chart and mark off each row as you go. It keeps you from getting lost and accidentally creating a wonky, abstract heart.
Gifting a heart bracelet is basically a guaranteed win. It shows you put in the extra effort, and who doesn’t love a little heart on their wrist? No one, that’s who.
7. The Zigzag Wonder
If you’re into bold graphics and dynamic patterns, the zigzag is calling your name. It’s a visually striking bracelet that brings a lot of energy to any arm stack. Think of it as the cooler, edgier sibling to the chevron.
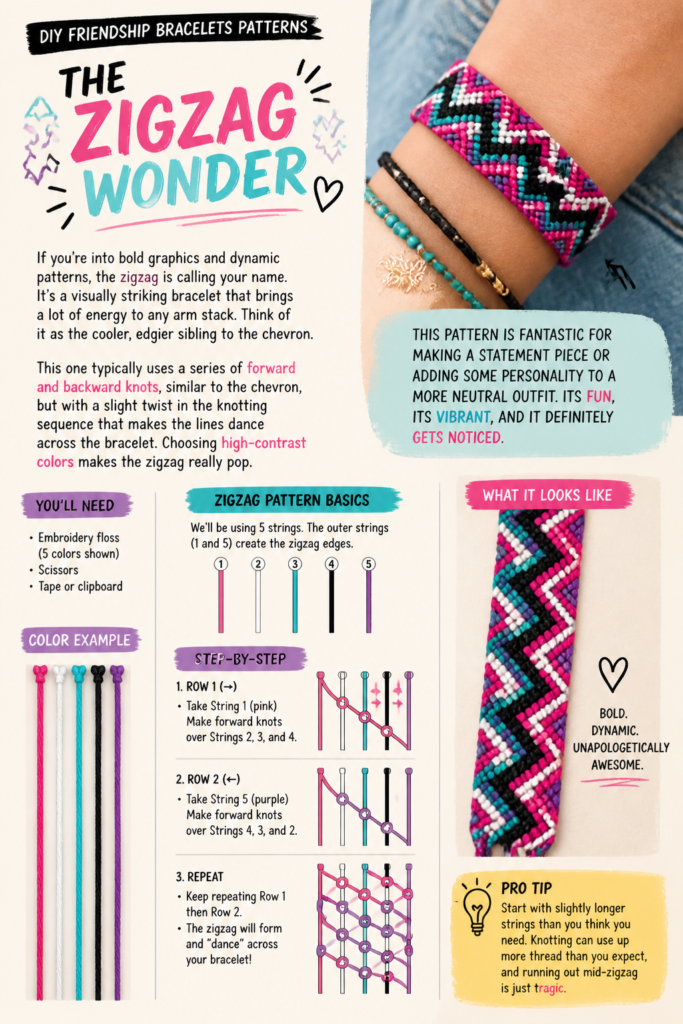
This one typically uses a series of forward and backward knots, similar to the chevron, but with a slight twist in the knotting sequence that makes the lines dance across the bracelet. Choosing high-contrast colors makes the zigzag really pop.
Pro tip: Start with slightly longer strings than you think you need. Knotting can use up more thread than you expect, and running out mid-zigzag is just tragic.
This pattern is fantastic for making a statement piece or adding some personality to a more neutral outfit. It’s fun, it’s vibrant, and it definitely gets noticed.
8. The Ladder Stitch
Looking for something with a bit more structure? The ladder stitch creates a cool, almost woven-looking bracelet with distinct horizontal bars, like little rungs on a ladder. It’s surprisingly simple to execute and looks super neat.
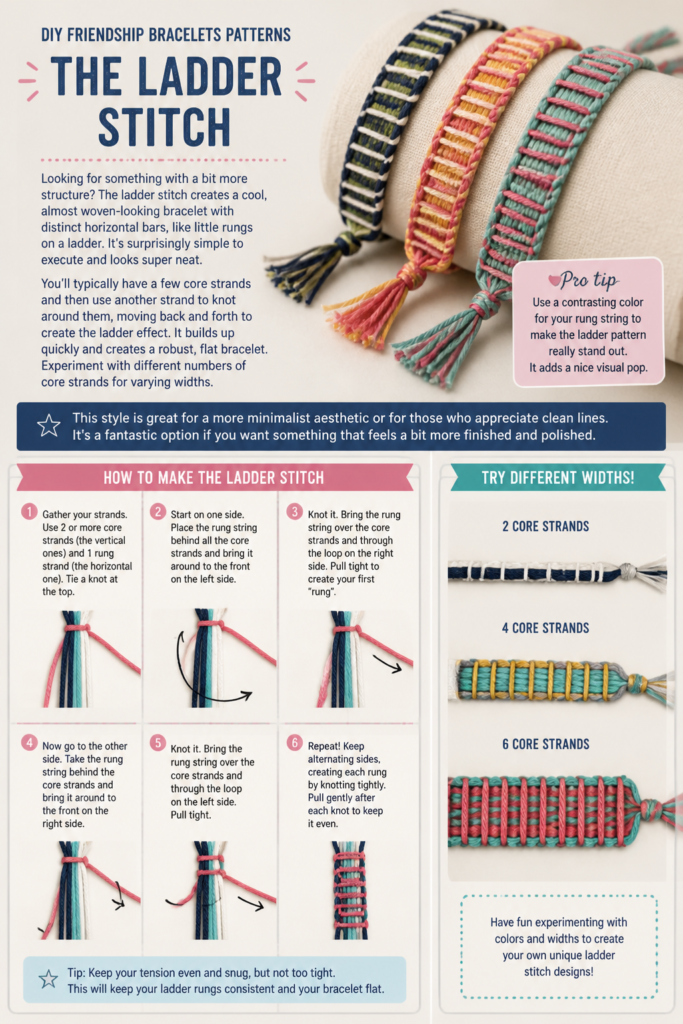
You’ll typically have a few core strands and then use another strand to knot around them, moving back and forth to create the ladder effect. It builds up quickly and creates a robust, flat bracelet. Experiment with different numbers of core strands for varying widths.
Pro tip: Use a contrasting color for your “rung” string to make the ladder pattern really stand out. It adds a nice visual pop.
This style is great for a more minimalist aesthetic or for those who appreciate clean lines. It’s a fantastic option if you want something that feels a bit more “finished” than a simple braid.
9. The Spiral Staircase
Prepare for some mesmerizing magic with the spiral staircase. This pattern creates a beautifully twisted, rope-like bracelet that looks incredibly intricate but is actually just a continuous series of a single type of knot. Mind blown, right?
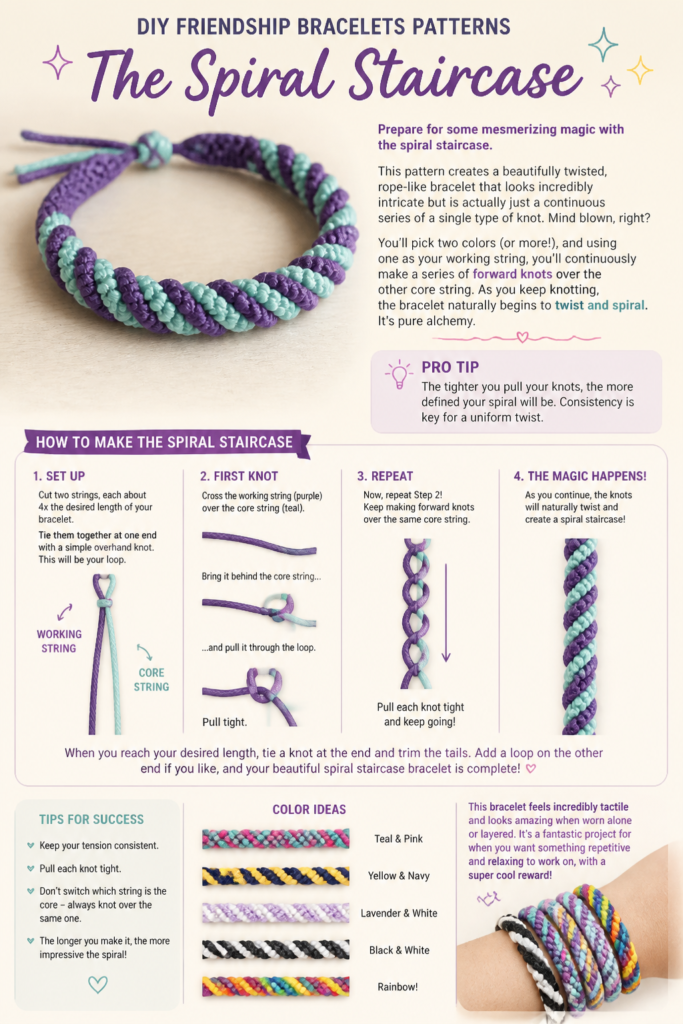
You’ll pick two colors (or more!), and using one as your working string, you’ll continuously make a series of forward knots over the other core string. As you keep knotting, the bracelet naturally begins to twist and spiral. It’s pure alchemy.
Pro tip: The tighter you pull your knots, the more defined your spiral will be. Consistency is key for a uniform twist.
This bracelet feels incredibly tactile and looks amazing when worn alone or layered. It’s a fantastic project for when you want something repetitive and relaxing to work on, with a super cool payoff.
10. The Beaded Beauty
Alright, let’s add some sparkle, because who doesn’t love a little bling? Incorporating beads into your friendship bracelets takes them from cute to absolutely stunning. It’s a game-changer, trust us.
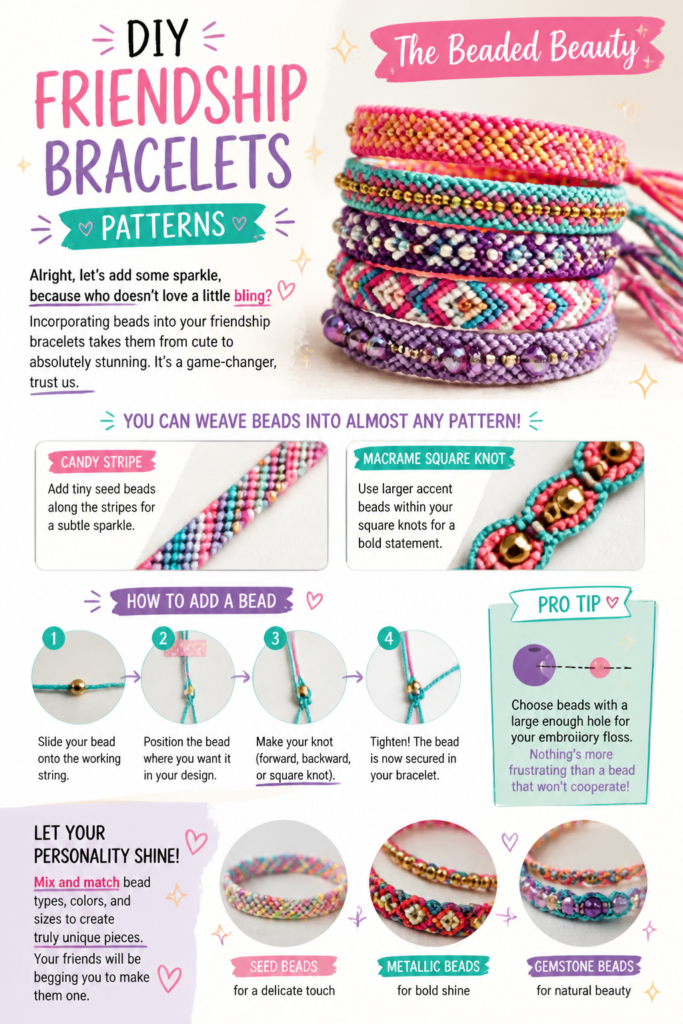
You can weave beads into almost any pattern – think tiny seed beads along a candy stripe, or larger accent beads within a macrame square knot. Just slide the bead onto your working string before making your knot. It instantly elevates the design.
Pro tip: Choose beads with a large enough hole for your embroidery floss. Nothing’s more frustrating than a bead that won’t cooperate.
This is where you can really let your personality shine. Mix and match bead types, colors, and sizes to create truly unique pieces. Your friends will be begging you to make them one.
11. The Half-Hitch Knot
For something a bit more rustic and organic, the half-hitch knot is your go-to. This pattern creates a textured, almost knobbly bracelet that looks fantastic in earthy tones or bright, contrasting colors. It’s deceptively simple yet very effective.
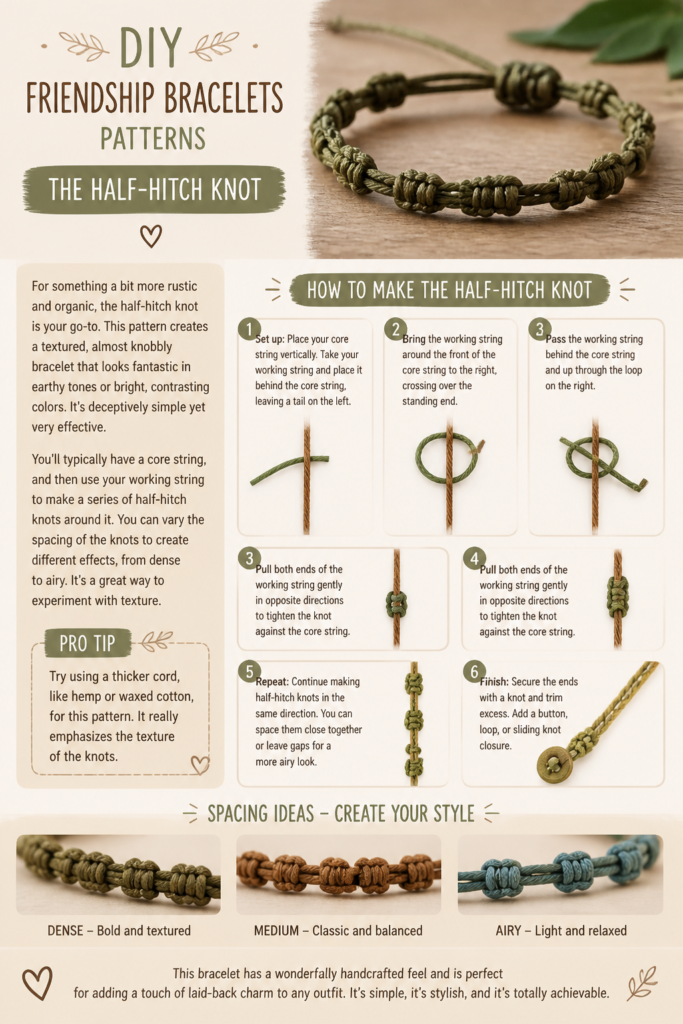
You’ll typically have a core string, and then use your working string to make a series of half-hitch knots around it. You can vary the spacing of the knots to create different effects, from dense to airy. It’s a great way to experiment with texture.
Pro tip: Try using a thicker cord, like hemp or waxed cotton, for this pattern. It really emphasizes the texture of the knots.
This bracelet has a wonderfully handcrafted feel and is perfect for adding a touch of laid-back charm to any outfit. It’s simple, it’s stylish, and it’s totally achievable.
✨ New Member Etsy Shops (100% Unsponsored!)
We are incredibly proud of the talent in this community! 💖 We've rounded up some gorgeous new Etsy shops launched by our very own members.
There are ZERO affiliate links in this post—just 100% pure support for our makers. Click below to shop small, show them some love, and find your new favorite items! 👇🛍️


Conclusion
So there you have it, 11 patterns to get your creative juices flowing and your fingers knotting. Seriously, ditch the generic gifts and put some actual heart into it. These DIY friendship bracelets aren’t just strings and knots; they’re little wearable hugs, tiny tokens of appreciation, and proof that you’re way cooler than anyone who buys their accessories.
Go forth, embrace the floss, and make some magic. Your friends (and your wrists) will thank you. Now, which one are you making first?