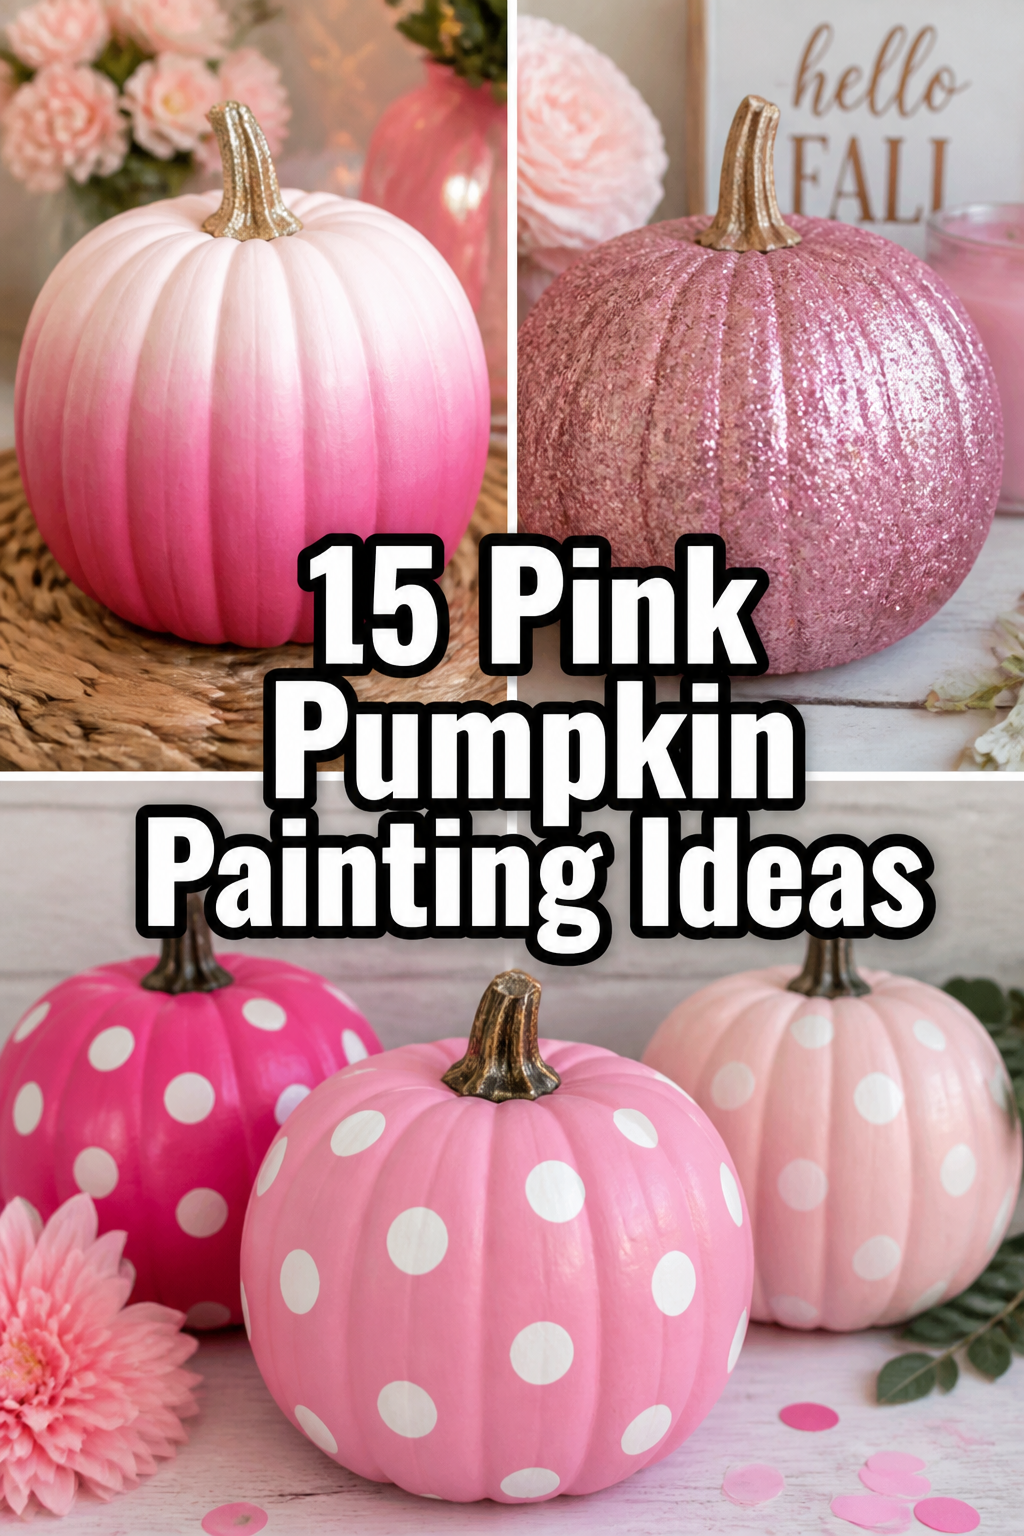
🎃 15 Pink Pumpkin Painting Ideas
🛠️ The Ultimate Maker's Toolkit
I've tested thousands of craft tools over the years. Whether you are quilting, crafting, or building mixed-media art, these are the top 5 absolute non-negotiable tools I personally recommend to guarantee professional results.
🪡 SINGER Heavy Duty 4452 Sewing Machine
The sewing community highly recommends this as the ultimate "bulletproof" entry-level machine. Its heavy metal frame powerfully pushes through thick denim and heavy quilt layers that would instantly jam a standard plastic machine.
✂️ Fiskars 8" Orange-Handled Scissors
Never settle for dull dollar-store blades. Wirecutter repeatedly names Fiskars the absolute best all-purpose craft scissor due to its legendary precision-ground blades and an ergonomic grip that prevents hand-cramping.
🔥 Gorilla Dual Temp Hot Glue Gun
Named Wirecutter's top choice because it literally does the work of two tools. It features dual-temperature settings offering low heat for delicate florals and blistering high heat for heavy wood adhesion repairs.
🖌️ Mod Podge Waterbase Gloss Sealer
The absolute undisputed champion of decoupage and paper crafts. Experts rely exclusively on this exact water-based formula because it glues, seals, and finishes beautifully without yellowing or flaking over time.
🎨 Apple Barrel Acrylic Paint (2 oz)
The quintessential, incredibly inexpensive craft paint. Woodworkers and hobby painters swear by its smooth flow and matte finish, providing massive value and remarkably thick color coverage on rough surfaces.
Okay, so you bought a pumpkin. Maybe a few. And now you’re staring at it, wondering how to make it less… orange. We get it.
You want something chic, something playful, something that screams “I tried, but also, I’m fabulous.” Forget the basic orange and black. We’re going pink, baby!
Here are 15 pink pumpkin painting ideas that will totally transform your gourd game.

1. The Classic Millennial Pink
- Best For: Minimalists, brunch enthusiasts, anyone with a blush-toned sofa.
- Vibe: Chic, understated, effortlessly cool.
- Why it works: It’s simple, elegant, and always in style.
Grab a can of matte millennial pink spray paint. Seriously, one coat usually does the trick. You want full, even coverage here, no streaky business.
This look is all about that uniform, soft hue. Pair it with a few white pumpkins for a dreamy, subtle display that whispers “I know what I’m doing.”
Pro Tip: Use a primer first, especially if your pumpkin is super dark. It helps the pink pop more vibrantly.
2. Pink Ombre Dream
- Best For: The artistically inclined, those who love a gradient, anyone with patience.
- Vibe: Ethereal, sophisticated, visually stunning.
- Why it works: The gradient effect adds depth and visual interest without being too busy.
Start with a deep fuchsia at the base of your pumpkin and gradually lighten to a pale blush at the top. You’ll need at least three shades of pink acrylic paint and a good blending brush.
Work in small sections, blending the colors while they’re still wet. This takes a bit of finesse, but the result is totally worth the effort.
Pro Tip: Keep a damp paper towel handy to clean your brush between color changes for seamless blending.
3. Pretty in Pink Polka Dots
- Best For: Families, playful decorators, anyone who loves a bit of whimsy.
- Vibe: Fun, cheerful, retro-chic.
- Why it works: Polka dots are universally charming and easy to execute.
Paint your pumpkin a solid light pink first as your base. Once dry, use a contrasting darker pink or even white paint to add various-sized polka dots.
You can freehand them with a brush, or use the eraser end of a pencil for perfectly round, uniform dots. Don’t be afraid to mix dot sizes for extra visual appeal.
Pro Tip: For crisp dots, dip your tool straight down into the paint and then straight onto the pumpkin without twisting.
4. Gold-Dipped Pink
- Best For: Glam lovers, fancy dinner parties, anyone who appreciates a touch of sparkle.
- Vibe: Luxurious, elegant, a little bit extra.
- Why it works: The metallic gold elevates the pink, making it feel high-end.
Give your pumpkin a solid coat of your favorite pink. Once it’s completely dry, tape off the bottom third or quarter of the pumpkin.
Spray or paint the taped-off section with gold metallic paint. Remove the tape carefully when the gold is still slightly tacky for a super clean line. It’s like a tiny, gilded crown for your gourd.
Pro Tip: Use painter’s tape for the sharpest line. Press it down firmly to prevent any bleed-through.
5. Abstract Pink Swirls
- Best For: The modern art enthusiast, those who prefer organic shapes, anyone who hates perfection.
- Vibe: Artistic, free-spirited, contemporary.
- Why it works: It’s forgiving and allows for creative expression without strict rules.
Start with a pale pink or even a white base. Then, using a few different shades of pink (and maybe a touch of gold or white), create organic swirls and blobs.
Think less “perfect circle” and more “beautiful accident.” Use a small brush or even a toothpick for delicate lines. This isn’t about precision; it’s about flow.
Pro Tip: Don’t overthink it. Let your hand move freely and embrace the imperfections for a truly unique piece.
6. Striped Pink Delight
- Best For: Graphic design fans, those who like clean lines, anyone with an eye for detail.
- Vibe: Bold, modern, playful geometry.
- Why it works: Stripes are classic and can be customized with different widths and colors.
Paint your pumpkin a solid pink base. Once dry, use painter’s tape to create vertical or horizontal stripes.
You can alternate between a darker pink, white, or even a metallic gold for the stripes. Peel the tape off slowly for those satisfyingly crisp lines. Instant chic.
Pro Tip: For perfect spacing, measure and mark your lines lightly with a pencil before applying tape.
7. Hot Pink & Black Glam
- Best For: Edgy decorators, Halloween party hosts, anyone who loves a dramatic contrast.
- Vibe: Bold, punk-rock chic, slightly gothic.
- Why it works: The high contrast creates a dramatic and striking look.
Go all out with a vibrant, glossy hot pink base. Once that’s dry and dazzling, add black accents.
Think black spiderwebs, spooky silhouettes, or even simple black stripes. This combination is unexpectedly sophisticated and totally eye-catching.
Pro Tip: Use a fine-tipped brush for detailed black designs to keep your lines clean and sharp.
8. Pink Marble Effect
- Best For: Trendsetters, DIY enthusiasts, those looking for an expensive-looking finish.
- Vibe: Luxurious, sophisticated, naturally artistic.
- Why it works: It creates a high-end, unique pattern that looks much harder than it is.
This one’s a bit more advanced but so worth it. Start with a white or very pale pink base. You’ll need a few shades of pink and a dark gray or black paint.
Drip and swirl colors onto the pumpkin, then gently mist with water to help the colors spread and blend. A feather or a thin brush can help create those delicate vein-like patterns. It’s messy, but beautiful.
Pro Tip: Experiment on a piece of paper first to get a feel for how the paints will spread and blend.
9. Sweet Pastel Pink
- Best For: Nurseries, baby showers, anyone who loves all things adorable.
- Vibe: Gentle, soft, utterly charming.
- Why it works: Pastel colors are inherently calming and sweet, perfect for a gentle aesthetic.
Opt for the palest, softest pastel pink you can find. Think cotton candy or ballet slipper pink. Keep the entire pumpkin one uniform, dreamy shade.
You can add a subtle touch with a delicate white bow tied around the stem, or tiny pearl embellishments. This look is pure innocence and charm.
Pro Tip: For extra softness, use a matte finish sealant instead of glossy.
10. Pink with Floral Accents
- Best For: Romantics, garden lovers, those who appreciate intricate details.
- Vibe: Whimsical, feminine, naturally beautiful.
- Why it works: Flowers add a delicate, organic touch to the solid pink base.
Paint your pumpkin a lovely solid pink. Once dry, use a contrasting color like white, gold, or even a darker pink to paint small, delicate floral designs.
Think tiny roses, daisies, or simple leafy vines. You don’t need to be a pro artist; even simple stylized flowers look fantastic. Small stickers or stencils also work wonders here.
Pro Tip: Practice your floral designs on paper first to get comfortable with the brush strokes before tackling the pumpkin.
11. Glitter Bomb Pink
- Best For: Diva decorators, party animals, anyone who believes more is more.
- Vibe: Dazzling, glamorous, unapologetically sparkly.
- Why it works: Glitter adds instant festivity and a playful touch.
First, paint your pumpkin a solid pink. While the paint is still wet (or immediately after applying a layer of craft glue), sprinkle on a generous amount of pink glitter.
Don’t be shy! For extra staying power, finish with a clear sealant spray. This pumpkin will catch every single ray of light.
Pro Tip: Work over a tray or newspaper to catch excess glitter for easy cleanup and reuse.
12. Pink Geo-Metallic
- Best For: Modern decor enthusiasts, graphic designers, those who love clean, bold lines.
- Vibe: Contemporary, sharp, architecturally inspired.
- Why it works: Geometric patterns are trendy and offer a sophisticated, structured look.
Paint your pumpkin a solid, vibrant pink. Once dry, use painter’s tape to create sharp geometric shapes like triangles, squares, or chevrons.
Fill these shapes with a contrasting metallic color like copper, silver, or gold. The crisp lines and metallic pop are pure modern art. Remove tape carefully for clean edges.
Pro Tip: Plan your design on paper first to ensure your geometric shapes fit well on the pumpkin’s curved surface.
13. Pink Leopard Print
- Best For: Fashionistas, bold personalities, anyone craving a touch of wild.
- Vibe: Sassy, fierce, fashion-forward.
- Why it works: Leopard print is a timeless, bold pattern that adds a playful edge.
Paint your pumpkin a light, soft pink as your base. Once dry, use a slightly darker pink or even a brown to paint irregular, blob-like shapes.
Then, outline these blobs with a thin brush and black paint, leaving small gaps in the outline. This takes a steady hand, but the fierce result is fabulous. Roar!
Pro Tip: Don’t try to make the spots perfect. The beauty of leopard print is in its organic, slightly irregular nature.
14. Pink with White Drips
- Best For: The playfully messy, those who like a deconstructed look, anyone who appreciates a bit of grunge.
- Vibe: Quirky, artistic, delightfully imperfect.
- Why it works: The drip effect is visually interesting and adds an element of unexpected texture.
Paint your pumpkin a solid, vibrant pink. Let it dry completely. Then, using thick white acrylic paint, start applying it generously around the stem.
Let gravity do its thing as the white paint slowly drips down the sides. You can encourage the drips in certain directions if you want, but the randomness is part of the charm.
Pro Tip: Use paint that is a little thicker than usual for more pronounced and controlled drips.
15. The “I Woke Up Like This” Pink
- Best For: The truly lazy, the effortlessly cool, anyone who embraces natural beauty.
- Vibe: Rustic, natural, perfectly undone.
- Why it works: It highlights the pumpkin’s natural texture while adding a pop of color.
Instead of full coverage, opt for a sheer wash of pink. Mix a little pink acrylic paint with water to create a translucent stain. Apply it unevenly, letting some of the pumpkin’s natural color show through.
This look is all about that “barely there” tint, allowing the pumpkin’s texture and natural imperfections to shine. It’s chic without trying too hard.
Pro Tip: Apply with a sponge for an even more textured, natural finish. Build up layers if you want a slightly deeper hue.
Our Top Recommended Finds
- Acrylic Paint Set: A good range of pinks, whites, and metallics gives you endless options for mixing and matching.
- Painter’s Tape: Essential for those crisp lines, whether you’re doing stripes, geometric patterns, or a gold-dipped look.
- Matte Sealing Spray: Protects your masterpiece and gives it a professional, non-glossy finish that looks super modern.
Which of these will you try first?
Seriously, ditch the basic and embrace the pink! Your pumpkins (and your decor) will thank you for the glow-up.
Tell us in the comments below which fabulous pink pumpkin idea you’re tackling first. We’re totally here for your gourd-geous creations!