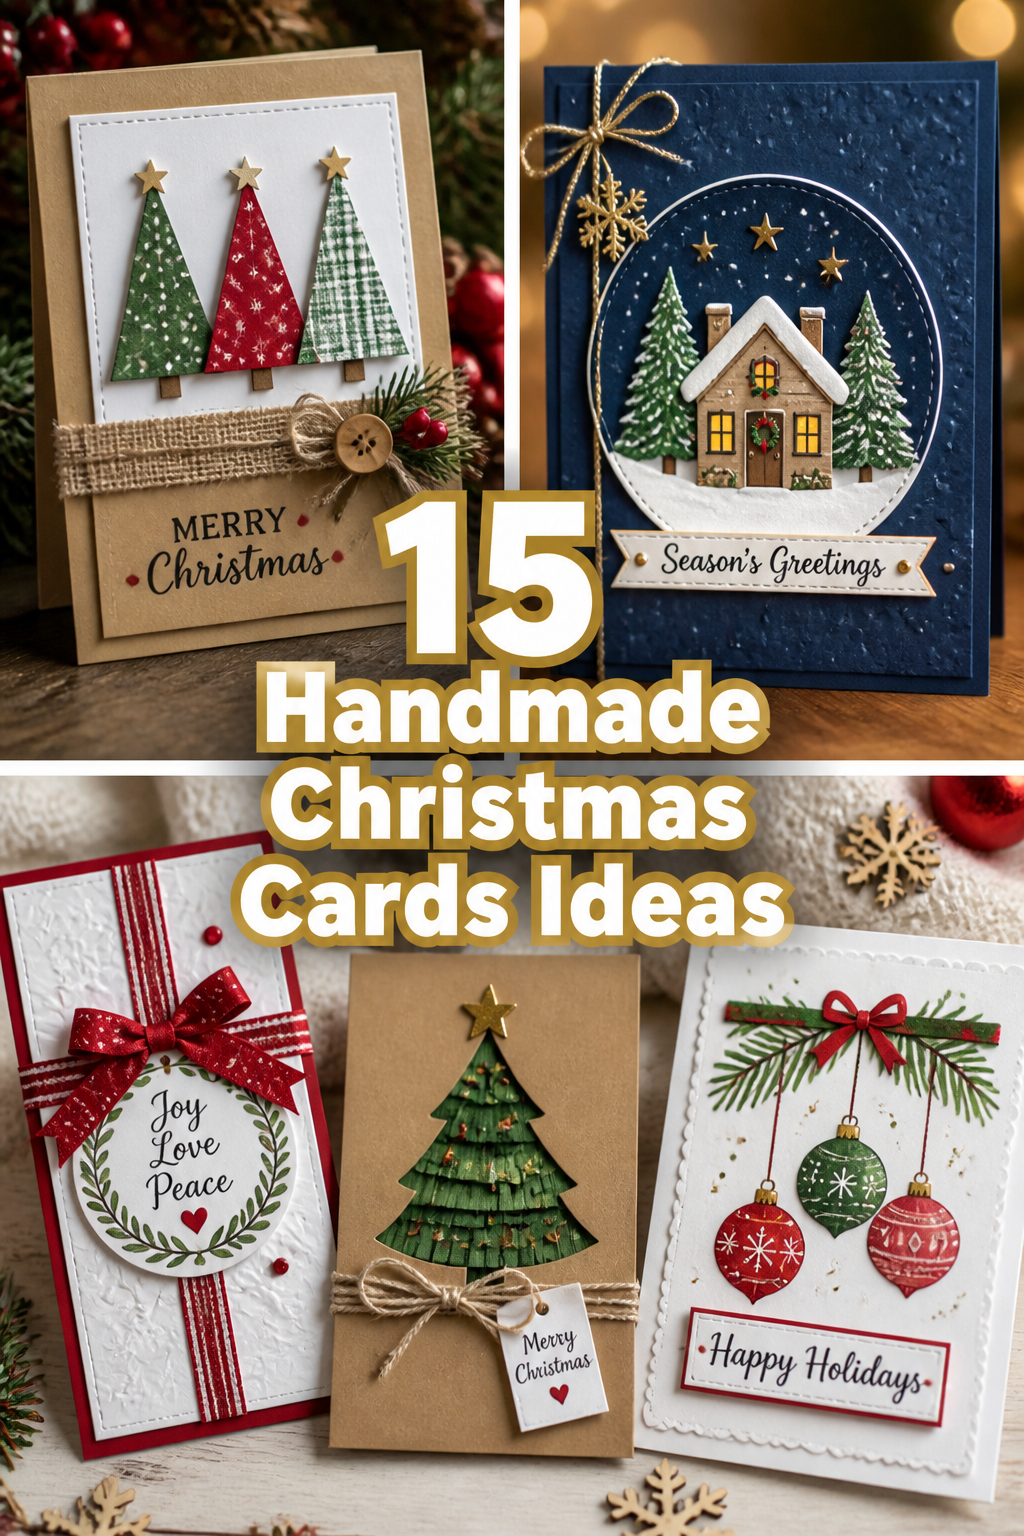
🎅 15 Handmade Christmas Cards Ideas
🛠️ The Ultimate Maker's Toolkit
I've tested thousands of craft tools over the years. Whether you are quilting, crafting, or building mixed-media art, these are the top 5 absolute non-negotiable tools I personally recommend to guarantee professional results.
🪡 SINGER Heavy Duty 4452 Sewing Machine
The sewing community highly recommends this as the ultimate "bulletproof" entry-level machine. Its heavy metal frame powerfully pushes through thick denim and heavy quilt layers that would instantly jam a standard plastic machine.
✂️ Fiskars 8" Orange-Handled Scissors
Never settle for dull dollar-store blades. Wirecutter repeatedly names Fiskars the absolute best all-purpose craft scissor due to its legendary precision-ground blades and an ergonomic grip that prevents hand-cramping.
🔥 Gorilla Dual Temp Hot Glue Gun
Named Wirecutter's top choice because it literally does the work of two tools. It features dual-temperature settings offering low heat for delicate florals and blistering high heat for heavy wood adhesion repairs.
🖌️ Mod Podge Waterbase Gloss Sealer
The absolute undisputed champion of decoupage and paper crafts. Experts rely exclusively on this exact water-based formula because it glues, seals, and finishes beautifully without yellowing or flaking over time.
🎨 Apple Barrel Acrylic Paint (2 oz)
The quintessential, incredibly inexpensive craft paint. Woodworkers and hobby painters swear by its smooth flow and matte finish, providing massive value and remarkably thick color coverage on rough surfaces.
Okay, let’s be real. Another year, another stack of generic store-bought cards just waiting to get lost in the holiday shuffle.
Your grandma deserves better than that, right?
Good news: I’ve got the lowdown on how to ditch the predictable and craft some seriously envy-inducing greetings. Get ready to sprinkle some magic on those mailboxes.

1. Watercolor Wash Wonders
- Best For: Art lovers, serene greetings, anyone who appreciates a touch of elegance.
- Vibe: Dreamy, sophisticated, effortlessly artistic.
- Why it works: It looks super impressive but is surprisingly forgiving for beginners.
Grab some heavy cardstock and a basic watercolor set. Paint a light wash of blues, greens, or purples across the card, letting the colors blend naturally. Once dry, use a black fine-tip pen to add a simple silhouette of a tree, a star, or “Joy” in a pretty script. Think soft, ethereal vibes, not a kindergarten finger painting. You can snag a decent watercolor set for under $15.
Pro Tip: Less is more with watercolors. Don’t overwork it; let the water do its thing.
2. Button Christmas Trees
- Best For: Kids and adults, eco-conscious crafters, adding a playful 3D element.
- Vibe: Whimsical, charming, delightfully tactile.
- Why it works: It’s a fun way to use up old buttons and creates instant texture.
Dig through your button stash for green, red, and white ones. On a plain white or cream card, lightly sketch a triangle for your tree shape. Starting from the bottom, glue buttons in rows, decreasing in size as you go up, to form a delightful 3D Christmas tree. Add a tiny yellow button or a sequin for the star. This is a brilliant way to recycle those lone buttons that lost their shirt match.
Pro Tip: Use a strong craft glue to ensure those buttons stay put through the mail. Nobody wants a naked tree!
3. Fingerprint Fairy Lights
- Best For: Parents, grandparents, anyone wanting a personal, adorable touch.
- Vibe: Sweet, personal, utterly heartwarming.
- Why it works: It’s incredibly simple, requires minimal supplies, and captures a moment.
Fold some colored cardstock in half. Using a black marker, draw a wavy line across the card, like a string of fairy lights. Then, dip your finger (or your kiddo’s tiny finger) into various bright paint colors – red, green, yellow, blue – and press them along the line to create “light bulbs.” Add a tiny white dot in each print with a gel pen for a little sparkle. It’s surprisingly cute and costs practically nothing.
Pro Tip: Use washable paint for easy cleanup, especially if little hands are involved. Trust me on this one.
4. Washi Tape Wonders
- Best For: Minimalists, quick crafters, pattern enthusiasts.
- Vibe: Modern, clean, effortlessly stylish.
- Why it works: Washi tape comes in endless patterns and makes quick work of card designs.
Get your hands on some festive washi tape – glittery, striped, or with tiny reindeers. Create simple shapes like a Christmas tree by layering strips diagonally, or form stripes across the card. You can even cut small shapes out of the tape, like stars or baubles, and stick them on. It’s basically instant gratification for your crafting itch. A roll of good washi tape usually runs about $3-5.
Pro Tip: For crisp lines, use an X-Acto knife on a cutting mat to trim the tape edges perfectly.
5. Yarn-Wrapped Trees
- Best For: Texture lovers, cozy vibes, using up yarn scraps.
- Vibe: Rustic, cozy, handcrafted charm.
- Why it works: Adds incredible dimension and a comforting, soft feel to your card.
Cut a simple Christmas tree shape from a piece of cardboard or thick cardstock. Wrap green yarn tightly around the tree, securing the ends with a dab of glue on the back. Once fully wrapped, glue this textured tree onto a contrasting card base. You can add tiny beads or sequins for “ornaments.” This card practically screams “hygge” and a warm mug of cocoa.
Pro Tip: Varying yarn textures (chunky vs. fine) can give you really interesting results. Don’t be afraid to mix it up.
6. Stamped & Embossed Snowflakes
- Best For: Elegant cards, crafters with basic stamping supplies, adding a touch of luxury.
- Vibe: Sophisticated, frosty, subtly shimmering.
- Why it works: Embossing powder creates a raised, glossy effect that feels high-end.
Grab a snowflake stamp and some embossing ink. Stamp your snowflakes onto colored cardstock (dark blue or deep red works beautifully). Sprinkle embossing powder over the wet ink, tap off the excess, and then use a heat gun to melt the powder into a raised, shiny design. This technique instantly elevates a simple stamp into something truly special. Embossing supplies might be a small initial investment, around $20-30 for a basic kit.
Pro Tip: Work quickly after stamping with embossing ink, as it dries fast. Have your powder ready to go.
7. Pop-Up Presents
- Best For: Surprising recipients, those who enjoy a little engineering, adding an interactive element.
- Vibe: Playful, exciting, a delightful surprise.
- Why it works: A simple pop-up mechanism makes the card memorable and fun.
Fold your card in half. On the fold line, make two parallel cuts about an inch apart, then fold the resulting strip inwards. Decorate this “shelf” with a tiny paper present, a snowman, or a mini Christmas tree. When the card opens, your little creation pops out! Decorate the surrounding card with festive patterns. It’s a fantastic way to add a bit of unexpected joy.
Pro Tip: Keep your pop-up elements relatively flat to avoid bulk when mailing. Nobody likes paying extra postage for a lumpy card.
8. Glitter Glue Doodles
- Best For: Kids, adding sparkle without the mess of loose glitter, quick and easy designs.
- Vibe: Sparkly, festive, cheerfully handmade.
- Why it works: It’s a low-fuss way to add shimmer and allows for freehand creativity.
Get a variety of colored glitter glues. On a plain card, draw simple Christmas shapes like stars, baubles, or even just swirly patterns. You can outline a sketched design or freehand it. Let it dry completely for a raised, sparkly effect. This is super easy and adds immediate festive cheer without glitter getting absolutely everywhere. A pack of glitter glue pens is usually under $10.
Pro Tip: Don’t glob on too much glitter glue; it takes ages to dry and might crack. Thin, even lines are your friend.
9. Rustic Twig Trees
- Best For: Nature lovers, minimalist aesthetics, a truly unique, organic look.
- Vibe: Earthy, minimalist, charmingly natural.
- Why it works: It brings a piece of the outdoors in and is incredibly simple yet striking.
Collect a few tiny, thin twigs from your garden or a local park. Break them into progressively smaller pieces. Glue them onto a kraft paper or cream-colored card in the shape of a Christmas tree. Add a small star sticker or a dab of yellow paint at the top. This card is all about understated elegance and natural beauty. It’s practically free, assuming you have a backyard.
Pro Tip: Make sure your twigs are completely dry before gluing them down to prevent mold or warping.
10. Craft Paper Cut-Outs
- Best For: Silhouette lovers, graphic designers, creating striking contrasts.
- Vibe: Graphic, modern, bold yet simple.
- Why it works: Layering different colored papers creates depth and visual interest easily.
Choose two contrasting colors of cardstock, like deep red and crisp white. Cut out intricate snowflake patterns, a silhouette of Santa’s sleigh, or elegant typography from one color. Glue this cut-out piece onto the contrasting background. This method looks incredibly polished and professional, especially if you have a craft cutter. Basic craft paper is super affordable, around $0.50-$1 per sheet.
Pro Tip: Use a fine-tip craft knife or a die-cutting machine for really precise and intricate cut-outs. Your scissors will hate you otherwise.
11. Melted Crayon Art
- Best For: Experimenters, creating abstract designs, using up old crayons.
- Vibe: Abstract, vibrant, wonderfully unique.
- Why it works: The melted wax creates beautiful, marbled effects that are one-of-a-kind.
Peel the paper off some old crayons. Place small pieces or shavings onto a piece of cardstock. Cover with a sheet of parchment paper and gently iron over it with a warm iron (no steam!). The crayons will melt into beautiful, abstract swirls. Once cool, you can cut shapes from this unique paper and glue them onto your card. Each card will be a miniature work of art.
Pro Tip: Test the iron temperature on a scrap piece first to avoid scorching your paper or crayons. Low and slow is the way to go.
12. Stitched Stars & Snowflakes
- Best For: Embroidery enthusiasts, adding a handmade textile touch, creating delicate designs.
- Vibe: Delicate, rustic, charmingly homespun.
- Why it works: Hand stitching adds a lovely texture and an undeniable personal touch.
Lightly sketch a simple star, snowflake, or Christmas tree outline onto your cardstock. Use a needle to poke small holes along the lines. Then, with embroidery floss (white, silver, or gold work wonderfully), stitch through the holes to create your design. This adds a beautiful, tactile element that recipients will adore. A skein of embroidery floss is usually under a dollar.
Pro Tip: Use a thimble to protect your fingers, especially if you’re working with thicker cardstock. Your thumbs will thank you.
13. Paper Strip Trees
- Best For: Kids, quick projects, creating modern, geometric designs.
- Vibe: Modern, geometric, surprisingly chic.
- Why it works: It’s a simple technique that yields a clean, contemporary Christmas tree.
Cut various shades of green cardstock into strips of different lengths, all the same width. Starting with the longest at the bottom, glue the strips horizontally onto your card, decreasing the length as you go up, to form a layered Christmas tree. Add a tiny paper star at the top. This is a wonderfully straightforward way to make a striking, graphic card.
Pro Tip: Use a paper trimmer for perfectly straight strips. It makes a huge difference in the final polished look.
14. Hand-Lettered Quotes
- Best For: Calligraphy fans, minimalists, focusing on heartfelt messages.
- Vibe: Elegant, personal, sincerely thoughtful.
- Why it works: A beautifully written quote can be more impactful than elaborate decorations.
If you’ve got decent handwriting or a knack for faux calligraphy, this one is for you. Use a metallic gel pen or a brush pen to write a festive quote (“Merry & Bright,” “Peace on Earth,” “Believe”) beautifully across a plain card. You can add a simple hand-drawn border or a few small dots for extra flair. Sometimes, the message itself is the best art. Good quality pens might be $5-10 each.
Pro Tip: Practice your chosen phrase on scrap paper a few times before committing to the card. No pressure, just practice!
15. Cookie Cutter Stamping
- Best For: Families, quick batches, creating consistent, charming shapes.
- Vibe: Nostalgic, playful, delightfully homemade.
- Why it works: Cookie cutters are readily available and make perfect, recognizable holiday shapes.
Grab your favorite Christmas cookie cutters – a star, a tree, a gingerbread man. Dip the edge of the cookie cutter into a shallow plate of acrylic paint and press it onto your card to create festive outlines. You can fill in the outlines with paint or just leave them as silhouettes. It’s a super easy way to get clean, holiday-themed shapes quickly. Plus, your kitchen tools get a holiday workout.
Pro Tip: Clean your cookie cutters immediately after using them with paint to avoid any permanent festive stains on your baking tools.
Our Top Recommended Finds
- A Reliable Paper Trimmer: Seriously, crisp edges make all the difference. Say goodbye to wonky lines and hello to professional-looking cards.
- Assorted Cardstock Pack: Having a variety of colors and weights on hand lets you experiment without running to the store every five minutes.
- Good Quality Craft Glue: Nobody wants their masterpiece falling apart in transit. A strong, quick-drying glue is a non-negotiable for lasting creations.
Which of these will you try first?
So, there you have it, 15 ways to make this year’s Christmas cards anything but basic. Ditch the generic, embrace the handmade, and spread some serious holiday cheer that actually feels special.
Which brilliant idea is calling your name for a craft session? Spill the tea in the comments below!