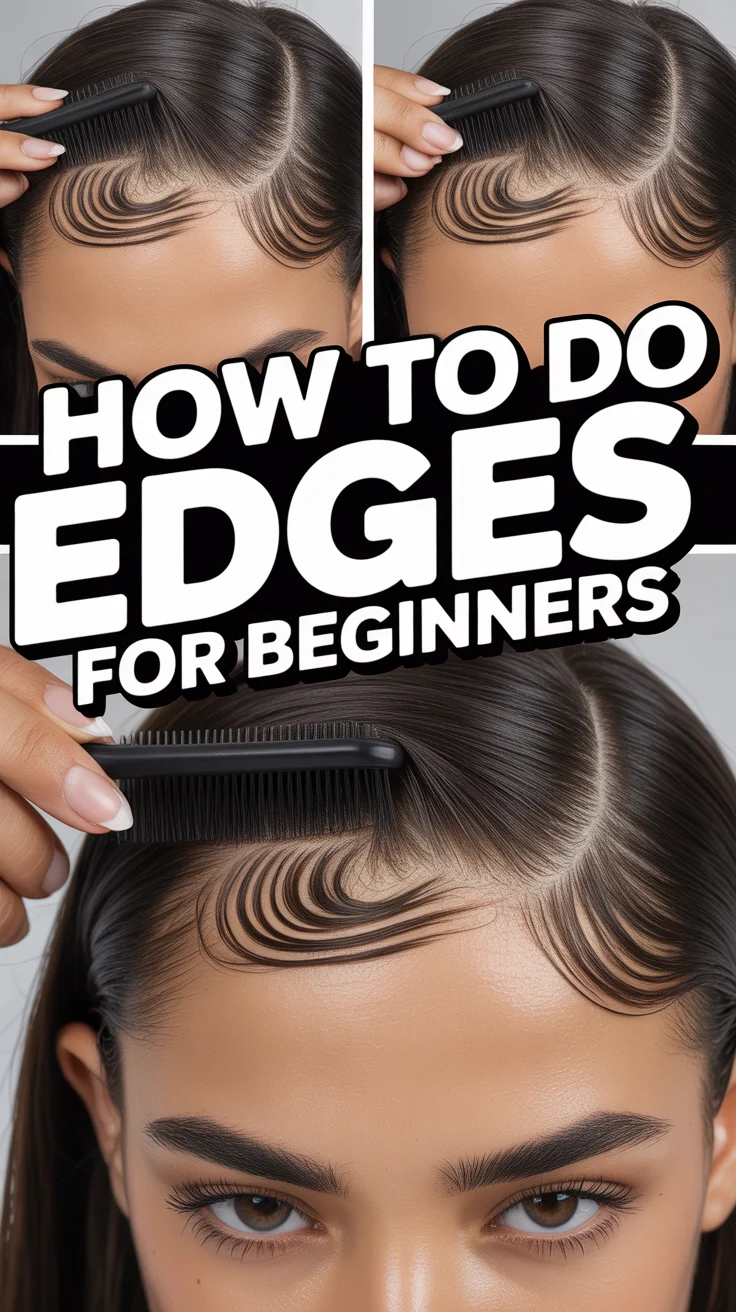
💫 How To Do Edges For Beginners
🛠️ The Ultimate Maker's Toolkit
I've tested thousands of craft tools over the years. Whether you are quilting, crafting, or building mixed-media art, these are the top 5 absolute non-negotiable tools I personally recommend to guarantee professional results.
🪡 SINGER Heavy Duty 4452 Sewing Machine
The sewing community highly recommends this as the ultimate "bulletproof" entry-level machine. Its heavy metal frame powerfully pushes through thick denim and heavy quilt layers that would instantly jam a standard plastic machine.
✂️ Fiskars 8" Orange-Handled Scissors
Never settle for dull dollar-store blades. Wirecutter repeatedly names Fiskars the absolute best all-purpose craft scissor due to its legendary precision-ground blades and an ergonomic grip that prevents hand-cramping.
🔥 Gorilla Dual Temp Hot Glue Gun
Named Wirecutter's top choice because it literally does the work of two tools. It features dual-temperature settings offering low heat for delicate florals and blistering high heat for heavy wood adhesion repairs.
🖌️ Mod Podge Waterbase Gloss Sealer
The absolute undisputed champion of decoupage and paper crafts. Experts rely exclusively on this exact water-based formula because it glues, seals, and finishes beautifully without yellowing or flaking over time.
🎨 Apple Barrel Acrylic Paint (2 oz)
The quintessential, incredibly inexpensive craft paint. Woodworkers and hobby painters swear by its smooth flow and matte finish, providing massive value and remarkably thick color coverage on rough surfaces.
New to laying edges? No stress. We’re keeping it simple, cute, and drama-free. Grab your brush, your gel, and your patience—lightly seasoned—because we’re about to make those baby hairs behave.
1. Prep With a Clean Slate
Oily edges don’t lay—they lounge. Start with a clean hairline so your product actually grips. Use a gentle cleanser or micellar water to remove buildup and sweat.
Key points:
- Clean hairline helps gel stick and last longer.
- Towel-dry to avoid slipping and flakes.
- Light leave-in keeps hair soft without greasing it up.
Pro tip: If your edges are dry, dab a tiny bit of lightweight oil after styling, not before.
This works because clean strands hold shape better and reduce the dreaded curl pop-back.
2. Choose the Right Tools
The right tools turn chaos into curls-on-command. Think tiny and precise. We’re sculpting, not raking leaves.
Key points:
- Edge brush with a comb end for parting and smoothing.
- Soft toothbrush works in a pinch.
- Silk scarf to set without frizz.
Pro tip: Keep a travel-sized brush in your bag for post-mask or hat touch-ups.
It works because precision tools give you control over tiny hairs and clean lines.
3. Pick Your Product Wisely
Gel? Edge control? Mousse? Pick based on your hair’s mood and texture. No one likes crunch that fights back.
Key points:
- Edge control for firm hold and shine.
- Gel for flexible, buildable hold.
- Mousse for soft, fluffy swoops on fine hair.
Pro tip: Layer gel first, then a thin swipe of edge control for all-day hold without cement vibes.
This works because each product addresses different needs—hold, shine, and softness.
4. Map Your Swoops
Don’t wing it—plan it. Decide where your swoops, C-curves, or S-waves will live before you start.
Key points:
- Part your baby hairs from the hairline gently.
- Section into front, temple, and sideburns.
- Less is more—pull thin pieces for a natural look.
Pro tip: Use the comb end to outline your swoop shape first, then smooth with the brush.
This works because a game plan stops product overload and messy re-dos.
5. Master the Brush-and-Pull
It’s all in the wrist. Brush, curve, and lightly pull to create that sleek swoop.
Key points:
- Apply product to the section, not the entire hairline.
- Brush inward toward the face, then curve back.
- Use short strokes for clean, controlled shapes.
Pro tip: Anchor the base of the swoop with your finger while brushing the tail—crispy lines, zero lift.
This works because controlled tension shapes the hair without frizzing it up.
6. Try Simple Shapes First
Start basic, then spice it up later. Clean curves beat chaotic waves every time.
Key points:
- Single C-curve at the front for a quick win.
- Temple swoop to frame your face.
- Mini sideburn curl for a soft finish.
Pro tip: Match your shape to your part—side parts love diagonal swoops.
This works because simple patterns are easier to repeat and look polished.
7. Set It and Chill
Patience equals laid edges that last. Give your work a minute to lock in.
Key points:
- Wrap with a silk or satin scarf for 5–10 minutes.
- Use a cool blow dryer if you’re in a rush.
- Hands off while drying to prevent frizz.
Pro tip: A thin layer of styling foam before the scarf can smooth flyaways without residue.
This works because setting compresses the hair and product together for longevity.
8. Avoid Flakes and Build-Up
Flakes are not invited. Keep it clean, cute, and breathable.
Key points:
- Use water or aloe mist to reactivate yesterday’s edges.
- Gently wipe with a damp cloth before reapplying product.
- Clarify weekly to reset the hairline.
Pro tip: Mix a drop of leave-in with your gel to soften strong holds and reduce flaking.
This works because fresh layers stick better and look smoother.
9. Match Your Style and Texture
Your edges should vibe with your hairstyle. Harmony, not battle.
Key points:
- Protective styles pair well with sleek, defined swoops.
- Wash-and-go loves softer, fluffy edges.
- Presses and blowouts look best with minimal, subtle curves.
Pro tip: If your hair reverts fast, use a stronger hold only at the roots and lighter hold on the ends.
This works because the finish matches the texture, so everything looks intentional.
10. Practice Without Pressure
Edges are art, not taxes. The more you practice, the cleaner your lines get.
Key points:
- Experiment with 2–3 shapes you can repeat.
- Time yourself to get a fast everyday routine.
- Take pics to see what angles and products work best.
Pro tip: Practice at night before wrapping your hair—wake up to set, crisp edges.
This works because low-stakes reps build muscle memory and confidence.
✨ New Member Etsy Shops (100% Unsponsored!)
We are incredibly proud of the talent in this community! 💖 We've rounded up some gorgeous new Etsy shops launched by our very own members.
There are ZERO affiliate links in this post—just 100% pure support for our makers. Click below to shop small, show them some love, and find your new favorite items! 👇🛍️


Conclusion
Laid edges aren’t sorcery—they’re steps done calmly with the right tools. Keep it clean, choose products that match your texture, and set it like you mean it. With a little practice, your swoops will clock in on time and mind their business all day.