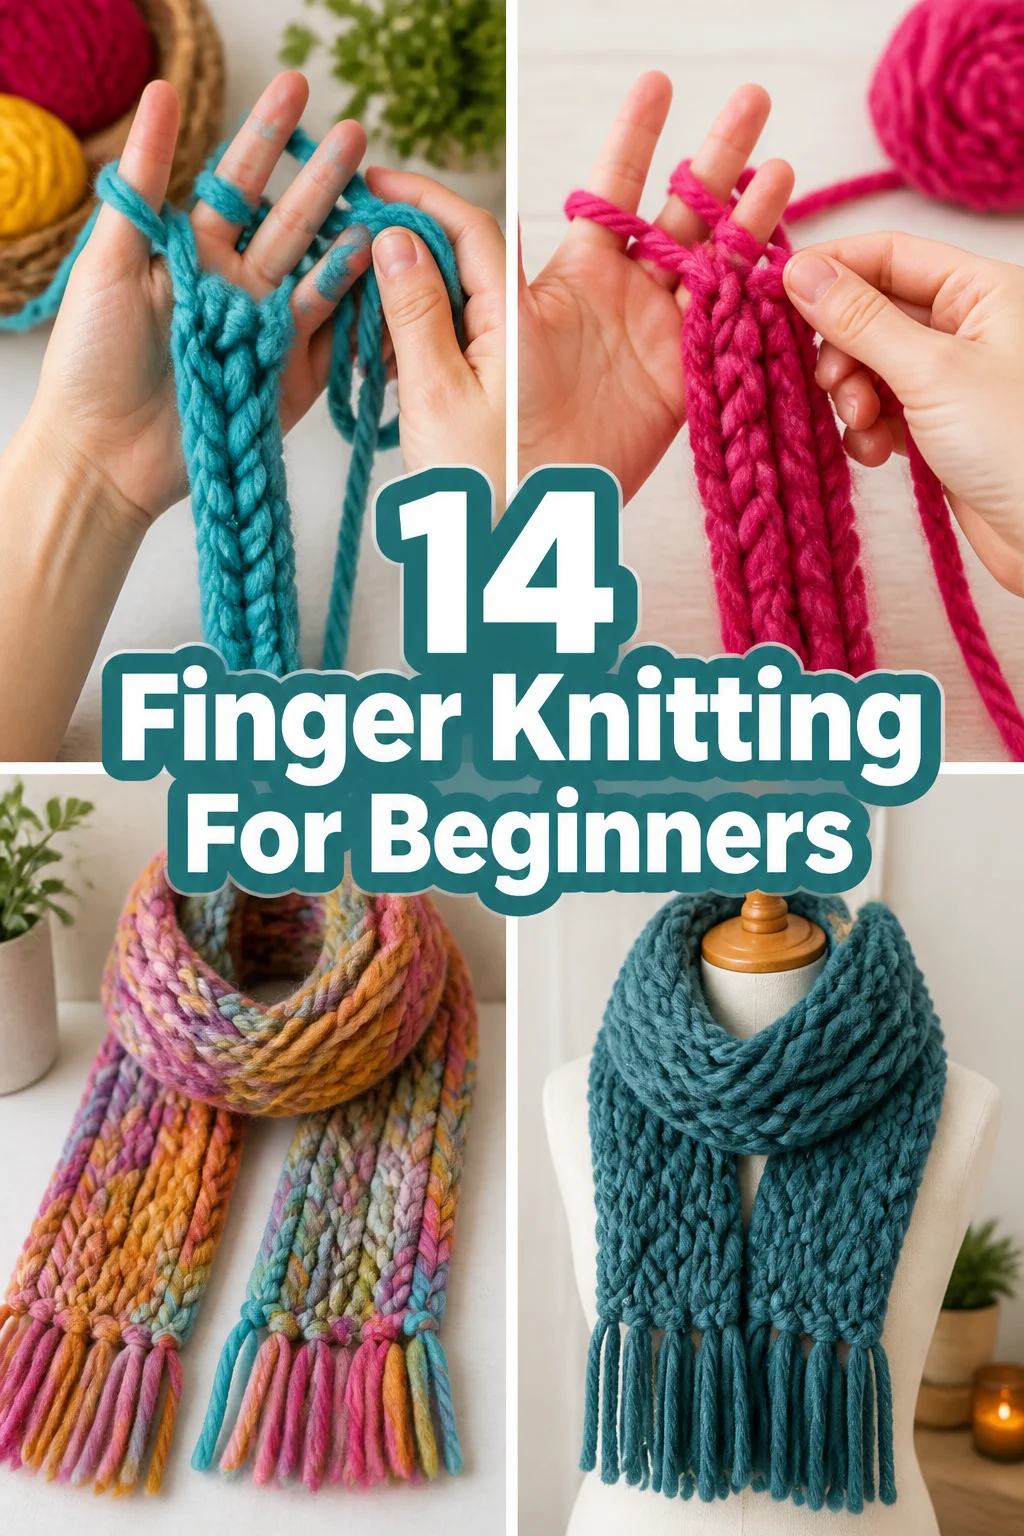
🧶 14 Finger Knitting For Beginners
🛠️ The Ultimate Maker's Toolkit
I've tested thousands of craft tools over the years. Whether you are quilting, crafting, or building mixed-media art, these are the top 5 absolute non-negotiable tools I personally recommend to guarantee professional results.
🪡 SINGER Heavy Duty 4452 Sewing Machine
The sewing community highly recommends this as the ultimate "bulletproof" entry-level machine. Its heavy metal frame powerfully pushes through thick denim and heavy quilt layers that would instantly jam a standard plastic machine.
✂️ Fiskars 8" Orange-Handled Scissors
Never settle for dull dollar-store blades. Wirecutter repeatedly names Fiskars the absolute best all-purpose craft scissor due to its legendary precision-ground blades and an ergonomic grip that prevents hand-cramping.
🔥 Gorilla Dual Temp Hot Glue Gun
Named Wirecutter's top choice because it literally does the work of two tools. It features dual-temperature settings offering low heat for delicate florals and blistering high heat for heavy wood adhesion repairs.
🖌️ Mod Podge Waterbase Gloss Sealer
The absolute undisputed champion of decoupage and paper crafts. Experts rely exclusively on this exact water-based formula because it glues, seals, and finishes beautifully without yellowing or flaking over time.
🎨 Apple Barrel Acrylic Paint (2 oz)
The quintessential, incredibly inexpensive craft paint. Woodworkers and hobby painters swear by its smooth flow and matte finish, providing massive value and remarkably thick color coverage on rough surfaces.
Okay, so you’ve seen those super chic, chunky knits all over your feed and thought, “Ugh, wish I could do that, but knitting needles scare me.” Plot twist: you totally can, and you don’t need any scary pointy sticks. We’re diving headfirst into the glorious world of finger knitting, where your hands are the only tools required. Seriously, if you can tie your shoes (mostly), you can do this. It’s ridiculously easy, super satisfying, and honestly, a little bit meditative. Get ready to impress yourself and maybe even your cat.
1. Your Hands Are the Needles
Forget the intimidating array of knitting needles. Your fingers are about to become the most versatile tools in your craft arsenal. This isn’t some ancient secret; it’s just pure, unadulterated simplicity. You’ll be looping yarn around your digits like a pro in no time.
Pro tip: Keep your hands relaxed. Tense fingers make for tight stitches and a sore wrist, which nobody wants when they’re trying to achieve peak cozy.
This works because it strips away all the fancy equipment, making the entry point super low-stress for anyone.
2. Yarn Selection Not All Fluff Is Equal
Choosing the right yarn is like picking the perfect snack for your crafting session. For beginners, go for something chunky or super bulky. It’s easier to see your stitches, and your projects will grow quickly, giving you that instant gratification hit.
Avoid super fuzzy or thin yarns initially; they’re the advanced level boss fights you don’t need right now. Think soft acrylics or wool blends that glide easily.
Pro tip: A lighter color yarn makes it much easier to spot your stitches and correct any rogue loops. Save the moody charcoal for when you’re a seasoned finger knitter.
Getting the right yarn sets you up for success, ensuring your first attempts are smooth and visible.
3. The Slip Knot Where It All Begins
Every great finger knitting journey starts with a simple slip knot. This isn’t rocket science, but it’s the foundation of everything you’re about to create. It’s literally just a loop that can be tightened or loosened. Think of it as your yarn’s starting pistol.
Make a loop, bring the working yarn through it, and pull. Boom, you’ve got a slip knot. Don’t pull it too tight, you’ll need a little wiggle room.
Pro tip: Practice making a few slip knots before you even think about knitting. Muscle memory is your friend here, making the actual knitting process smoother.
Mastering this first step builds confidence and ensures a solid start to your project.
4. Casting On Getting Those Loops Going
Casting on is how you get your initial stitches onto your fingers. For basic finger knitting, you’ll just loop the yarn around each finger (usually four, sometimes two or three depending on your project). It’s like giving each finger its own little yarn ring.
Wrap the yarn around your index finger, then middle, then ring, then pinky. Each finger should have a loop. Easy peasy.
Pro tip: Keep the tension consistent but not too tight. If your loops are strangling your fingers, you’ll struggle to move them in the next step.
This step establishes the width of your project and gets the yarn ready for actual stitch creation.
5. The Knit Stitch The Main Event
This is it, the big kahuna, the actual knitting part. You’ll have loops on your fingers. You’ll take the working yarn (the one coming from the ball) and lay it across the front of your fingers. Then, using each finger, you’ll lift the bottom loop up and over the new yarn and off your finger.
Repeat for each finger. That’s one row. You just knitted, my friend.
Pro tip: Always remember which way you’re looping. Consistency is key to an even fabric. If you’re right-handed, you’ll typically work from your pinky to your index finger.
This repetitive action is the core of finger knitting, transforming loose yarn into a cohesive fabric.
6. Creating a Chain Your First Fabric
Before you tackle a flat panel, try making a simple finger-knitted chain. This is essentially doing one stitch on one finger repeatedly. It’s fantastic for practice and makes super cool, chunky “ropes” that are great for necklaces, bracelets, or even pet toys.
Start with a slip knot, put it on one finger, then just keep looping the yarn and pulling the bottom loop over the top. Watch it grow!
Pro tip: Don’t be afraid to experiment with different finger counts. A two-finger chain makes a slightly flatter, wider rope than a single-finger one.
Chains are perfect for building confidence and understanding the basic stitch mechanics without the pressure of a larger project.
7. Making a Flat Panel Scarf Central
Once you’ve mastered the basic knit stitch on four fingers, you’re ready for a flat panel. This is how you make scarves, placemats, or even parts of a blanket. You just knit across your fingers, then turn your hand and knit back the other way.
It’s essentially knitting rows back and forth. Keep your tension even, and watch your fabric take shape. It’s incredibly satisfying.
Pro tip: If your edges are looking a bit wonky, try to be extra mindful of the tension on the first and last stitches of each row. They tend to be the culprits.
Flat panels demonstrate how simple stitches can build into practical and beautiful items.
8. Knitting in the Round Bracelets and Headbands
Want to make something tubular, like a chunky bracelet, a headband, or even a tiny hat for your coffee mug? You’ll knit in the round. Instead of turning your hand, you just keep knitting in the same direction, continuously looping around your fingers.
After you knit across your fingers, bring the yarn back to your starting finger and repeat the process. Your fabric will start to form a tube.
Pro tip: This is where a slightly looser tension helps. Trying to pull tight stitches around in a circle can be a real pain in the … well, in the fingers.
Knitting in the round opens up a whole new world of project possibilities, from accessories to home decor.
9. Changing Colors Level Up Your Swag
Ready to make your finger knitting projects pop? Adding a new color is super easy. When you’re about to start a new row (or just want to switch mid-row), simply drop the old yarn, pick up the new color, and tie the ends together with a simple knot. Then just keep knitting.
You can weave in the tails later or just trim them close if you’re feeling rebellious. It’s your art, after all.
Pro tip: When tying the knot to join new yarn, tie it close to your work but not so close that it pulls the fabric. A small, neat knot is your goal.
Introducing new colors allows for creative expression and adds visual interest to your hand-knitted pieces.
10. Fixing Mistakes Don’t Panic It’s Just Yarn
Mistakes happen. A loop drops, a stitch gets skipped. It’s not the end of the world, promise. Often, you can just gently trace back your stitches until you find the rogue loop and put it back on your finger. If it’s too far gone, sometimes it’s easier to unravel a few rows and restart.
Don’t be afraid to pull it out. Yarn is patient. It wants to be knitted correctly (eventually).
Pro tip: If you drop a loop, quickly grab it with your other hand or even a pencil to stop it from unraveling further. Prevention is better than a full unraveling party.
Understanding that mistakes are fixable reduces frustration and encourages continued practice.
11. Binding Off The Grand Finale
You’ve knitted your heart out, and now your project is the perfect length. Time to bind off, which secures all your loops so your masterpiece doesn’t unravel into a sad pile of yarn. You’ll essentially knit two stitches, then pass the first one over the second, leaving one stitch on your finger.
Repeat this process until you have one loop left. Cut the yarn, pull the tail through the last loop, and pull tight. Ta-da!
Pro tip: Don’t bind off too tightly. A loose bind-off makes for a much neater and more flexible edge, which is especially important for things like scarves.
Binding off is the crucial step that completes your project and gives it a professional, finished look.
12. Project Idea The Coziest Scarf Ever
This is often the first big project for finger knitters, and for good reason. Scarves are forgiving, don’t require precise shaping, and give you plenty of practice. Pick a super bulky yarn in your favorite color, and just keep knitting until it’s long enough to wrap around you three times.
Think maximum snuggle factor. You’ll be rocking your handmade accessory with pride.
Pro tip: If you want a wider scarf, try using all four fingers on both hands and knitting two separate panels, then joining them with a simple seam later. Double the width, double the warmth.
A scarf is a practical and satisfying first project that showcases your new finger knitting skills.
13. Project Idea Chunky Blanket Goals
Yes, you can finger knit a blanket! It’s going to be a commitment, but the results are absolutely stunning. You’ll need a lot of super bulky yarn, perhaps even giant roving. You’ll work in large flat panels (maybe even using your whole arm for really big stitches) and then seam them together.
Imagine snuggling under a blanket you made with your own two hands. Pure bliss.
Pro tip: For a truly oversized, chunky blanket, consider using arm knitting techniques instead of just fingers. It’s the same principle, just on a much larger scale, and goes surprisingly fast.
Tackling a blanket demonstrates the scalability of finger knitting and results in a truly impressive, cozy item.
14. Project Idea Cute Coasters or Trivets
Need a quick win or a handmade gift that doesn’t take forever? Finger knit some coasters or a trivet! Use a sturdy, chunky cotton or acrylic yarn. You can knit a small flat panel, bind off, and you’ve got a perfect little mat for your mug or hot dish.
They’re small, quick, and a great way to use up leftover yarn scraps. Plus, functional art!
Pro tip: For extra sturdiness and to prevent curling, you can finger knit two identical squares and then stitch them together. Double layer, double the protection.
Small projects like coasters are excellent for quick practice, using up stash yarn, and creating functional decor.
✨ New Member Etsy Shops (100% Unsponsored!)
We are incredibly proud of the talent in this community! 💖 We've rounded up some gorgeous new Etsy shops launched by our very own members.
There are ZERO affiliate links in this post—just 100% pure support for our makers. Click below to shop small, show them some love, and find your new favorite items! 👇🛍️


Conclusion
So there you have it, folks. Fourteen ways to dive headfirst into the wonderfully squishy world of finger knitting. Who knew your hands were capable of such crafty magic? Ditch the fear of needles, grab some fluffy yarn, and get ready to create something awesome. Your fingers are ready for their moment in the spotlight. Go forth and knit some cozy dreams into reality. You’ve got this!