🪵 15 Easy Small Wood Projects
🛠️ The Ultimate Maker's Toolkit
I've tested thousands of craft tools over the years. Whether you are quilting, crafting, or building mixed-media art, these are the top 5 absolute non-negotiable tools I personally recommend to guarantee professional results.
🪡 SINGER Heavy Duty 4452 Sewing Machine
The sewing community highly recommends this as the ultimate "bulletproof" entry-level machine. Its heavy metal frame powerfully pushes through thick denim and heavy quilt layers that would instantly jam a standard plastic machine.
✂️ Fiskars 8" Orange-Handled Scissors
Never settle for dull dollar-store blades. Wirecutter repeatedly names Fiskars the absolute best all-purpose craft scissor due to its legendary precision-ground blades and an ergonomic grip that prevents hand-cramping.
🔥 Gorilla Dual Temp Hot Glue Gun
Named Wirecutter's top choice because it literally does the work of two tools. It features dual-temperature settings offering low heat for delicate florals and blistering high heat for heavy wood adhesion repairs.
🖌️ Mod Podge Waterbase Gloss Sealer
The absolute undisputed champion of decoupage and paper crafts. Experts rely exclusively on this exact water-based formula because it glues, seals, and finishes beautifully without yellowing or flaking over time.
🎨 Apple Barrel Acrylic Paint (2 oz)
The quintessential, incredibly inexpensive craft paint. Woodworkers and hobby painters swear by its smooth flow and matte finish, providing massive value and remarkably thick color coverage on rough surfaces.
Stop scrolling through Pinterest and actually make something for once. You do not need a massive workshop or a flannel shirt collection to start these. Most of these projects require minimal tools and even less patience. Let us turn that scrap pile into something that does not look like a middle school shop class disaster.
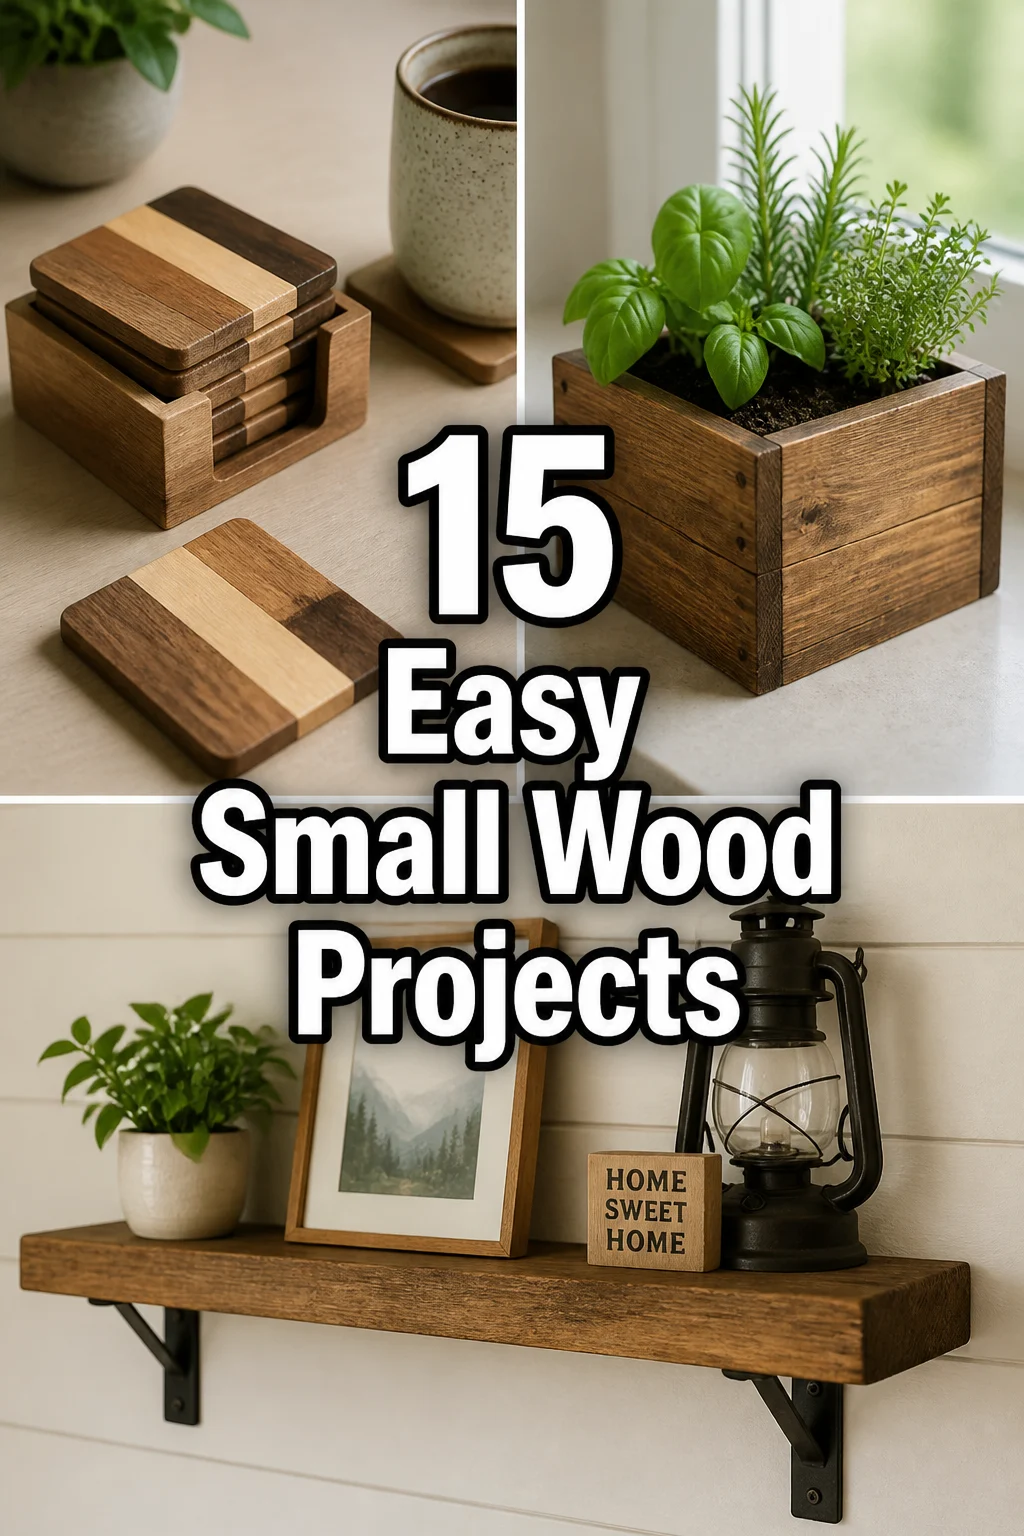
1. Modern Coaster Set
Protect your coffee table from those annoying condensation rings without looking like your grandmother. These are essentially just squares of wood, so even you can handle this. Sand them down until they feel like butter and apply a matte finish for that boutique look.
- Use hardwood offcuts like walnut or oak for durability.
- Keep the dimensions around four inches square.
- Apply a clear coat to show off the natural grain.
Glue some cork backing to the bottom to prevent your coasters from sliding across the room. This project works because it takes twenty minutes but looks like you spent forty dollars at a local craft fair.
2. Minimalist Jewelry Stand
Stop detangling your necklaces every single morning like you are solving a tiny, frustrating puzzle. A simple base and a vertical dowel do the trick here. It is a functional sculpture for your dresser that keeps your gold chains from becoming a ball of chaos.
- Drill a hole in a heavy wood block for the main post.
- Add a horizontal crossbar for hanging earrings or bracelets.
- Sand the edges to a soft round for a high-end feel.
Paint the tips of the wood with metallic gold acrylic for a trendy dip-dyed effect. It turns a basic organizational tool into a legitimate piece of decor.
3. Rustic Serving Tray
Breakfast in bed just got a massive upgrade. You are basically just putting handles on a nice-looking plank of wood. It is the easiest way to impress guests when you serve cheese and crackers later.
- Select a wide board with an interesting grain pattern.
- Attach two matte black metal handles from the hardware store.
- Sand everything thoroughly to avoid splinters in your snacks.
Rub the wood down with food-safe mineral oil if you plan on putting appetizers directly on the surface. It makes the wood pop and keeps things hygienic for your hungry friends.
4. Desktop Phone Stand
Your neck will thank you for this one during your next endless video call. Cut a simple notch into a thick block of wood at a slight angle. It is way more stable than propping your expensive phone against a half-empty coffee mug.
- Measure your phone thickness before you start cutting.
- Angle the cut at about fifteen degrees for the best viewing.
- Heavy wood like maple or cherry keeps the stand from tipping over.
Cut the notch slightly wider than your phone to accommodate thick protective cases. This project is the ultimate desk upgrade for the remote worker who has everything.
5. Floating Corner Shelf
Utilize that weird corner space you usually ignore. Cut a triangle of wood and mount it with simple cleats or hidden brackets. It is the perfect home for a tiny succulent or that book you keep promising to read.
- Use a miter saw to get those forty-five-degree angles perfect.
- Paint it the same color as the wall for a built-in look.
- Keep the size small to avoid putting too much stress on the wall.
Always use sturdy wall anchors so your shelf does not take a dive in the middle of the night. It provides instant storage without eating up any of your precious floor space.
6. Magnetic Key Holder
Stop losing your keys in the couch cushions like a disorganized teenager. Drill small holes into the back of a wood strip and glue in strong magnets. Mount it by the door and watch your keys “stick” to the wood like magic.
- Use a Forstner bit to create clean, flat-bottomed holes.
- Space the magnets out so your keychains do not get tangled.
- Finish the wood with a dark stain for a sophisticated vibe.
Ensure you use neodymium magnets because they have a death grip on heavy keyrings. It is a sleek solution that eliminates the need for those ugly plastic hooks.
7. Wooden Plant Stand
Give your leafy friends a literal pedestal to sit on. Create a simple X-frame base that fits your favorite ceramic pot. It elevates the plant and makes your living room look like you actually have your life together.
- Use square dowels for a clean, mid-century modern aesthetic.
- Cross-lap the middle joint for maximum stability.
- Match the wood stain to your existing furniture for a cohesive look.
Apply a water-resistant sealer to protect the wood from accidental spills during watering. Your monstera will appreciate the view from a few inches higher.
8. Simple Bathtub Caddy
Turn your bathroom into a spa without the expensive membership fee. Measure the width of your tub and cut a board to fit perfectly across the edges. It is a game-changer for anyone who likes to soak for an hour.
- Add small wood blocks underneath to keep the board from sliding into the water.
- Sand the edges until they are perfectly smooth to the touch.
- Use a wide enough board to hold a book and a candle.
Seal the entire thing with waterproof polyurethane to prevent mold and warping from the steam. Now you have a dedicated spot for your wine glass while you ignore your responsibilities.
9. Wall-Mounted Bottle Opener
This is the ultimate party trick for your kitchen or patio. Screw a cast-iron opener to a finished board and mount it to the wall. Add a small box at the bottom to catch the caps so you do not trip on them later.
- Use a vintage-style iron opener for extra character.
- Mount it at eye level for easy access during parties.
- Personalize the wood with a wood-burning tool or paint.
Use hidden keyhole slots on the back for a clean mounting look that hides the screws. No more hunting through the junk drawer for an opener while your beer gets warm.
10. Geometric Bookends
Keep your books upright and your shelves looking sharp. Cut two heavy blocks into interesting, irregular angles. It is a great way to use up those chunky scraps you were going to throw away.
- Heavier woods like oak or walnut work best to support weight.
- Contrast the wood grain by sanding different facets to different grits.
- Leave the wood natural to emphasize the geometric shapes.
Add rubber feet to the bottom to keep the bookends from sliding on slippery shelves. Even your cheap paperbacks look like high art when they are framed by these.
11. Herb Garden Marker Set
Finally remember which green sprout is parsley and which is cilantro. Small, thin strips of wood work best for these garden stakes. They look much better than those plastic tags that come from the nursery.
- Use a permanent marker or a wood-burning tool for the names.
- Whittle the bottom into a point so they slide into the soil easily.
- Keep them uniform in size for a tidy garden look.
Dip the bottom half of the stakes in melted beeswax to prevent the wood from rotting in the damp soil. Your garden now looks organized and professional enough for a magazine shoot.
12. Minimalist Picture Ledge
Swap out your art without making fifty new holes in your wall. Create a shallow U-shaped shelf that holds frames leaning against the wall. It is the gallery wall solution for people with commitment issues.
- Keep the front lip high enough to prevent frames from sliding off.
- Mount it directly into studs for the best support.
- Paint it the same color as your trim for a seamless look.
Use pre-drilled pilot holes to prevent the thin wood from splitting during installation. It allows you to change your decor whenever the mood strikes without a hammer.
13. Wooden Candle Holders
Set the mood without the risk of a house fire. Use a wide drill bit to create perfect holes for tea lights in chunky square blocks. They look great in clusters of three at different heights.
- Use a Forstner bit to get a perfectly flat bottom in the hole.
- Sand the blocks until they are silky smooth.
- Group different wood species together for a mixed-material look.
Never leave burning candles unattended, even when they are sitting in your beautiful new wood holders. They provide instant ambiance for your next dinner party or solo pizza night.
14. Desk Organizer Tray
Tame the chaos of pens, paperclips, and loose change. A low-profile box with a few internal dividers does wonders for your productivity. It keeps your workspace from looking like a total disaster zone.
- Use thin plywood for the dividers to save space.
- Sand the top edges of the dividers so they are flush with the frame.
- Finish with a light oil to keep the wood looking fresh.
Line the bottom of the compartments with adhesive felt for a touch of luxury and to protect your items. A clean desk leads to a clear mind, or at least a desk that looks like you have one.
15. Blanket Ladder
Display your cozy throws instead of stuffing them into a crowded basket. Two long side rails and a few rungs are all you need for this project. Lean it against the wall for an instant rustic vibe in your living room.
- Angle the bottom feet so the ladder sits flush against the floor.
- Space the rungs about twelve inches apart.
- Ensure the rungs are smooth so they do not snag your blankets.
Secure the top to the wall with a small strap if you have pets or kids who might try to climb it. It is functional decor that takes up zero shelf space and looks incredibly trendy.
✨ New Member Etsy Shops (100% Unsponsored!)
We are incredibly proud of the talent in this community! 💖 We've rounded up some gorgeous new Etsy shops launched by our very own members.
There are ZERO affiliate links in this post—just 100% pure support for our makers. Click below to shop small, show them some love, and find your new favorite items! 👇🛍️


Conclusion
You now have zero excuses to leave that wood pile alone in the garage. Pick a project, grab a saw, and try not to lose any fingers in the process. Making things is significantly more satisfying than buying them from a big-box store. Go build something cool and brag about it to your friends.