🧶 12 Crochet Borders For Blankets
& CRAFT IDEAS
Beginner-friendly tutorials, creative projects,
and weekly inspiration in your inbox.
🛠️ The Ultimate Maker's Toolkit
I've tested thousands of craft tools over the years. Whether you are quilting, crafting, or building mixed-media art, these are the top 5 absolute non-negotiable tools I personally recommend to guarantee professional results.
🪡 SINGER Heavy Duty 4452 Sewing Machine
The sewing community highly recommends this as the ultimate "bulletproof" entry-level machine. Its heavy metal frame powerfully pushes through thick denim and heavy quilt layers that would instantly jam a standard plastic machine.
✂️ Fiskars 8" Orange-Handled Scissors
Never settle for dull dollar-store blades. Wirecutter repeatedly names Fiskars the absolute best all-purpose craft scissor due to its legendary precision-ground blades and an ergonomic grip that prevents hand-cramping.
🔥 Gorilla Dual Temp Hot Glue Gun
Named Wirecutter's top choice because it literally does the work of two tools. It features dual-temperature settings offering low heat for delicate florals and blistering high heat for heavy wood adhesion repairs.
🖌️ Mod Podge Waterbase Gloss Sealer
The absolute undisputed champion of decoupage and paper crafts. Experts rely exclusively on this exact water-based formula because it glues, seals, and finishes beautifully without yellowing or flaking over time.
🎨 Apple Barrel Acrylic Paint (2 oz)
The quintessential, incredibly inexpensive craft paint. Woodworkers and hobby painters swear by its smooth flow and matte finish, providing massive value and remarkably thick color coverage on rough surfaces.
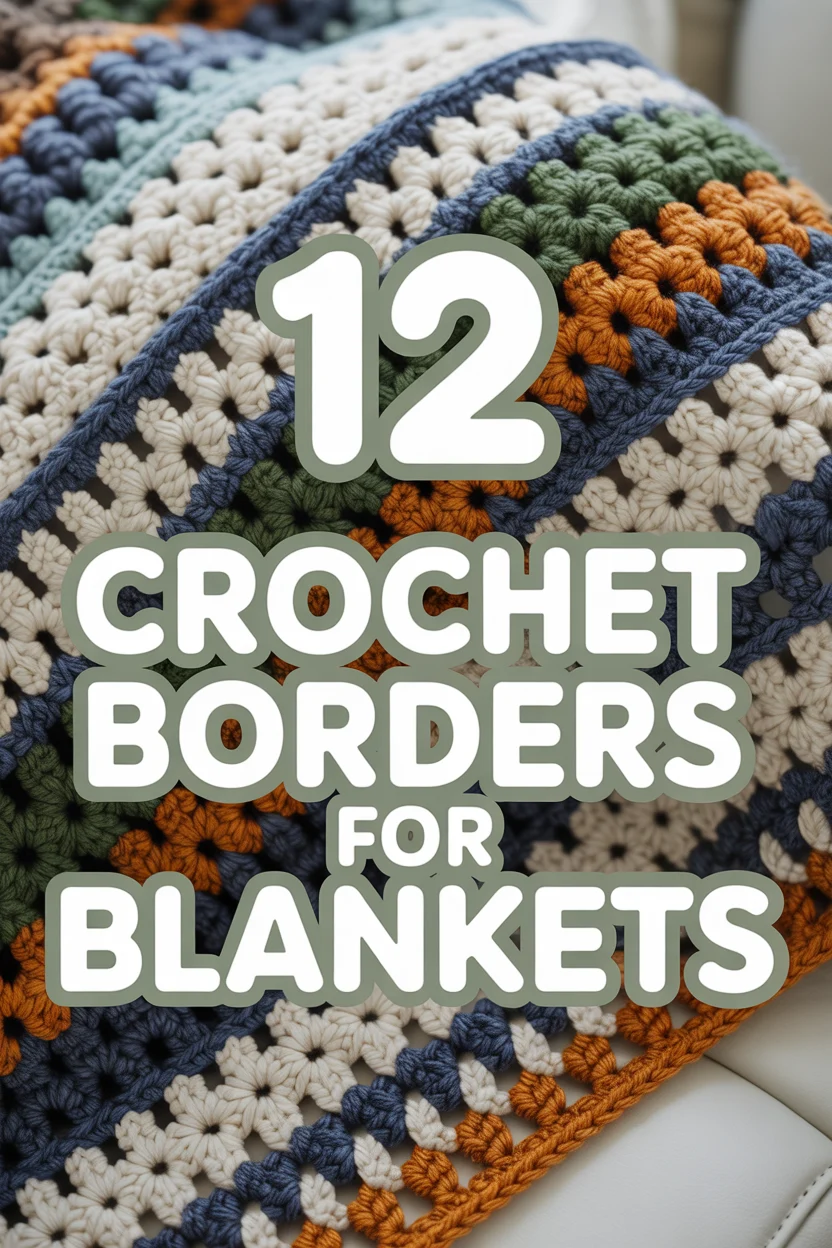
Alright bestie, finished that epic blanket project? Awesome. But hold up, you’re not really done until you’ve slapped a fabulous border on it. Think of it as the cherry on top, the mic drop, the… well, you get it. A plain edge is just begging for a glow-up, and we’re here to deliver. Let’s talk about turning those raw edges into pure perfection.
1. Single Crochet Border
The OG, the MVP, the ‘I just want a clean finish’ border. This border creates a neat, sturdy edge that lets your main blanket design truly shine. It’s also a total lifesaver for squaring up edges that might be a tad bit wonky.
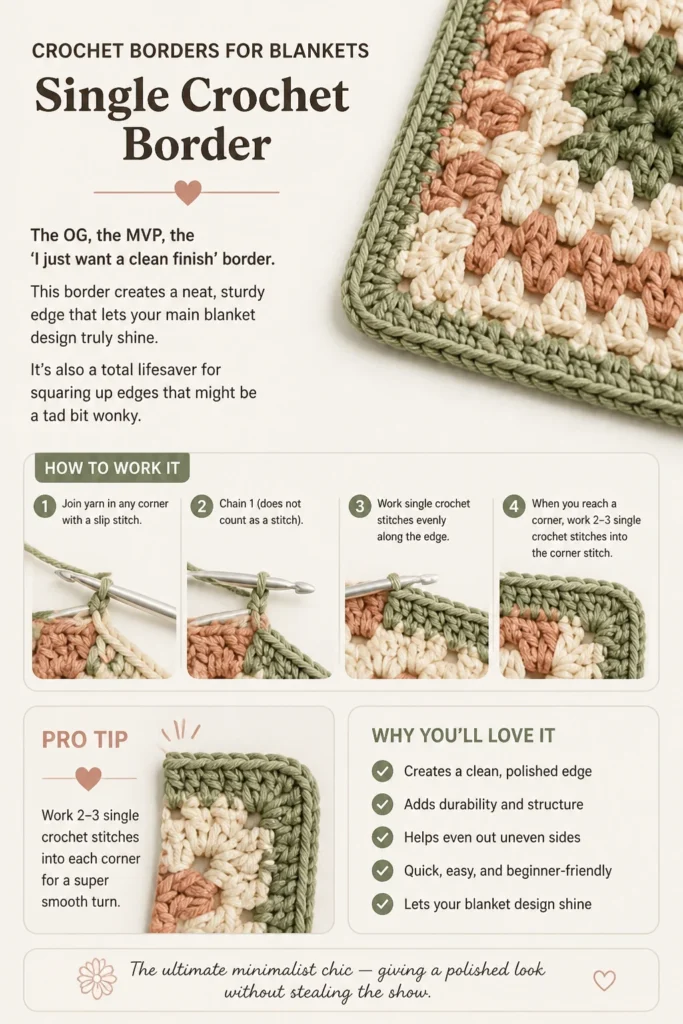
Pro tip: Work 2-3 single crochet stitches into each corner for a super smooth turn. It’s the ultimate minimalist chic, giving a polished look without stealing the show.
2. Reverse Single Crochet (Crab Stitch) Border
Feeling fancy? This one’s got your back (literally, you work backward). It creates a unique, rope-like texture that makes people go “ooh, how did you do that?” It adds a substantial, finished look that’s surprisingly simple once you get the hang of working left-to-right (if you’re right-handed).
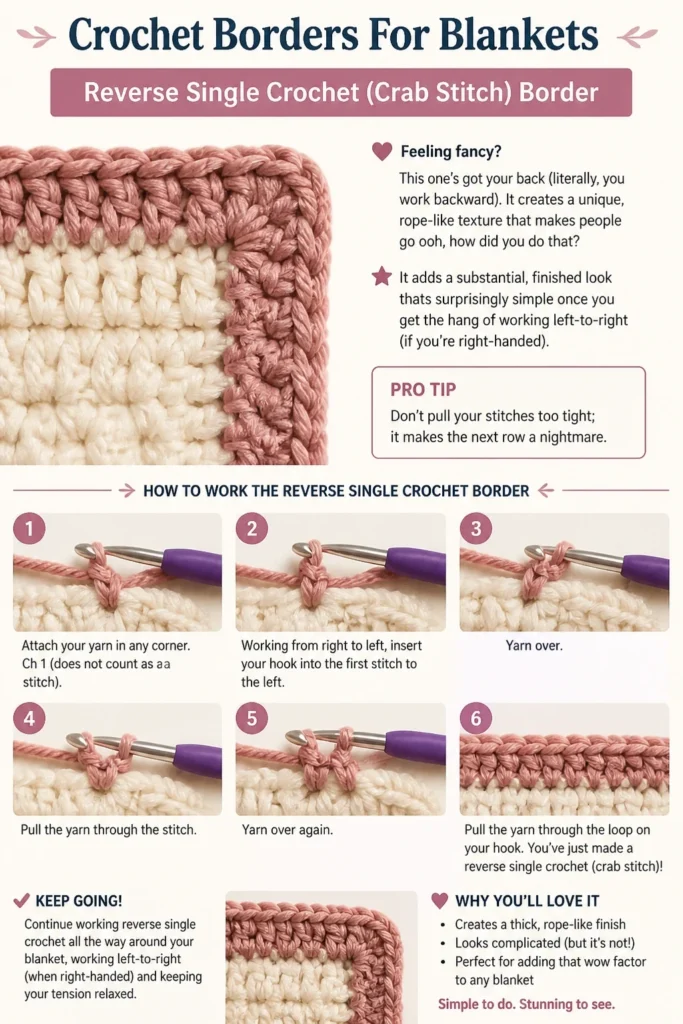
Pro tip: Don’t pull your stitches too tight; it makes the next row a nightmare. This border is unique and looks way more complicated than it actually is, which is always a win.
3. Shell Stitch Border
For when your blanket demands a touch of classic elegance. A timeless favorite, this border forms beautiful little scallop-like shells along the edge. You typically work multiple double crochets into one stitch, skip a few, then repeat, adding a lovely, decorative flair.
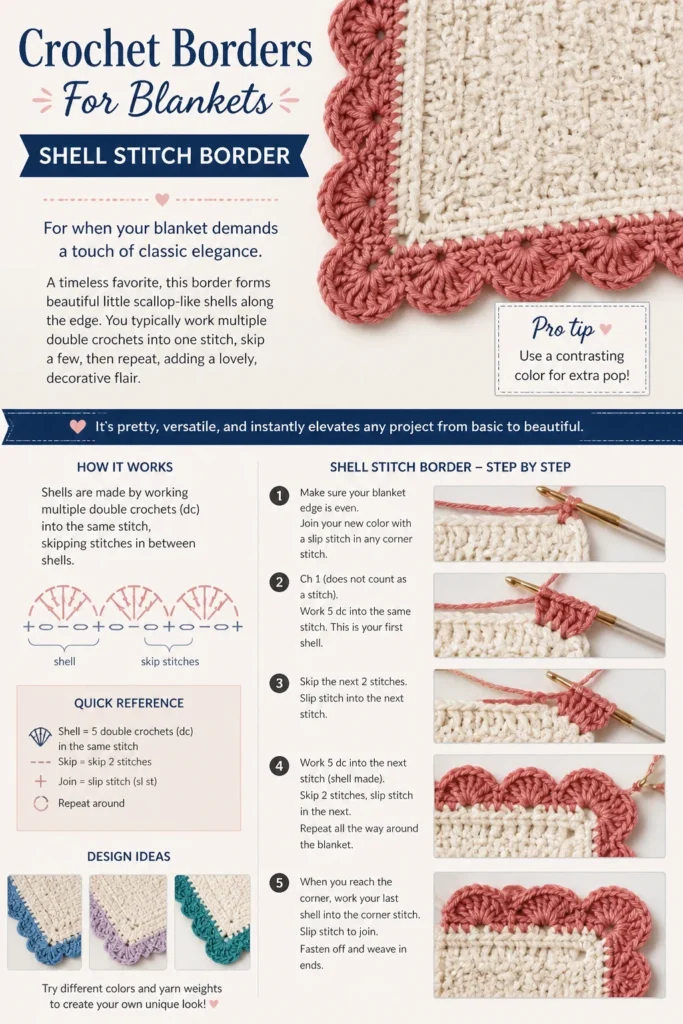
Pro tip: Use a contrasting color for extra pop! It’s pretty, versatile, and instantly elevates any project from basic to beautiful.
4. Picot Border
Delicate, dainty, and just a little bit whimsical. These tiny bobbles or ‘points’ are formed by slip stitching back into a chain, creating a sweet, lacy edge. It’s perfect for baby blankets or anything needing a soft, intricate touch.
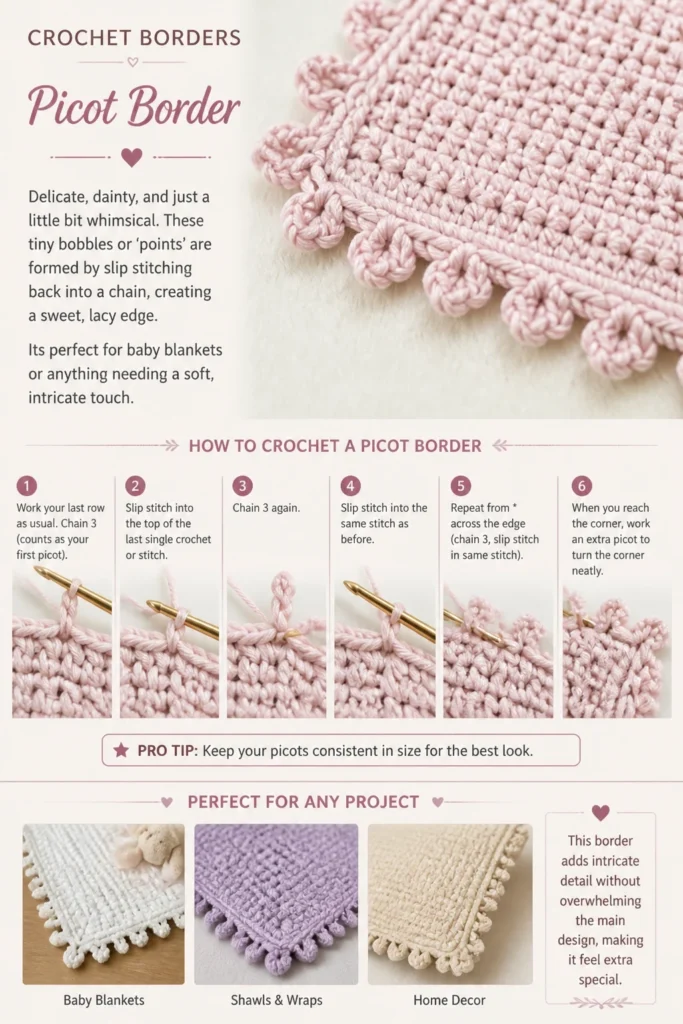
Pro tip: Keep your picots consistent in size for the best look. This border adds intricate detail without overwhelming the main design, making it feel extra special.
5. Granny Stripe Border
Got a granny square blanket? This border is its soulmate. It mimics the classic granny square pattern, using clusters of double crochets, and is fantastic for adding extra color and tying together a multi-colored project. Hello, super cozy vibes!
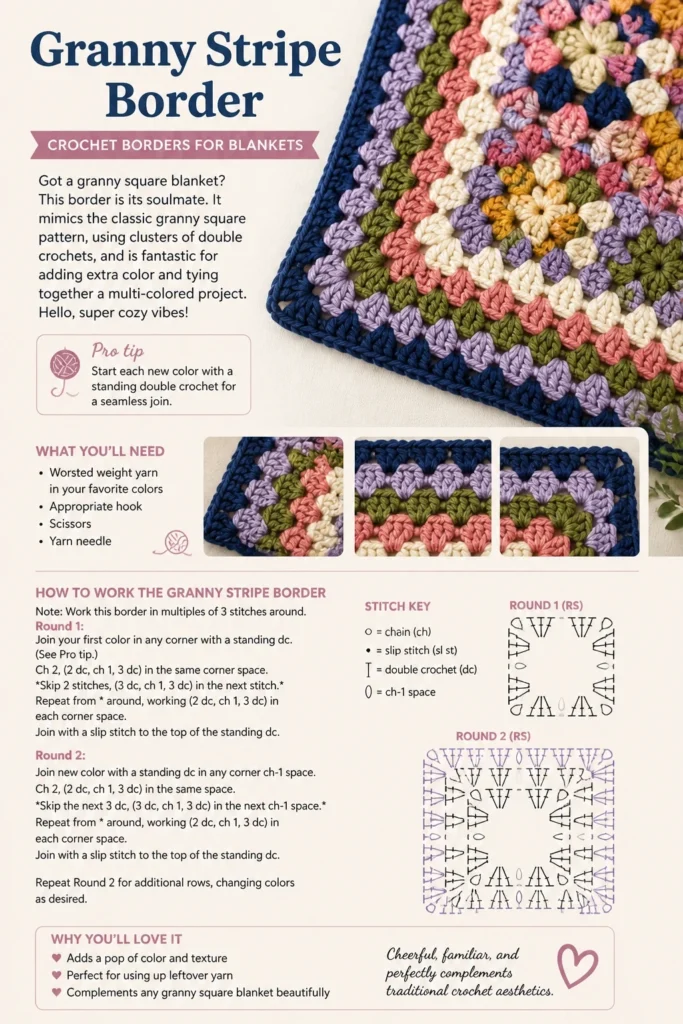
Pro tip: Start each new color with a standing double crochet for a seamless join. It’s cheerful, familiar, and perfectly complements traditional crochet aesthetics.
6. Scallop Border
Waves of charm for your cozy creation. This border is a slightly larger, more pronounced version of a shell border, creating gentle, rounded curves. It adds a soft, undulating finish that’s just adorable, like beach house chic but for your blanket.
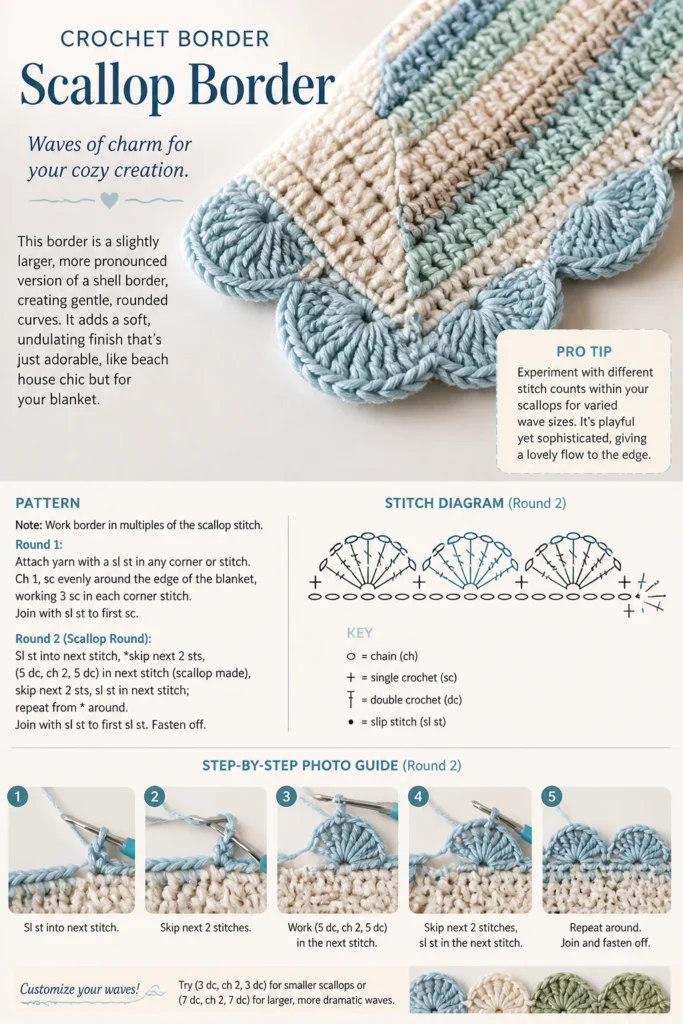
Pro tip: Experiment with different stitch counts within your scallops for varied wave sizes. It’s playful yet sophisticated, giving a lovely flow to the edge.
7. Bobble Stitch Border
When you want texture that practically screams ‘hug me!’ These little three-dimensional bumps are made by working several partial double crochets into one stitch and then closing them all together. They add significant texture and a fun, tactile element that’s impossible to resist.
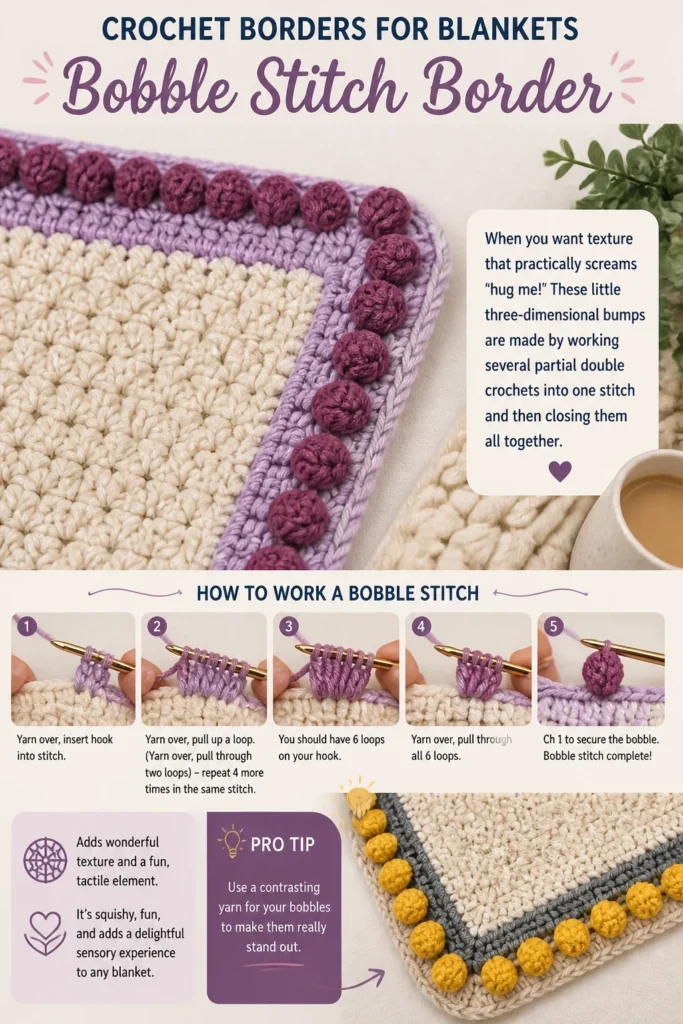
Pro tip: Use a contrasting yarn for your bobbles to make them really stand out. It’s squishy, fun, and adds a delightful sensory experience to any blanket.
8. Puff Stitch Border
Bobble’s slightly softer, squishier cousin enters the chat. Similar to bobbles but often worked with half-double or double crochets, these are a bit less defined and more ‘puffy.’ They create a plush, cloud-like edge that’s incredibly inviting and feels luxurious.
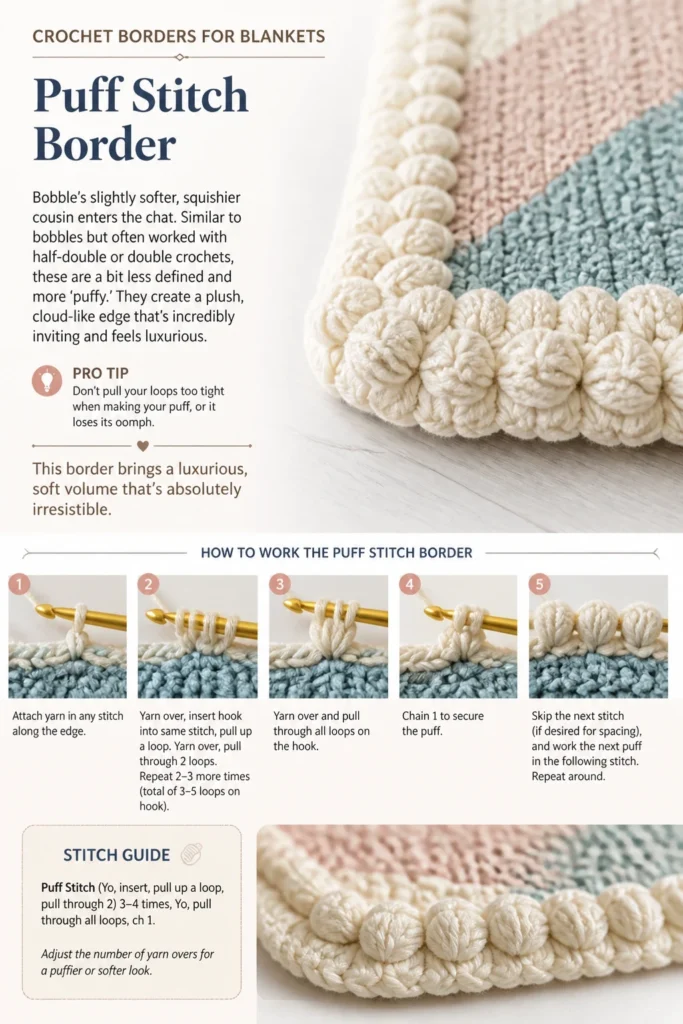
Pro tip: Don’t pull your loops too tight when making your puff, or it loses its oomph. This border brings a luxurious, soft volume that’s absolutely irresistible.
9. Ruffle Border
Drama, darling, but the good kind. This border adds a playful, gathered edge that can be subtle or super voluminous, depending on your stitch count. It’s fantastic for baby blankets or anything needing a touch of whimsical flair and extra personality.
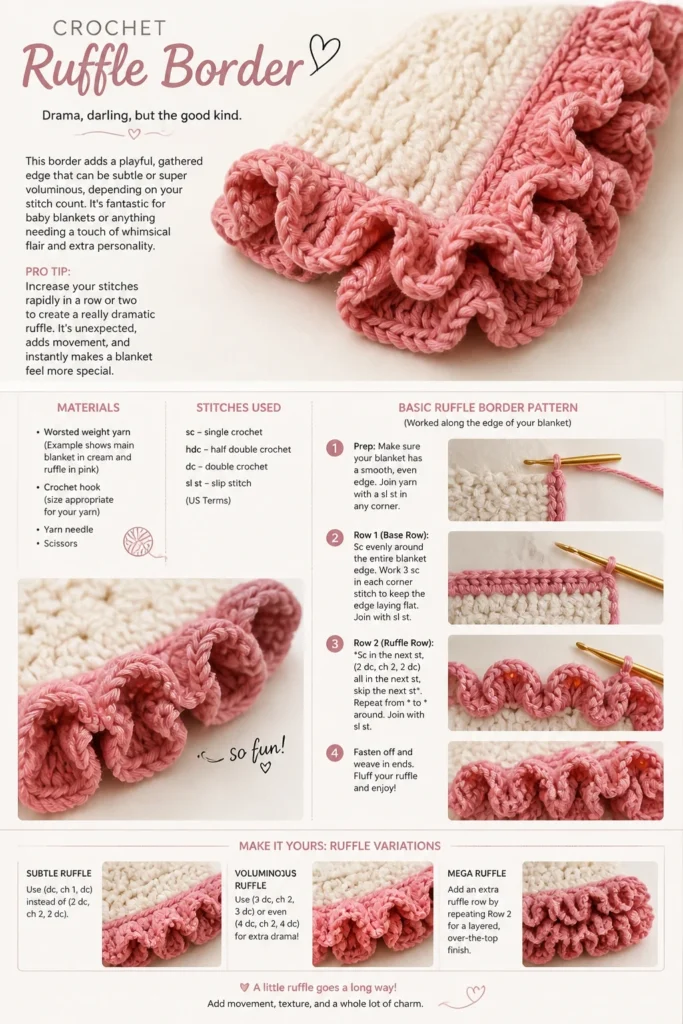
Pro tip: Increase your stitches rapidly in a row or two to create a really dramatic ruffle. It’s unexpected, adds movement, and instantly makes a blanket feel more special.
10. Spike Stitch Border
Modern lines meets serious style. You work a single crochet (or other stitch) into a row below the current working row, creating a longer, ‘spiked’ stitch. This forms cool, graphic lines that are totally on-trend and give a sleek finish.
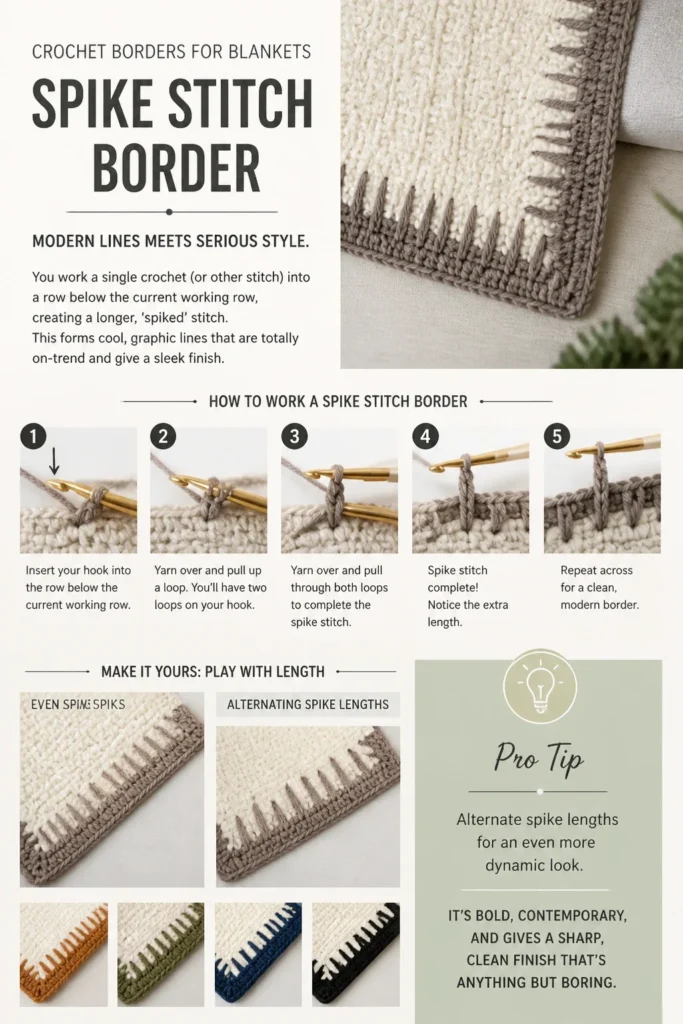
Pro tip: Alternate spike lengths for an even more dynamic look. It’s bold, contemporary, and gives a sharp, clean finish that’s anything but boring.
11. Block Stitch Border
Color block your way to a statement edge. This border uses alternating blocks of color, often created with groups of double crochets and single crochets. It’s perfect for using up scraps and adding a vibrant, graphic punch to your project.
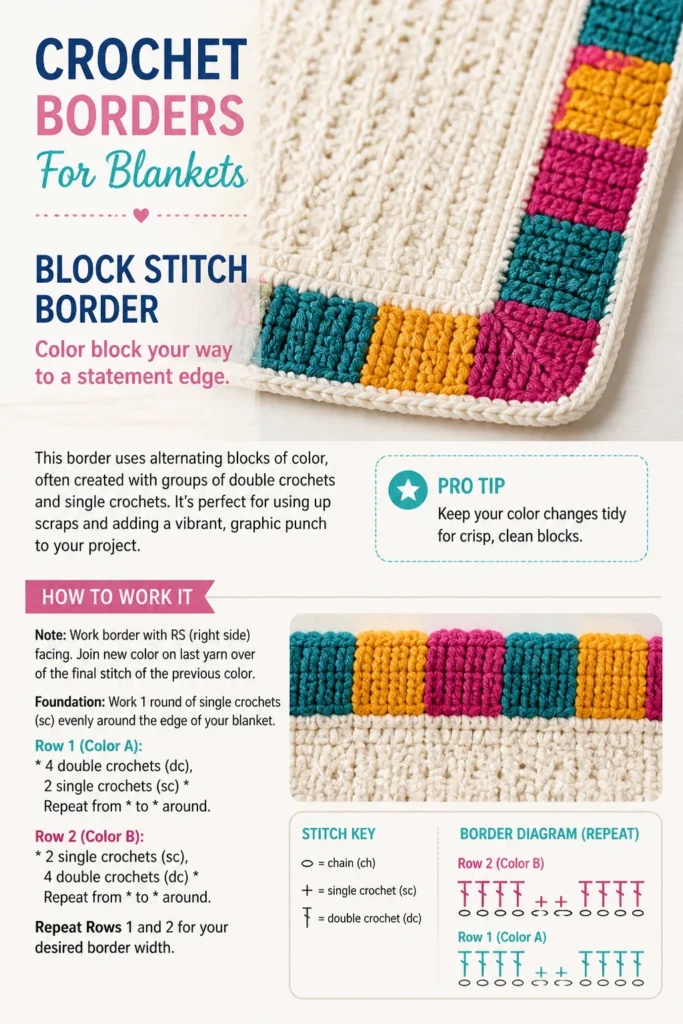
Pro tip: Keep your color changes tidy for crisp, clean blocks. It’s visually striking and a fantastic way to introduce new colors or pull existing ones together beautifully.
12. Fan Stitch Border
When you want elegance with a little extra ‘oomph’ beyond the basic shell. Fan stitches are essentially larger, more elaborate shell stitches, often with more stitches or even multiple rows. They create a beautiful, fanned-out effect that’s truly eye-catching and luxurious.
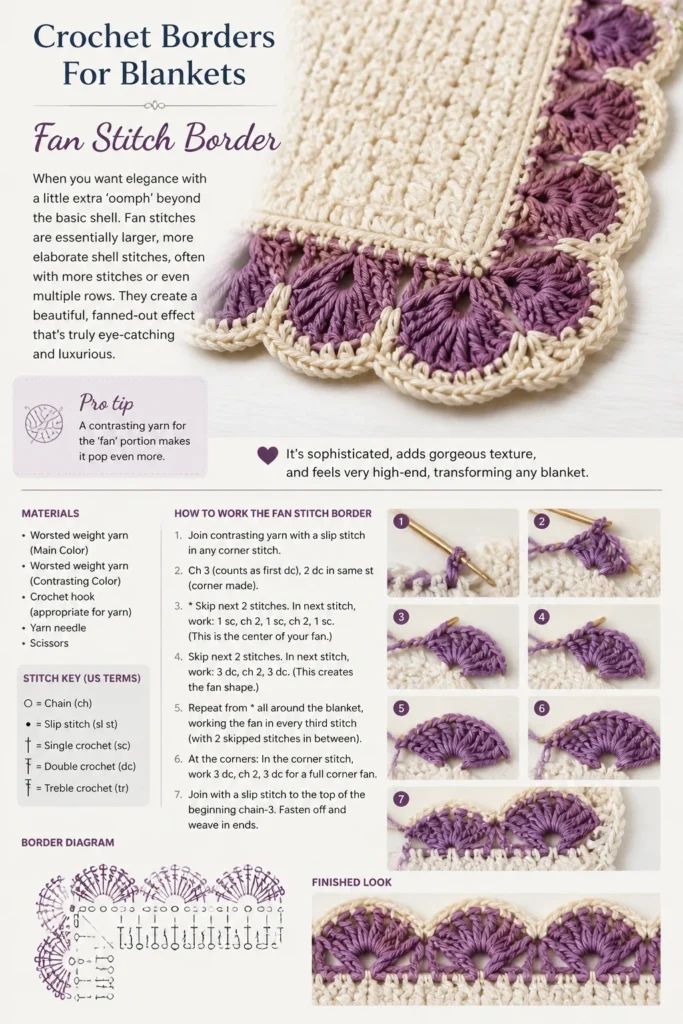
Pro tip: A contrasting yarn for the ‘fan’ portion makes it pop even more. It’s sophisticated, adds gorgeous texture, and feels very high-end, transforming any blanket.
Conclusion
So there you have it, twelve ways to take your blanket from ‘meh’ to ‘marvelous’. Seriously, don’t skip the border. It’s like leaving the house without your favorite accessories – just unfinished, you know? Go forth, grab that hook, and give your blanket the fabulous finish it deserves. Your hands (and your couch) will thank you!
& CRAFT IDEAS
Beginner-friendly tutorials, creative projects,
and weekly inspiration in your inbox.