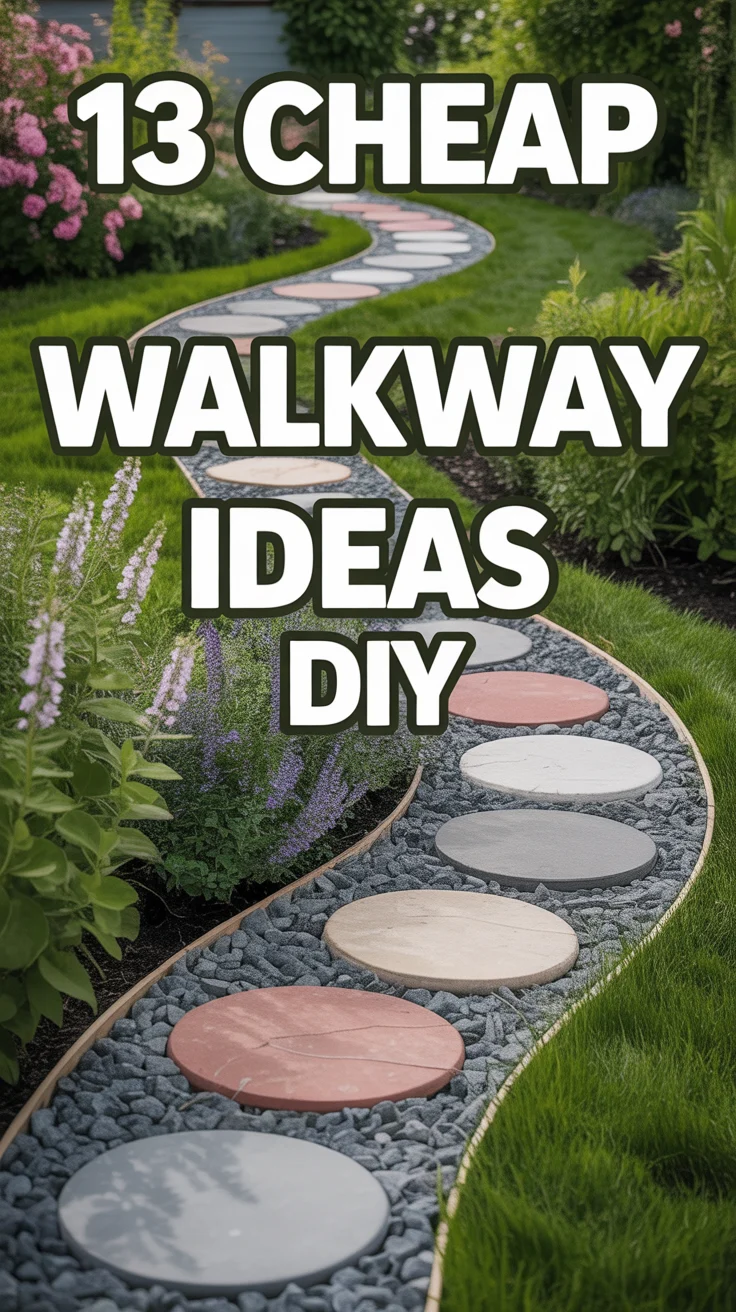
🚶♀️ 13 Cheap Walkway Ideas DIY
🛠️ The Ultimate Maker's Toolkit
I've tested thousands of craft tools over the years. Whether you are quilting, crafting, or building mixed-media art, these are the top 5 absolute non-negotiable tools I personally recommend to guarantee professional results.
🪡 SINGER Heavy Duty 4452 Sewing Machine
The sewing community highly recommends this as the ultimate "bulletproof" entry-level machine. Its heavy metal frame powerfully pushes through thick denim and heavy quilt layers that would instantly jam a standard plastic machine.
✂️ Fiskars 8" Orange-Handled Scissors
Never settle for dull dollar-store blades. Wirecutter repeatedly names Fiskars the absolute best all-purpose craft scissor due to its legendary precision-ground blades and an ergonomic grip that prevents hand-cramping.
🔥 Gorilla Dual Temp Hot Glue Gun
Named Wirecutter's top choice because it literally does the work of two tools. It features dual-temperature settings offering low heat for delicate florals and blistering high heat for heavy wood adhesion repairs.
🖌️ Mod Podge Waterbase Gloss Sealer
The absolute undisputed champion of decoupage and paper crafts. Experts rely exclusively on this exact water-based formula because it glues, seals, and finishes beautifully without yellowing or flaking over time.
🎨 Apple Barrel Acrylic Paint (2 oz)
The quintessential, incredibly inexpensive craft paint. Woodworkers and hobby painters swear by its smooth flow and matte finish, providing massive value and remarkably thick color coverage on rough surfaces.
Alright, let’s be real. Your backyard is begging for a glow-up, but your wallet is currently giving you the side-eye. You dream of a charming path leading to your secret garden (or, let’s be honest, your trusty grill), but fancy pavers cost more than your last vacation. Fear not, my budget-savvy friend! We’re diving headfirst into some seriously clever, seriously cheap, and seriously DIY walkway ideas that’ll make your neighbors think you hired a landscape architect. Except, you didn’t. You’re just that good.
1. Gravel Path
Who knew tiny rocks could look so chic? A gravel path is the OG of cheap walkways. It’s super easy to install, drains like a dream, and gives off major cottage core vibes without the cottage core price tag.

Just dig out your path a bit, lay down some landscape fabric to thwart those pesky weeds, and dump your gravel. Pro tip: Opt for crushed gravel or pea gravel; they settle better and are comfier underfoot than sharp, angular stuff. It’s the low-maintenance superstar your yard deserves.
2. Wood Slice Walkway
Talk about rustic charm! If you’ve got access to a fallen tree or a friend with a chainsaw and a penchant for tree-felling, you’re halfway there. Slice up those logs into thick rounds and arrange them like a natural mosaic.
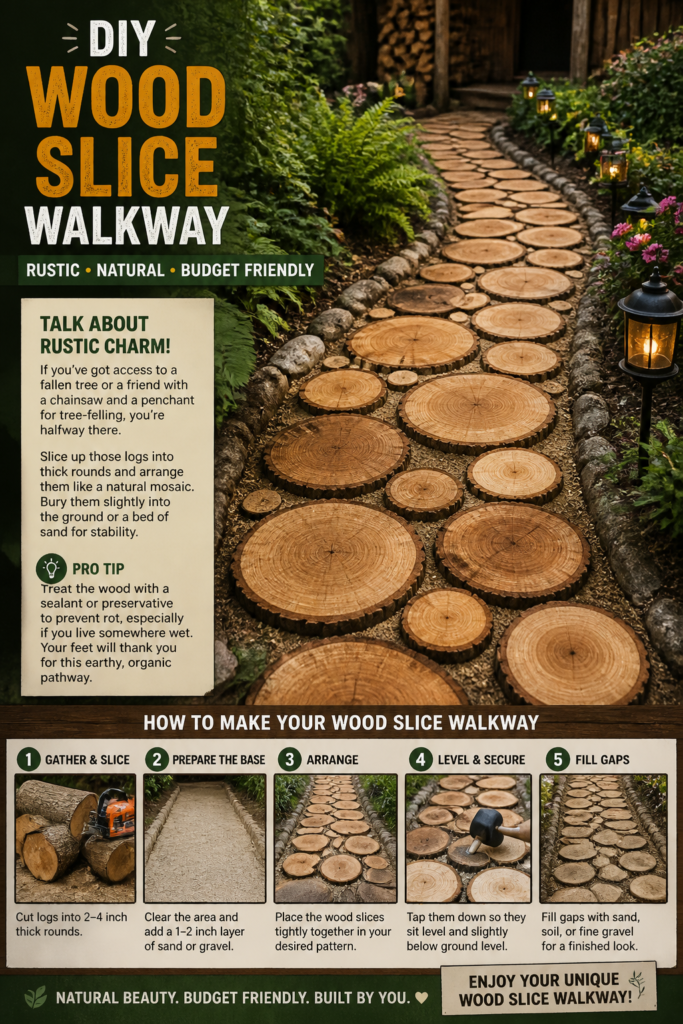
Bury them slightly into the ground or a bed of sand for stability. Pro tip: Treat the wood with a sealant or preservative to prevent rot, especially if you live somewhere wet. Your feet will thank you for this earthy, organic pathway.
3. Pallet Path
Pallets: the unsung heroes of DIY. Grab some free or cheap pallets (check local businesses or construction sites), dismantle them, and use the planks to create a rustic boardwalk.
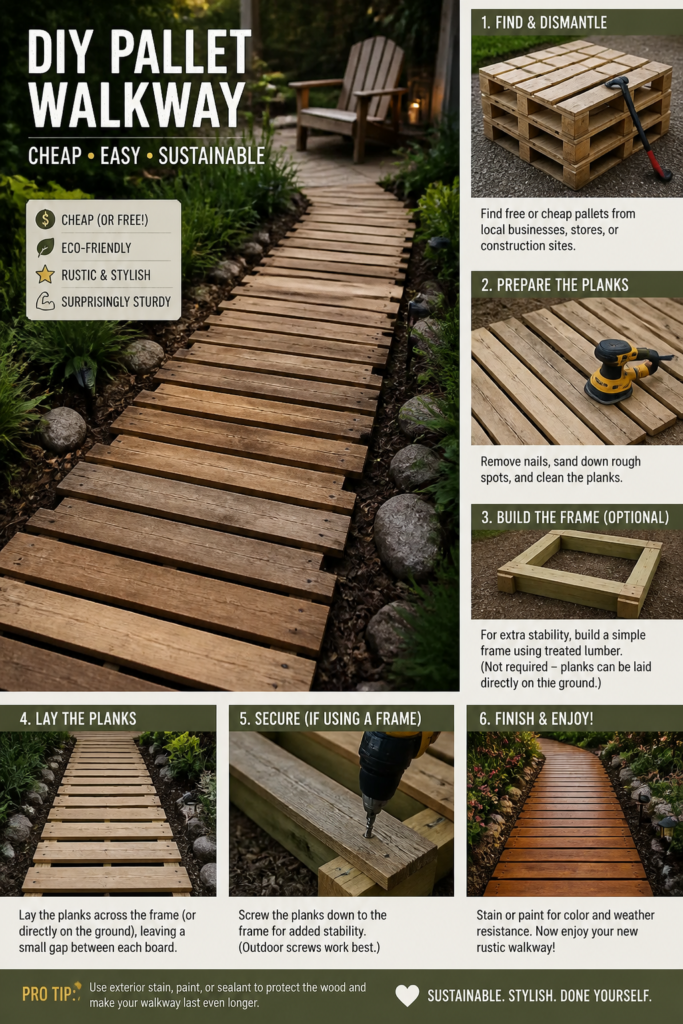
Lay the planks directly on the ground, or for extra stability, on a simple frame. Pro tip: Sand down any rough spots and consider a stain or paint for a pop of color or added weather resistance. It’s sustainable, stylish, and surprisingly sturdy.
4. DIY Concrete Stepping Stones
Feeling crafty? You can make your own stepping stones with a bag of concrete mix and some molds. Think old plastic containers, cake pans, or even leaves for imprints.
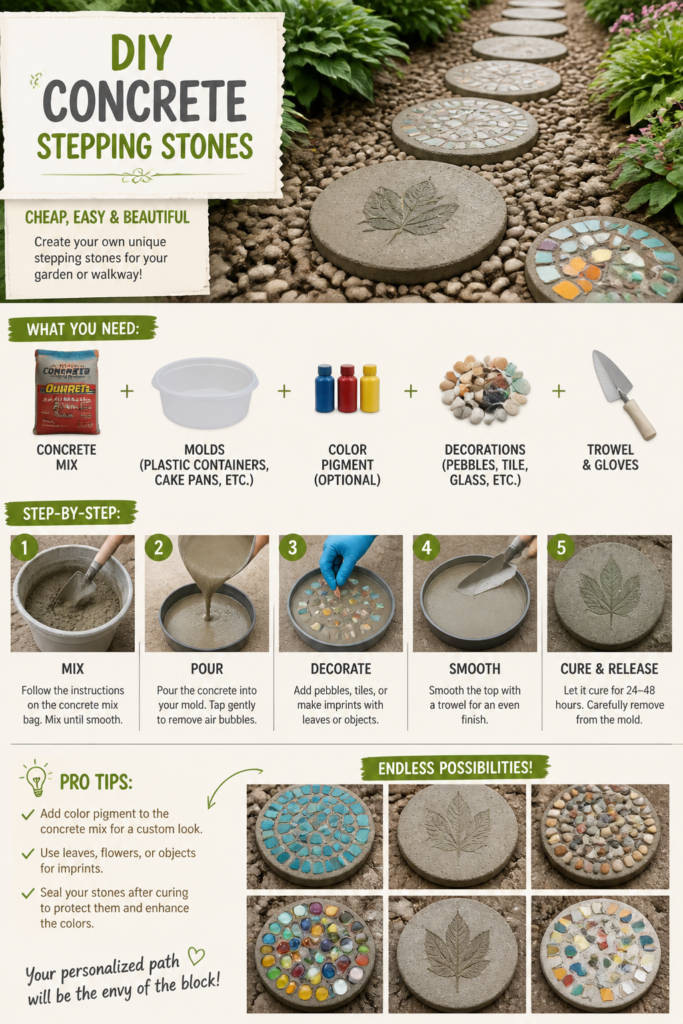
Mix your concrete, pour into your chosen molds, and let them cure. Pro tip: Add some color pigment to the concrete mix for a custom look, or embed pebbles and broken tiles for a mosaic effect. Your personalized path will be the envy of the block.
5. Brick Edging with Mulch or Pebbles
Sometimes, a little definition goes a long way. Use reclaimed bricks (hello, Facebook Marketplace!) to create a neat border, then fill the center with cheap mulch, wood chips, or small pebbles.
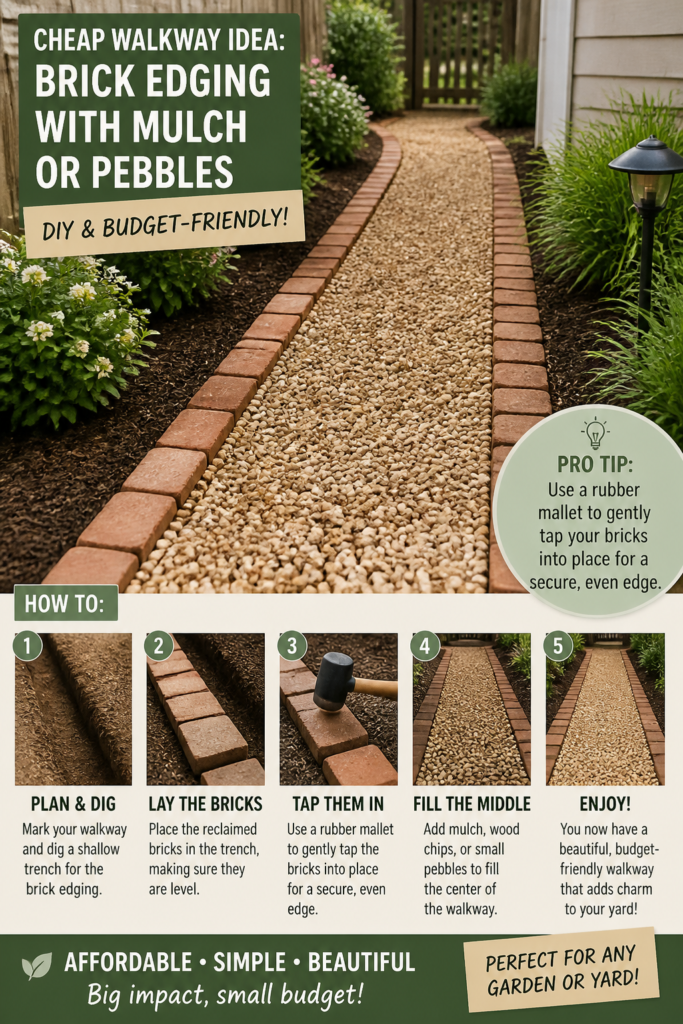
Dig a shallow trench for your bricks, ensuring they’re level, then fill the middle. Pro tip: Use a rubber mallet to gently tap your bricks into place for a secure, even edge. This combo gives you a polished look without breaking the bank.
6. Recycled Rubber Mulch Path
Want a soft, eco-friendly option? Recycled rubber mulch, often made from old tires, creates a springy, comfortable path that’s great for kids’ areas or just a comfy stroll.
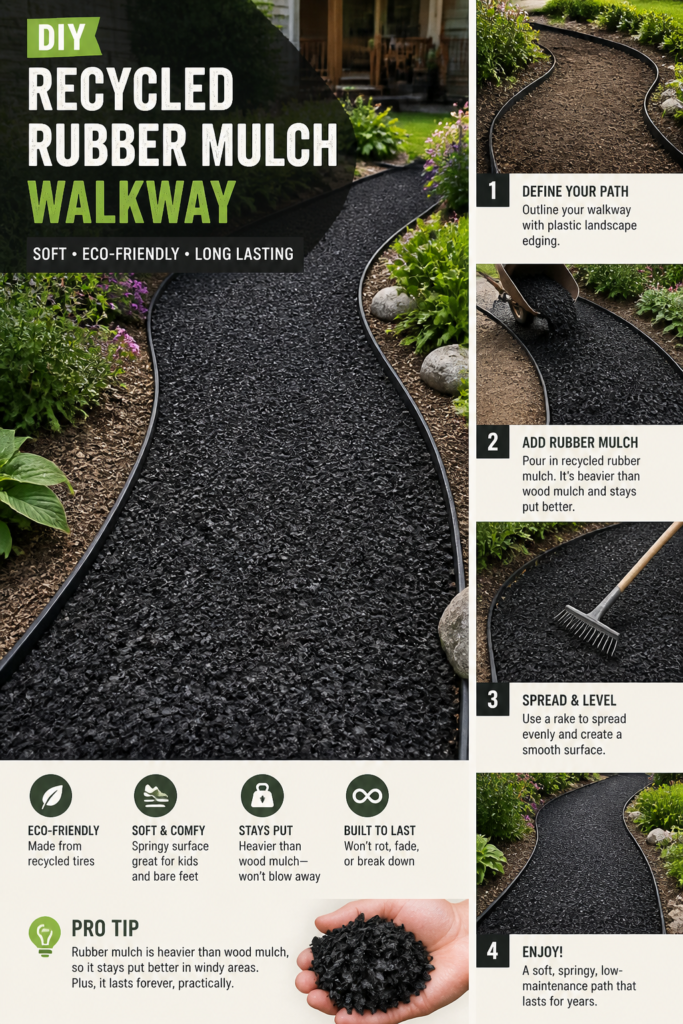
Just define your path with an edge (like those cheap plastic landscape borders) and pour in the rubber mulch. Pro tip: It’s heavier than wood mulch, so it stays put better in windy areas. Plus, it lasts forever, practically.
7. Flagstone (Irregular Pavers) on Sand
“Flagstone” sounds fancy, but you can often find irregular concrete pavers or even natural stone remnants for cheap. Laying them on a sand base makes installation a breeze.
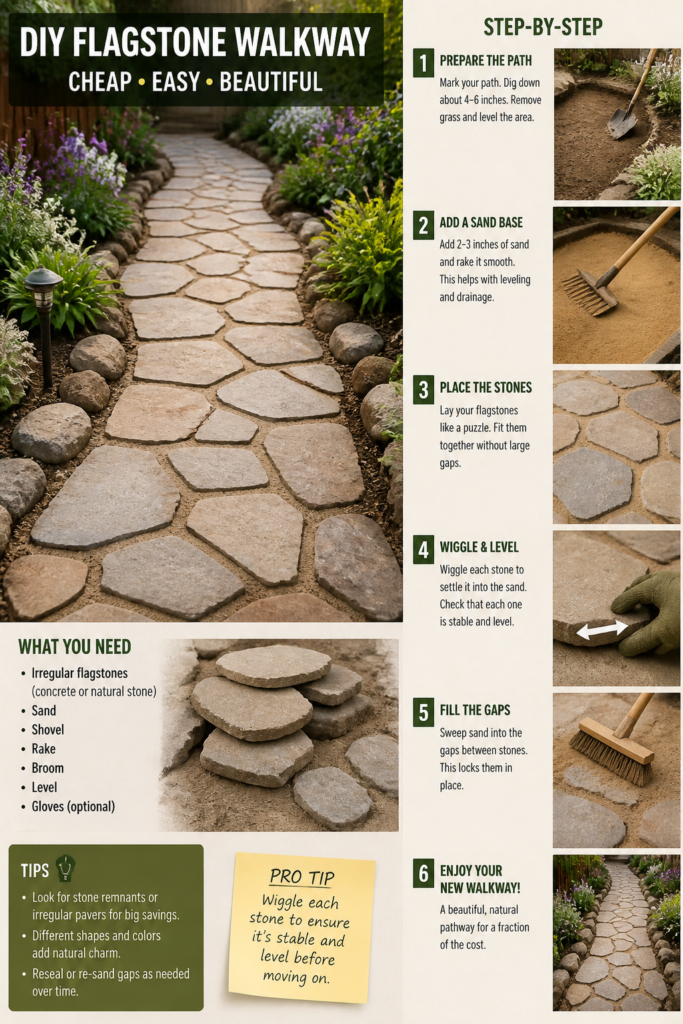
Prepare your base with a layer of sand, then fit your stones together like a puzzle. Pro tip: Wiggle each stone to ensure it’s stable and level before moving on. This gives you a natural, organic pathway that feels custom-made.
8. Crushed Shell Walkway
If you live near the coast or can source crushed shells cheaply, this is a beautiful, unique option. They offer great drainage, a satisfying crunch underfoot, and a lovely, bright aesthetic.
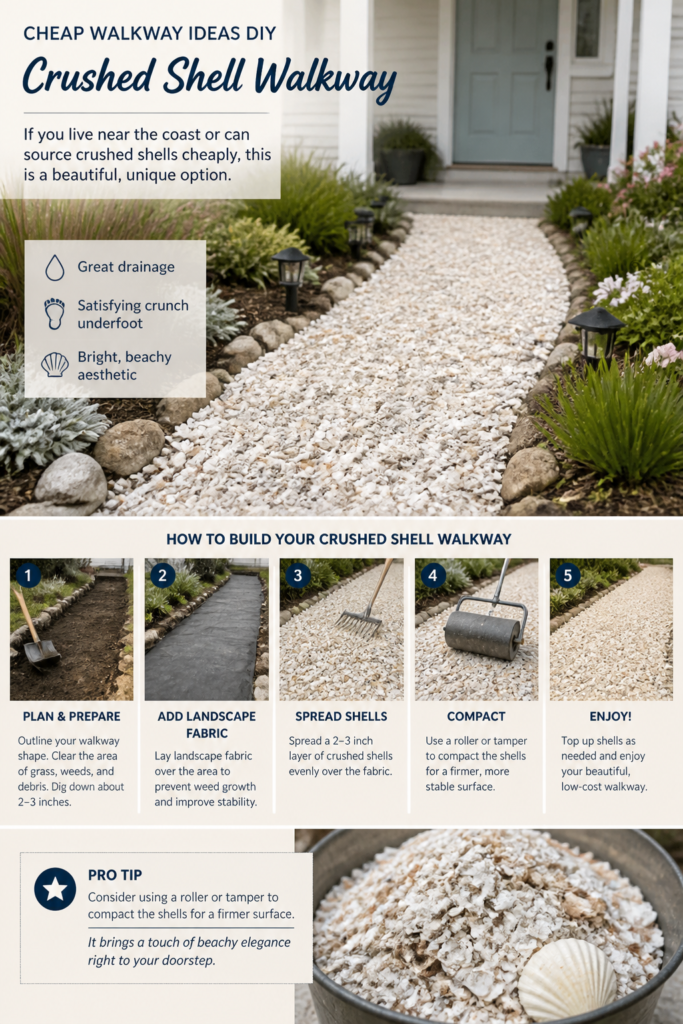
Similar to gravel, prepare your path with landscape fabric, then spread your crushed shells. Pro tip: Consider using a roller or tamper to compact the shells for a firmer surface. It brings a touch of beachy elegance right to your doorstep.
9. Log Rounds Path
Similar to wood slices but often thicker and more substantial, log rounds create a sturdy, rustic path. These are perfect if you have access to larger tree trunks.
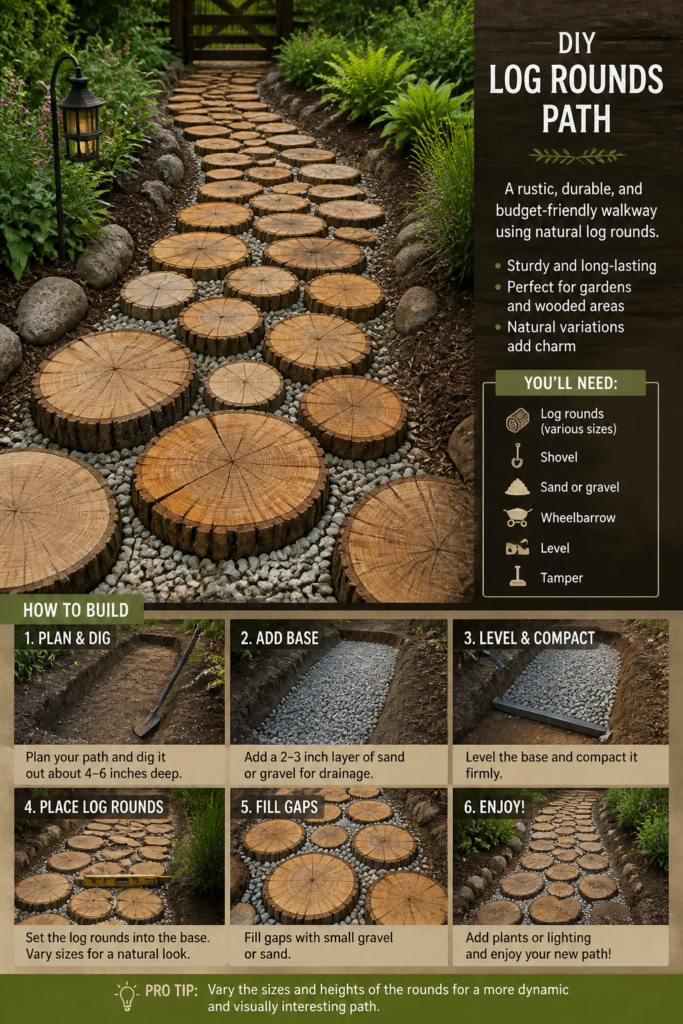
Dig out your path, lay a base of sand or gravel for drainage, and set your log rounds. Pro tip: Vary the sizes of the rounds for a more dynamic and visually interesting path. They offer a robust, natural feel that stands the test of time.
10. DIY Paver Molds Path
You can buy reusable plastic paver molds that let you pour concrete directly into a pattern on your prepared path. It’s like building with giant LEGOs, but for adults.
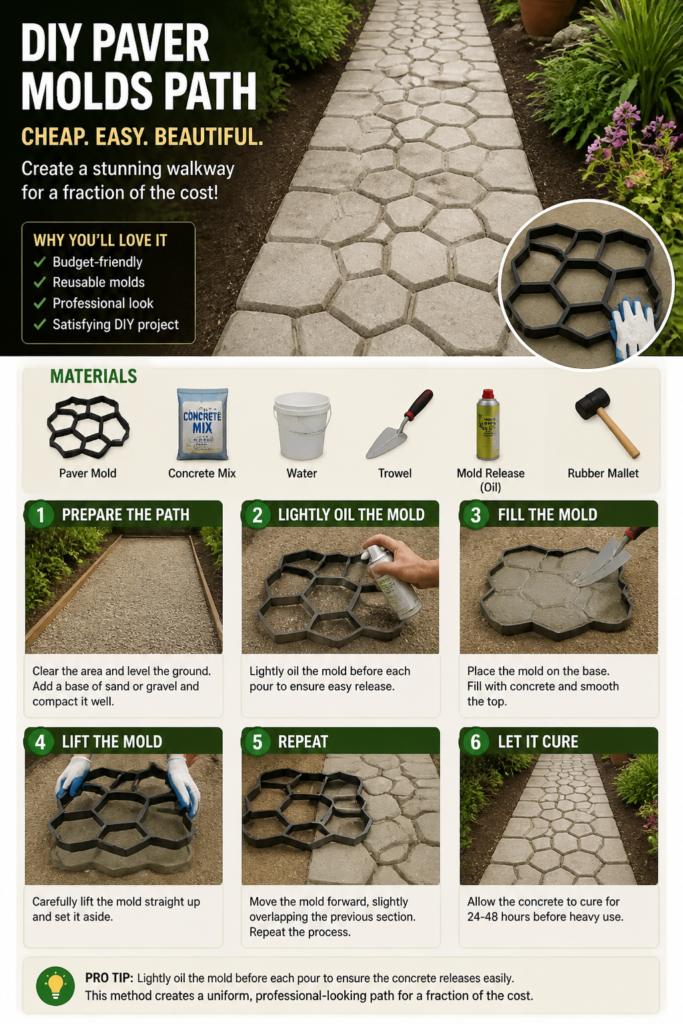
Mix concrete, fill the mold, lift, and repeat. Pro tip: Lightly oil the mold before each pour to ensure the concrete releases easily. This method creates a uniform, professional-looking path for a fraction of the cost.
11. Pebble Mosaic
Feeling artistic? A pebble mosaic path is a labor of love but incredibly rewarding and unique. Collect smooth, flat pebbles (or buy bags cheaply) and arrange them into patterns.
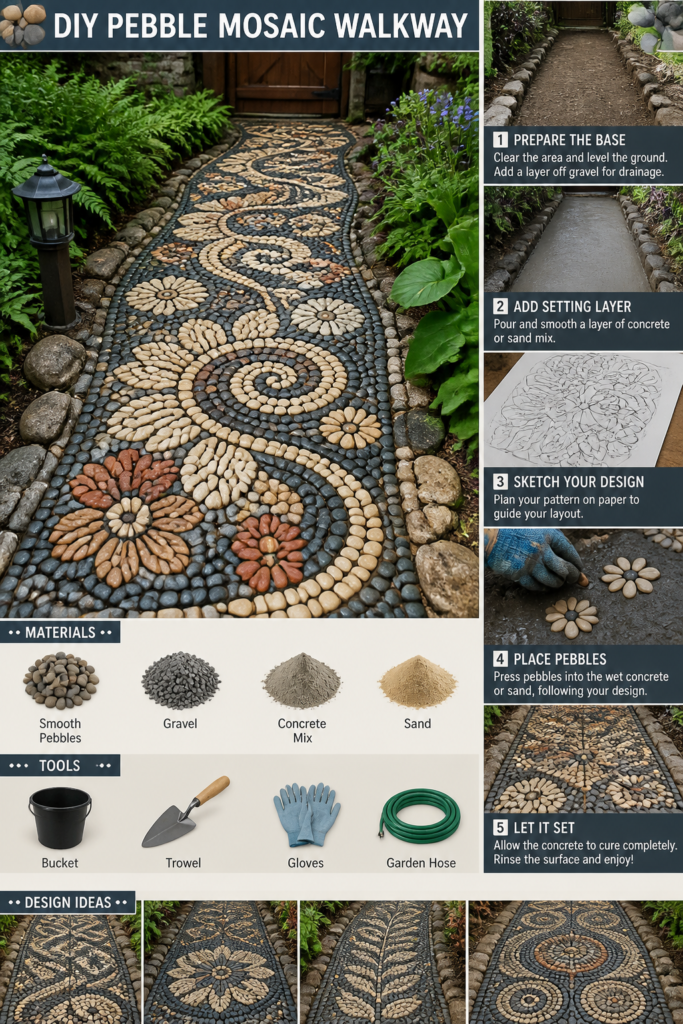
Set the pebbles into wet concrete or sand, arranging them face-up. Pro tip: Sketch your design beforehand to guide your placement and keep the pattern consistent. Your walkway becomes a piece of art that invites lingering.
12. Stenciled Concrete Path
If you already have a plain concrete path, give it a serious upgrade with stencils and paint. You can mimic brick, flagstone, or geometric patterns for a high-end look on a shoestring budget.
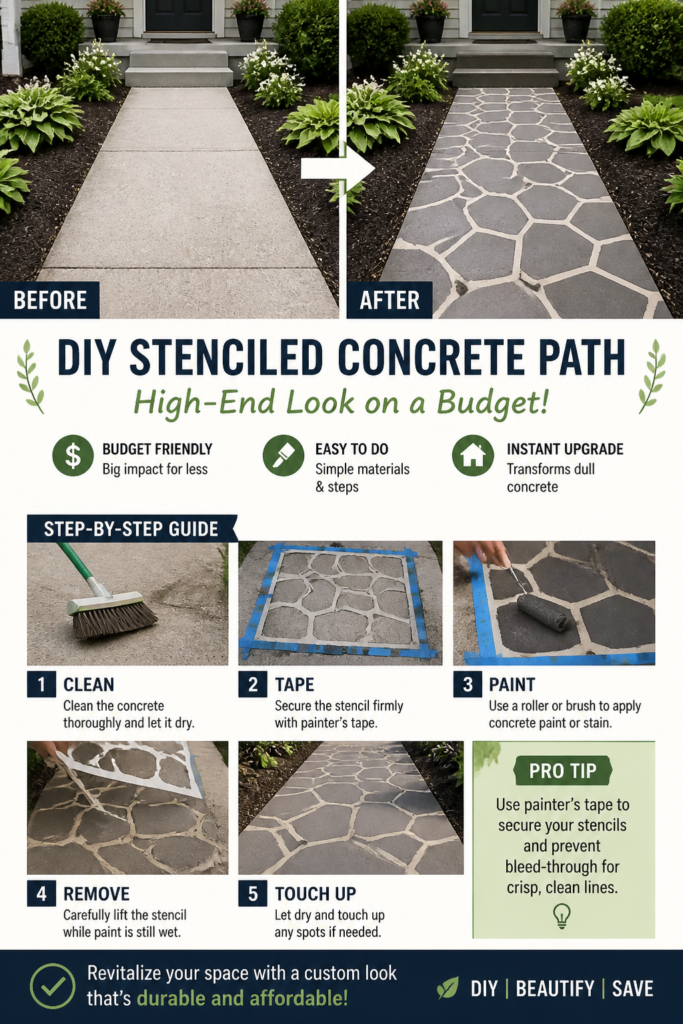
Clean your existing concrete, apply your stencil, and paint with concrete stain or paint. Pro tip: Use painter’s tape to secure your stencils and prevent bleed-through for crisp lines. It’s a fantastic way to revitalize an existing, dull surface.
13. Reclaimed Concrete Slabs (Urbanite)
Don’t toss that broken concrete from an old patio or driveway! Break it into manageable pieces (wear safety goggles, please) and repurpose it as “urbanite” pavers.
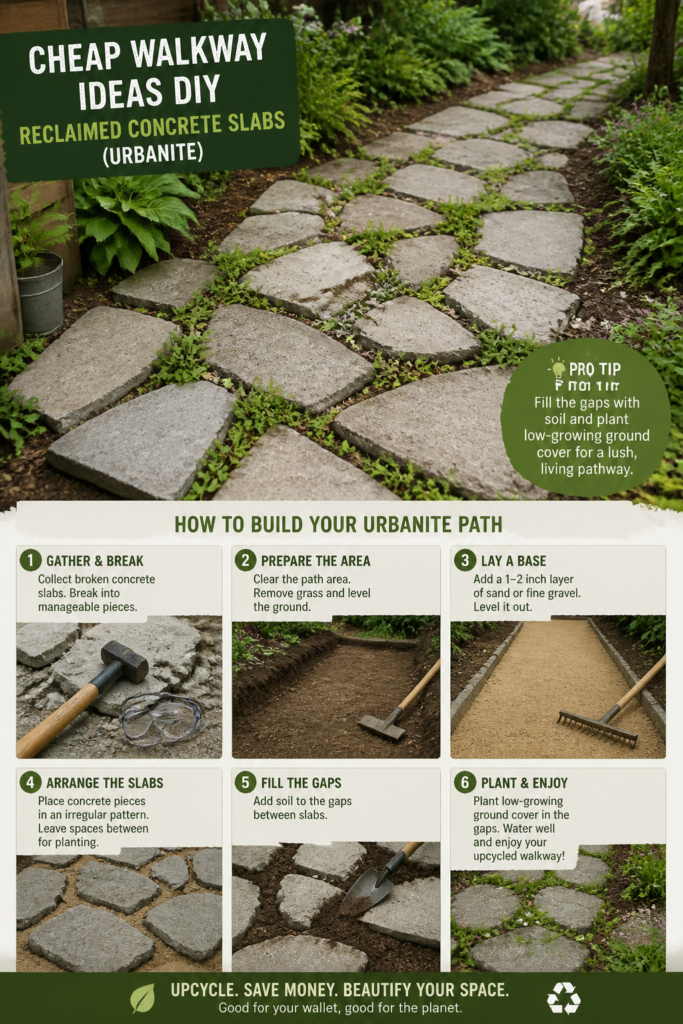
Arrange the pieces like an irregular flagstone path, setting them into sand or dirt. Pro tip: Fill the gaps with soil and plant low-growing ground cover for a lush, living pathway. It’s the ultimate upcycling win, giving new life to old materials.
✨ New Member Etsy Shops (100% Unsponsored!)
We are incredibly proud of the talent in this community! 💖 We've rounded up some gorgeous new Etsy shops launched by our very own members.
There are ZERO affiliate links in this post—just 100% pure support for our makers. Click below to shop small, show them some love, and find your new favorite items! 👇🛍️


Conclusion
See? Who needs a fat wallet when you’ve got ingenuity and a little elbow grease? These cheap walkway ideas DIY proof that you can totally transform your outdoor space without selling a kidney. Now go forth, get your hands dirty, and create a path that’s as unique and awesome as you are. Your feet (and your budget) will thank you.