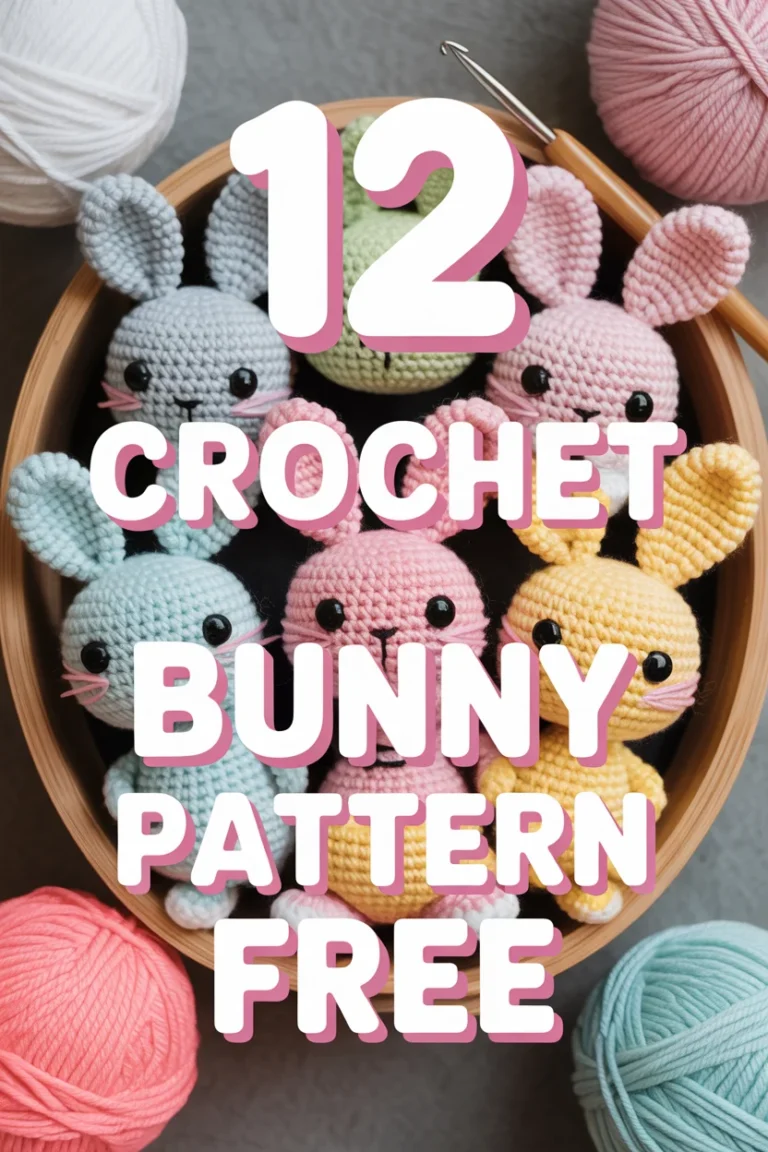
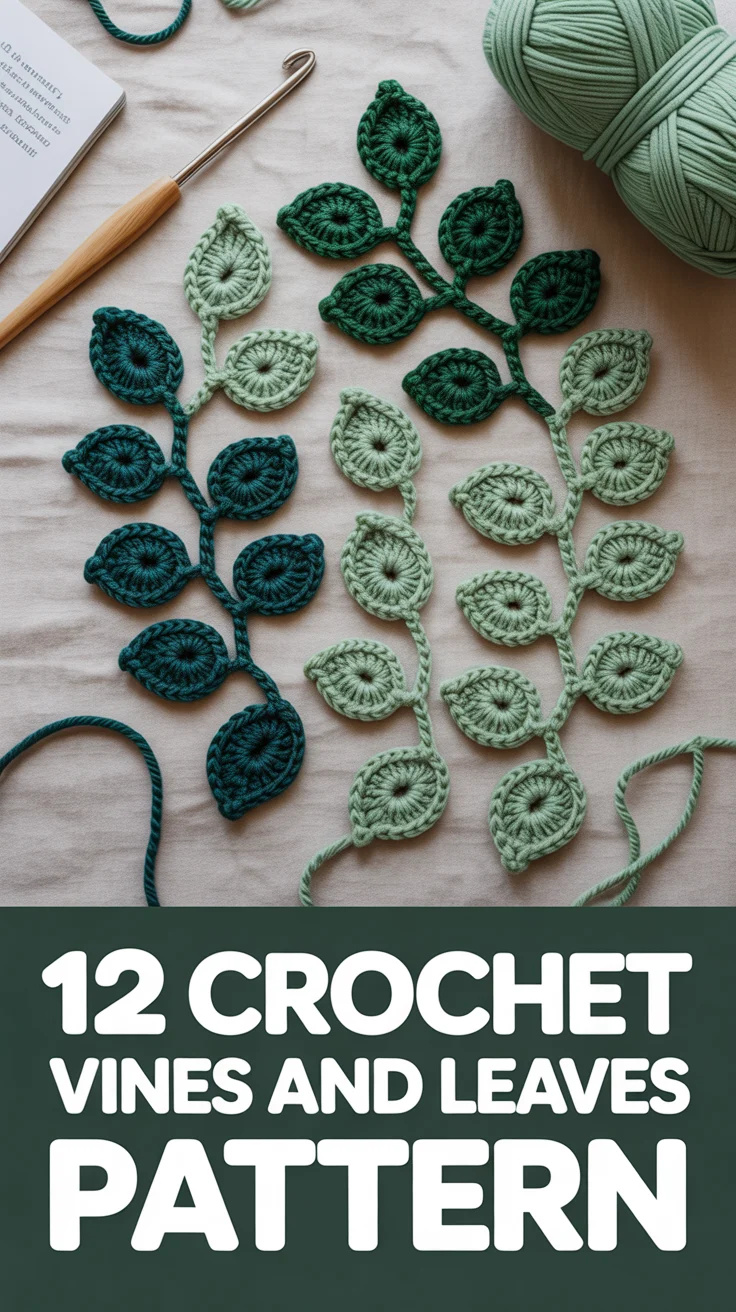
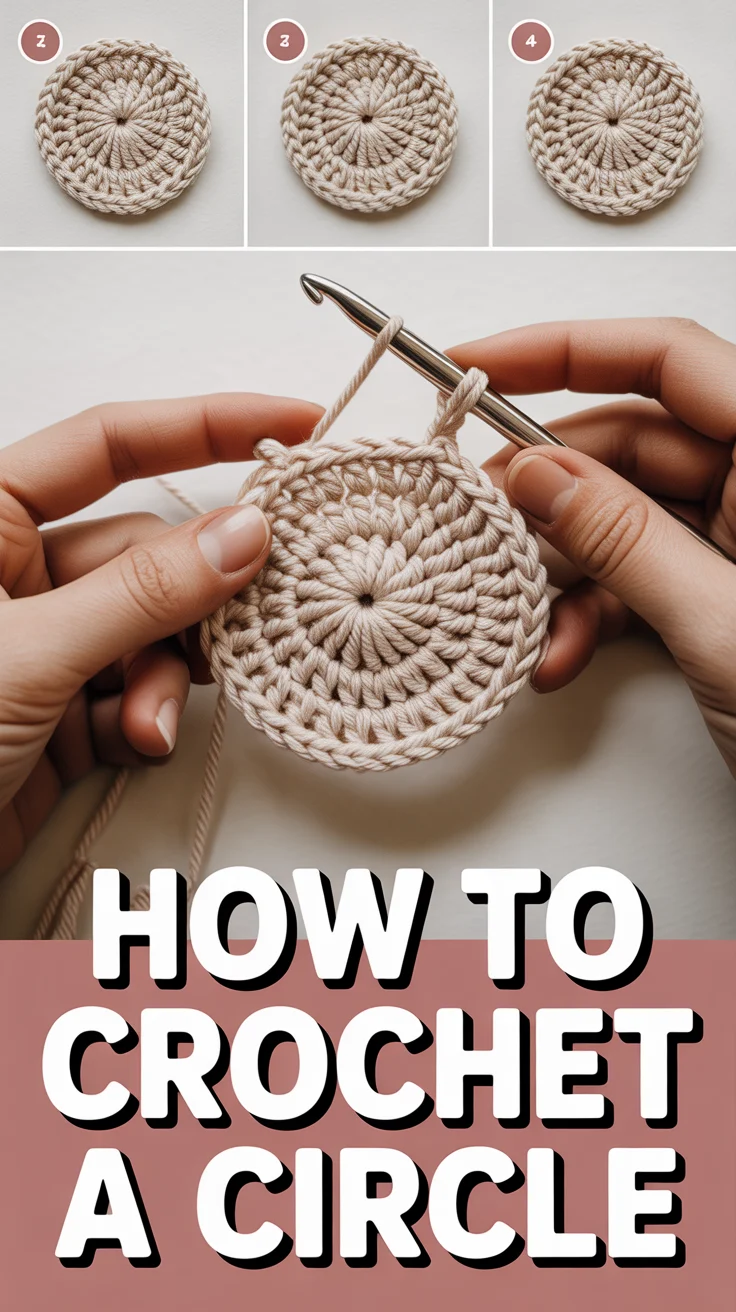
🧶 How To Crochet A Circle
🛠️ The Ultimate Maker's Toolkit
I've tested thousands of craft tools over the years. Whether you are quilting, crafting, or building mixed-media art, these are the top 5 absolute non-negotiable tools I personally recommend to guarantee professional results.
🪡 SINGER Heavy Duty 4452 Sewing Machine
The sewing community highly recommends this as the ultimate "bulletproof" entry-level machine. Its heavy metal frame powerfully pushes through thick denim and heavy quilt layers that would instantly jam a standard plastic machine.
✂️ Fiskars 8" Orange-Handled Scissors
Never settle for dull dollar-store blades. Wirecutter repeatedly names Fiskars the absolute best all-purpose craft scissor due to its legendary precision-ground blades and an ergonomic grip that prevents hand-cramping.
🔥 Gorilla Dual Temp Hot Glue Gun
Named Wirecutter's top choice because it literally does the work of two tools. It features dual-temperature settings offering low heat for delicate florals and blistering high heat for heavy wood adhesion repairs.
🖌️ Mod Podge Waterbase Gloss Sealer
The absolute undisputed champion of decoupage and paper crafts. Experts rely exclusively on this exact water-based formula because it glues, seals, and finishes beautifully without yellowing or flaking over time.
🎨 Apple Barrel Acrylic Paint (2 oz)
The quintessential, incredibly inexpensive craft paint. Woodworkers and hobby painters swear by its smooth flow and matte finish, providing massive value and remarkably thick color coverage on rough surfaces.
Ready to make a perfect little yarn pancake? We’re turning string into circles without tears, tangles, or lopsided coasters. Grab a hook, a vibe, and let’s spin this into shape.
1. Pick the Right Yarn and Hook
Set yourself up for success with materials that play nice. Choose a medium-weight yarn and a matching hook size so your stitches don’t rebel. Smooth, light-colored yarn helps you see what you’re doing.
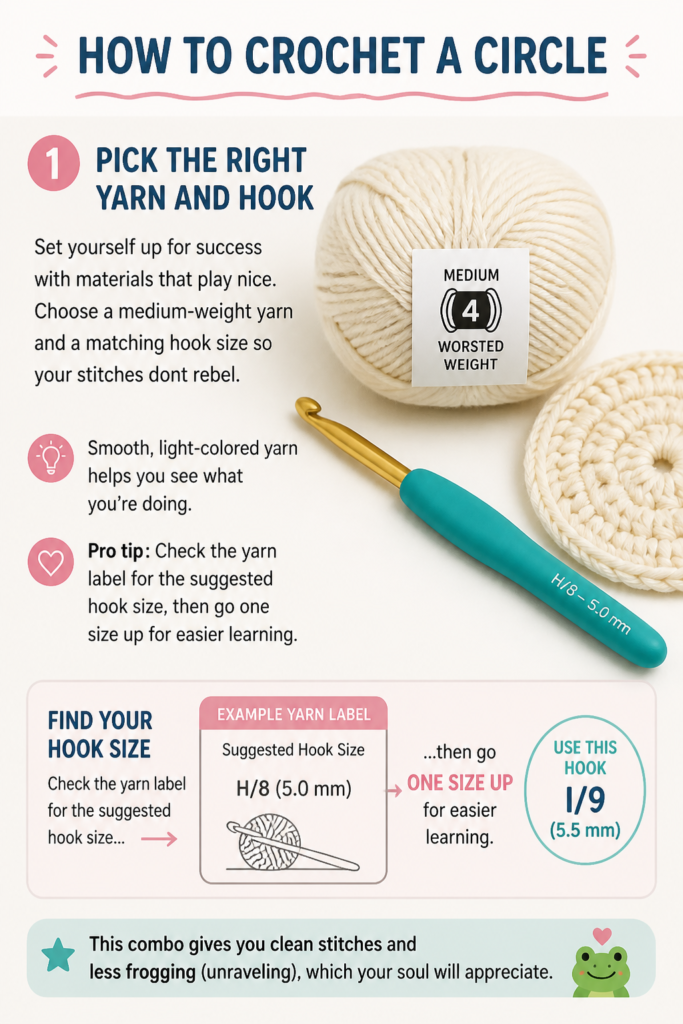
Pro tip: Check the yarn label for the suggested hook size, then go one size up for easier learning.
This combo gives you clean stitches and less frogging (unraveling), which your soul will appreciate.
2. Start With a Magic Ring
The magic ring makes your circle center tight and tidy. Wrap the yarn, insert your hook, and anchor your first stitches inside the loop. No weird hole in the middle. Win.
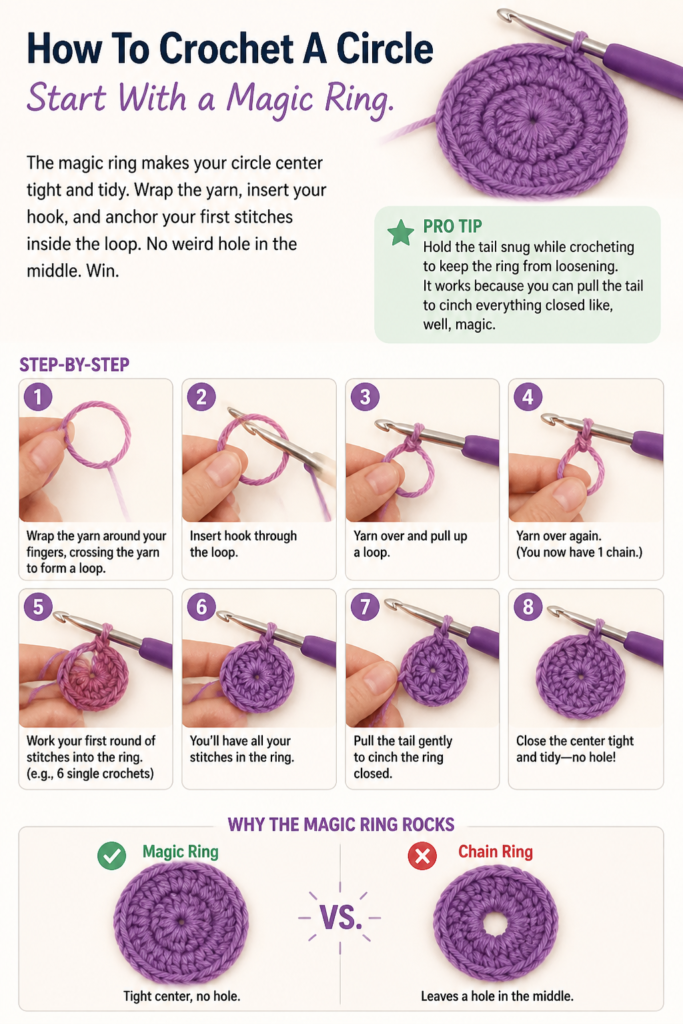
Pro tip: Hold the tail snug while crocheting to keep the ring from loosening.
It works because you can pull the tail to cinch everything closed like, well, magic.
3. Chain to Set Your Height
Your starting chain sets the stitch height. For single crochet, chain 1; for half double crochet, chain 2; for double crochet, chain 3. Consistency keeps your edge neat.
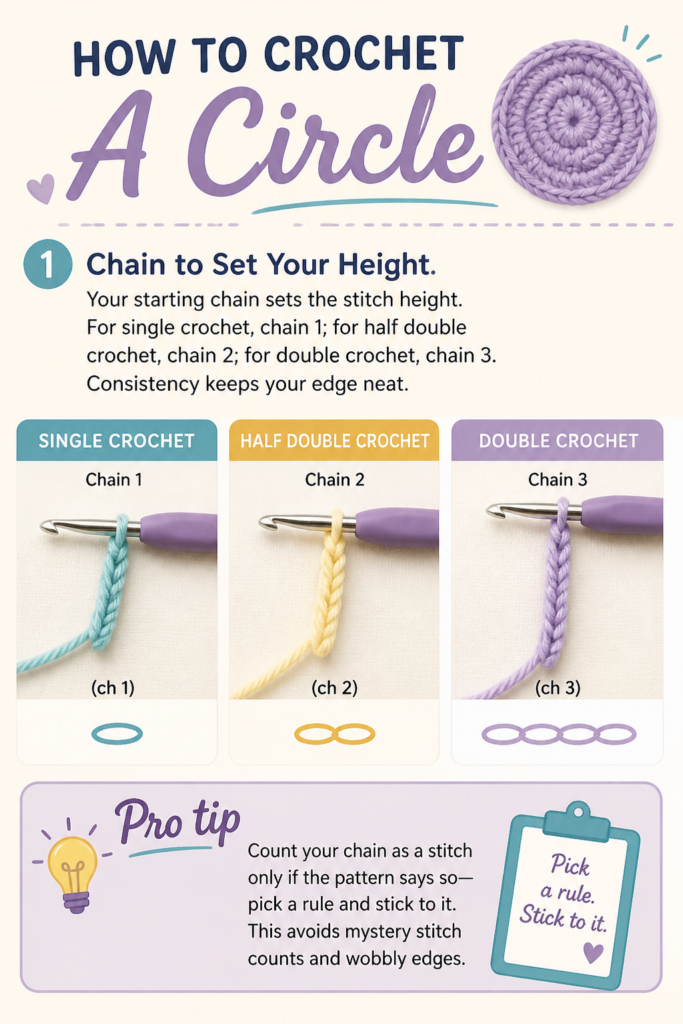
Pro tip: Count your chain as a stitch only if the pattern says so—pick a rule and stick to it.
This avoids mystery stitch counts and wobbly edges.
4. Round One Is Your Foundation
Work your first round stitches into the ring. A classic start is 6 single crochets, or 12 double crochets if you want a bigger jump. Then pull the ring tight.
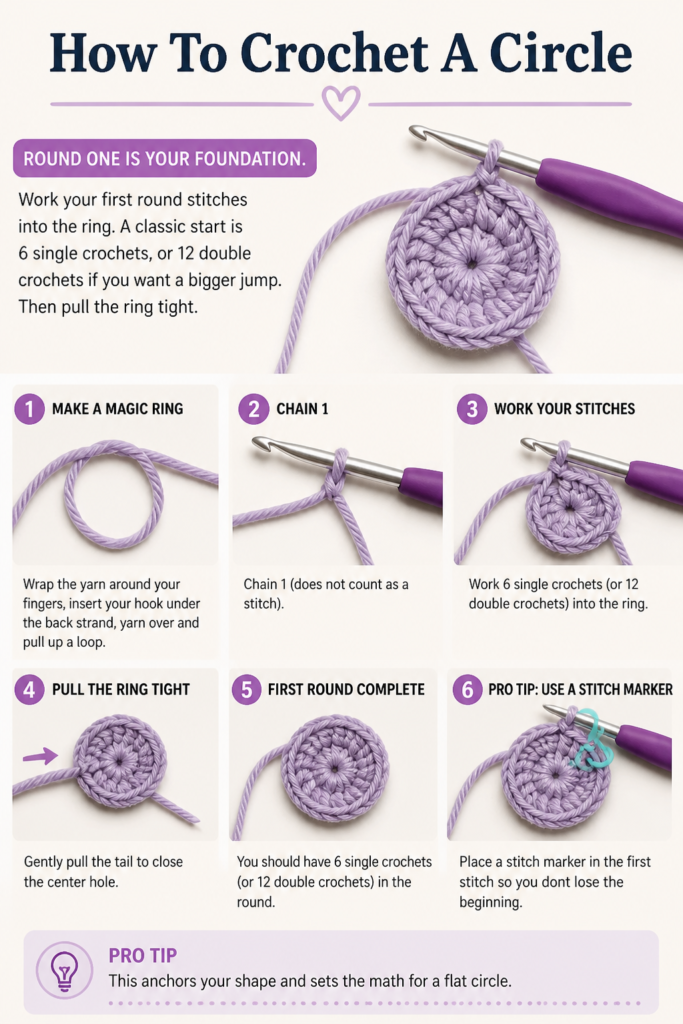
Pro tip: Place a stitch marker in the first stitch so you don’t lose the beginning.
This anchors your shape and sets the math for a flat circle.
5. Learn the Increase Formula
To keep it flat, you need steady increases. For single crochet, the classic pattern is 6 increases per round. That means your stitch totals go 6, 12, 18, 24, and so on.
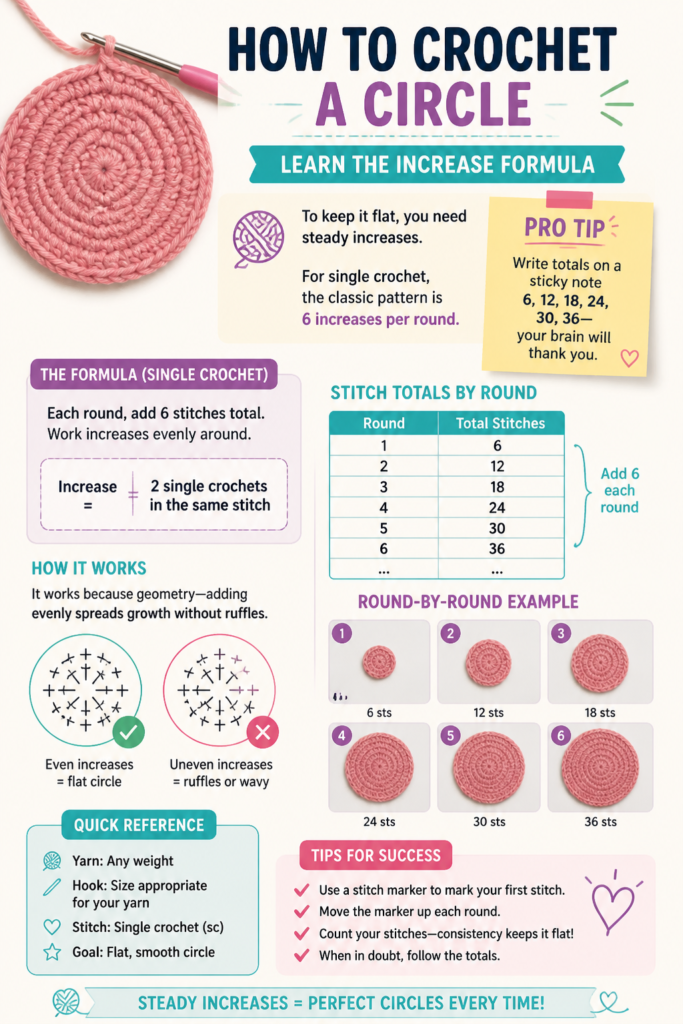
Pro tip: Write totals on a sticky note: 6, 12, 18, 24, 30, 36—your brain will thank you.
It works because geometry—adding evenly spreads growth without ruffles.
6. Place Increases Evenly
Distribute increases so each round grows smoothly. Try: Round 2, increase in every stitch; Round 3, increase every 2nd stitch; Round 4, every 3rd, etc. Keep the spacing consistent.
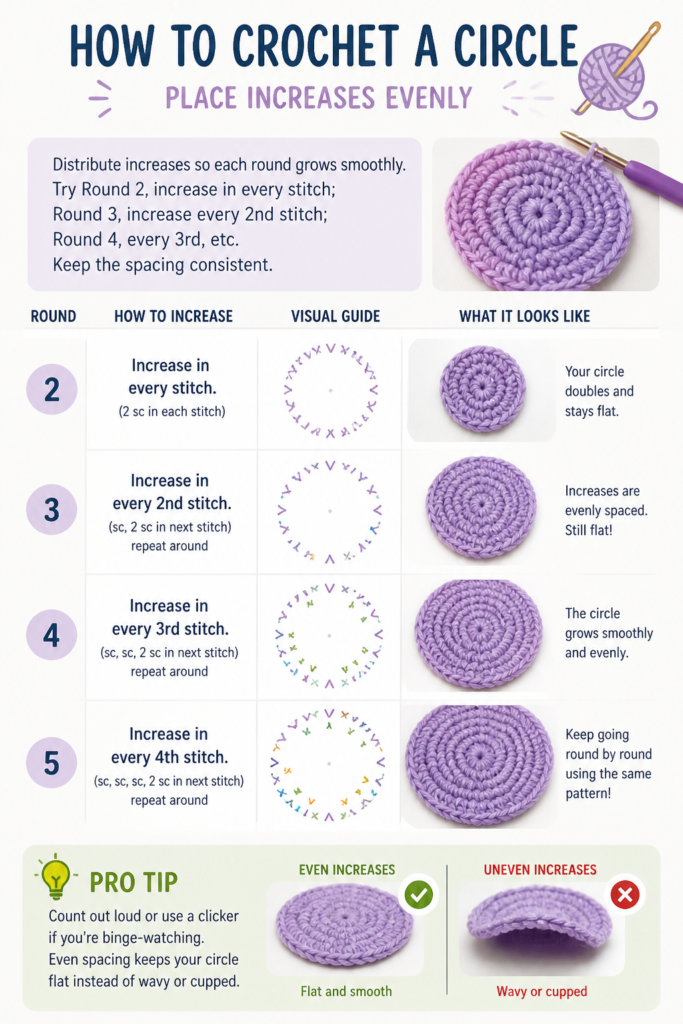
Pro tip: Count out loud or use a clicker if you’re binge-watching.
Even spacing keeps your circle flat instead of wavy or cupped.
7. Choose Your Stitch Type Wisely
Different stitches change texture and speed. Single crochet gives dense, sturdy circles; half double balances speed and structure; double crochet builds fast and drapey.
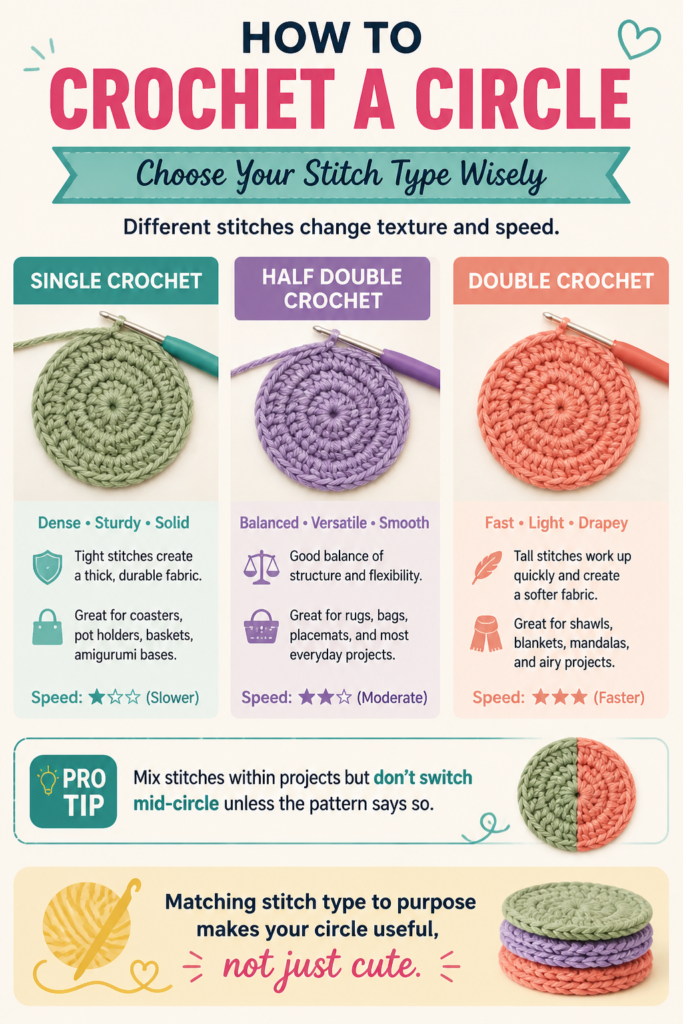
Pro tip: Mix stitches within projects but don’t switch mid-circle unless the pattern says so.
Matching stitch type to purpose makes your circle useful, not just cute.
8. Keep Tension Chill and Consistent
White-knuckle tension leads to bowl shapes; loosey-goosey makes ruffles. Aim for smooth, even loops sliding on the hook. Your fabric should lie flat naturally.
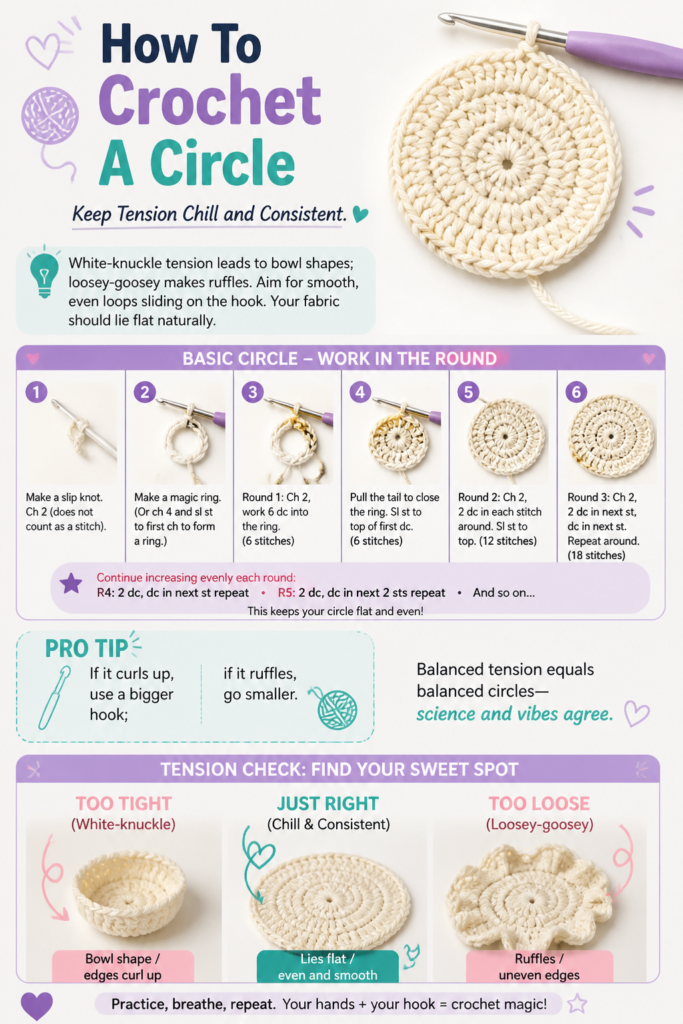
Pro tip: If it curls up, use a bigger hook; if it ruffles, go smaller.
Balanced tension equals balanced circles—science and vibes agree.
9. Spiral vs Joined Rounds
Spirals look seamless, joined rounds look segmented but tidy. For spirals, skip the slip stitch and keep going; for joins, slip stitch to the first stitch and chain up.
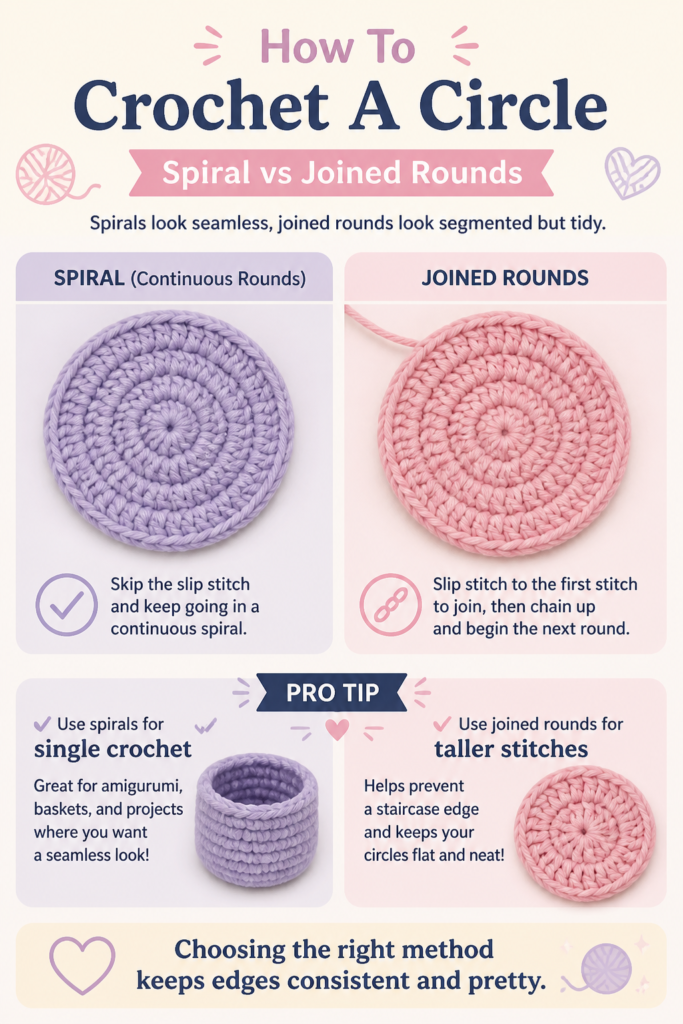
Pro tip: Use spirals for single crochet; use joined rounds for taller stitches to avoid a staircase edge.
Choosing the right method keeps edges consistent and pretty.
10. Fix Curling and Ruffling Fast
Circle turning into a hat? You need more increases. Ruffling like lettuce? Fewer increases or tighter tension. Adjust one round at a time.
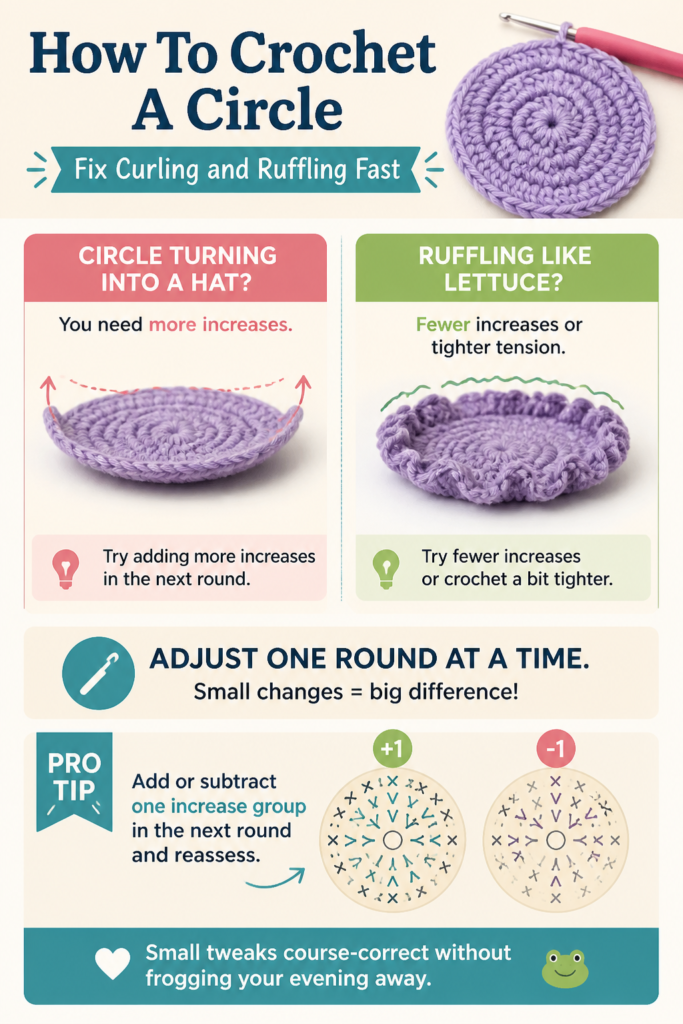
Pro tip: Add or subtract one increase group in the next round and reassess.
Small tweaks course-correct without frogging your evening away.
11. Count Like You Mean It
Counting is the secret sauce. Use stitch markers every 10 or 12 stitches. Recount at the end of each round—yes, every time.
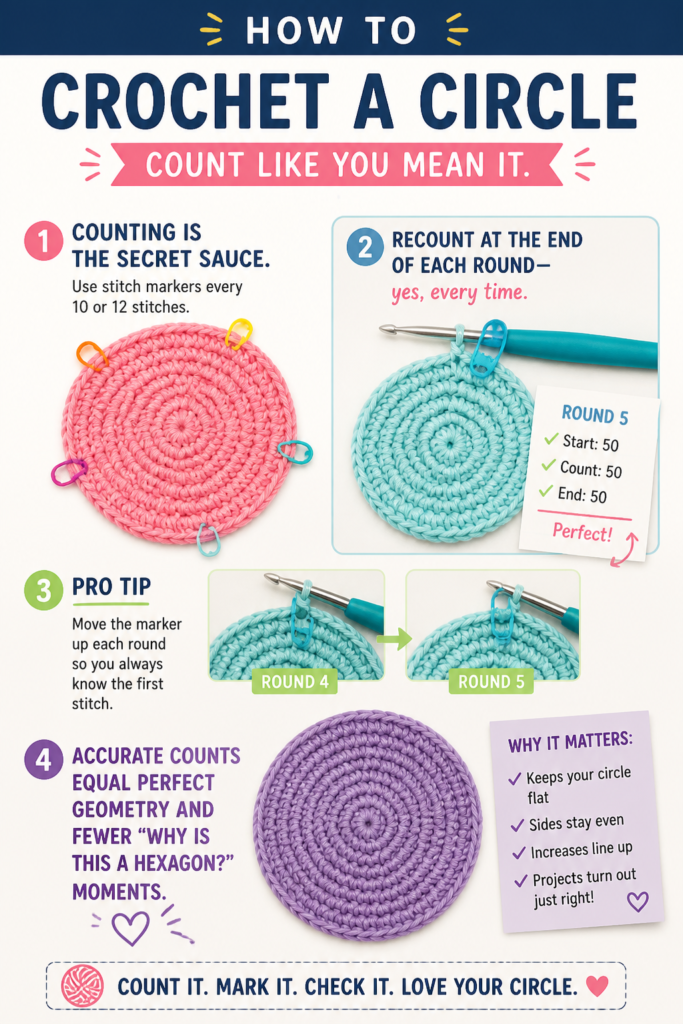
Pro tip: Move the marker up each round so you always know the first stitch.
Accurate counts equal perfect geometry and fewer “why is this a hexagon” moments.
12. Finish Clean and Flatten
End with a slip stitch, then a yarn tail weave through the back loops for invisibility. Lightly block with steam or a gentle pin-out if needed.
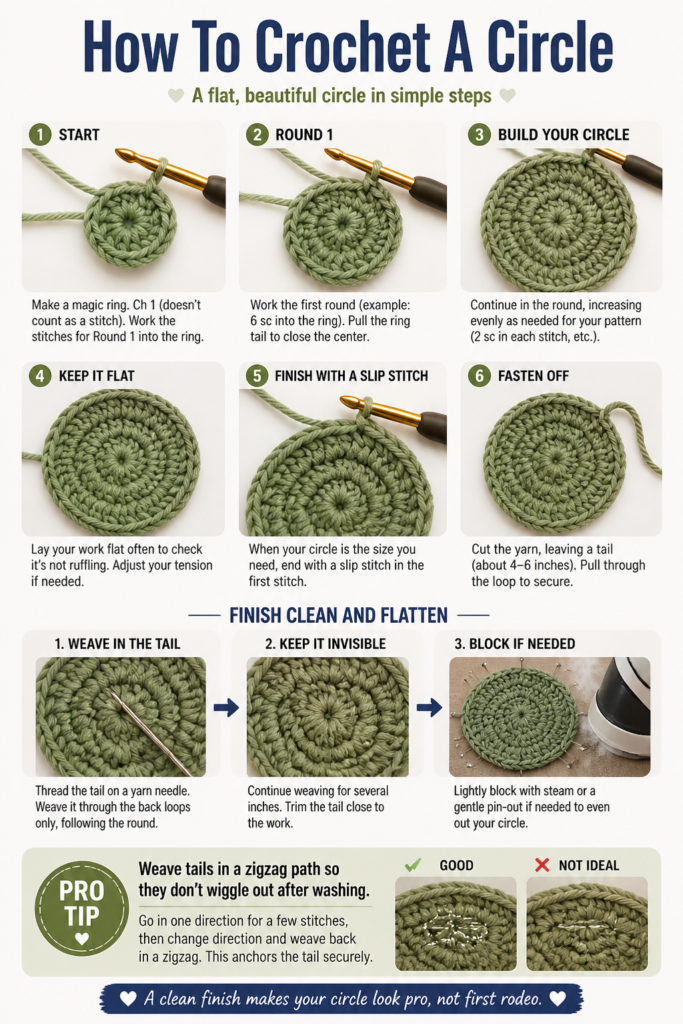
Pro tip: Weave tails in a zigzag path so they don’t wiggle out after washing.
A clean finish makes your circle look pro, not “first rodeo.”
✨ New Member Etsy Shops (100% Unsponsored!)
We are incredibly proud of the talent in this community! 💖 We've rounded up some gorgeous new Etsy shops launched by our very own members.
There are ZERO affiliate links in this post—just 100% pure support for our makers. Click below to shop small, show them some love, and find your new favorite items! 👇🛍️


Conclusion
Circles are just math in cozy form, and now you’ve got the formula. Keep your increases steady, your tension chill, and your stitch marker loyal. From coasters to rugs, you’re ready to spin perfect rounds like a crochet DJ.