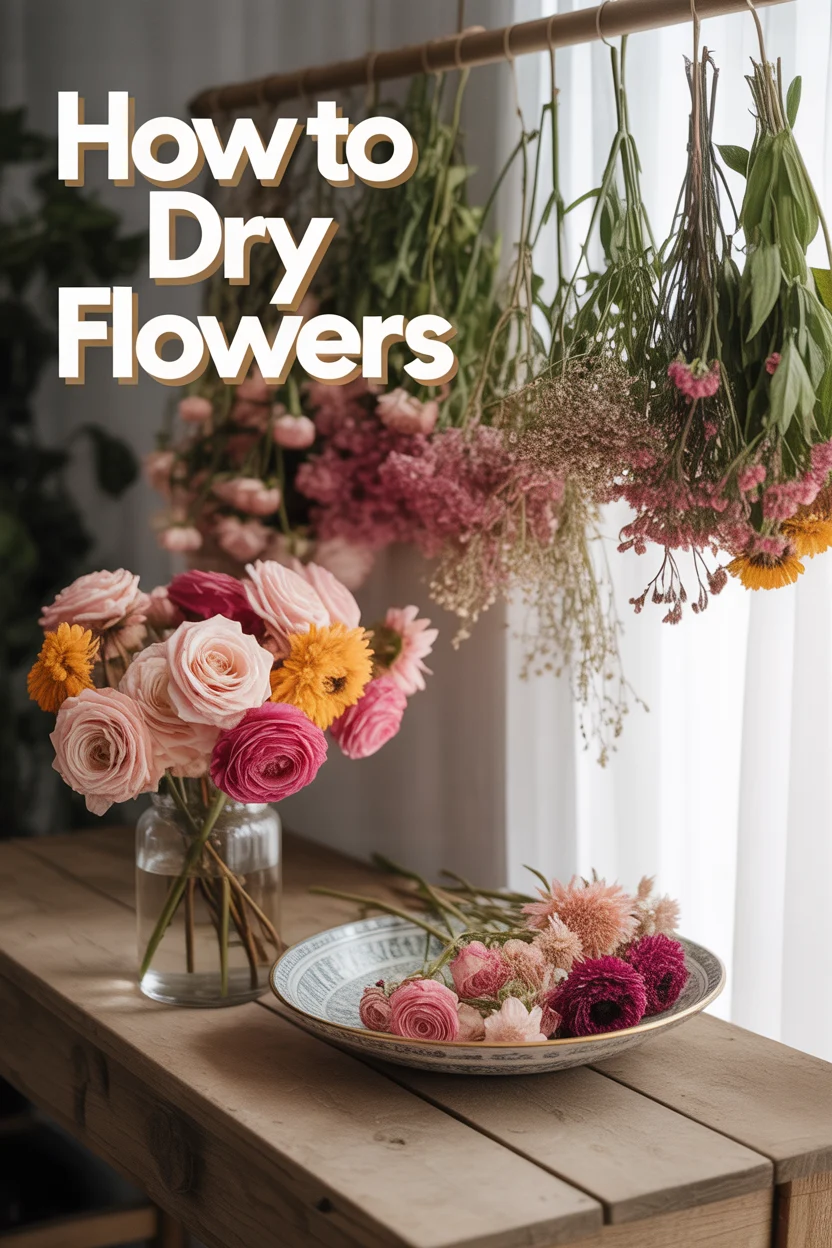
🌸 How To Dry Flowers
🛠️ The Ultimate Maker's Toolkit
I've tested thousands of craft tools over the years. Whether you are quilting, crafting, or building mixed-media art, these are the top 5 absolute non-negotiable tools I personally recommend to guarantee professional results.
🪡 SINGER Heavy Duty 4452 Sewing Machine
The sewing community highly recommends this as the ultimate "bulletproof" entry-level machine. Its heavy metal frame powerfully pushes through thick denim and heavy quilt layers that would instantly jam a standard plastic machine.
✂️ Fiskars 8" Orange-Handled Scissors
Never settle for dull dollar-store blades. Wirecutter repeatedly names Fiskars the absolute best all-purpose craft scissor due to its legendary precision-ground blades and an ergonomic grip that prevents hand-cramping.
🔥 Gorilla Dual Temp Hot Glue Gun
Named Wirecutter's top choice because it literally does the work of two tools. It features dual-temperature settings offering low heat for delicate florals and blistering high heat for heavy wood adhesion repairs.
🖌️ Mod Podge Waterbase Gloss Sealer
The absolute undisputed champion of decoupage and paper crafts. Experts rely exclusively on this exact water-based formula because it glues, seals, and finishes beautifully without yellowing or flaking over time.
🎨 Apple Barrel Acrylic Paint (2 oz)
The quintessential, incredibly inexpensive craft paint. Woodworkers and hobby painters swear by its smooth flow and matte finish, providing massive value and remarkably thick color coverage on rough surfaces.
Imagine capturing the ephemeral beauty of a fresh bloom, freezing a moment in time, and transforming it into a lasting piece of art or a cherished memento. Drying flowers isn’t just a craft; it’s a magical act of preservation, allowing you to extend the life of your favorite blossoms, create stunning home decor, or immortalize special memories from weddings, anniversaries, or simple garden joys. Forget the fleeting nature of fresh bouquets – with a few simple techniques, you can transform them into timeless treasures. This guide will walk you through everything you need to know, making you feel capable and inspired to start preserving nature’s artistry today!
Quick Overview
You’re about to unlock the secrets to preserving flowers, turning their fleeting beauty into enduring keepsakes and stunning decorative elements. Whether you want to press a delicate rose from a special occasion or air-dry a vibrant bouquet for a rustic display, you’ll gain the skills to achieve beautiful, lasting results.
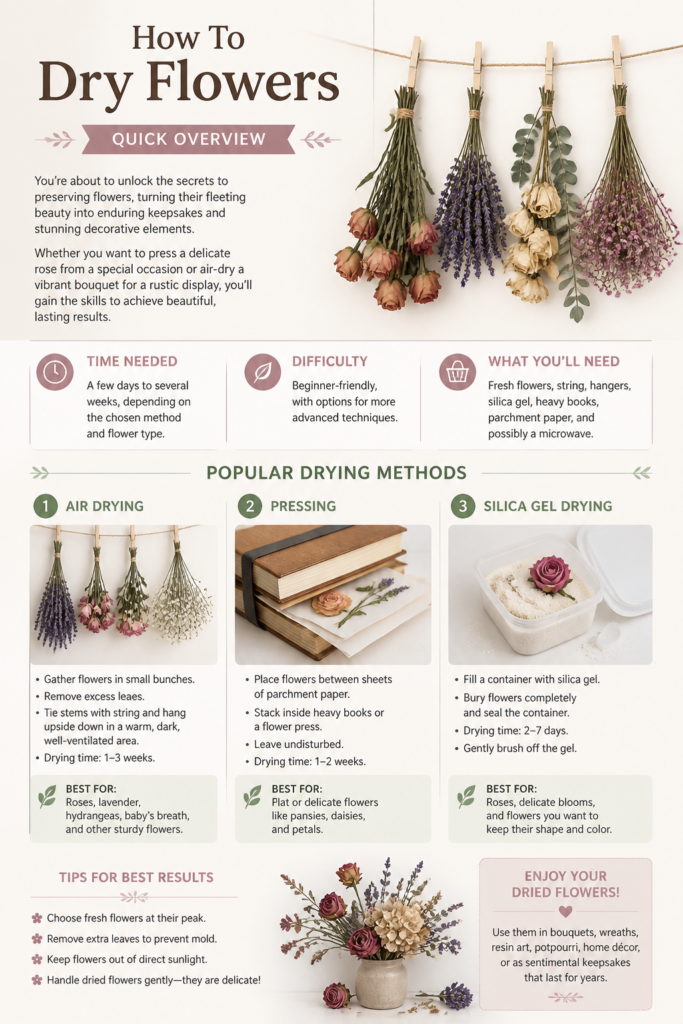
- Time needed: A few days to several weeks, depending on the chosen method and flower type.
- Difficulty: Beginner-friendly, with options for more advanced techniques.
- What you’ll need: Fresh flowers, string, hangers, silica gel, heavy books, parchment paper, and possibly a microwave.
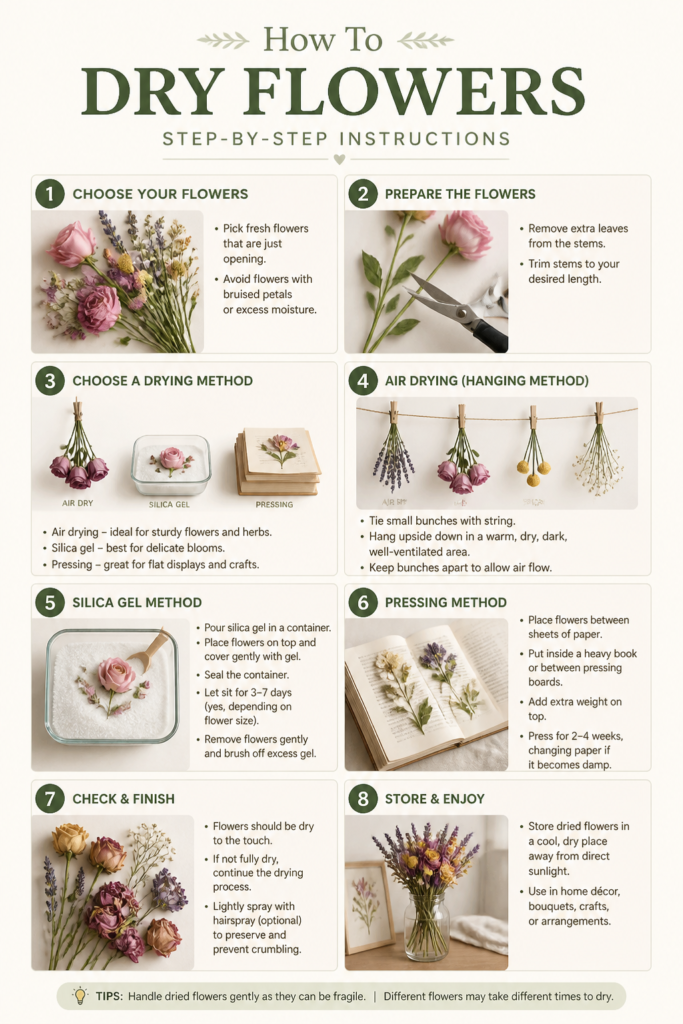
Step-by-Step Instructions
Step 1: Choose Your Blooms Wisely – The Foundation of Success
The journey to beautifully dried flowers begins even before you snip them. The type and condition of your flowers are paramount to achieving stunning, long-lasting results. Not all flowers dry equally well, and timing is everything.
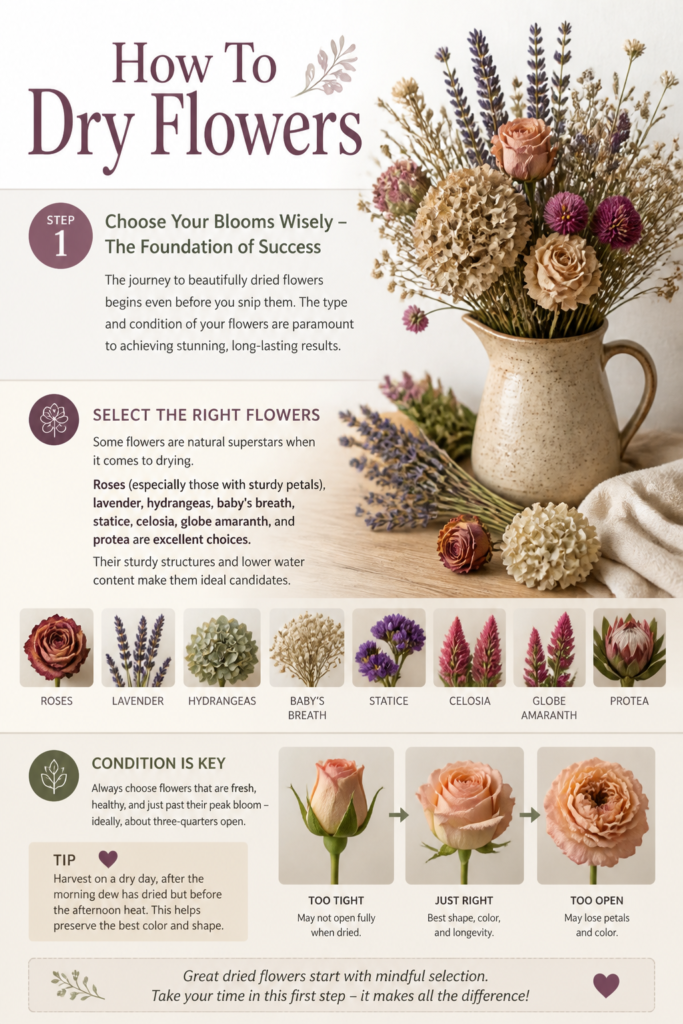
- Select the Right Flowers: Some flowers are natural superstars when it comes to drying. Roses (especially those with sturdy petals), lavender, hydrangeas, baby’s breath, statice, celosia, globe amaranth, and protea are excellent choices. Their sturdy structures and lower water content make them ideal candidates. Delicate flowers like lilies or tulips often struggle to retain their shape and color.
- Condition is Key: Always choose flowers that are fresh, healthy, and just past their peak bloom – ideally, about three-quarters open. Flowers that are too tight may not open fully during drying, while those that are over-bloomed or starting to wilt will likely fall apart or brown. Avoid any blooms with blemishes, insect damage, or signs of disease.
- Harvesting Time: The best time to harvest flowers for drying is in the late morning, after any dew has evaporated but before the midday sun causes them to wilt. Ensure they are completely dry to the touch – any residual moisture is an open invitation for mold.
- Consider Color: Some colors hold up better than others. Reds, pinks, purples, and blues tend to retain their vibrancy more effectively than whites and yellows, which can sometimes brown or fade.
Pro tip: When selecting roses, opt for varieties with strong, firm petals. Hybrid tea roses often dry beautifully, retaining their classic shape and rich color. For hydrangeas, wait until their color has deepened and their petals feel papery, typically in late summer or early autumn, for the best drying results.
Step 2: Prepare Your Flowers for Preservation – Clean, Lean, and Ready
Once you’ve carefully selected your blooms, a bit of preparation will set them up for successful drying, no matter which method you choose. This stage is about minimizing moisture and maximizing airflow.
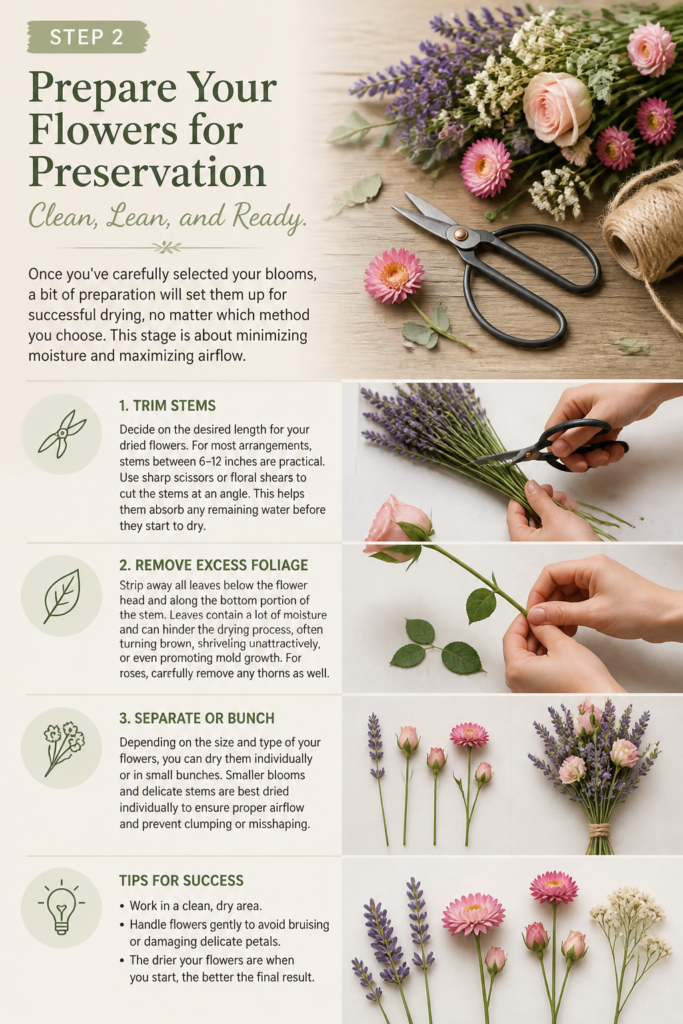
- Trim Stems: Decide on the desired length for your dried flowers. For most arrangements, stems between 6-12 inches are practical. Use sharp scissors or floral shears to cut the stems at an angle. This helps them absorb any remaining water before they start to dry.
- Remove Excess Foliage: Strip away all leaves below the flower head and along the bottom portion of the stem. Leaves contain a lot of moisture and can hinder the drying process, often turning brown, shriveling unattractively, or even promoting mold growth. For roses, carefully remove any thorns as well.
- Separate or Bunch: Depending on the drying method, you might need to separate individual flowers or create small bunches. For air drying, small bunches (3-5 stems) are ideal. For pressing or silica gel, individual blooms work best.
- Hydrate (Briefly): If your flowers have traveled a bit or seem a little thirsty, place them in a vase with a small amount of water for an hour or two. This allows them to “drink up” and ensures they are plump and vibrant before the drying process begins. Don’t leave them in water for too long, as the goal is to remove moisture.
Pro tip: For flowers with very thick stems (like sunflowers or some hydrangeas), you might consider splitting the bottom of the stem a few inches up or gently scraping away some of the outer bark to encourage faster moisture release during air drying.
Step 3: Method 1: The Timeless Art of Air Drying – Simple and Rustic
Air drying is the most traditional, easiest, and most budget-friendly method, producing beautiful rustic results perfect for bouquets, wreaths, and garlands.
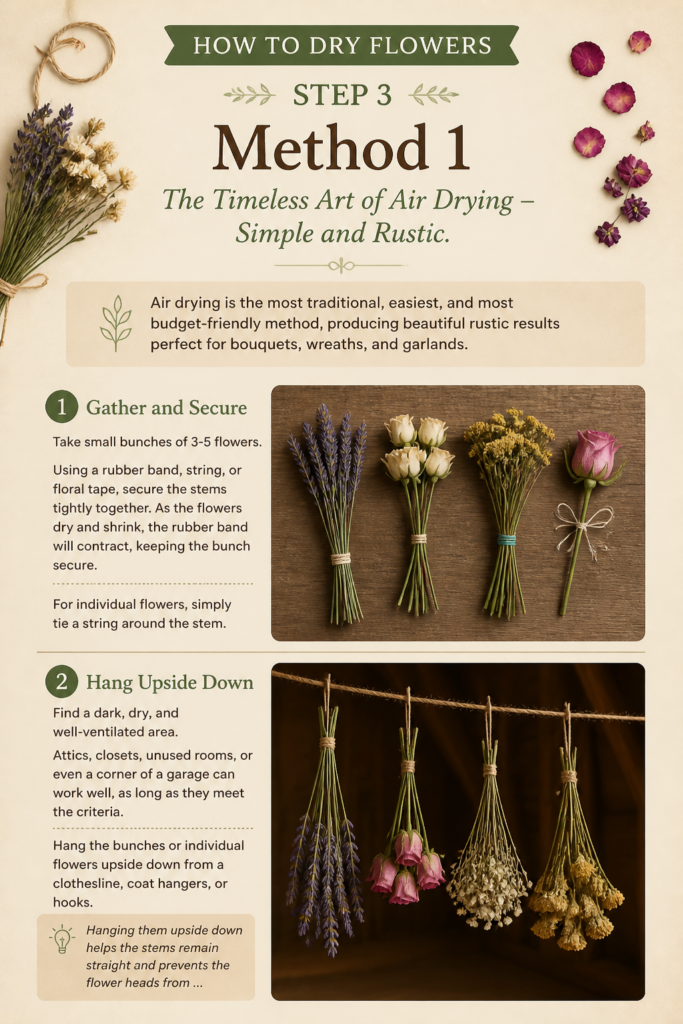
- Gather and Secure: Take small bunches of 3-5 flowers. Using a rubber band, string, or floral tape, secure the stems tightly together. As the flowers dry and shrink, the rubber band will contract, keeping the bunch secure. For individual flowers, simply tie a string around the stem.
- Hang Upside Down: Find a dark, dry, and well-ventilated area. Attics, closets, unused rooms, or even a corner of a garage can work well, as long as they meet the criteria. Hang the bunches or individual flowers upside down from a clothesline, coat hangers, or hooks. Hanging them upside down helps the stems remain straight and prevents the flower heads from drooping or collapsing as they dry.
- Ensure Good Airflow: Space the bunches far enough apart so air can circulate freely around each one. Overcrowding can trap moisture and lead to mold.
- Patience is a Virtue: The drying process typically takes 2-4 weeks, depending on the flower type, humidity levels, and air circulation. You’ll know they’re ready when the flowers feel completely dry, crisp, and firm to the touch. The stems should snap rather than bend.
- Finishing Touch: Once fully dried, you can lightly mist your flowers with an unscented hairspray (a cheap, strong-hold option works best) or a specialized floral sealant. This helps to protect them from brittleness, reduce shedding, and slightly enhance their color retention.
Pro tip: If you’re drying flowers with large, heavy heads (like hydrangeas), consider drying them individually or in very small bunches to prevent sagging. For a more modern look, some flowers like eucalyptus or lavender can be air-dried standing upright in a vase without water, allowing them to gently curve and create unique silhouettes.
Step 4: Method 2: Pressing for Flat Beauty – Delicate and Detailed
Flower pressing is perfect for creating flat, delicate botanical art, ideal for framing, greeting cards, bookmarks, or resin projects. It’s a method that captures intricate details beautifully.

- Gather Your Materials: You’ll need heavy books (dictionaries, encyclopedias work great), absorbent paper (blotting paper, plain newsprint, or even coffee filters), and cardboard. A dedicated flower press is also an excellent investment for serious crafters.
- Prepare Your Flowers: Choose relatively flat flowers or carefully separate petals from larger blooms. Trim stems very short or remove them entirely. Gently blot any excess moisture from the petals.
- Layering Technique:
- Start with a piece of cardboard.
- Place a sheet of absorbent paper on top.
- Carefully arrange your flowers on the absorbent paper, ensuring they don’t overlap. Use tweezers for delicate placement to avoid damaging petals.
- Place another sheet of absorbent paper over the flowers.
- Add another piece of cardboard on top.
- Repeat the layers if you’re pressing multiple batches.
- Apply Pressure: Stack heavy books on top of your layered materials, ensuring even pressure. If using a flower press, tighten the screws firmly.
- Change Paper: After 3-5 days, carefully open your press or books and replace the damp absorbent paper with fresh, dry sheets. This is crucial for preventing mold and speeding up the drying process.
- The Waiting Game: Continue pressing for 2-4 weeks, checking periodically. The flowers are ready when they feel completely dry and papery to the touch, and all moisture has been removed.
Pro tip: Experiment with arranging flowers and leaves in artistic compositions before pressing them. This way, when they dry, they’ll be preserved in your desired arrangement. For extra vibrancy, try pressing flowers that have naturally thin petals, as they tend to retain color better than thick-petaled varieties when pressed.
Step 5: Method 3: Silica Gel for Vibrant 3D Forms – Color and Shape Retention
For flowers where retaining their original 3D shape and vibrant color is paramount, silica gel is your secret weapon. This desiccant absorbs moisture quickly and efficiently.
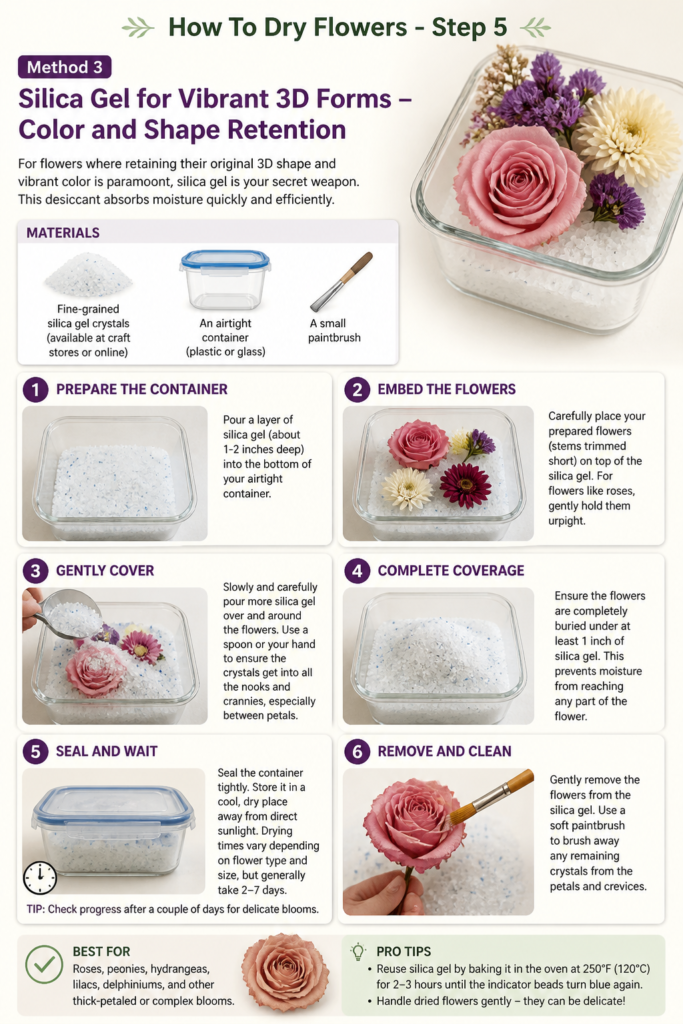
- Materials: You’ll need fine-grained silica gel crystals (available at craft stores or online), an airtight container (plastic or glass), and a small paintbrush.
- Prepare the Container: Pour a layer of silica gel (about 1-2 inches deep) into the bottom of your airtight container.
- Embed the Flowers: Carefully place your prepared flowers (stems trimmed short) on top of the silica gel. For flowers like roses, gently hold them upright.
- Gently Cover: Slowly and carefully pour more silica gel over and around the flowers. Use a spoon or your hand to ensure the crystals get into all the nooks and crannies, especially between petals. The goal is to completely bury the flowers without crushing them.
- Seal and Wait: Seal the container tightly with its lid. Place it in a dry, room-temperature location. The drying time varies greatly by flower type and size, ranging from 2-7 days. Delicate flowers like pansies might be ready in a couple of days, while a large rose could take a week.
- Check and Retrieve: After the estimated drying time, carefully unbury one flower. It should feel dry, crisp, and retain its shape and color. If not, re-bury and check again in a day or two. Once dry, gently brush off any clinging silica gel with a soft paintbrush.
Pro tip: Silica gel can be reused! When the crystals turn pink (indicating they’ve absorbed maximum moisture), spread them on a baking sheet and bake them in an oven at 250°F (120°C) for a few hours until they turn back to their original blue or clear color. Always follow manufacturer instructions for recharging. For especially delicate flowers, try using a mix of silica gel and fine sand (about 50/50) to provide more gentle support while drying.
Step 6: Method 4: The Speedy Microwave Press – Instant Gratification
If you’re short on time but still want pressed flowers, the microwave can dramatically speed up the process, turning weeks into minutes. This method is best for flat flowers or individual petals.
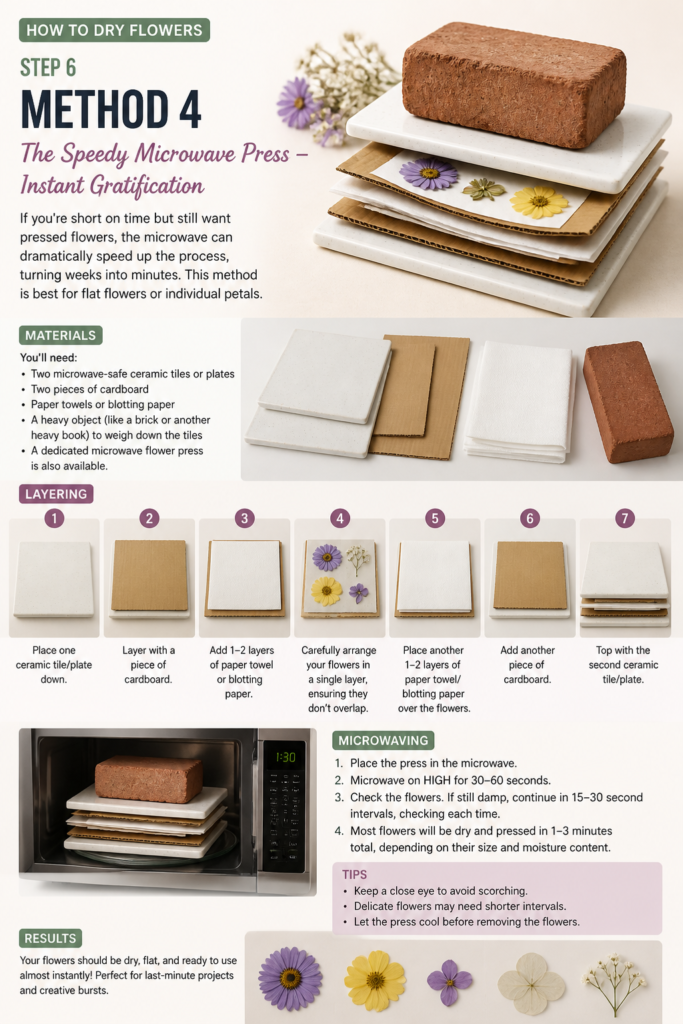
- Materials: You’ll need two microwave-safe ceramic tiles or plates, two pieces of cardboard, paper towels or blotting paper, and a heavy object (like a brick or another heavy book) to weigh down the tiles. A dedicated microwave flower press is also available.
- Layering:
- Place one ceramic tile/plate down.
- Layer with a piece of cardboard.
- Add 1-2 layers of paper towel or blotting paper.
- Carefully arrange your flowers in a single layer, ensuring they don’t overlap.
- Place another 1-2 layers of paper towel/blotting paper over the flowers.
- Add another piece of cardboard.
- Top with the second ceramic tile/plate.
- Microwave in Bursts: Place the stacked materials in the microwave. Put your heavy object on top of the stack. Microwave on a medium-low setting (around 50-70% power) for 30-60 second bursts.
- Check and Repeat: After each burst, carefully remove the stack, lift the top tile, and check the flowers. Replace the damp paper towels with dry ones if needed. Continue microwaving in short bursts, checking frequently, until the flowers are dry and crisp. This can take anywhere from 1-5 minutes total, depending on the flower and microwave power.
- Cool Down: Once dry, remove the flowers and let them cool completely. They will be fragile.
Pro tip: Start with very short bursts (10-15 seconds) for the first few rounds, especially if you’re new to this method, to avoid scorching your flowers. The key is to remove moisture gradually. This method works exceptionally well for delicate, thin-petaled flowers like pansies, violas, or individual rose petals.
Step 7: Finish and Preserve Your Dried Treasures – Longevity and Protection
Once your flowers are beautifully dried, a final touch of care will ensure they last for years, protecting them from environmental damage and decay.
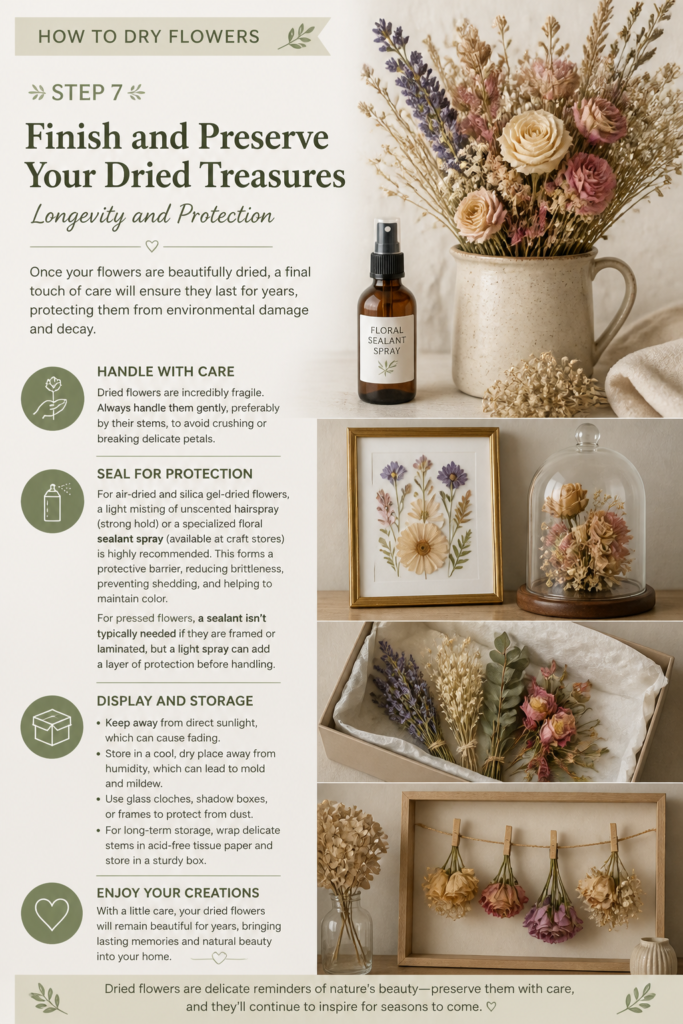
- Handle with Care: Dried flowers are incredibly fragile. Always handle them gently, preferably by their stems, to avoid crushing or breaking delicate petals.
- Seal for Protection: For air-dried and silica gel-dried flowers, a light misting of unscented hairspray (strong hold) or a specialized floral sealant spray (available at craft stores) is highly recommended. This forms a protective barrier, reducing brittleness, preventing shedding, and helping to maintain color. For pressed flowers, a sealant isn’t typically needed if they are framed or laminated, but a light spray can add a layer of protection before handling.
- Display and Storage:
- Keep Away from Direct Sunlight: UV rays are the primary enemy of dried flowers, causing them to fade rapidly. Display them in areas with indirect light.
- Avoid Humidity: Humidity can cause dried flowers to reabsorb moisture, leading to softening, drooping, and even mold. Keep them in dry environments.
- Dust Gently: Over time, dust will accumulate. Use a soft, dry paintbrush, a can of compressed air (from a safe distance), or a hairdryer on a cool, low setting to gently remove dust.
- Airtight Storage: If you’re not immediately displaying your dried flowers, store them in airtight containers or boxes in a cool, dark, dry place. Add a small desiccant packet (like the ones found in shoe boxes) for extra moisture protection.
- Creative Applications: Now for the fun part! Use your dried flowers in bouquets, wreaths, potpourri, resin art, framed botanical prints, greeting cards, candles, or jewelry. The possibilities are endless, limited only by your imagination.
Pro tip: When spraying with sealant or hairspray, do it in a well-ventilated area or outdoors. Hold the can about 10-12 inches away from the flowers and apply a light, even coat. Multiple thin coats are better than one heavy coat, which can make flowers look wet or sticky. For pressed flowers that you plan to incorporate into crafts, consider using archival, acid-free paper and glues to ensure their longevity.
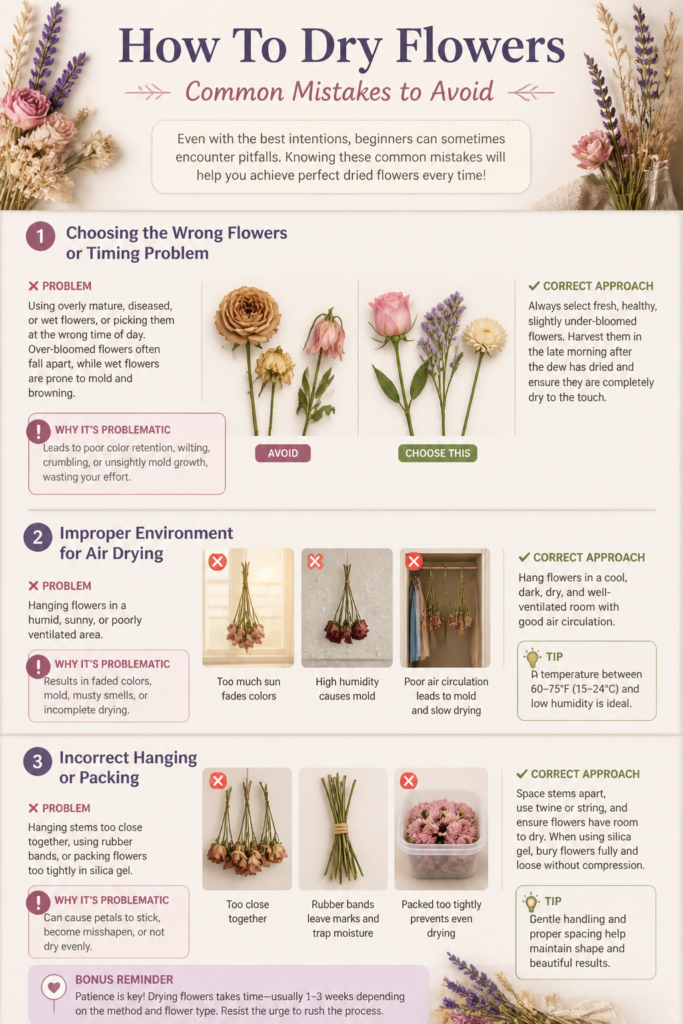
Common Mistakes to Avoid
Even with the best intentions, beginners can sometimes encounter pitfalls. Knowing these common mistakes will help you achieve perfect dried flowers every time!
-
Choosing the Wrong Flowers or Timing:
- Problem: Using overly mature, diseased, or wet flowers, or picking them at the wrong time of day. Over-bloomed flowers often fall apart, while wet flowers are prone to mold and browning.
- Why it’s problematic: Leads to poor color retention, wilting, crumbling, or unsightly mold growth, wasting your effort.
- Correct approach: Always select fresh, healthy, slightly under-bloomed flowers. Harvest them in the late morning after the dew has dried and ensure they are completely dry to the touch.
-
Improper Environment for Air Drying:
- Problem: Hanging flowers in a humid, sunny, or poorly ventilated area.
- Why it’s problematic: Humidity encourages mold and prevents proper drying, leading to browning and softening. Sunlight causes rapid fading, and poor ventilation traps moisture.
- Correct approach: Choose a dark, dry, well-ventilated space (like a closet, attic, or unused room). Ensure good airflow around each bunch.
-
Overcrowding During Drying:
- Problem: Stuffing too many flowers into one air-drying bunch, press, or silica gel container.
- Why it’s problematic: Prevents even airflow and moisture removal, leading to uneven drying, crushed petals, or mold.
- Correct approach: Give your flowers space. Use small bunches for air drying, arrange flowers in a single layer for pressing, and ensure silica gel completely surrounds each bloom.
-
Skipping the Finishing Touches:
- Problem: Not applying a sealant (like hairspray or floral spray) after drying.
- Why it’s problematic: Dried flowers are naturally brittle and prone to shedding petals, collecting dust, and fading more quickly without a protective layer.
- Correct approach: Once fully dry, lightly mist your flowers with an unscented hairspray or floral sealant. This adds a protective layer, reduces brittleness, and helps preserve color.
-
Impatience:
- Problem: Rushing the drying process or removing flowers too soon.
- Why it’s problematic: Incompletely dried flowers will soften, droop, or develop mold when exposed to air, undoing all your hard work.
- Correct approach: Allow adequate time for each method. Air drying takes weeks, pressing several weeks, and silica gel a few days. Check for complete dryness before handling or displaying.
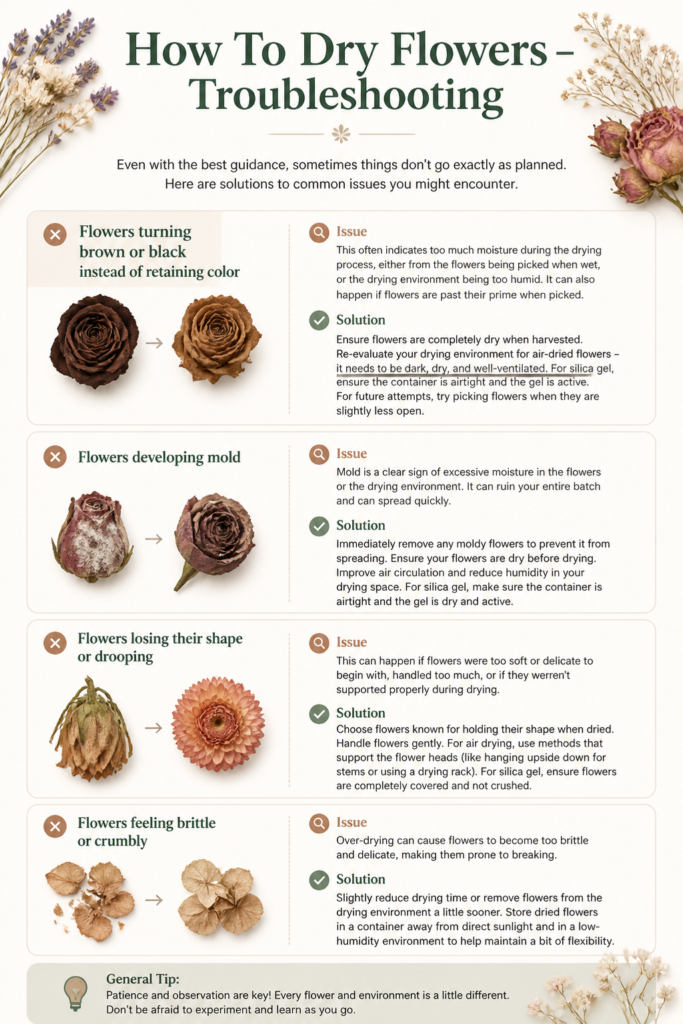
Troubleshooting
Even with the best guidance, sometimes things don’t go exactly as planned. Here are solutions to common issues you might encounter:
-
Flowers turning brown or black instead of retaining color:
- Issue: This often indicates too much moisture during the drying process, either from the flowers being picked when wet, or the drying environment being too humid. It can also happen if flowers are past their prime when picked.
- Solution: Ensure flowers are completely dry when harvested. Re-evaluate your drying environment for air-dried flowers – it needs to be dark, dry, and well-ventilated. For silica gel, ensure the container is airtight and the gel is active. For future attempts, try picking flowers when they are slightly less open.
-
Flowers developing mold:
- Issue: Mold is a clear sign of excessive moisture and/or insufficient airflow.
- Solution: Immediately discard any molded flowers to prevent spread. Drastically improve ventilation in your drying area (e.g., add a fan, open a window if humidity allows). Ensure flowers are bone-dry when picked and that there’s plenty of space between them. If using silica gel, ensure the container is airtight and the gel is not saturated.
-
Dried flowers are too brittle and crumble easily:
- Issue: This is a common characteristic of dried flowers, but it can be exacerbated by over-drying or lack of protection.
- Solution: A light mist of unscented hairspray or floral sealant spray (as mentioned in Step 7) is your best friend here. It adds a thin, protective layer that helps reduce brittleness. Handle dried flowers as little as possible and store them away from direct heat sources or extreme temperature fluctuations.
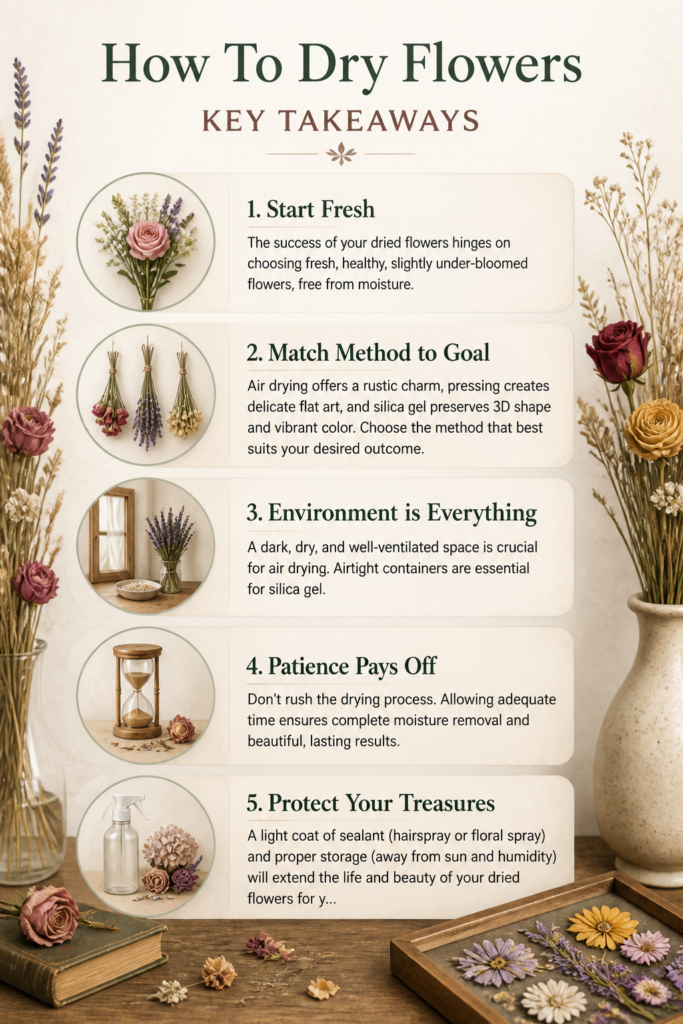
Key Takeaways
- Start Fresh: The success of your dried flowers hinges on choosing fresh, healthy, slightly under-bloomed flowers, free from moisture.
- Match Method to Goal: Air drying offers a rustic charm, pressing creates delicate flat art, and silica gel preserves 3D shape and vibrant color. Choose the method that best suits your desired outcome.
- Environment is Everything: A dark, dry, and well-ventilated space is crucial for air drying. Airtight containers are essential for silica gel.
- Patience Pays Off: Don’t rush the drying process. Allowing adequate time ensures complete moisture removal and beautiful, lasting results.
- Protect Your Treasures: A light coat of sealant (hairspray or floral spray) and proper storage (away from sun and humidity) will extend the life and beauty of your dried flowers for years.
- Avoid Overcrowding: Give your flowers ample space to dry evenly and prevent mold.
Frequently Asked Questions
Here are some common questions aspiring flower dryers often ask:
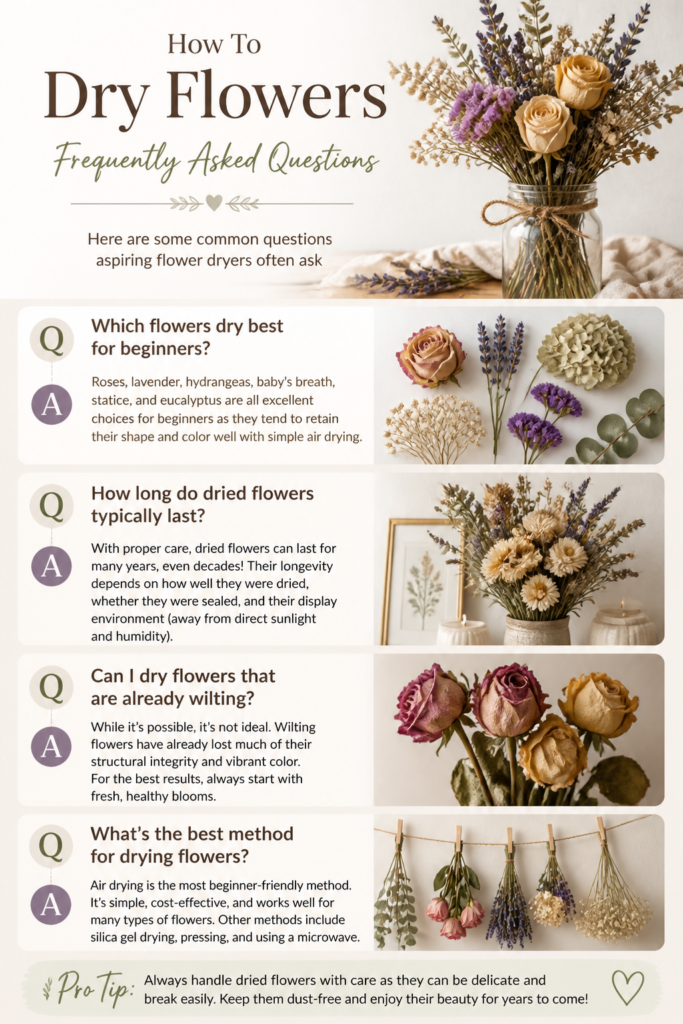
Q: Which flowers dry best for beginners?
A: Roses, lavender, hydrangeas, baby’s breath, statice, and eucalyptus are all excellent choices for beginners as they tend to retain their shape and color well with simple air drying.
Q: How long do dried flowers typically last?
A: With proper care, dried flowers can last for many years, even decades! Their longevity depends on how well they were dried, whether they were sealed, and their display environment (away from direct sunlight and humidity).
Q: Can I dry flowers that are already wilting?
A: While it’s possible, it’s not ideal. Wilting flowers have already lost much of their structural integrity and vibrant color. For the best results, always start with fresh, healthy blooms.
Q: Do I need special equipment to dry flowers?
A: Not necessarily! Air drying only requires string and a hanger. Pressing can be done with heavy books. Silica gel is a specific material, but a microwave press can be improvised with ceramic tiles. There are many ways to start with items you likely already have at home.
What’s Next?
You’ve mastered the art of drying flowers – now it’s time to unleash your creativity! The world of dried flower crafting is vast and exciting. Here are a few ideas to get you started:
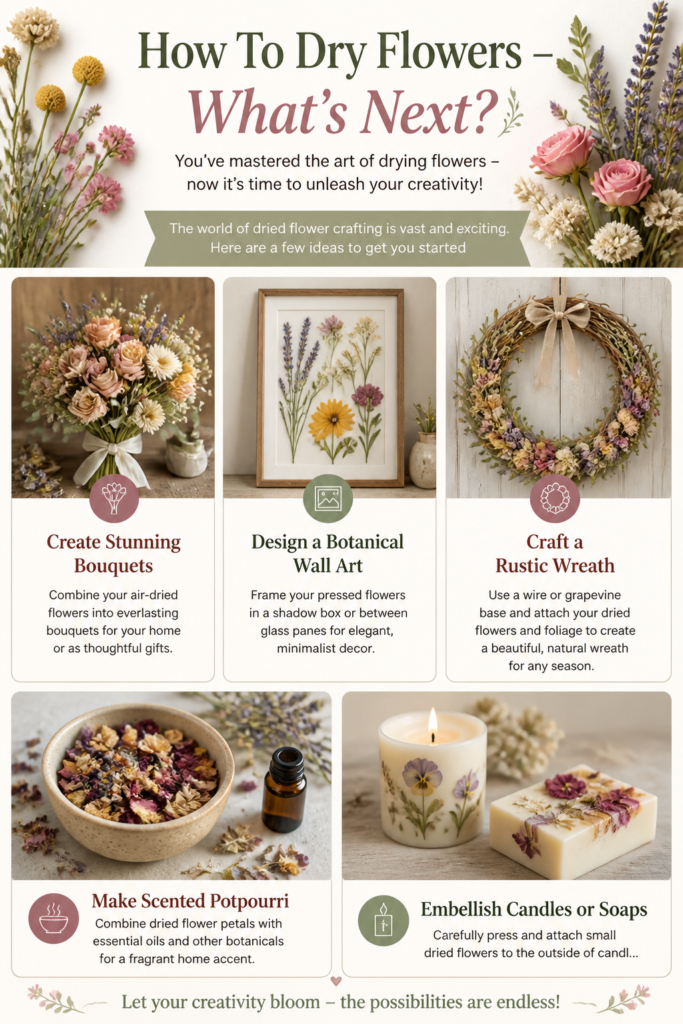
- Create Stunning Bouquets: Combine your air-dried flowers into everlasting bouquets for your home or as thoughtful gifts.
- Design a Botanical Wall Art: Frame your pressed flowers in a shadow box or between glass panes for elegant, minimalist decor.
- Craft a Rustic Wreath: Use a wire or grapevine base and attach your dried flowers and foliage to create a beautiful, natural wreath for any season.
- Make Scented Potpourri: Combine dried flower petals with essential oils and other botanicals for a fragrant home accent.
- Embellish Candles or Soaps: Carefully press and attach small dried flowers to the outside of candles or embed them in homemade soaps for a touch of natural beauty.
- Dive into Resin Art: Encapsulate your delicate dried flowers in clear resin to create jewelry, coasters, paperweights, or unique decorative pieces.
- Personalize Greeting Cards: Use pressed flowers to create unique, heartfelt greeting cards for any occasion.
Don’t be afraid to experiment with different flower types, colors, and arrangements. Each dried bloom tells a story, and now you have the power to preserve those stories. So gather your favorite blossoms, pick your method, and start crafting today. Your home, your gifts, and your memories will thank you for it!