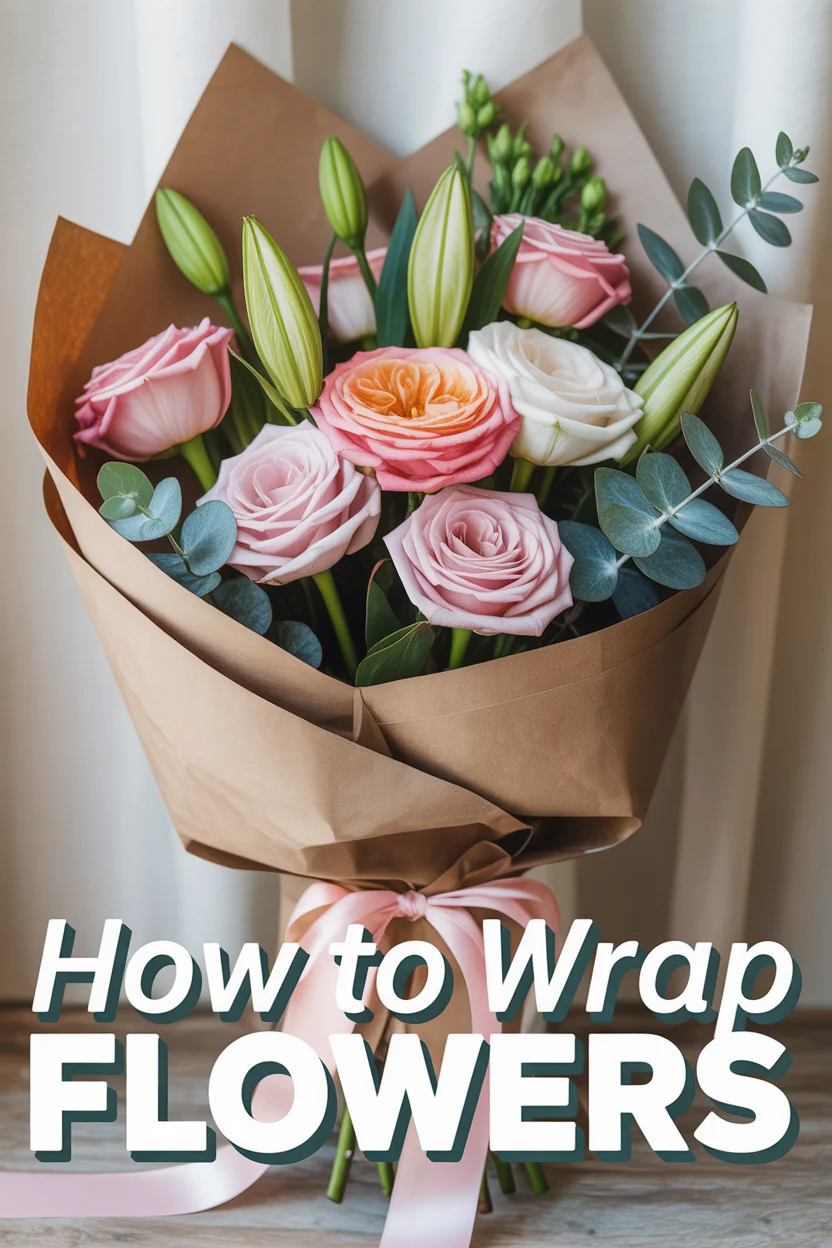
How To Wrap Flowers
🛠️ The Ultimate Maker's Toolkit
I've tested thousands of craft tools over the years. Whether you are quilting, crafting, or building mixed-media art, these are the top 5 absolute non-negotiable tools I personally recommend to guarantee professional results.
🪡 SINGER Heavy Duty 4452 Sewing Machine
The sewing community highly recommends this as the ultimate "bulletproof" entry-level machine. Its heavy metal frame powerfully pushes through thick denim and heavy quilt layers that would instantly jam a standard plastic machine.
✂️ Fiskars 8" Orange-Handled Scissors
Never settle for dull dollar-store blades. Wirecutter repeatedly names Fiskars the absolute best all-purpose craft scissor due to its legendary precision-ground blades and an ergonomic grip that prevents hand-cramping.
🔥 Gorilla Dual Temp Hot Glue Gun
Named Wirecutter's top choice because it literally does the work of two tools. It features dual-temperature settings offering low heat for delicate florals and blistering high heat for heavy wood adhesion repairs.
🖌️ Mod Podge Waterbase Gloss Sealer
The absolute undisputed champion of decoupage and paper crafts. Experts rely exclusively on this exact water-based formula because it glues, seals, and finishes beautifully without yellowing or flaking over time.
🎨 Apple Barrel Acrylic Paint (2 oz)
The quintessential, incredibly inexpensive craft paint. Woodworkers and hobby painters swear by its smooth flow and matte finish, providing massive value and remarkably thick color coverage on rough surfaces.
Have you ever gazed at a stunning bouquet in a flower shop, admiring not just the blooms but the elegant way they’re presented? There’s a certain magic in a beautifully wrapped bunch of flowers – it elevates a simple gift into a thoughtful gesture, a fleeting moment into a cherished memory.
Learning to wrap flowers yourself isn’t just a practical skill; it’s an art form that allows you to add a personal touch, express your creativity, and make every floral gift feel extra special and heartfelt.
Quick Overview
This guide will empower you to transform a loose collection of flowers into a professionally presented, eye-catching bouquet.
You’ll learn the essential techniques, discover the best materials, and gain the confidence to wrap flowers for any occasion, from a casual pick-me-up to a grand celebration. Get ready to impress your loved ones with your newfound floral artistry!
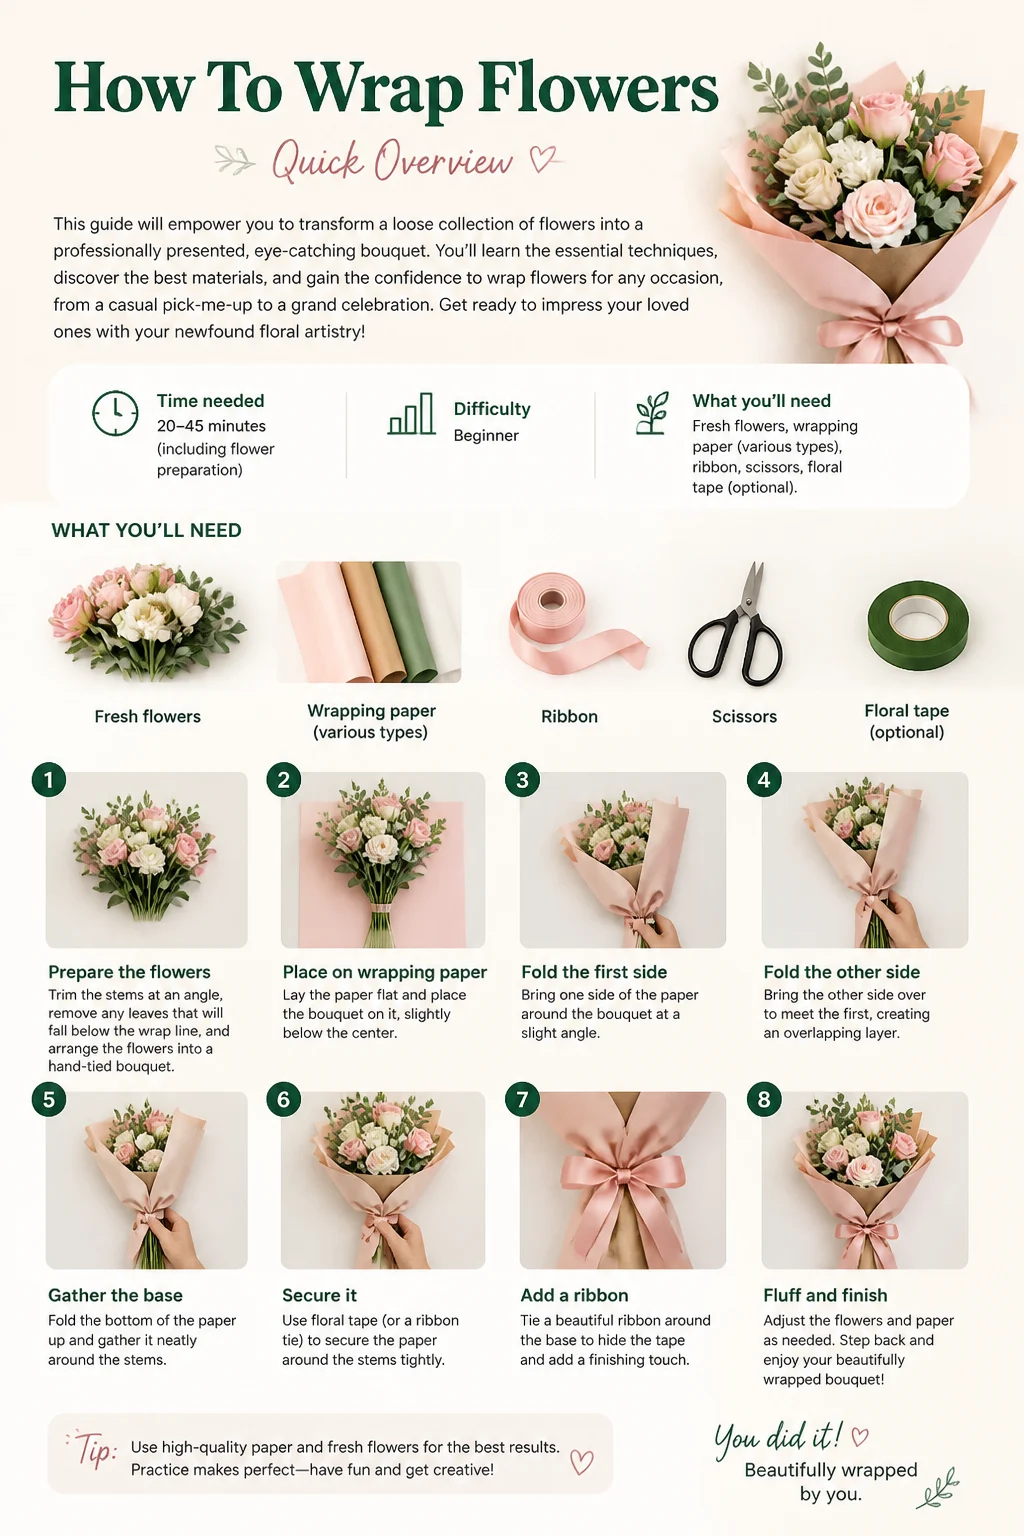
Time needed: 20-45 minutes (including flower preparation)
Difficulty: Beginner
What you’ll need: Fresh flowers, wrapping paper (various types), ribbon, scissors, floral tape (optional).
Step-by-Step Instructions
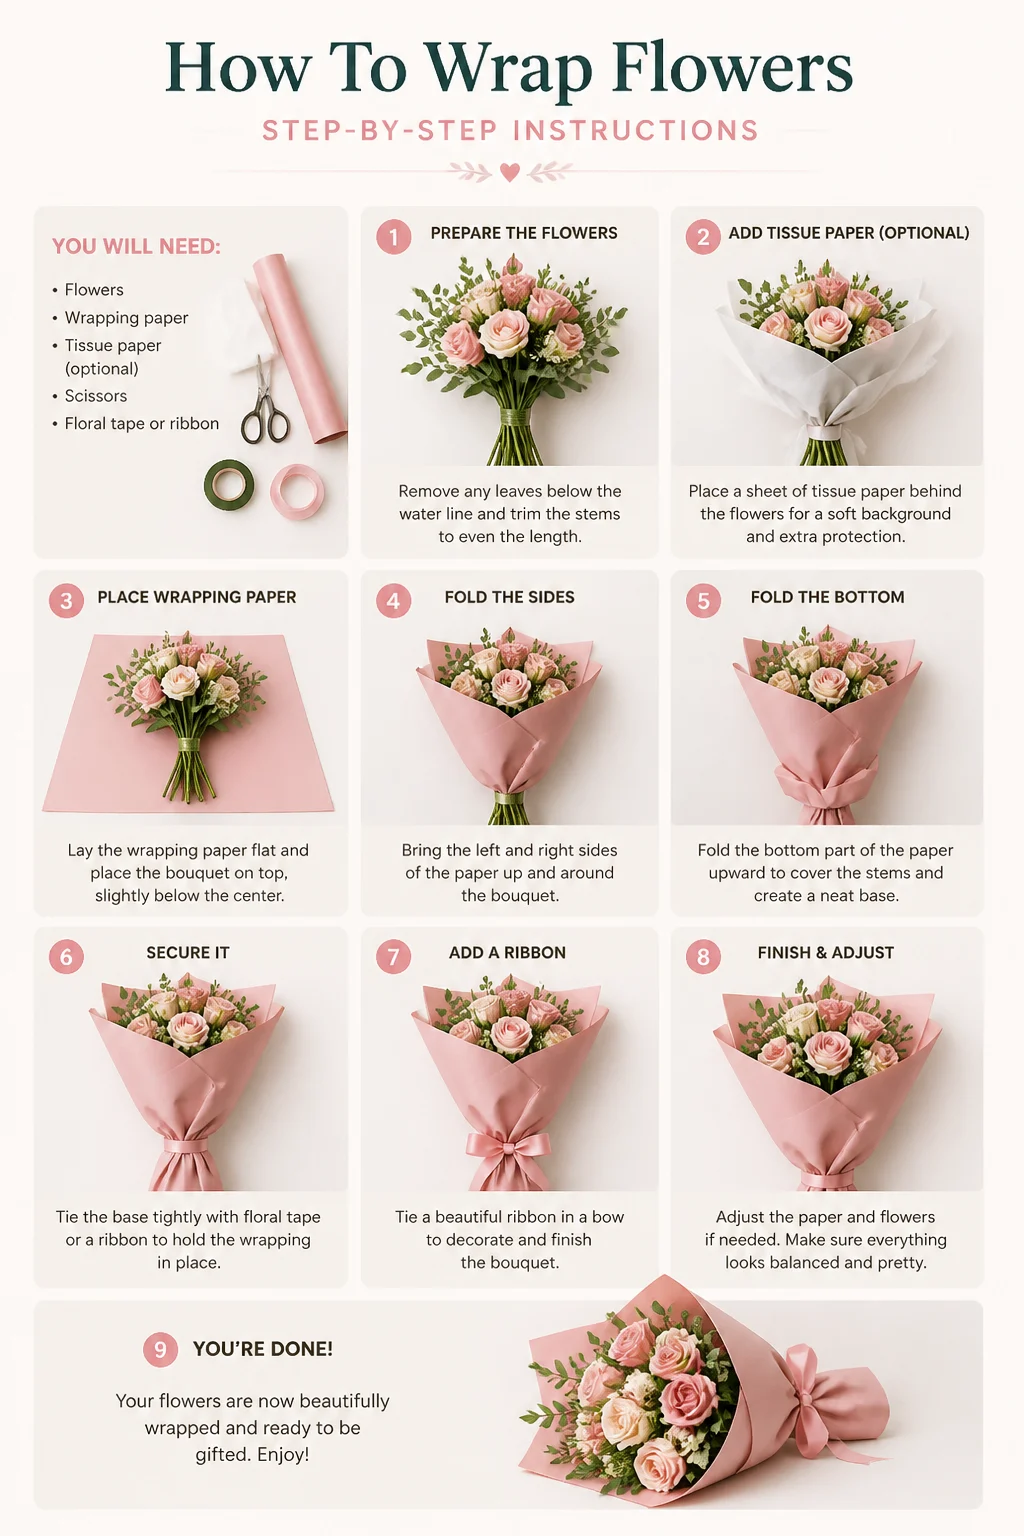
Step 1: Gather Your Floral Treasures & Tools
Before you embark on your wrapping journey, ensure you have everything you need laid out and ready. This initial preparation sets the stage for a smooth and enjoyable crafting experience. Think of it as preparing your artist’s palette before painting your masterpiece.
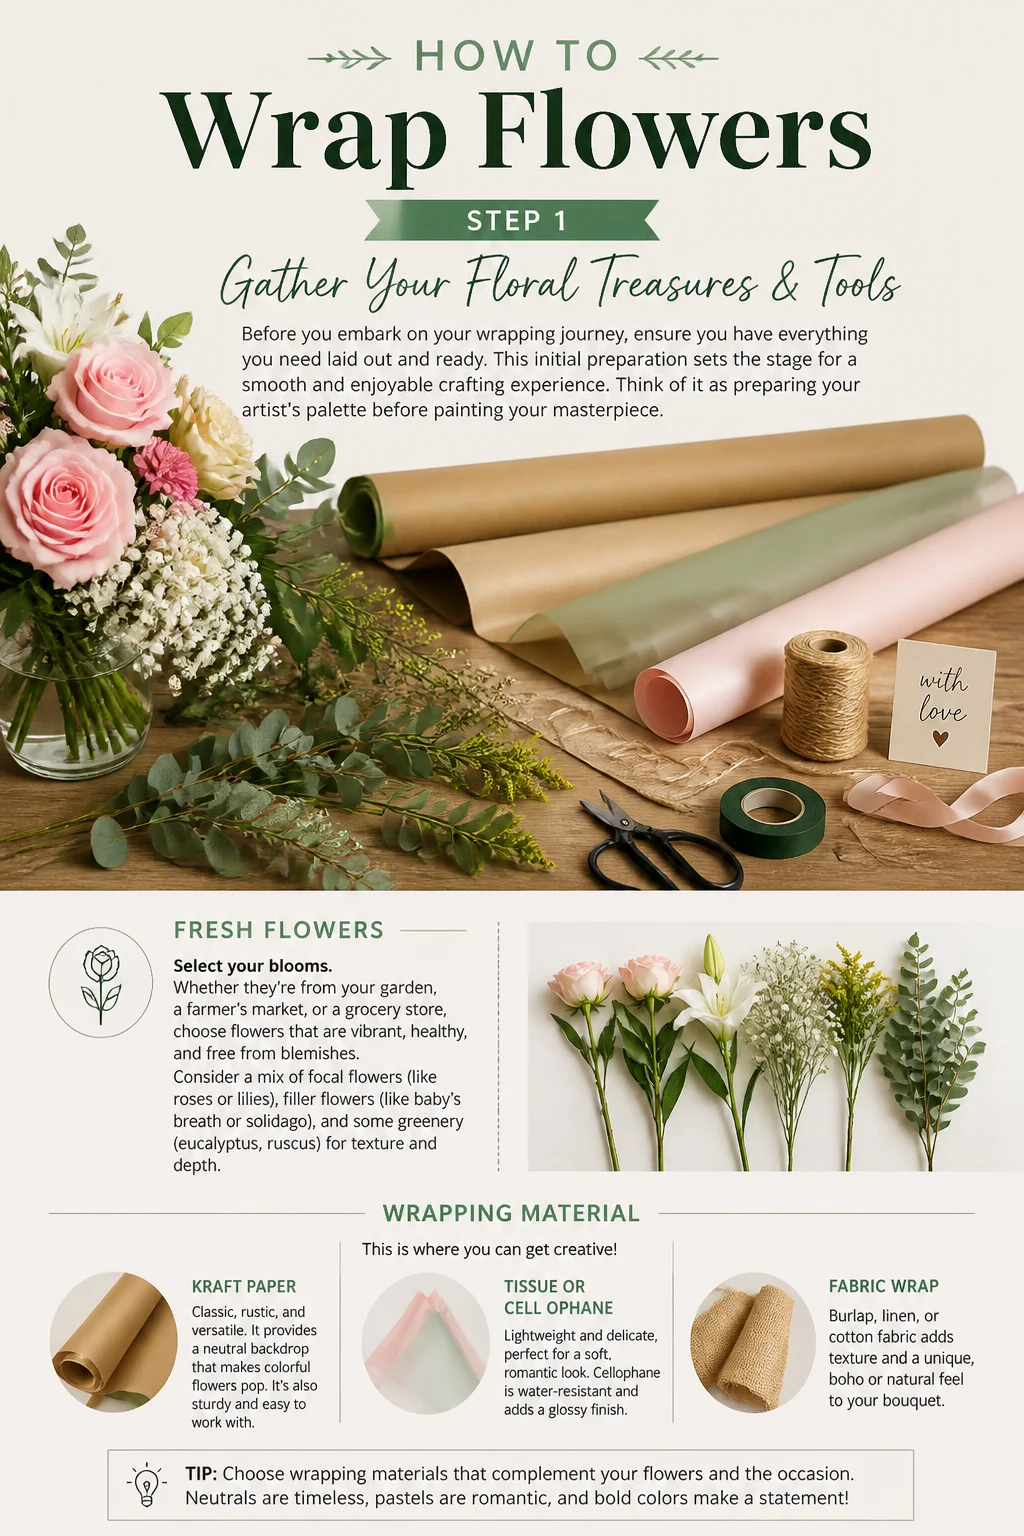
Fresh Flowers: Select your blooms. Whether they’re from your garden, a farmer’s market, or a grocery store, choose flowers that are vibrant, healthy, and free from blemishes. Consider a mix of focal flowers (like roses or lilies), filler flowers (like baby’s breath or solidago), and some greenery (eucalyptus, ruscus) for texture and depth.
Wrapping Material: This is where you can get creative!
Kraft Paper: Classic, rustic, and versatile. It provides a neutral backdrop that makes colorful flowers pop. It’s also sturdy and easy to work with.
Cellophane: Adds a protective, water-resistant layer, ideal if you’re adding a water source or want to showcase the stems. Choose clear or tinted options.
Tissue Paper: Perfect for layering, adding softness, or a pop of contrasting color. It’s delicate, so often used as an inner layer.
Fabric/Burlap: For a more luxurious or rustic feel. Muslin, linen, or even a nice scarf can work for a truly unique look.
Patterned Paper: From subtle stripes to bold botanicals, patterned paper can add personality.
Ribbon or Twine: Essential for securing your wrap and adding a decorative flourish. Satin, grosgrain, jute twine, or even raffia are great choices. Match it to your flowers or wrapping paper, or opt for a contrasting color.
Sharp Scissors or Floral Shears: Crucial for clean cuts on stems and paper. Dull scissors can crush stems, hindering water absorption.
Floral Tape (optional): Green, stretchy tape that helps hold your bouquet arrangement together before wrapping. This is particularly helpful for beginners or larger bouquets.
Paper Clips or Small Clamps (optional): Can help hold layers of paper while you’re arranging.
Pro tip: Lay out your chosen wrapping papers and ribbons together to see how their colors and textures complement each other before you start cutting. This helps visualize the final look and avoid last-minute changes.
Step 2: Prepare Your Flowers for Their Close-Up
Proper flower preparation is key to both the aesthetics and longevity of your bouquet. Think of this as grooming your flowers for their big reveal.
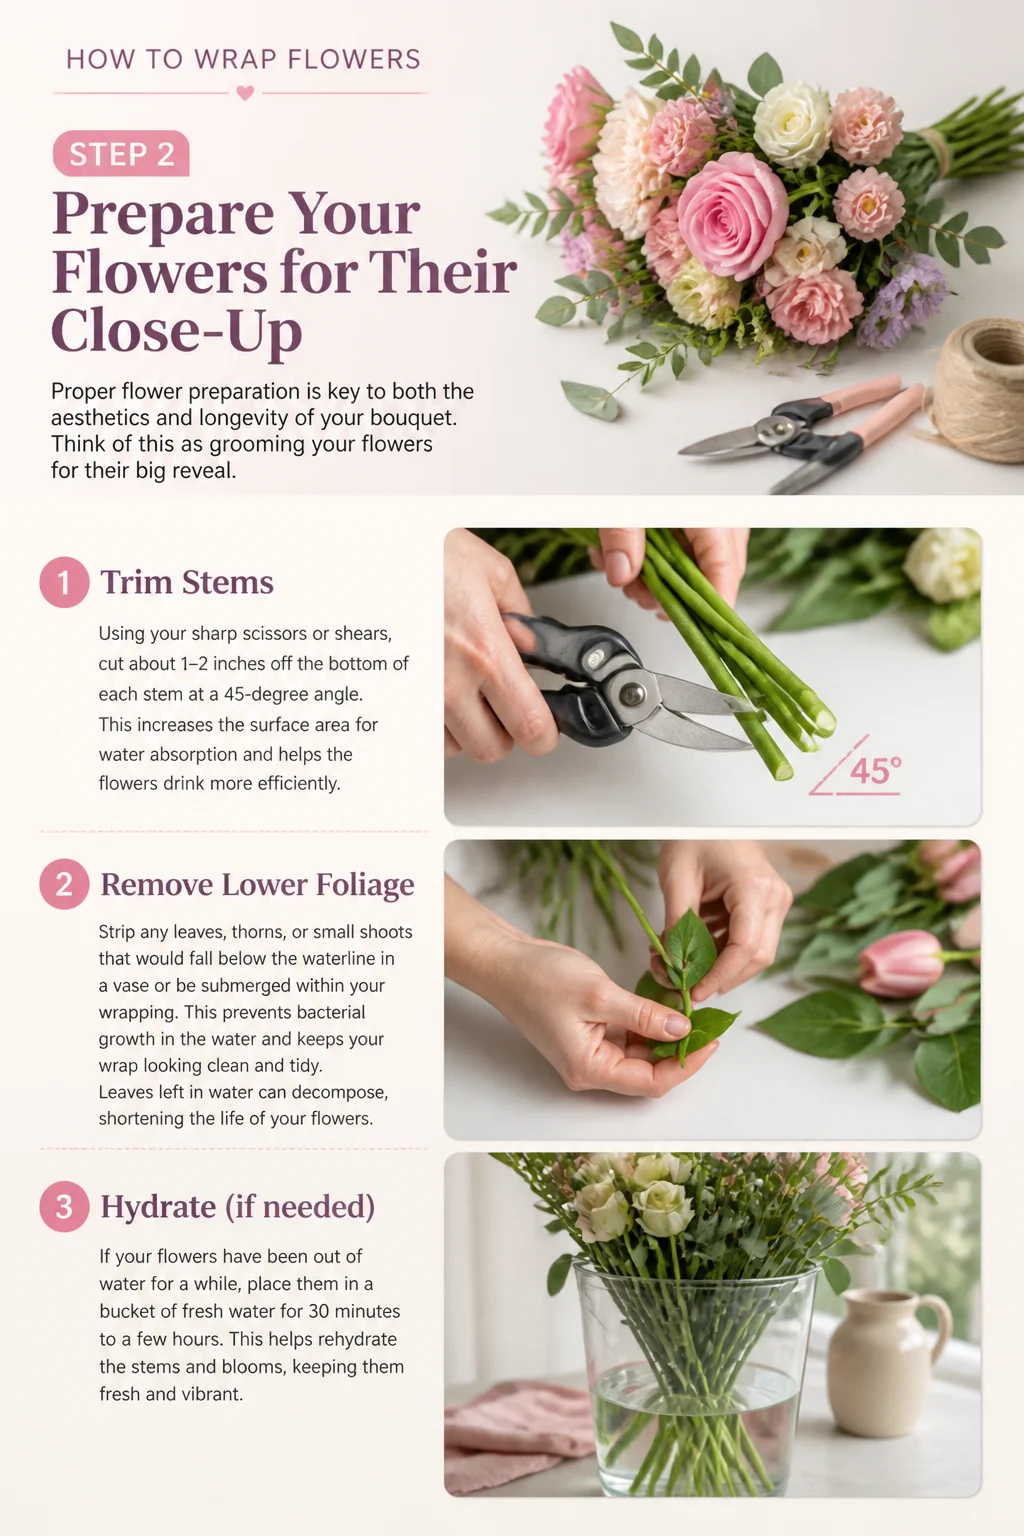
Trim Stems: Using your sharp scissors or shears, cut about 1-2 inches off the bottom of each stem at a 45-degree angle. This increases the surface area for water absorption and helps the flowers drink more efficiently.
Remove Lower Foliage: Strip any leaves, thorns, or small shoots that would fall below the waterline in a vase or be submerged within your wrapping. This prevents bacterial growth in the water and keeps your wrap looking clean and tidy. Leaves left in water can decompose, shortening the life of your flowers.
Hydrate (if needed): If your flowers have been out of water for a while, place them in a bucket of fresh water for 30 minutes to an hour. This “conditions” them, making them turgid and vibrant.
Clean Up: Gently remove any bruised petals or discolored leaves. Your goal is a pristine presentation.
Pro tip: Work on a clean, flat surface. Having ample space will make the arranging and wrapping process much smoother and prevent accidental damage to your delicate blooms.
Step 3: Craft Your Perfect Bouquet Arrangement
This is the heart of your floral creation. Arranging your flowers thoughtfully creates balance, visual appeal, and ensures each bloom gets its moment to shine.
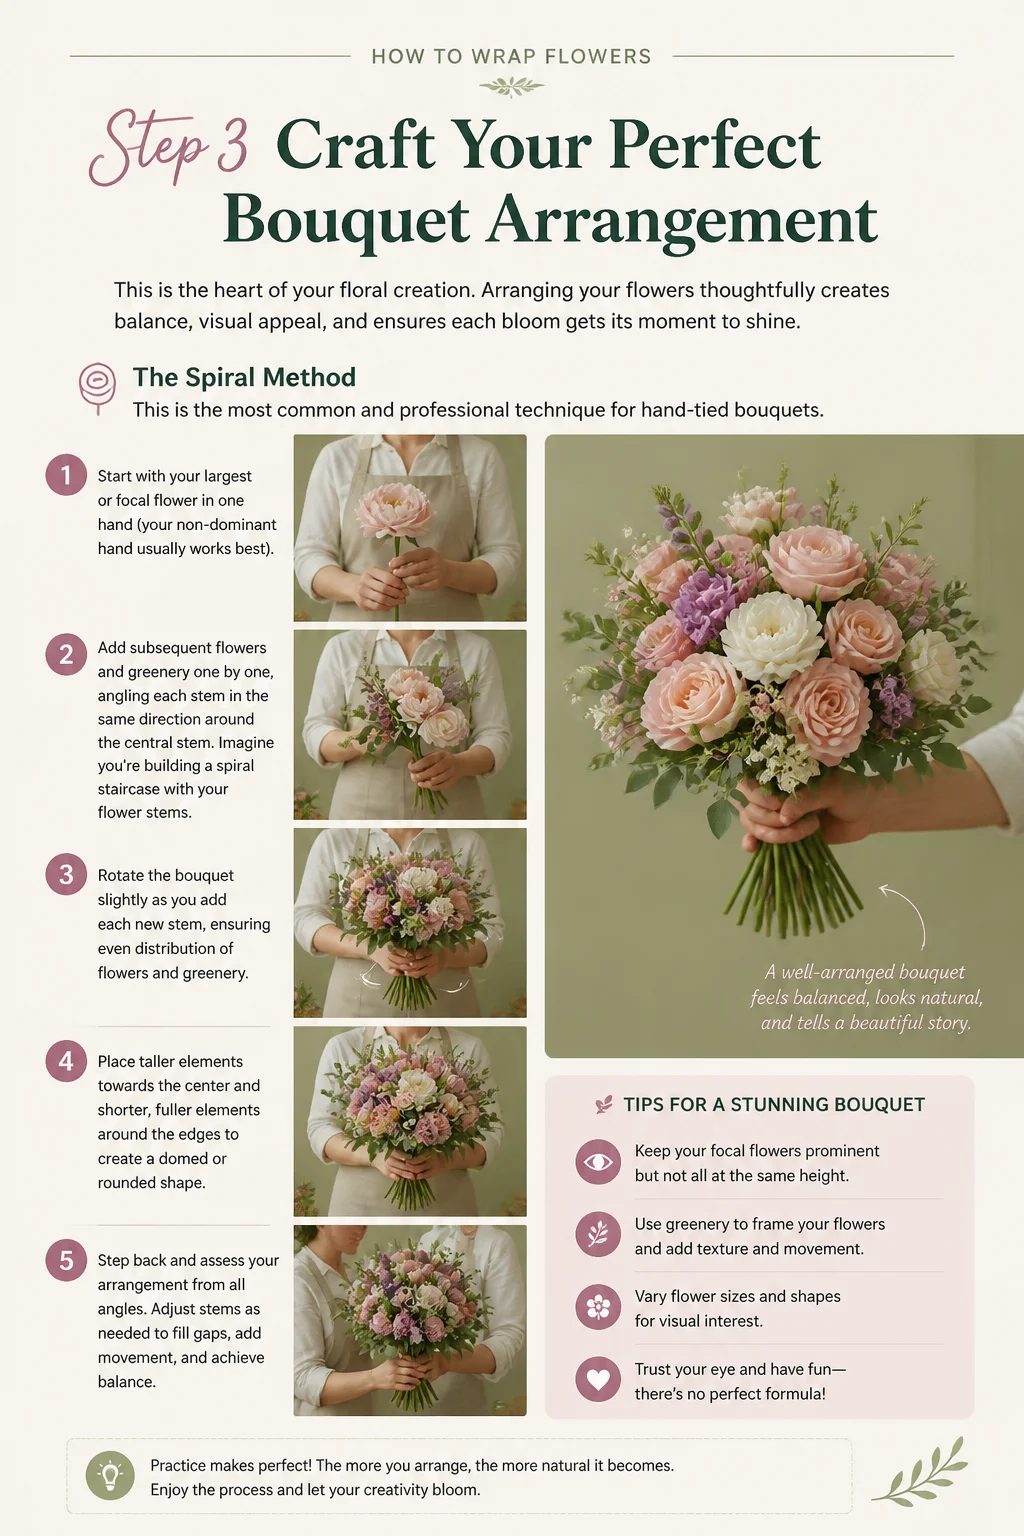
The Spiral Method: This is the most common and professional technique for hand-tied bouquets.
- Start with your largest or focal flower in one hand (your non-dominant hand usually works best).
- Add subsequent flowers and greenery one by one, angling each stem in the same direction around the central stem. Imagine you’re building a spiral staircase with your flower stems.
- Rotate the bouquet slightly as you add each new stem, ensuring even distribution of flowers and greenery.
- Place taller elements towards the center and shorter, fuller elements around the edges to create a domed or rounded shape.
- Step back and assess your arrangement. Do you have a good balance of colors, textures, and heights? Adjust as needed by gently pulling or pushing stems.
Secure the Stems (Optional but Recommended): Once you’re happy with your arrangement, use floral tape or a piece of twine to secure the stems tightly at their natural binding point (where your hand is holding them). This keeps the arrangement stable while you wrap.
Pro tip: Don’t be afraid to experiment! There’s no single “right” way to arrange. Play with different heights and textures. For a more modern look, try an asymmetrical arrangement. For a classic feel, keep it symmetrical and compact.
Step 4: Lay Out Your Wrapping Layers
The foundation of your wrap is crucial. Prepare your paper layers to accommodate your bouquet’s size and desired aesthetic.
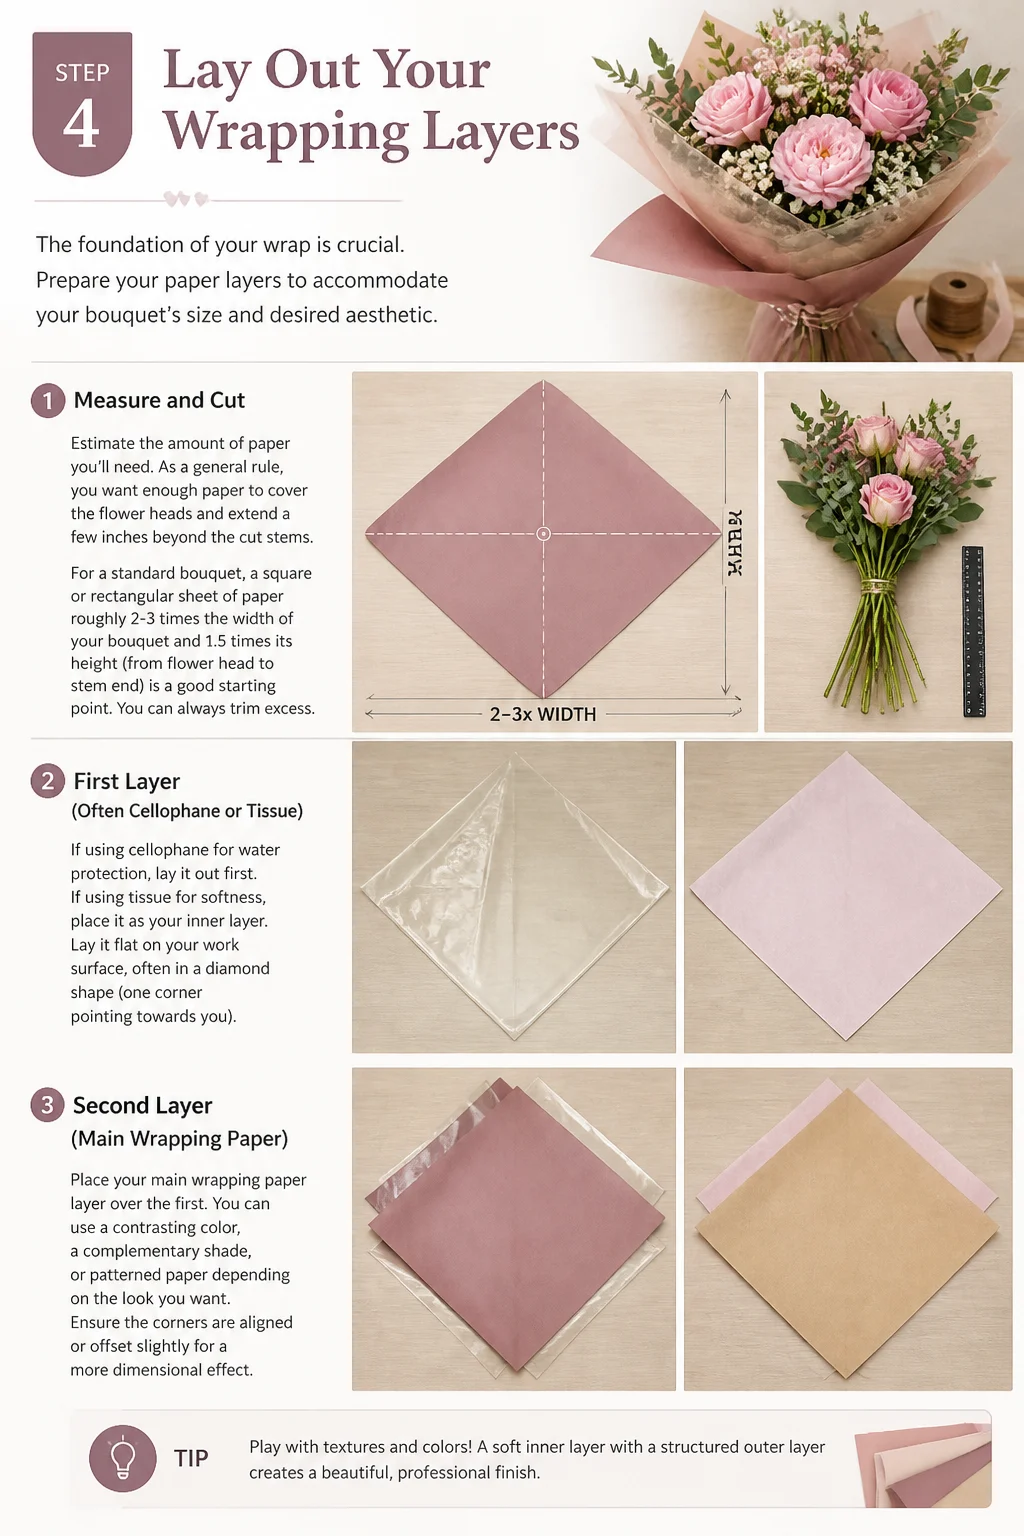
Measure and Cut: Estimate the amount of paper you’ll need. As a general rule, you want enough paper to cover the flower heads and extend a few inches beyond the cut stems.
For a standard bouquet, a square or rectangular sheet of paper roughly 2-3 times the width of your bouquet and 1.5 times its height (from flower head to stem end) is a good starting point. You can always trim excess.
First Layer (Often Cellophane or Tissue): If using cellophane for water protection, lay it out first. If using tissue for softness, place it as your inner layer. Lay it flat on your work surface, often in a diamond shape (one corner pointing towards you).
Second Layer (Main Wrapping Paper): Place your main wrapping paper (e.g., kraft paper) on top of the first layer. You can offset it slightly or align it directly, depending on the look you want. For a classic cone shape, lay it in a diamond.
Multiple Layers: Don’t hesitate to layer different papers for visual interest. A piece of tissue under kraft, or a patterned paper over a solid one, can add depth. Aim for 2-3 layers for the most impact without becoming too bulky.
Pro tip: For a clean, professional look, ensure your paper edges are neatly cut. A ruler and a craft knife can help achieve perfectly straight lines if precision is your goal.
Step 5: Position Your Bouquet and Start the Wrap
This is where your arrangement meets its beautiful casing. Precision here ensures a snug and attractive wrap.

Placement: Lay your arranged bouquet onto the prepared paper layers. Position the flowers so the binding point (where you tied the stems, or where your hand was holding them) sits roughly in the middle of the paper’s top edge (if you’re using a square/diamond layout). The flower heads should extend above the top edge, and the stems should extend down towards the bottom point.
First Fold (Bottom Corner): Take the bottom point of your outermost wrapping paper and fold it up over the stems. This creates the base of your cone. Don’t fold it too high – you want to leave the very ends of the stems exposed or just barely covered, depending on if you’re adding a water source.
Secure the Fold (Optional): If your paper is stiff or you’re struggling to hold it, a small piece of clear tape or a paper clip can temporarily hold this bottom fold in place.
Pro tip: If your bouquet is very wide, you might need to use two pieces of wrapping paper laid side-by-side, slightly overlapping in the middle, to ensure full coverage. Secure the overlap with a piece of tape on the back.
Step 6: Create the Cone and Secure the Sides
Now, you’ll bring the wrap to life, forming the classic cone shape that cradles your flowers.
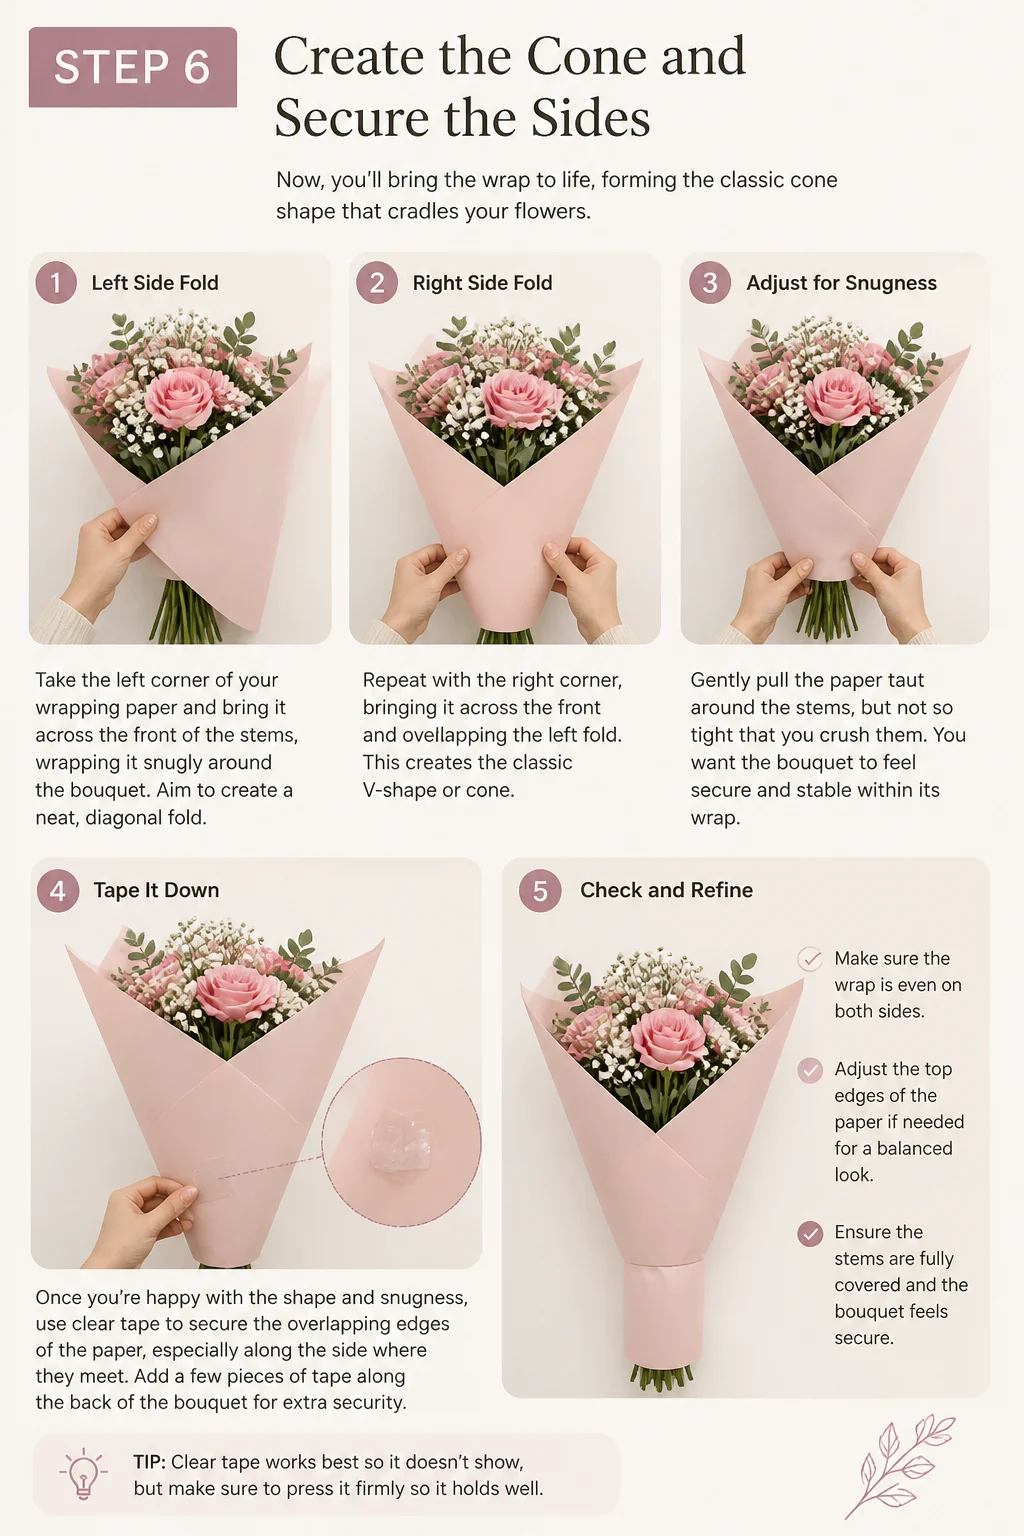
Left Side Fold: Take the left corner of your wrapping paper and bring it across the front of the stems, wrapping it snugly around the bouquet. Aim to create a neat, diagonal fold.
Right Side Fold: Repeat with the right corner, bringing it across the front and overlapping the left fold. This creates the classic V-shape or cone.
Adjust for Snugness: Gently pull the paper taut around the stems, but not so tight that you crush them. You want the bouquet to feel secure and stable within its wrap.
Tape It Down: Once you’re happy with the shape and snugness, use clear tape to secure the overlapping edges of the paper, especially along the side where they meet. Add a few pieces of tape along the back of the wrap as well to ensure everything stays put.
Pro tip: For extra security and a clean finish, you can fold a small hem (about half an inch) along the edge of each side before wrapping it around. This gives a crisp edge and prevents tearing.
Step 7: The Grand Finale: Add Ribbon & Finishing Touches
This is where you add the final flourish that elevates your wrapped flowers from good to gorgeous.
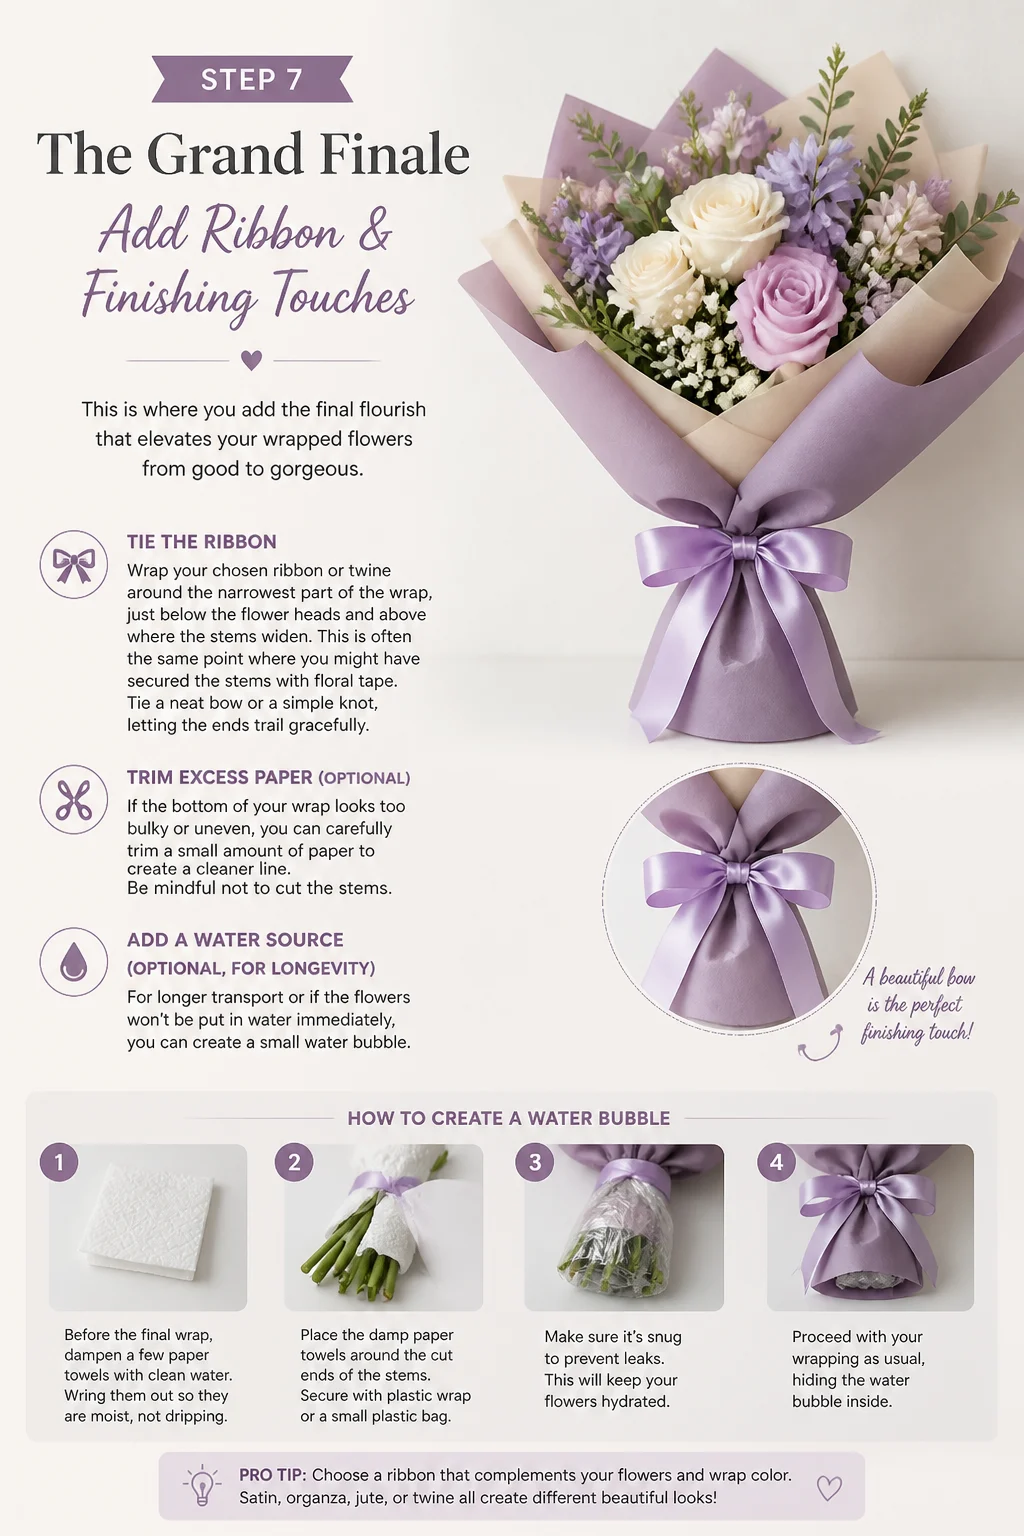
Tie the Ribbon: Wrap your chosen ribbon or twine around the narrowest part of the wrap, just below the flower heads and above where the stems widen. This is often the same point where you might have secured the stems with floral tape. Tie a neat bow or a simple knot, letting the ends trail gracefully.
Trim Excess Paper (Optional): If the bottom of your wrap looks too bulky or uneven, you can carefully trim a small amount of paper to create a cleaner line. Be mindful not to cut the stems.
Add a Water Source (Optional, for longevity): For longer transport or if the flowers won’t be put in water immediately, you can create a small “water bubble.”
- Before the final wrap, dampen a few paper towels and wrap them around the very ends of the trimmed stems.
- Secure with a rubber band.
- Place the damp paper towels inside a small plastic bag (like a sandwich bag) and secure it tightly around the stems with another rubber band.
- Ensure this water source is fully enclosed by your cellophane or inner wrapping layer to prevent leaks.
Personalize: Attach a small gift tag, a handwritten note, or a sprig of dried lavender or a feather for extra charm.
Pro tip: To make a beautiful bow, ensure your ribbon is long enough. For a classic double loop bow, aim for a length that is about 4-5 times the circumference of the area you are tying. Practice tying bows beforehand if you’re aiming for perfection!
Common Mistakes to Avoid
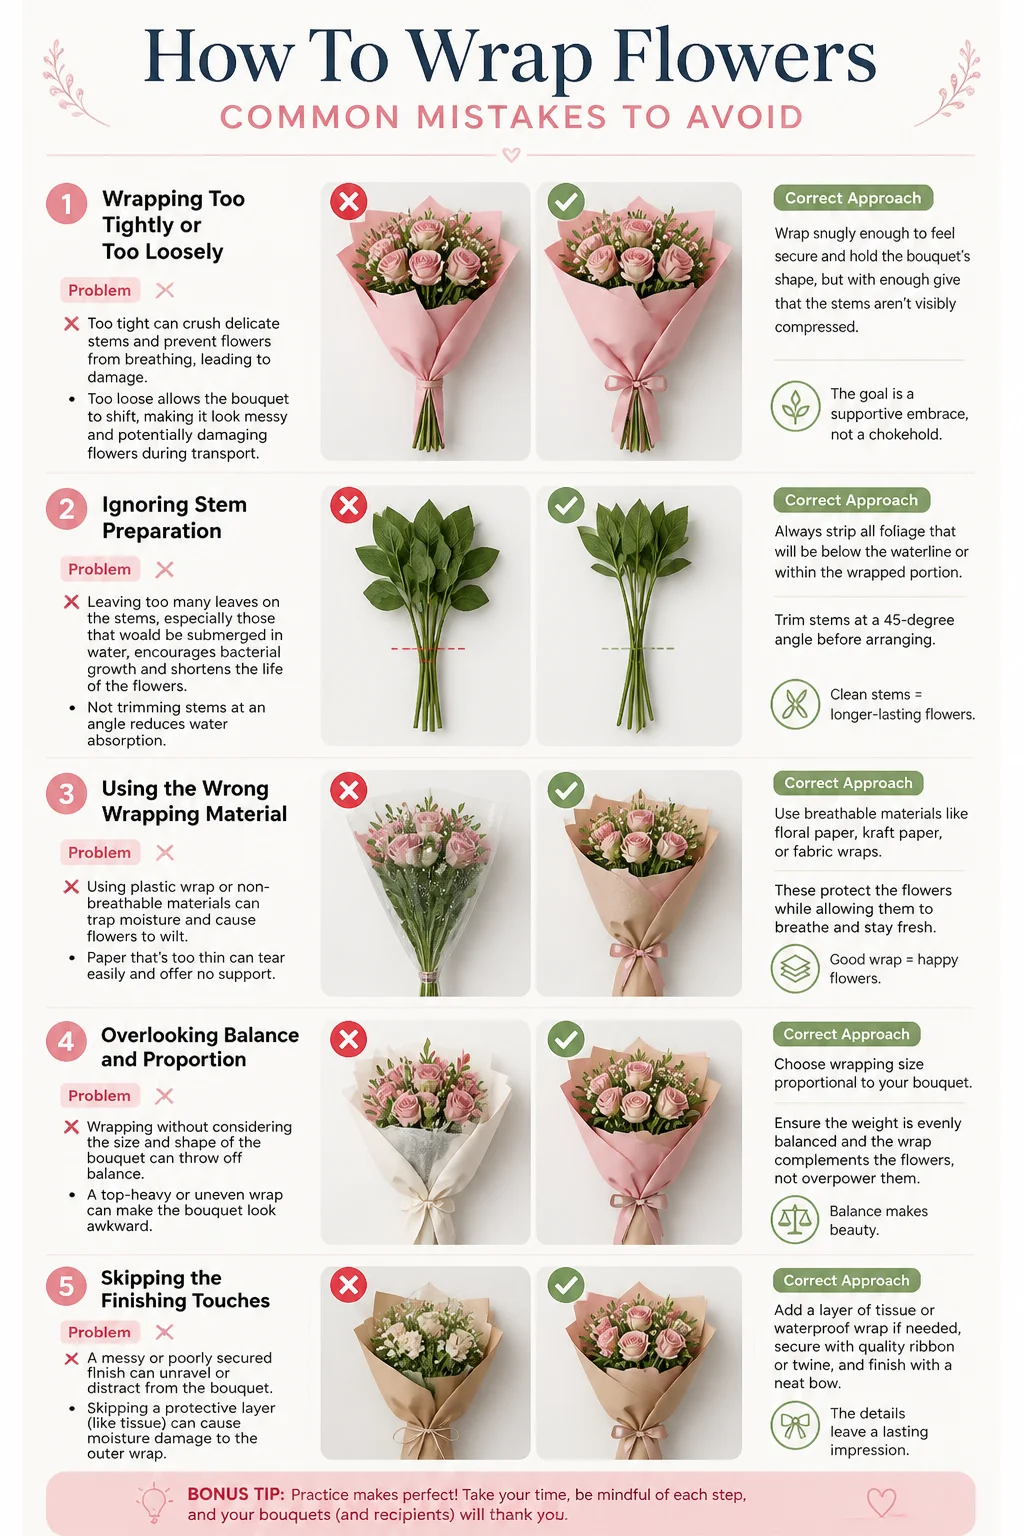
1. Wrapping Too Tightly or Too Loosely:
Problem: Too tight can crush delicate stems and prevent flowers from breathing, leading to damage. Too loose allows the bouquet to shift, making it look messy and potentially damaging flowers during transport.
Correct Approach: Wrap snugly enough to feel secure and hold the bouquet’s shape, but with enough give that the stems aren’t visibly compressed. The goal is a supportive embrace, not a chokehold.
2. Ignoring Stem Preparation:
Problem: Leaving too many leaves on the stems, especially those that would be submerged in water, encourages bacterial growth and shortens the life of the flowers. Not trimming stems at an angle reduces water absorption.
Correct Approach: Always strip all foliage that will be below the waterline or within the wrapped portion. Trim stems at a sharp 45-degree angle to maximize water uptake.
3. Using Insufficient or Excessive Paper:
Problem: Too little paper won’t adequately cover the bouquet, making it look skimpy and unfinished. Too much paper creates a bulky, clumsy, and overwhelming wrap that detracts from the flowers.
Correct Approach: Aim for enough paper to cover the stems and allow the flower heads to elegantly peek out, with a slight overlap at the sides for a secure cone. Err on the side of slightly more paper, as you can always trim excess.
4. Mismatched Aesthetics (Paper & Flowers):
Problem: A delicate, pastel bouquet wrapped in bold, geometric black and white paper can clash, as can rustic wildflowers in shiny, modern cellophane.
Correct Approach: Consider the overall vibe of your flowers. Complement bright, vibrant blooms with neutral or complementary colors. Pair delicate flowers with softer, lighter papers. Let the wrapping enhance, not compete with, the flowers.
5. Skipping the Inner Protection (for fresh flowers):
Problem: Wrapping fresh flowers directly in paper without any inner cellophane or a water source can lead to dehydration, especially if they’re out of water for a prolonged period.
Correct Approach: If you anticipate the flowers being out of water for more than an hour or two, consider an inner layer of cellophane with a small, damp paper towel/water bag around the stem ends. This provides a vital moisture barrier.
Troubleshooting
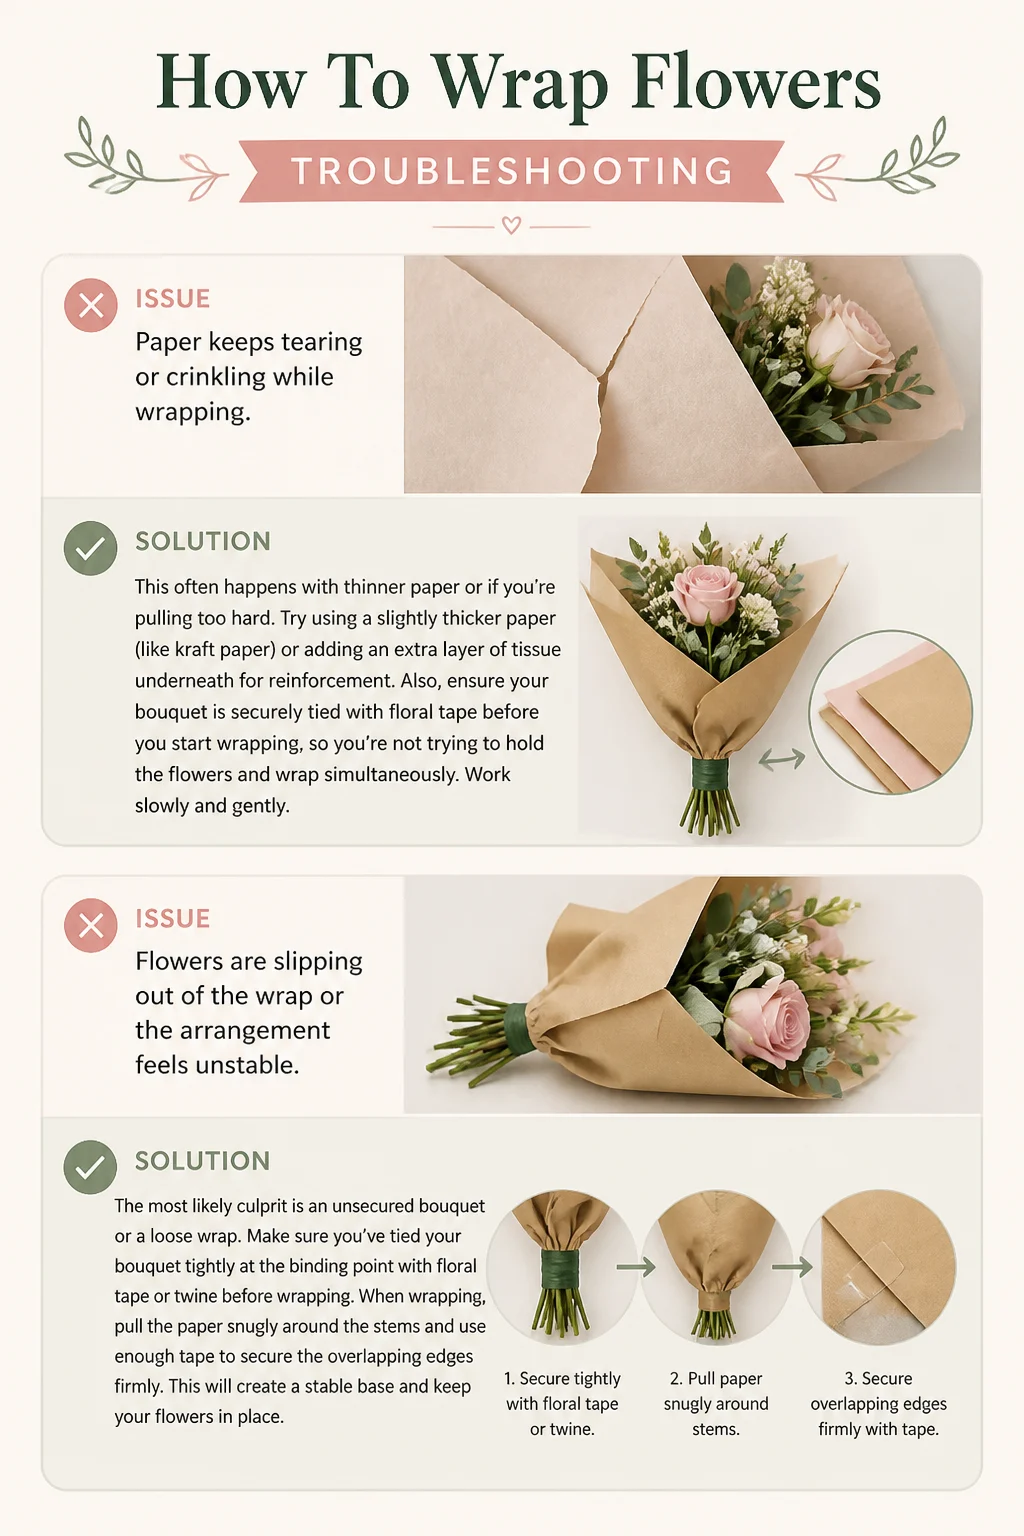
Issue: Paper keeps tearing or crinkling while wrapping.
Solution: This often happens with thinner paper or if you’re pulling too hard. Try using a slightly thicker paper (like kraft paper) or adding an extra layer of tissue underneath for reinforcement. Also, ensure your bouquet is securely tied with floral tape before you start wrapping, so you’re not trying to hold the flowers and wrap simultaneously. Work slowly and gently.
Issue: Flowers are slipping out of the wrap or the arrangement feels unstable.
Solution: The most likely culprit is an unsecured bouquet or a loose wrap. Make sure you’ve tied your bouquet tightly at the binding point with floral tape or twine before wrapping. When wrapping, pull the paper snugly around the stems and use enough tape to secure the overlapping edges firmly.
Issue: The overall wrap looks messy or unprofessional.
Solution: Don’t get discouraged! This is common for beginners.
1. Ensure your paper cuts are clean and straight.
2. Practice the spiral method for a tighter, more stable bouquet.
3. Use clear tape discreetly on the back of the wrap to hold folds in place.
4. Pay attention to the ribbon placement – a well-tied, neat bow can instantly elevate the look. Sometimes, less is more; a simple wrap with a beautiful ribbon can be very elegant.
Key Takeaways
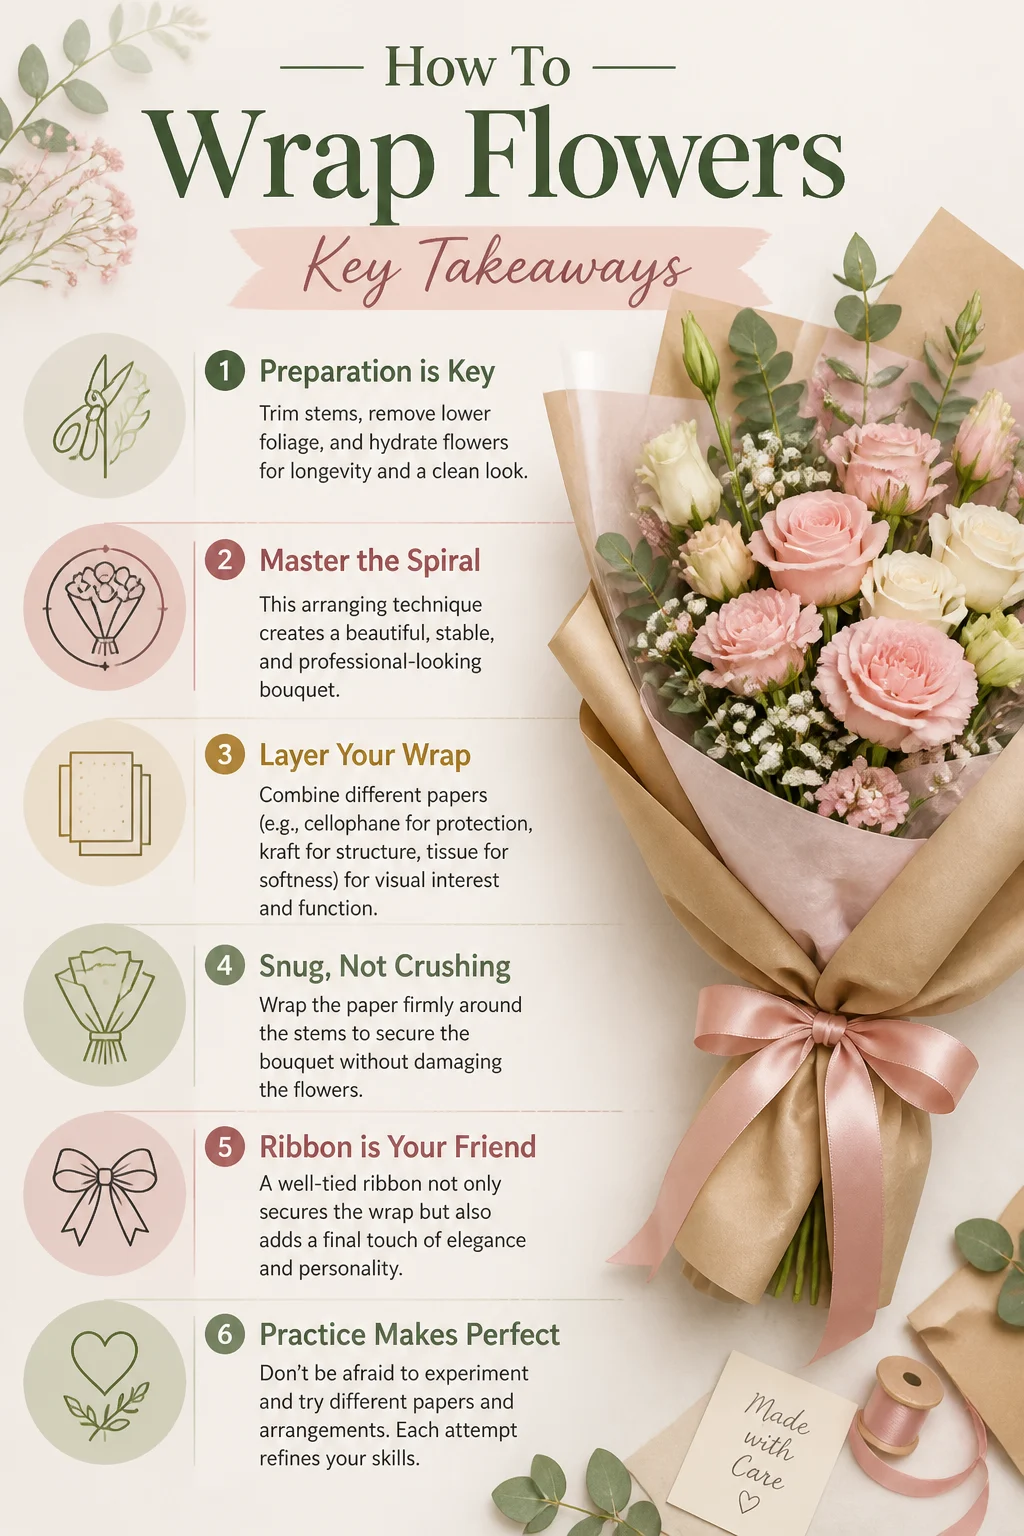
Preparation is Key: Trim stems, remove lower foliage, and hydrate flowers for longevity and a clean look.
Master the Spiral: This arranging technique creates a beautiful, stable, and professional-looking bouquet.
Layer Your Wrap: Combine different papers (e.g., cellophane for protection, kraft for structure, tissue for softness) for visual interest and function.
Snug, Not Crushing: Wrap the paper firmly around the stems to secure the bouquet without damaging the flowers.
Ribbon is Your Friend: A well-tied ribbon not only secures the wrap but also adds a final touch of elegance and personality.
Practice Makes Perfect: Don’t be afraid to experiment and try different papers and arrangements. Each attempt refines your skills.
Frequently Asked Questions
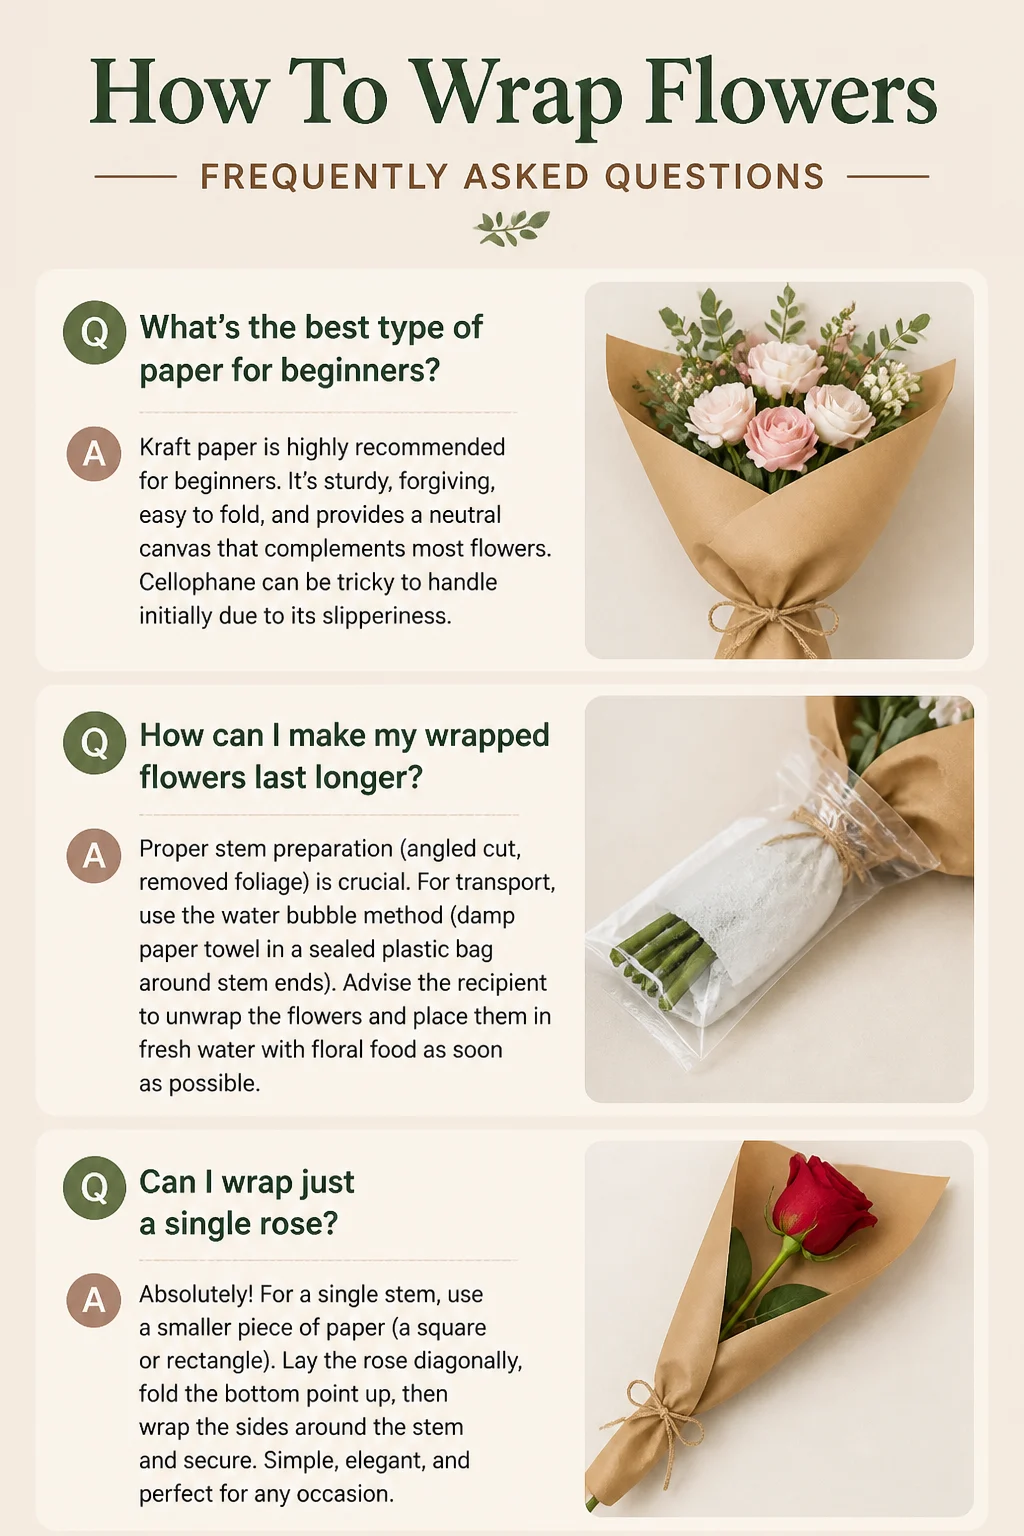
Q: What’s the best type of paper for beginners?
A: Kraft paper is highly recommended for beginners. It’s sturdy, forgiving, easy to fold, and provides a neutral canvas that complements most flowers. Cellophane can be tricky to handle initially due to its slipperiness.
Q: How can I make my wrapped flowers last longer?
A: Proper stem preparation (angled cut, removed foliage) is crucial. For transport, use the “water bubble” method (damp paper towel in a sealed plastic bag around stem ends). Advise the recipient to unwrap the flowers and place them in fresh water with floral food as soon as possible.
Q: Can I wrap just a single rose?
A: Absolutely! For a single stem, use a smaller piece of paper (a square or rectangle). Lay the rose diagonally, fold the bottom point up, then wrap the sides around, securing with tape and a small ribbon. It’s a charming, minimalist gesture.
Q: What if I don’t have floral tape?
A: Twine or even a strong rubber band can be used to secure the stems of your bouquet temporarily. Just be sure to tie it tightly enough to hold the arrangement together before you start wrapping.
What’s Next?
You’ve just unlocked a wonderful skill that brings joy to both the giver and the receiver. Now that you’ve mastered the basics of wrapping flowers, why not take your floral journey a step further?
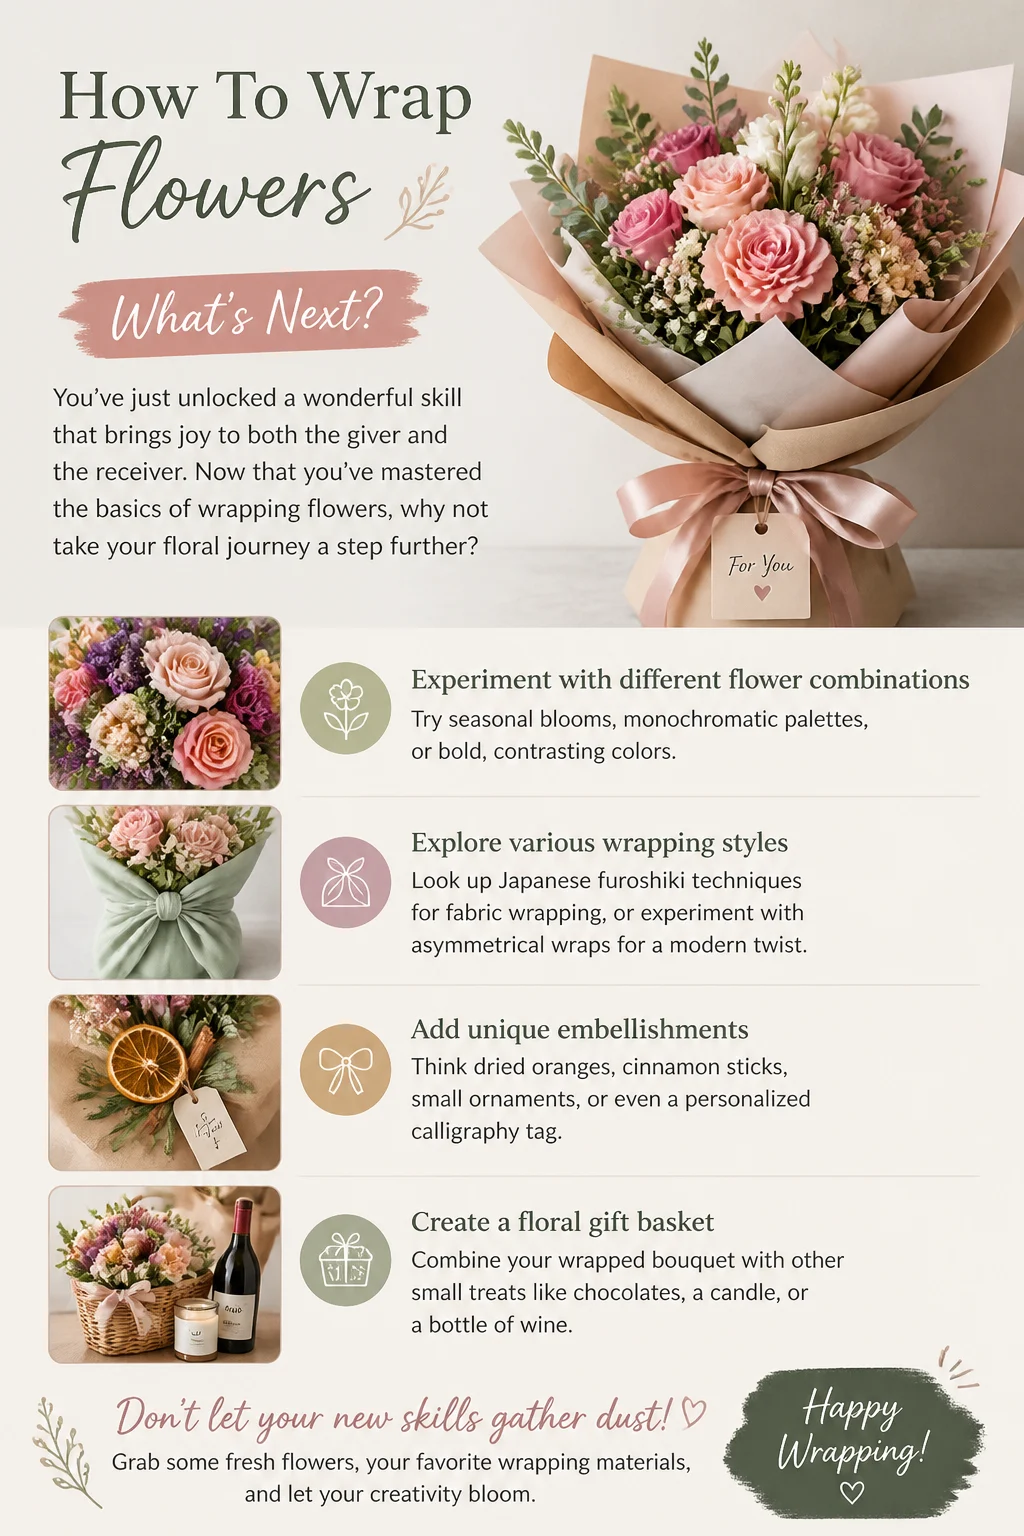
Experiment with different flower combinations: Try seasonal blooms, monochromatic palettes, or bold, contrasting colors.
Explore various wrapping styles: Look up Japanese furoshiki techniques for fabric wrapping, or experiment with asymmetrical wraps for a modern twist.
Add unique embellishments: Think dried oranges, cinnamon sticks, small ornaments, or even a personalized calligraphy tag.
Create a floral gift basket: Combine your wrapped bouquet with other small treats like chocolates, a candle, or a bottle of wine.
Don’t let your new skills gather dust! Grab some fresh flowers, your favorite wrapping paper, and start crafting. The more you practice, the more intuitive and beautiful your wrapped bouquets will become. Share your creations, brighten someone’s day, and most importantly, enjoy the creative process!