🧶 How To Crochet A Heart
🛠️ The Ultimate Maker's Toolkit
I've tested thousands of craft tools over the years. Whether you are quilting, crafting, or building mixed-media art, these are the top 5 absolute non-negotiable tools I personally recommend to guarantee professional results.
🪡 SINGER Heavy Duty 4452 Sewing Machine
The sewing community highly recommends this as the ultimate "bulletproof" entry-level machine. Its heavy metal frame powerfully pushes through thick denim and heavy quilt layers that would instantly jam a standard plastic machine.
✂️ Fiskars 8" Orange-Handled Scissors
Never settle for dull dollar-store blades. Wirecutter repeatedly names Fiskars the absolute best all-purpose craft scissor due to its legendary precision-ground blades and an ergonomic grip that prevents hand-cramping.
🔥 Gorilla Dual Temp Hot Glue Gun
Named Wirecutter's top choice because it literally does the work of two tools. It features dual-temperature settings offering low heat for delicate florals and blistering high heat for heavy wood adhesion repairs.
🖌️ Mod Podge Waterbase Gloss Sealer
The absolute undisputed champion of decoupage and paper crafts. Experts rely exclusively on this exact water-based formula because it glues, seals, and finishes beautifully without yellowing or flaking over time.
🎨 Apple Barrel Acrylic Paint (2 oz)
The quintessential, incredibly inexpensive craft paint. Woodworkers and hobby painters swear by its smooth flow and matte finish, providing massive value and remarkably thick color coverage on rough surfaces.
Let’s turn yarn into feelings, minus the drama. This quick heart project is beginner-friendly, stash-busting, and dangerously cute. Grab a hook, a snack, and let’s make something you’ll want to gift, hang, or hoard.

1. Pick Your Yarn And Hook
Start strong with the right tools so your heart doesn’t look like a potato. Choose worsted weight yarn and a 4 mm to 5 mm hook for a balanced, beginner-friendly size. Lighter yarn makes dainty hearts; chunkier yarn makes plushies.
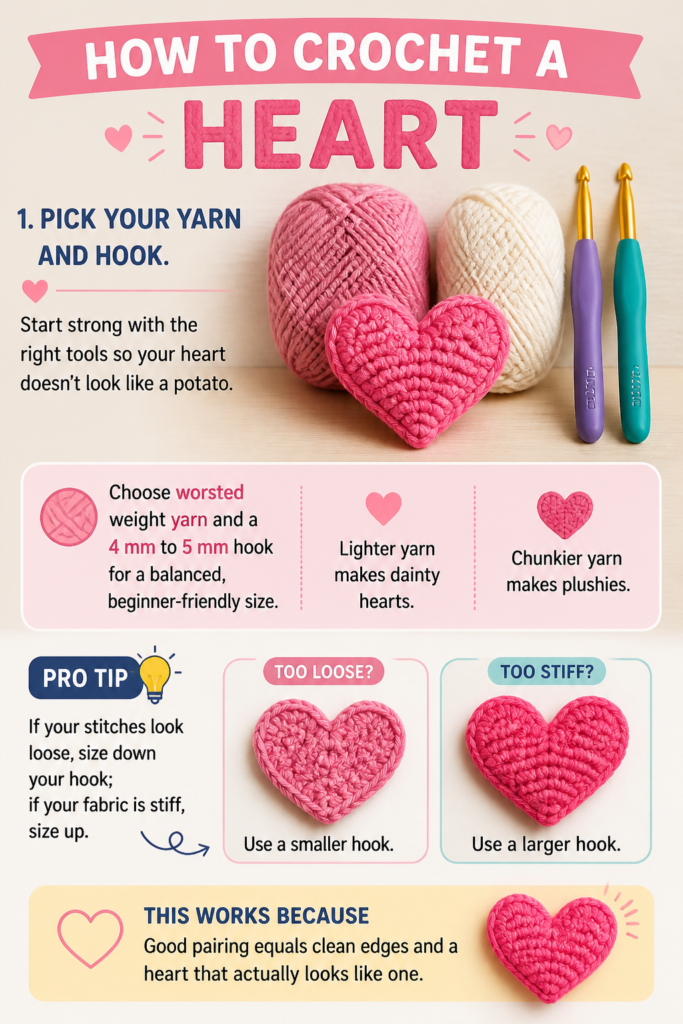
Pro tip: If your stitches look loose, size down your hook; if your fabric is stiff, size up.
This works because good pairing equals clean edges and a heart that actually looks like one.
2. Make A Magic Ring
The magic ring is your neat little start—no weird hole in the middle. Wrap yarn around two fingers, hook under, pull up a loop, and chain 1 to lock. You’ll build the heart inside this loop.
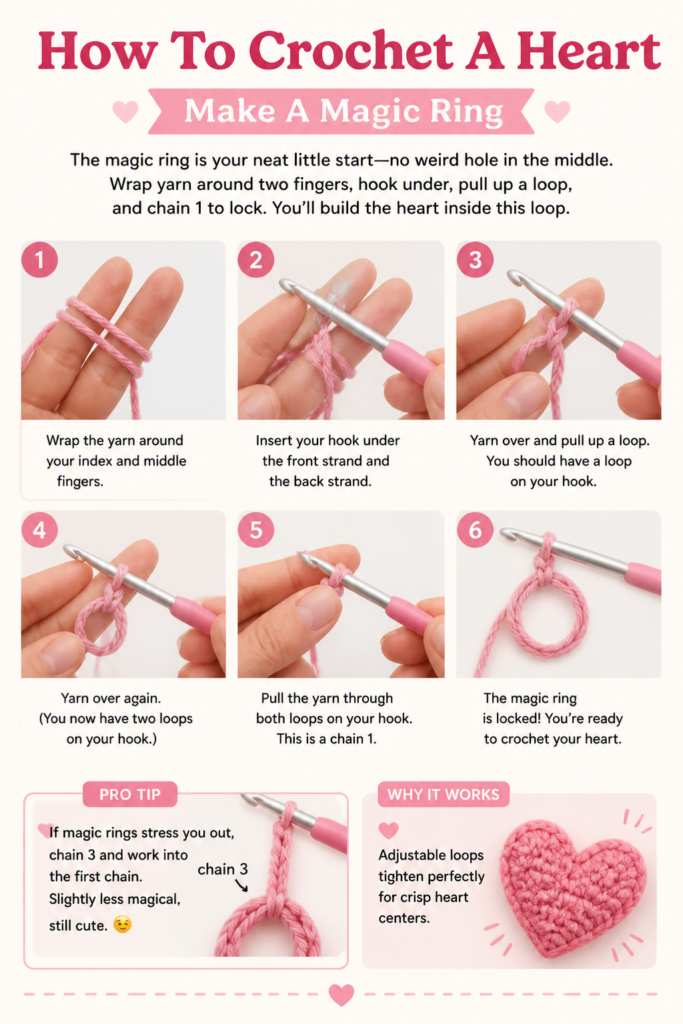
Pro tip: If magic rings stress you out, chain 3 and work into the first chain. Slightly less magical, still cute.
It works because adjustable loops tighten perfectly for crisp heart centers.
3. Build The Base Circle
You need a flat foundation so your heart doesn’t ripple. Work 8–12 single crochets into the ring depending on yarn size. Pull the tail to tighten the center, then slip stitch to the first stitch.
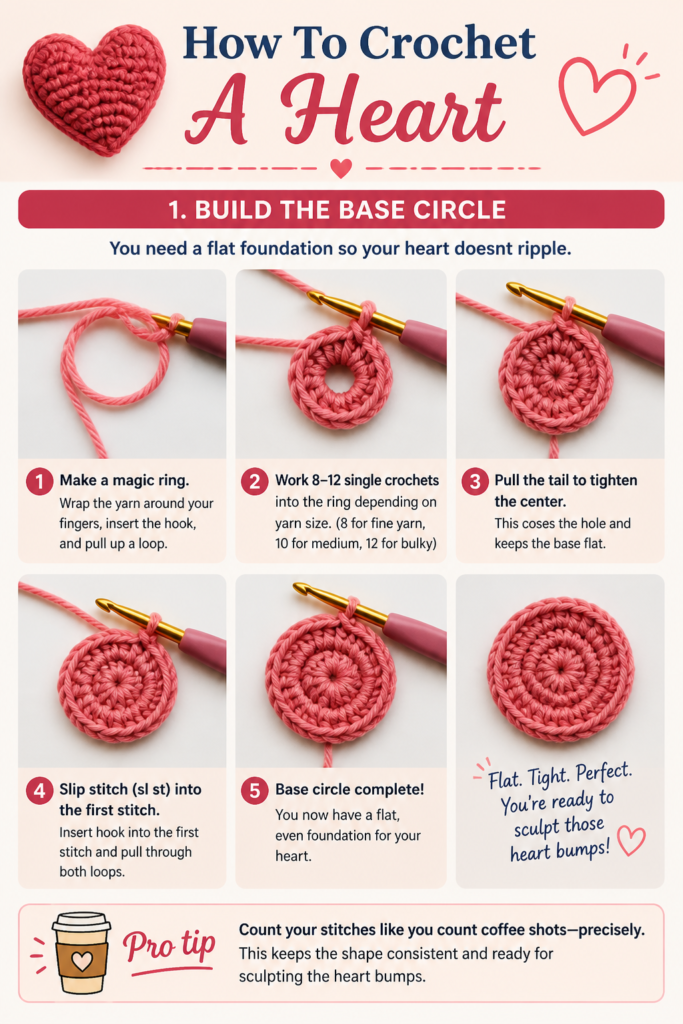
Pro tip: Count your stitches like you count coffee shots—precisely.
This keeps the shape consistent and ready for sculpting the heart bumps.
4. Shape The Lobes With Increases
Now for the squish factor. In the first round, place increases evenly to widen the circle: for example, (2 sc in next, sc in next) around. In round two, switch to double crochets for smooth curves.
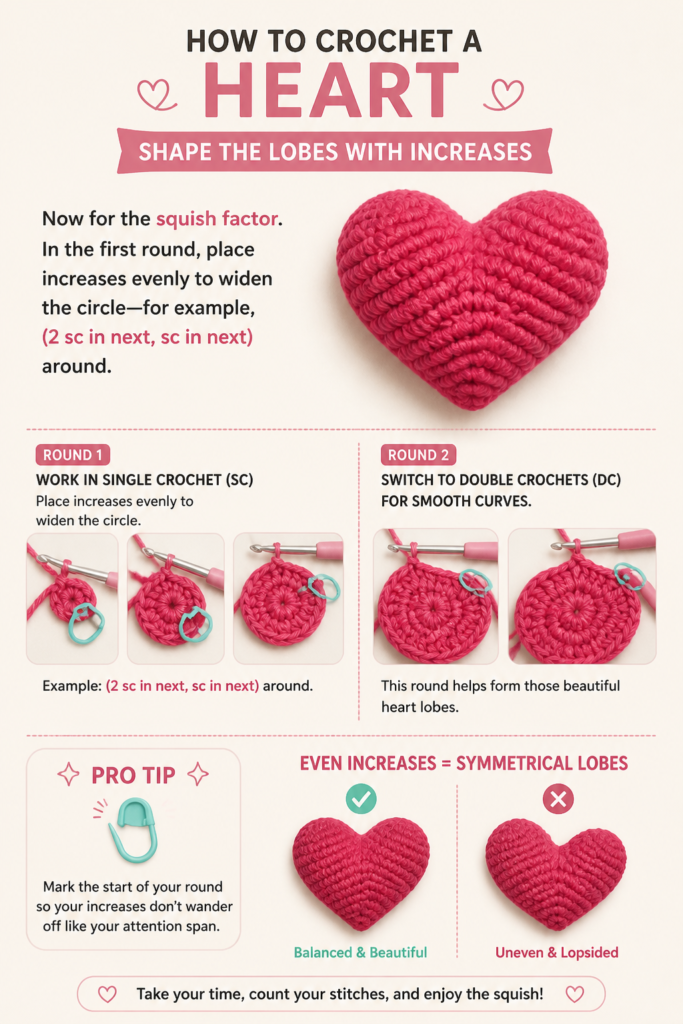
Pro tip: Mark the start of your round so your increases don’t wander off like your attention span.
Even increases create symmetrical lobes for a balanced heart.
5. Form The Top Curves
Time to carve out the heart’s signature bumps. Work a sequence like 2 dc, 2 tr, dc for the first lobe, then skip a stitch and mirror it for the second. Keep tension steady for clean arches.
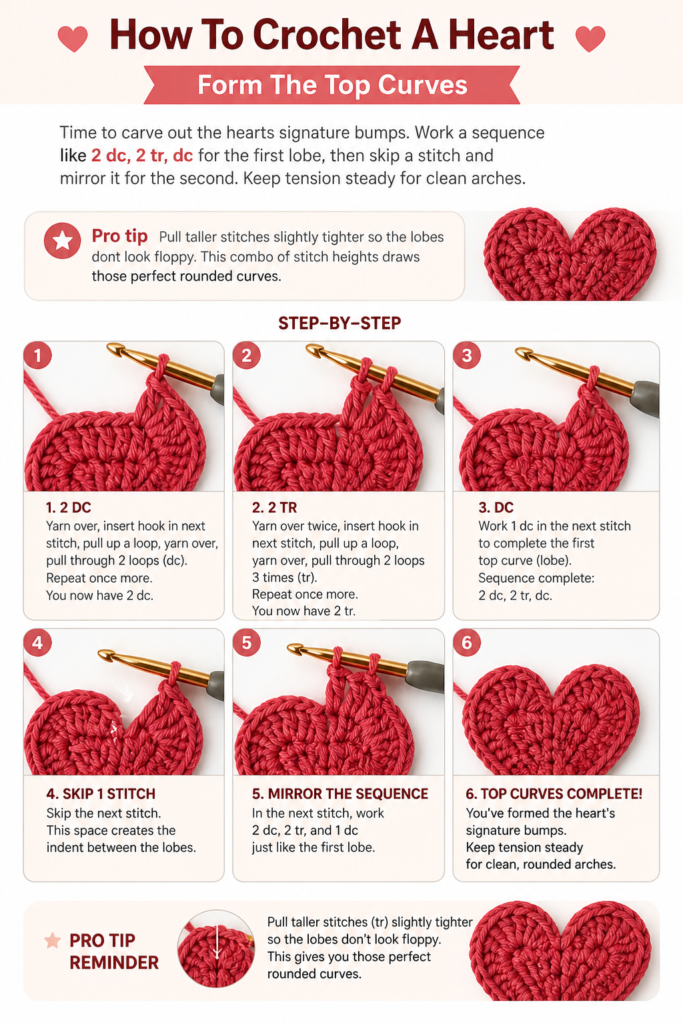
Pro tip: Pull taller stitches slightly tighter so the lobes don’t look floppy.
This combo of stitch heights draws those perfect rounded curves.
6. Carve The Point
The point makes it a heart, not a blob. Along the bottom, use hdc to sc to sl st decreases to taper neatly. A final picot or slip stitch at the tip sharpens it up.
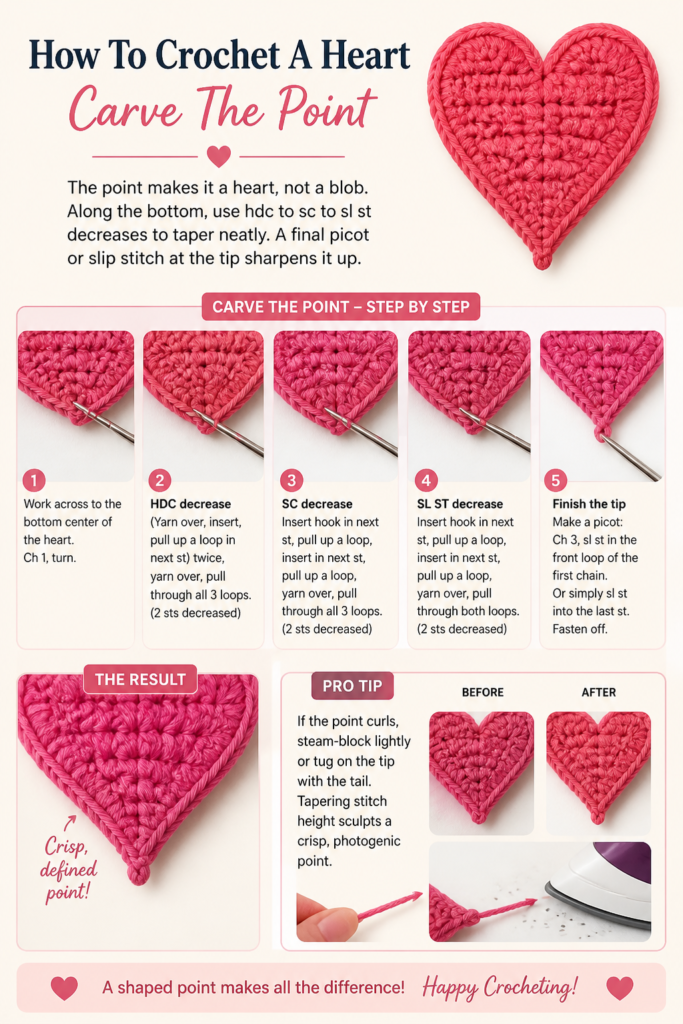
Pro tip: If the point curls, steam-block lightly or tug on the tip with the tail.
Tapering stitch height sculpts a crisp, photogenic point.
7. Add A Border For Pop
Outline equals instant polish. Work a round of single crochet around the edge, placing 2 sc in each corner of the lobes. Slip stitch around for a sleek finish if you want it thinner.
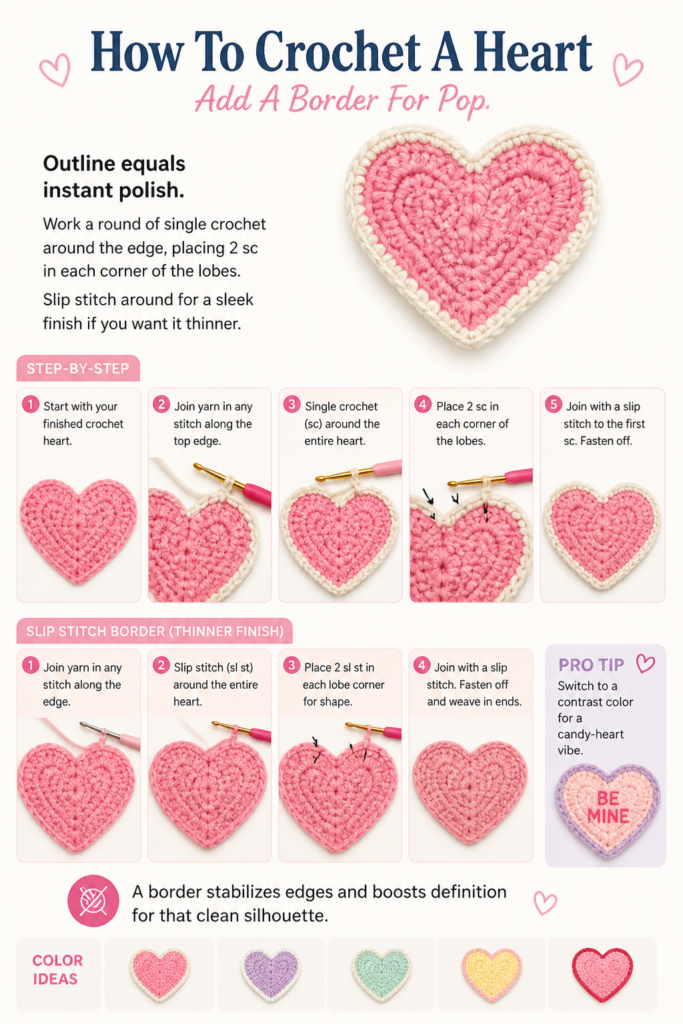
Pro tip: Switch to a contrast color for a candy-heart vibe.
A border stabilizes edges and boosts definition for that clean silhouette.
8. Make It Puffy
Want squish? Crochet two hearts the same size. Whipstitch or sc them together around the edge, stuffing lightly before you close.
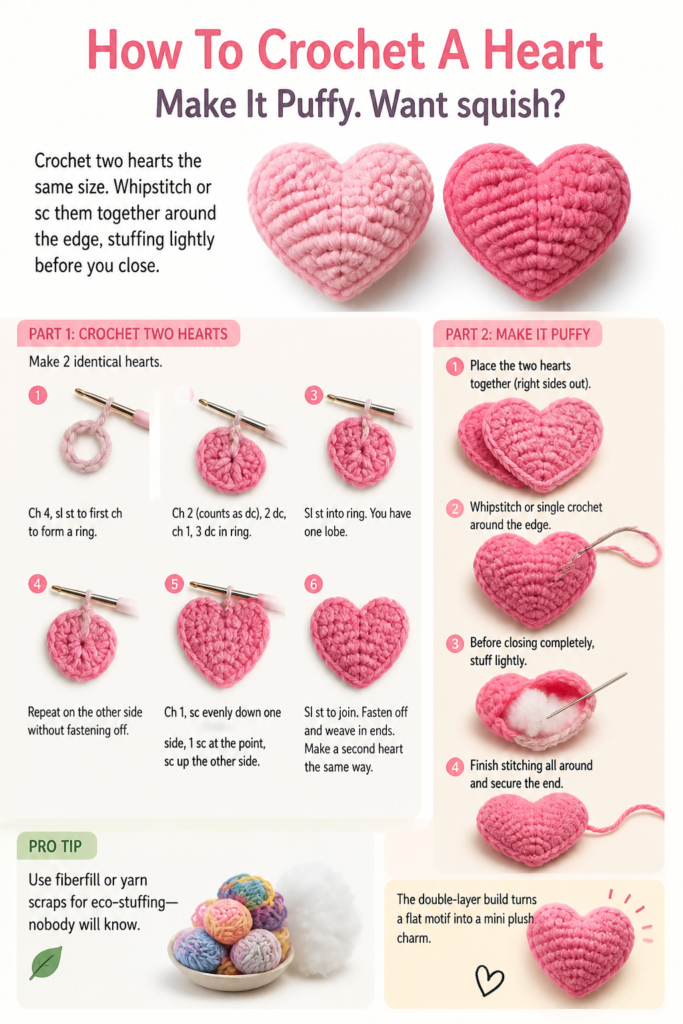
Pro tip: Use fiberfill or yarn scraps for eco-stuffing—nobody will know.
The double-layer build turns a flat motif into a mini plush charm.
9. Turn It Into A Keychain
Hearts that travel—iconic. Add a jump ring through a top stitch and clip on a keychain finding. Reinforce the stitch with extra thread if it’s a puffy heart.
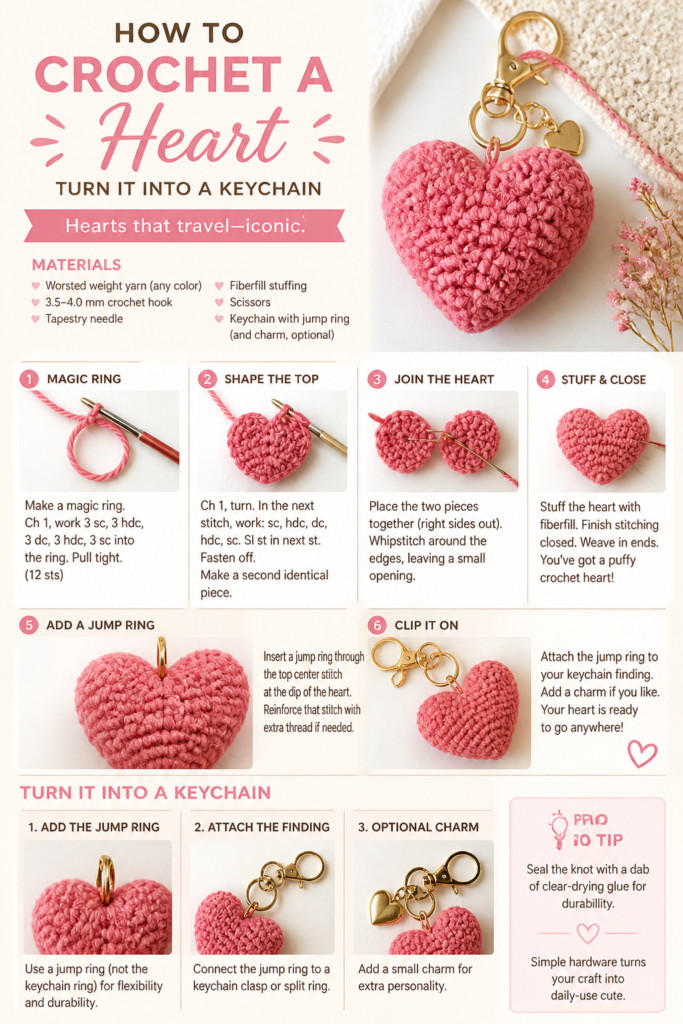
Pro tip: Seal the knot with a dab of clear-drying glue for durability.
Simple hardware turns your craft into daily-use cute.
10. Make A Garland
Decorate like a cozy genius. Crochet 6–12 hearts, then chain a long cord and slip stitch into the back of each heart to attach. Space them evenly for satisfying balance.
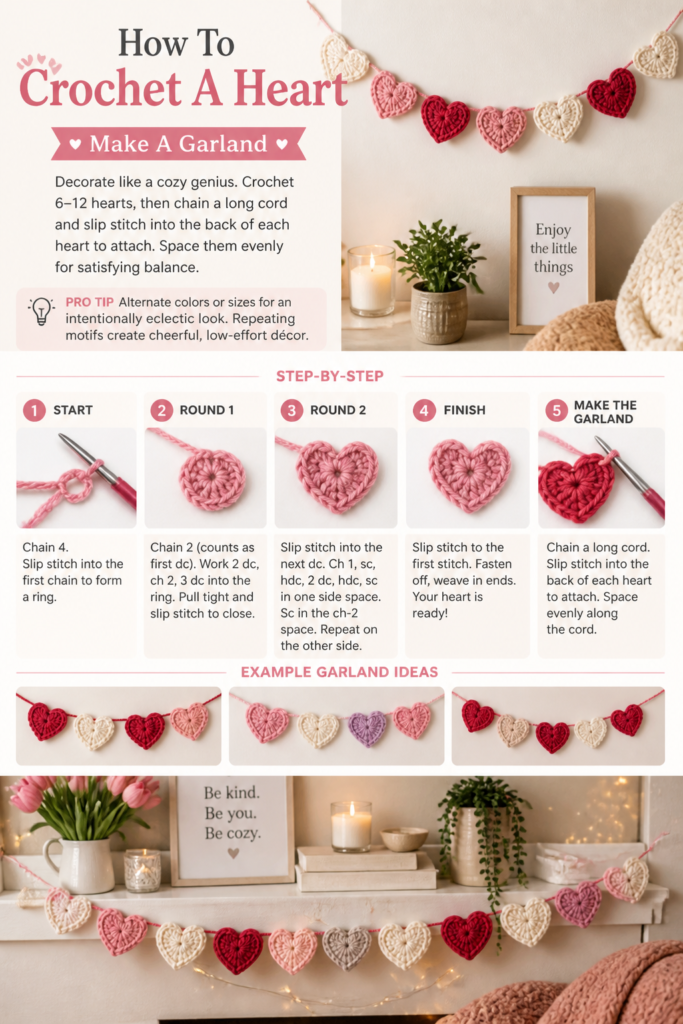
Pro tip: Alternate colors or sizes for an intentionally eclectic look.
Repeating motifs create cheerful, low-effort décor.
11. Stitch It Onto Wearables
Hearts on hats? Yes. Use a tapestry needle to sew a flat heart onto beanies, totes, or sweaters. Catch only the back loops so stitches stay invisible on the front.
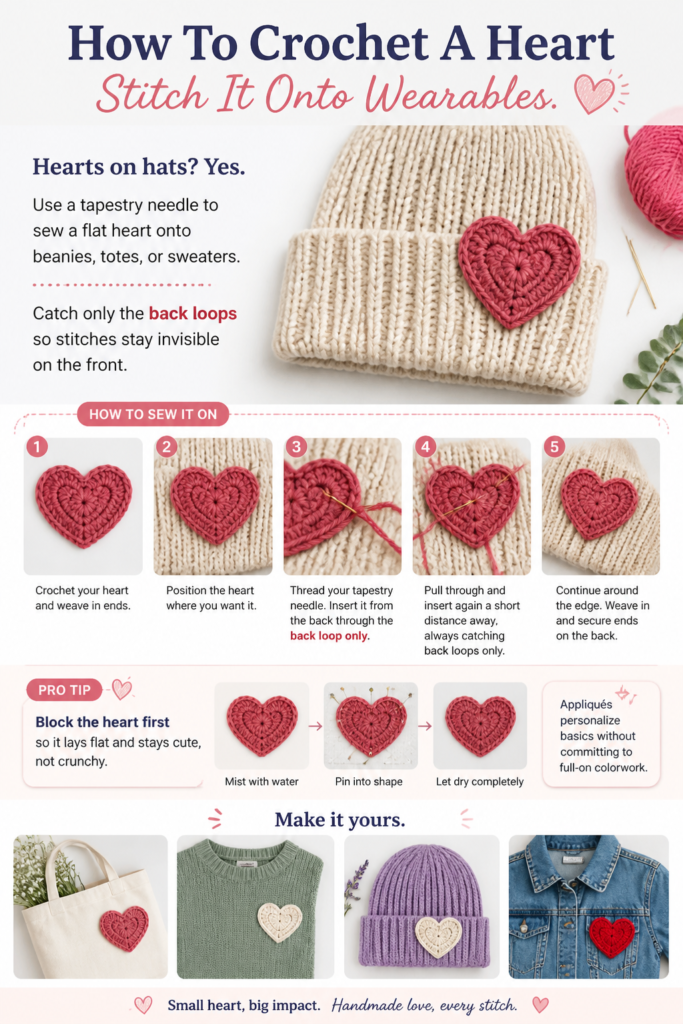
Pro tip: Block the heart first so it lays flat and stays cute, not crunchy.
Appliqués personalize basics without committing to full-on colorwork.
12. Try A Tiny Pendant Size
Micro hearts = instant jewelry. Use cotton thread and a 2 mm hook to make a delicate mini. Add a chain through a top stitch or glue to an earring post.
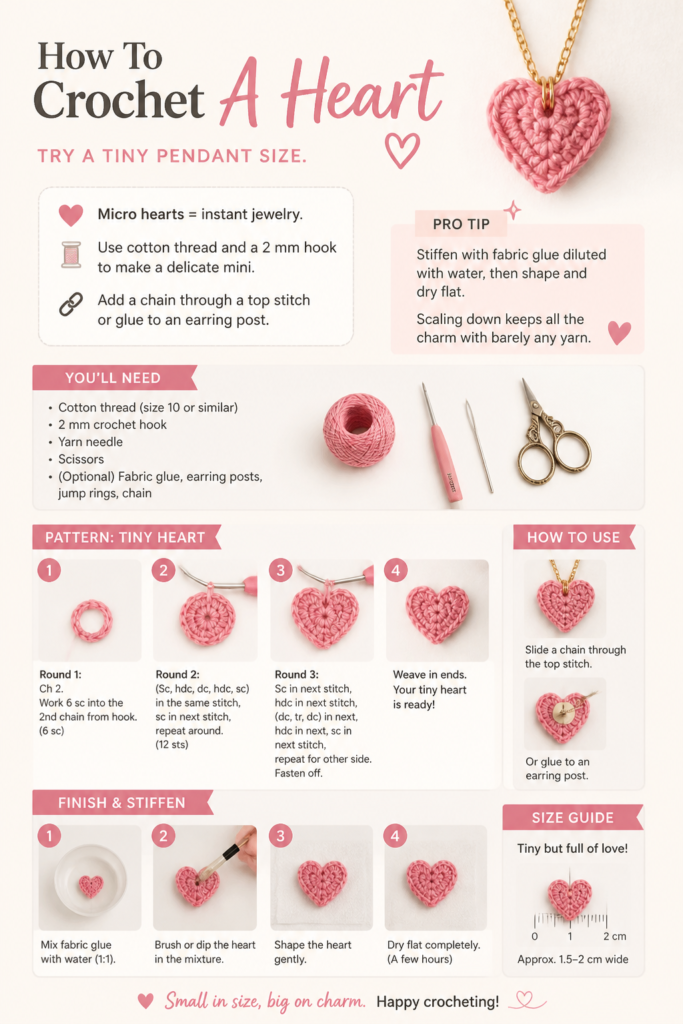
Pro tip: Stiffen with fabric glue diluted with water, then shape and dry flat.
Scaling down keeps all the charm with barely any yarn.
✨ New Member Etsy Shops (100% Unsponsored!)
We are incredibly proud of the talent in this community! 💖 We've rounded up some gorgeous new Etsy shops launched by our very own members.
There are ZERO affiliate links in this post—just 100% pure support for our makers. Click below to shop small, show them some love, and find your new favorite items! 👇🛍️


Conclusion
Crocheting a heart is basically yarn alchemy: a few stitches, and boom—vibes. Whether you make one tiny pendant or a whole garland, you’re building skills and joy at the same time. Keep your hook handy; love is now stash-friendly and handmade.