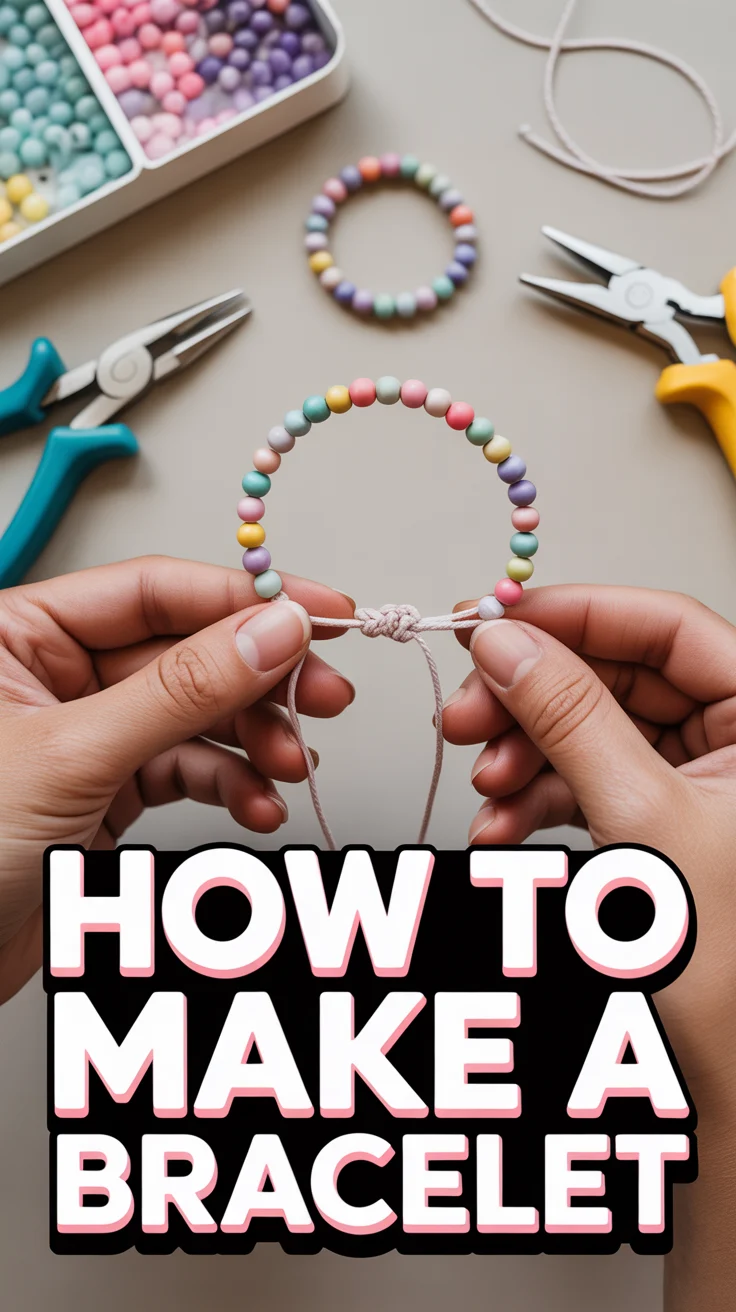
🧵 How To Make A Bracelet
🛠️ The Ultimate Maker's Toolkit
I've tested thousands of craft tools over the years. Whether you are quilting, crafting, or building mixed-media art, these are the top 5 absolute non-negotiable tools I personally recommend to guarantee professional results.
🪡 SINGER Heavy Duty 4452 Sewing Machine
The sewing community highly recommends this as the ultimate "bulletproof" entry-level machine. Its heavy metal frame powerfully pushes through thick denim and heavy quilt layers that would instantly jam a standard plastic machine.
✂️ Fiskars 8" Orange-Handled Scissors
Never settle for dull dollar-store blades. Wirecutter repeatedly names Fiskars the absolute best all-purpose craft scissor due to its legendary precision-ground blades and an ergonomic grip that prevents hand-cramping.
🔥 Gorilla Dual Temp Hot Glue Gun
Named Wirecutter's top choice because it literally does the work of two tools. It features dual-temperature settings offering low heat for delicate florals and blistering high heat for heavy wood adhesion repairs.
🖌️ Mod Podge Waterbase Gloss Sealer
The absolute undisputed champion of decoupage and paper crafts. Experts rely exclusively on this exact water-based formula because it glues, seals, and finishes beautifully without yellowing or flaking over time.
🎨 Apple Barrel Acrylic Paint (2 oz)
The quintessential, incredibly inexpensive craft paint. Woodworkers and hobby painters swear by its smooth flow and matte finish, providing massive value and remarkably thick color coverage on rough surfaces.
Ready to turn a pile of string and beads into wearable bragging rights? Let’s make bracelets that look boutique-level without the boutique price. Minimal tools, maximum compliments—plus a tiny dose of crafty chaos for flavor.
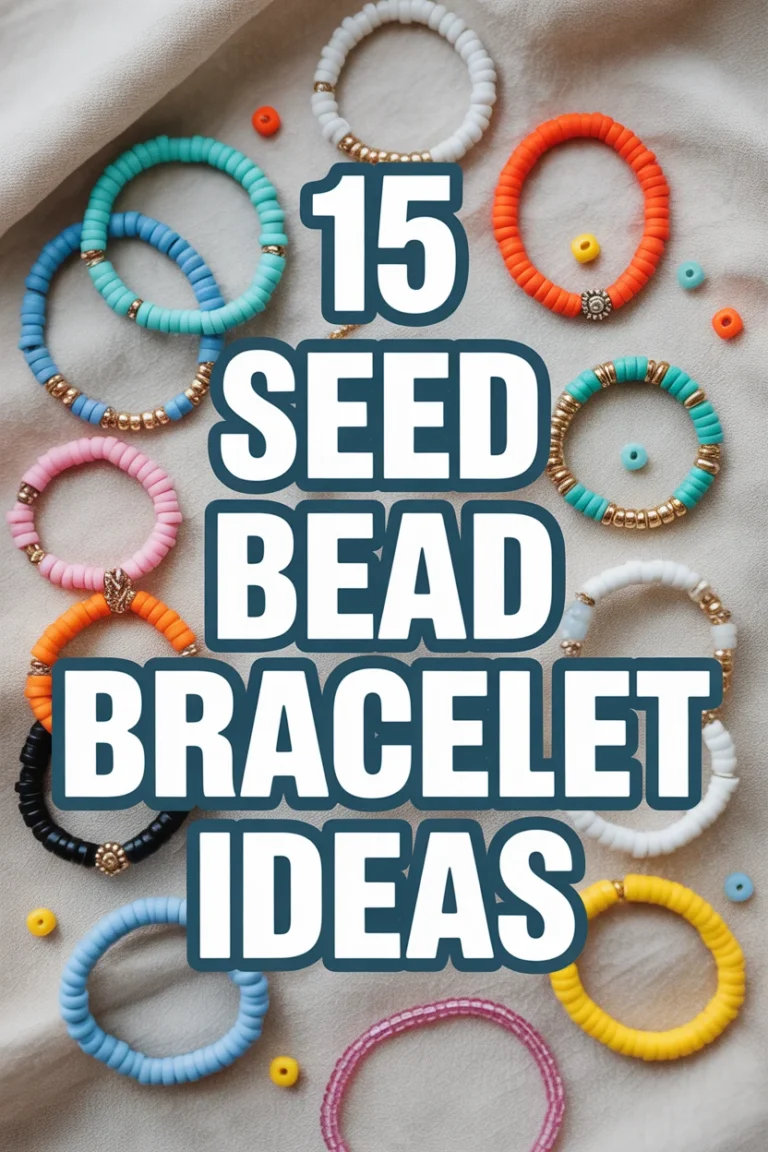
1. Stretchy Beaded Classic
Fast, cute, and stretchy—like athleisure for your wrist. Thread beads on elastic, knot, and boom. It’s the gateway bracelet.
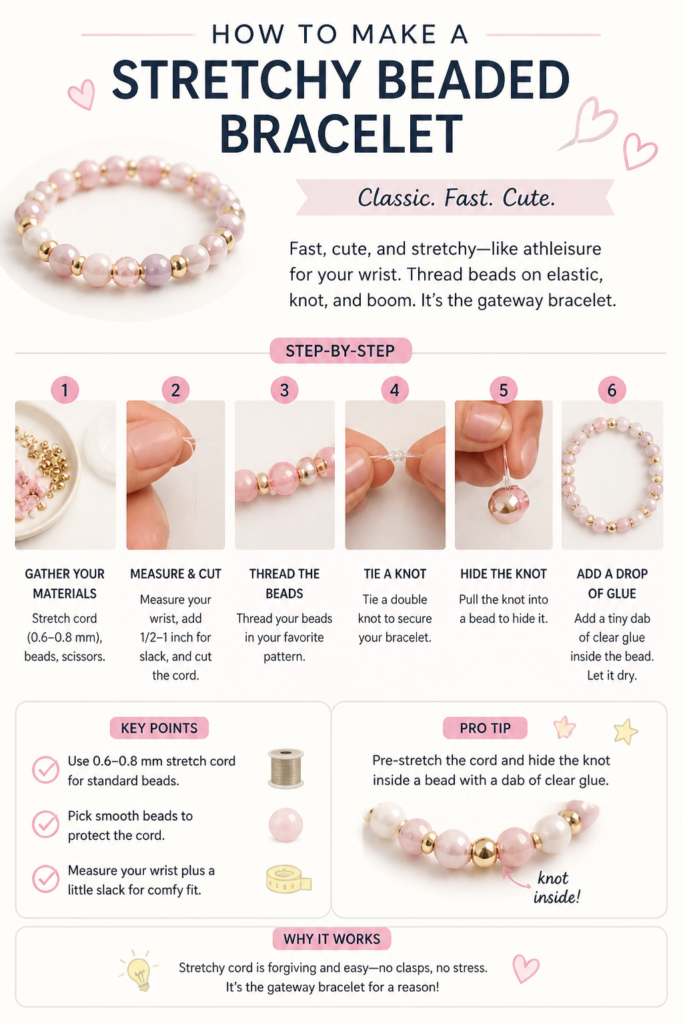
Key points:
- Use 0.6–0.8 mm stretch cord for standard beads.
- Pick smooth beads to protect the cord.
- Measure your wrist plus a little slack for comfy fit.
Pro tip: Pre-stretch the cord and hide the knot inside a bead with a dab of clear glue.
It works because stretchy cord is forgiving and easy—no clasps, no stress.
2. Adjustable Sliding Knot
The bracelet that fits everyone and looks intentionally chill. Great for gifts and commitment-phobes.
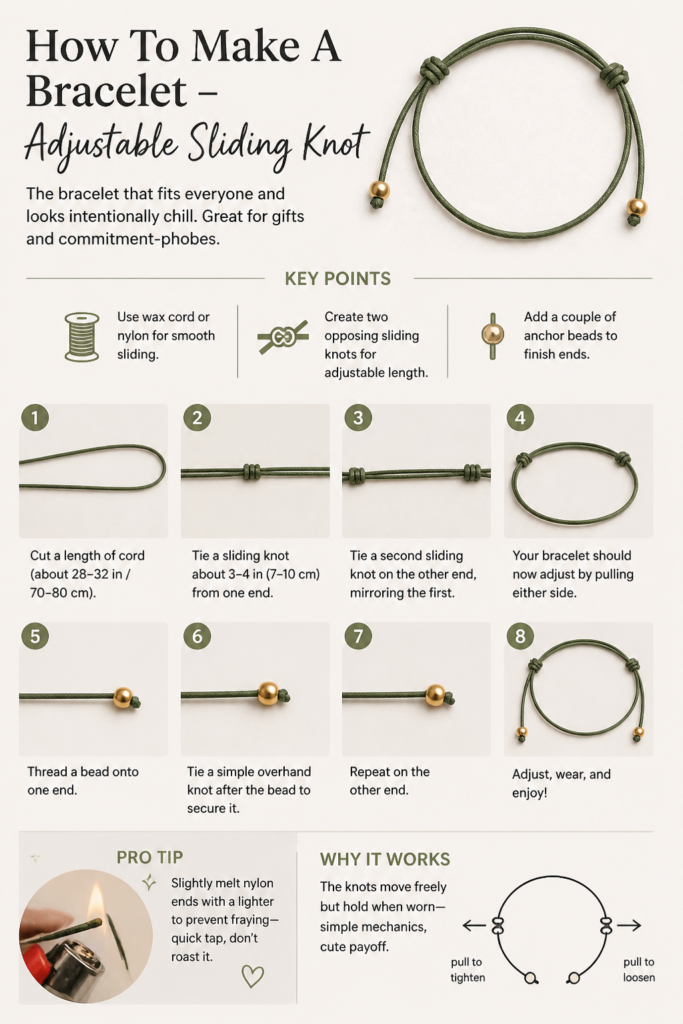
Key points:
- Use wax cord or nylon for smooth sliding.
- Create two opposing sliding knots for adjustable length.
- Add a couple of anchor beads to finish ends.
Pro tip: Slightly melt nylon ends with a lighter to prevent fraying—quick tap, don’t roast it.
It works because the knots move freely but hold when worn—simple mechanics, cute payoff.
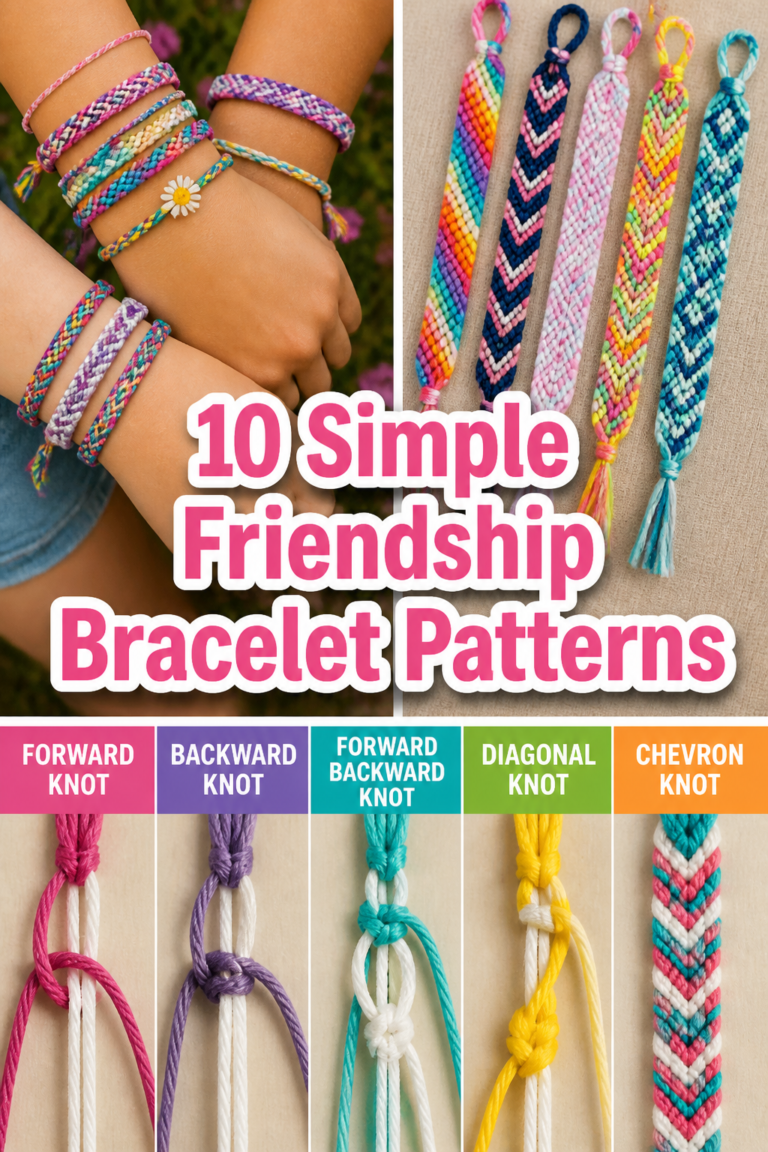
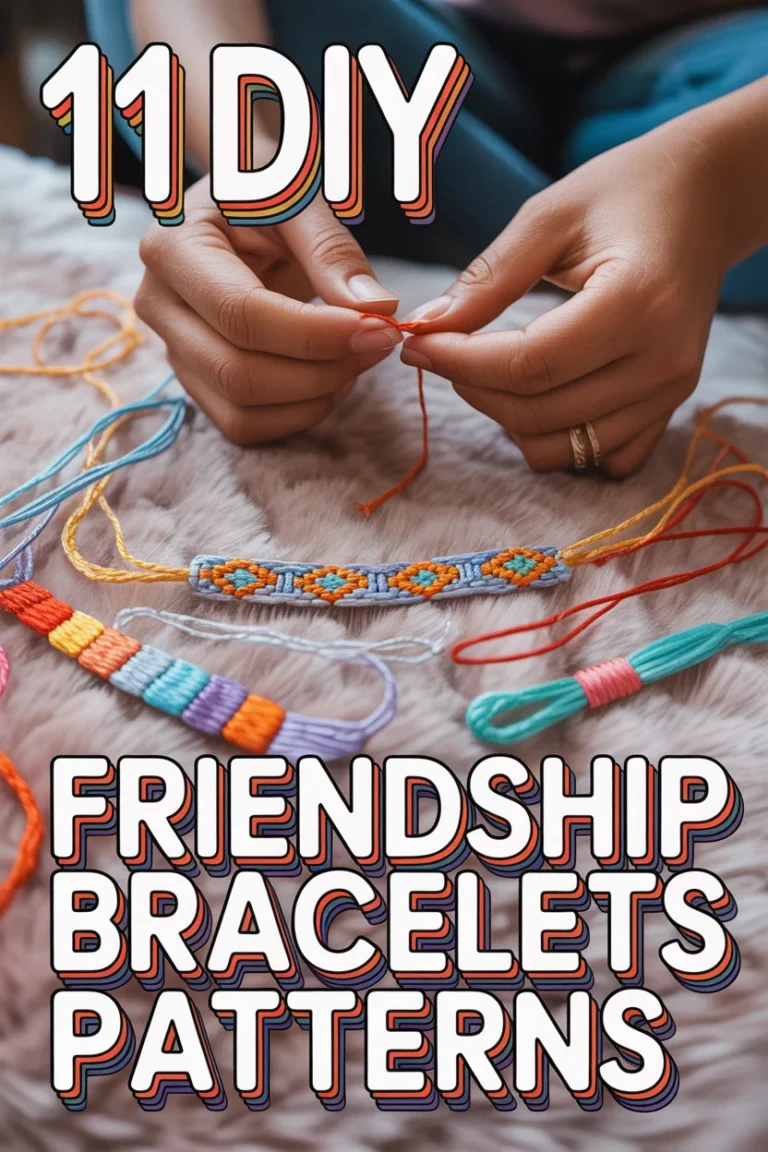
3. Macramé Friendship
Bring back the camp vibes, but make it polished. Repetitive knots = meditative crafting session.
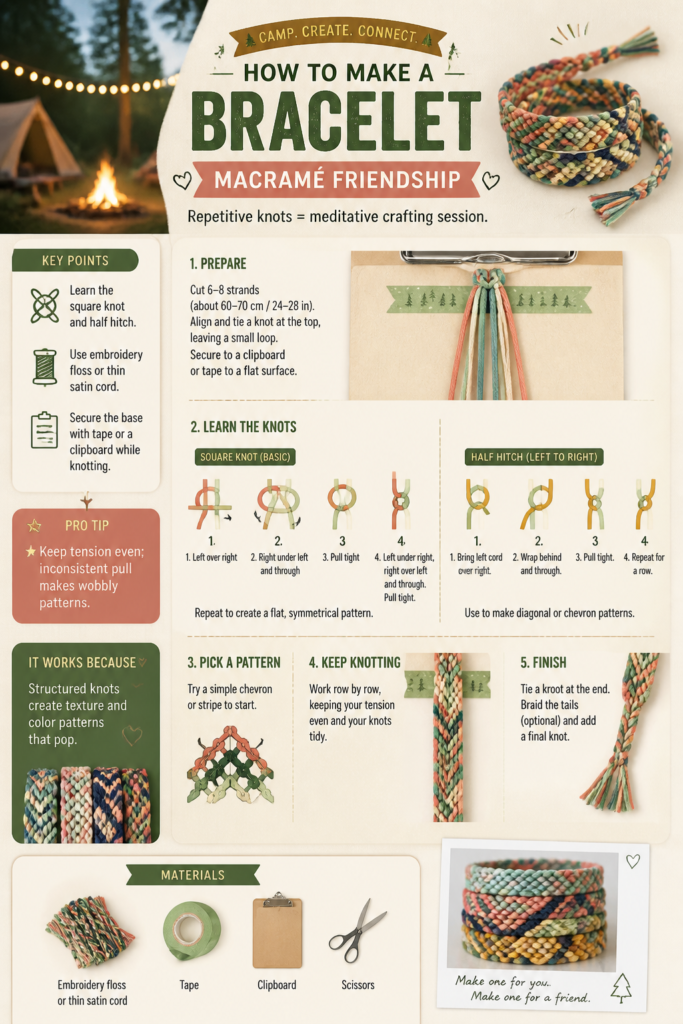
Key points:
- Learn the square knot and half hitch.
- Use embroidery floss or thin satin cord.
- Secure the base with tape or a clipboard while knotting.
Pro tip: Keep tension even; inconsistent pull makes wobbly patterns.
It works because structured knots create texture and color patterns that pop.
4. Bead Loom Pattern
Flat, graphic, and very “I bought this at a cool market.” It’s soothing like pixel art.
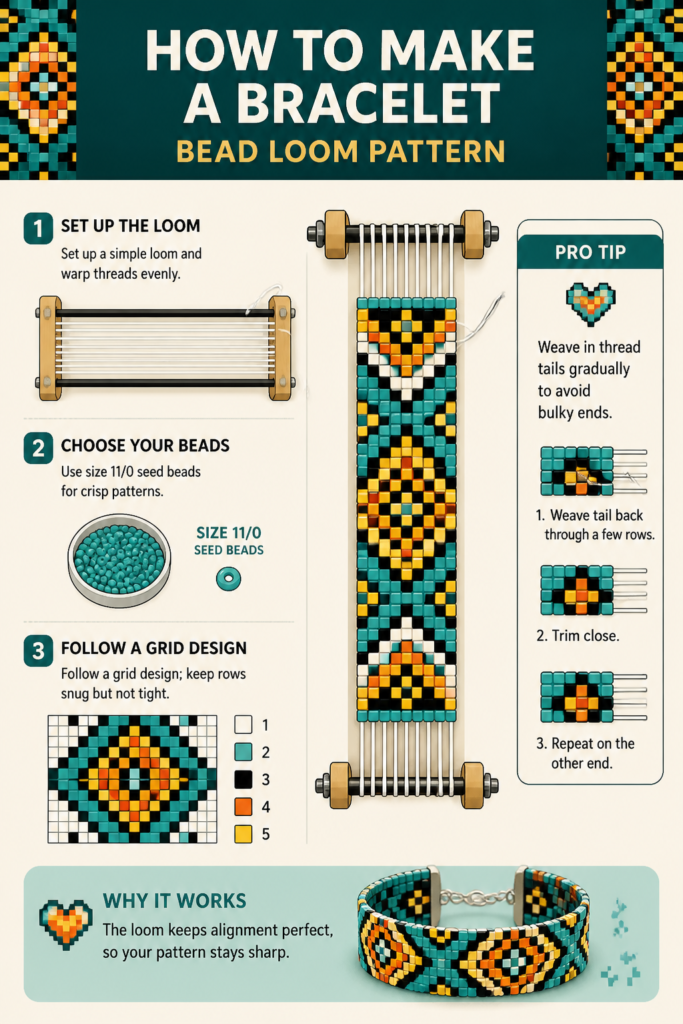
Key points:
- Set up a simple loom and warp threads evenly.
- Use size 11/0 seed beads for crisp patterns.
- Follow a grid design; keep rows snug but not tight.
Pro tip: Weave in thread tails gradually to avoid bulky ends.
It works because the loom keeps alignment perfect, so your pattern stays sharp.
5. Chain and Charm Stacker
Minimal effort, maximal jingle. Add charms to chain for instant personality.
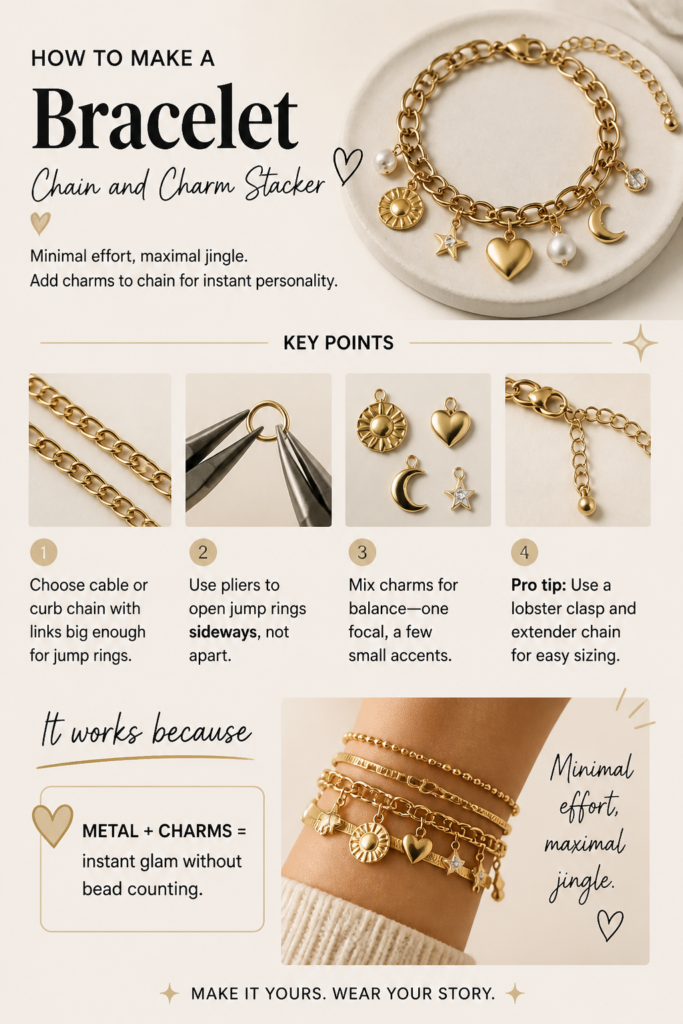
Key points:
- Choose cable or curb chain with links big enough for jump rings.
- Use pliers to open jump rings sideways, not apart.
- Mix charms for balance: one focal, a few small accents.
Pro tip: Use a lobster clasp and extender chain for easy sizing.
It works because metal + charms = instant glam without bead counting.
6. Heishi Beachy Vibes
Vacation wrist, activated. Heishi beads bring surfer energy without the sunburn.
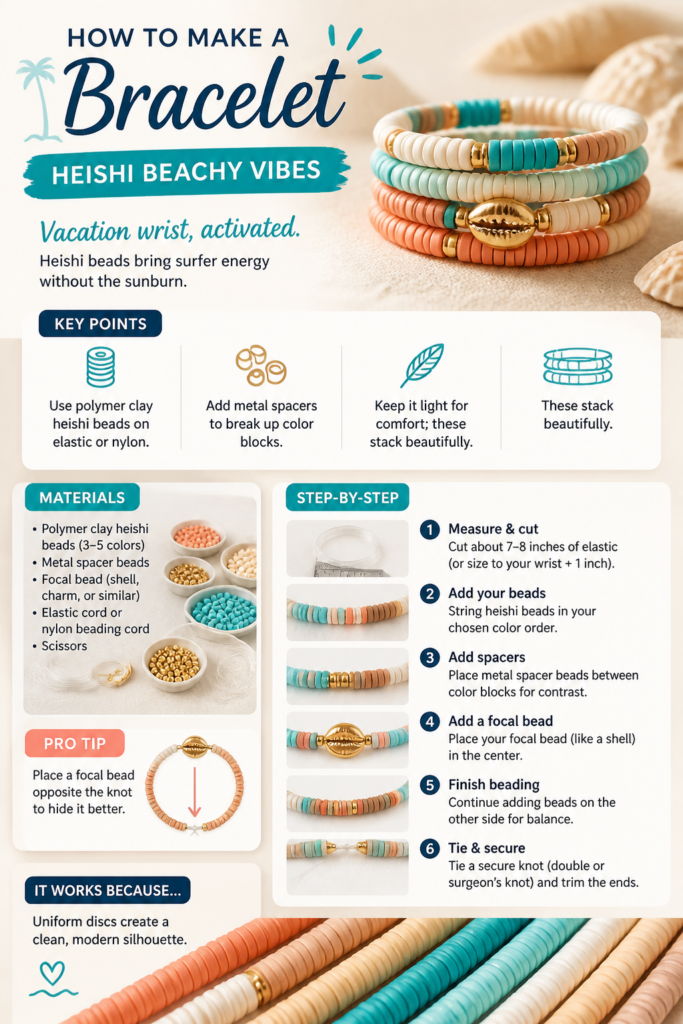
Key points:
- Use polymer clay heishi beads on elastic or nylon.
- Add metal spacers to break up color blocks.
- Keep it light for comfort; these stack beautifully.
Pro tip: Place a focal bead opposite the knot to hide it better.
It works because uniform discs create a clean, modern silhouette.
7. Wire-Wrapped Gem
One gemstone, main character energy. Wire does the heavy lifting.
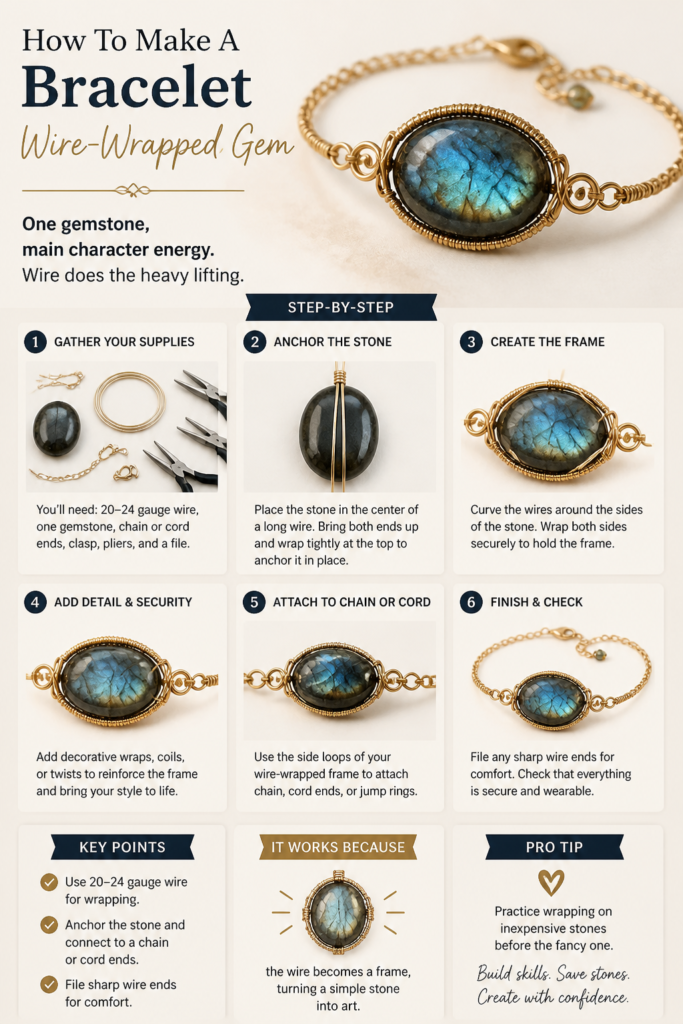
Key points:
- Use 20–24 gauge wire for wrapping.
- Anchor the stone and connect to a chain or cord ends.
- File sharp wire ends for comfort.
Pro tip: Practice wrapping on inexpensive stones before the fancy one.
It works because the wire becomes a frame, turning a simple stone into art.
8. Leather Wrap Bracelet
Boho meets polished. Double-wrap it and pretend you’re on a road trip.

Key points:
- Use leather cord as the base and seed beads to ladder-stitch between.
- Attach a button closure for adjustable loops.
- Keep stitch tension consistent for straight rows.
Pro tip: Wax your thread for fewer tangles and stronger holds.
It works because the leather adds structure while beads add shine and texture.
9. Name or Word Beads
Spell it out—cute, personal, and a little sassy if you want. Perfect for gifts.
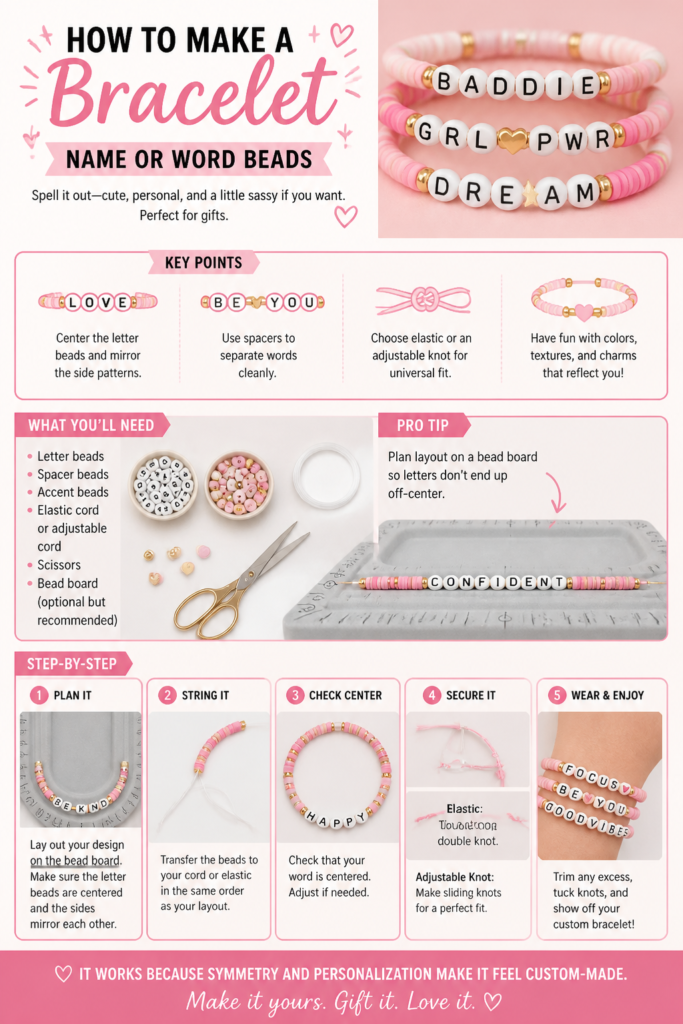
Key points:
- Center the letter beads and mirror the side patterns.
- Use spacers to separate words cleanly.
- Choose elastic or an adjustable knot for universal fit.
Pro tip: Plan layout on a bead board so letters don’t end up off-center.
It works because symmetry and personalization make it feel custom-made.
10. Safety Pin Beaded Cuff
Edgy meets DIY genius. Yes, safety pins—no, not punk only.
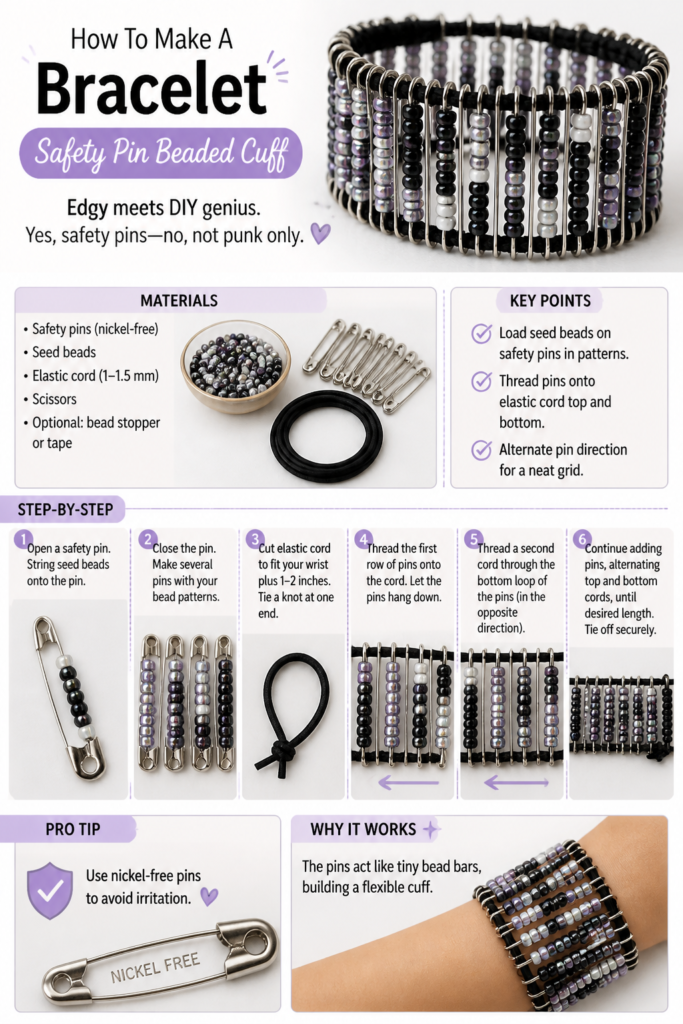
Key points:
- Load seed beads on safety pins in patterns.
- Thread pins onto elastic cord top and bottom.
- Alternate pin direction for a neat grid.
Pro tip: Use nickel-free pins to avoid irritation.
It works because the pins act like tiny bead bars, building a flexible cuff.
11. Braided Multi-Strand
Thick, textured, and dramatic. Braids never disappoint.
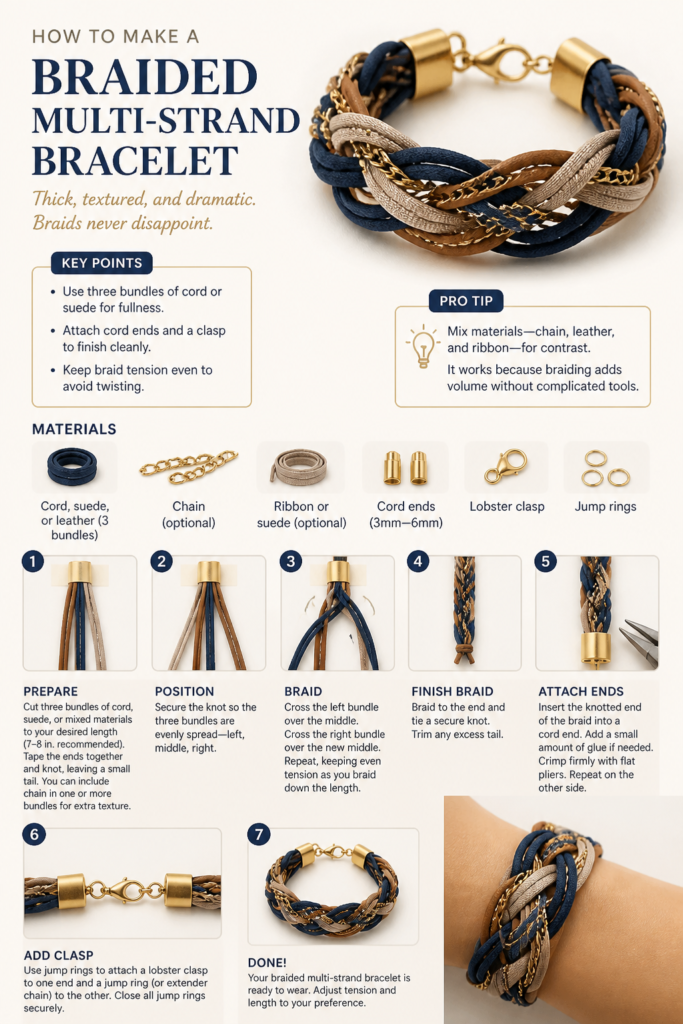
Key points:
- Use three bundles of cord or suede for fullness.
- Attach cord ends and a clasp to finish cleanly.
- Keep braid tension even to avoid twisting.
Pro tip: Mix materials—chain, leather, and ribbon—for contrast.
It works because braiding adds volume without complicated tools.
12. Minimalist Bar Bead
Chic with zero fuss. A single bead, perfectly placed.

Key points:
- Use a tube or bar bead on fine chain or cord.
- Crimp beads or knots hold the bar centered.
- Add a spring ring or lobster clasp for a clean finish.
Pro tip: Match metal tones across findings for a luxe feel.
It works because negative space and one focal detail feel effortlessly refined.
✨ New Member Etsy Shops (100% Unsponsored!)
We are incredibly proud of the talent in this community! 💖 We've rounded up some gorgeous new Etsy shops launched by our very own members.
There are ZERO affiliate links in this post—just 100% pure support for our makers. Click below to shop small, show them some love, and find your new favorite items! 👇🛍️


Conclusion
Your wrist is now a curated gallery, not a bare stretch of missed opportunity. Pick a style, grab a cord, and make one—then make five more because stacking is a personality. Homemade beats store-bought when it’s customized, comfy, and uniquely you.